Mica paper insulated barrel test
Posted by DB
|
Mica paper insulated barrel test May 15, 2009 12:06AM |
I am starting to do some extruder testing. I tried the BBQ paint method and while others have had some success with this, it felt too awkward. I ordered some mica paper and mica tape from McMaster Carr. This was mentioned in another post. It is very inexpensive and you could probably make a hundred extruder barrels from the paper supplied. Note that the mica tape is not adhesive. It is just mica applied to a fiber glass backing.
I had already machined a barrel from brass and drilled a .3mm hole in the end. Since this is a proof of concept test, the end of the barrel is not removable. Later I will make a barrel that has removable tips.
My barrel has a lip on the top. So I cut some holes in some pieces of mica tape to insulate the top. Next I wrapped the barrel in about two turns of mica paper. To keep the paper from unwinding, I wrapped the mica paper with a piece of ordinary paper and taped it on the outside. As I wound the barrel I slide the paper off. The mica stays tight to the barrel this way. I used 28AWG nichrome wire for the initial test. I will probably get some 30AWG later and try that.
To keep the wire from unwinding, I wrapped again with some mica paper. I can not use the paper tube trick this time because I have to keep tension on the wire at both ends. So I used a very small piece of scotch tape to keep the outer piece of paper from unwinding. To keep everything tight at temperature, I tied a couple of pieces of wire around the outer insulation layer. Next time I will try ordinary plastic bag type wire ties. I think it will be easier.
After verifying I had no shorts I applied power to the barrel. It took 2 amps at about 13 volts to reach roughly 400 degrees Fahrenheit. I need to build a test stand to support the barrel before I try some manual push tests of the filament. There was some smoking as the applied scotch tape burned off, but that did not last long.
I machined the barrel to take .095 inch weedeater cord. I have some 1/8 ABS on order from US Plastic, but this is just a proof on concept test. I am not sure how well the weedeater cord will work.
I have followed reprap for a couple of years now and I know a lot of people have insulated extruder barrels using JB Weld, BBQ paint, insulated nichrome or thermal cements. However I have to think mica paper is the way to go.
When I get the stand set up I will post some pictures of how it all looks.
|
Re: Mica paper insulated barrel test May 15, 2009 09:47PM |
Registered: 16 years ago Posts: 41 |
I did a manual push test which was successful, but refinements are needed.
The top of the barrel got too hot and I had problems with the weedeater filament melting on the top.
I drilled a .3 mm hole, but the filament extruded was .6mm in side.
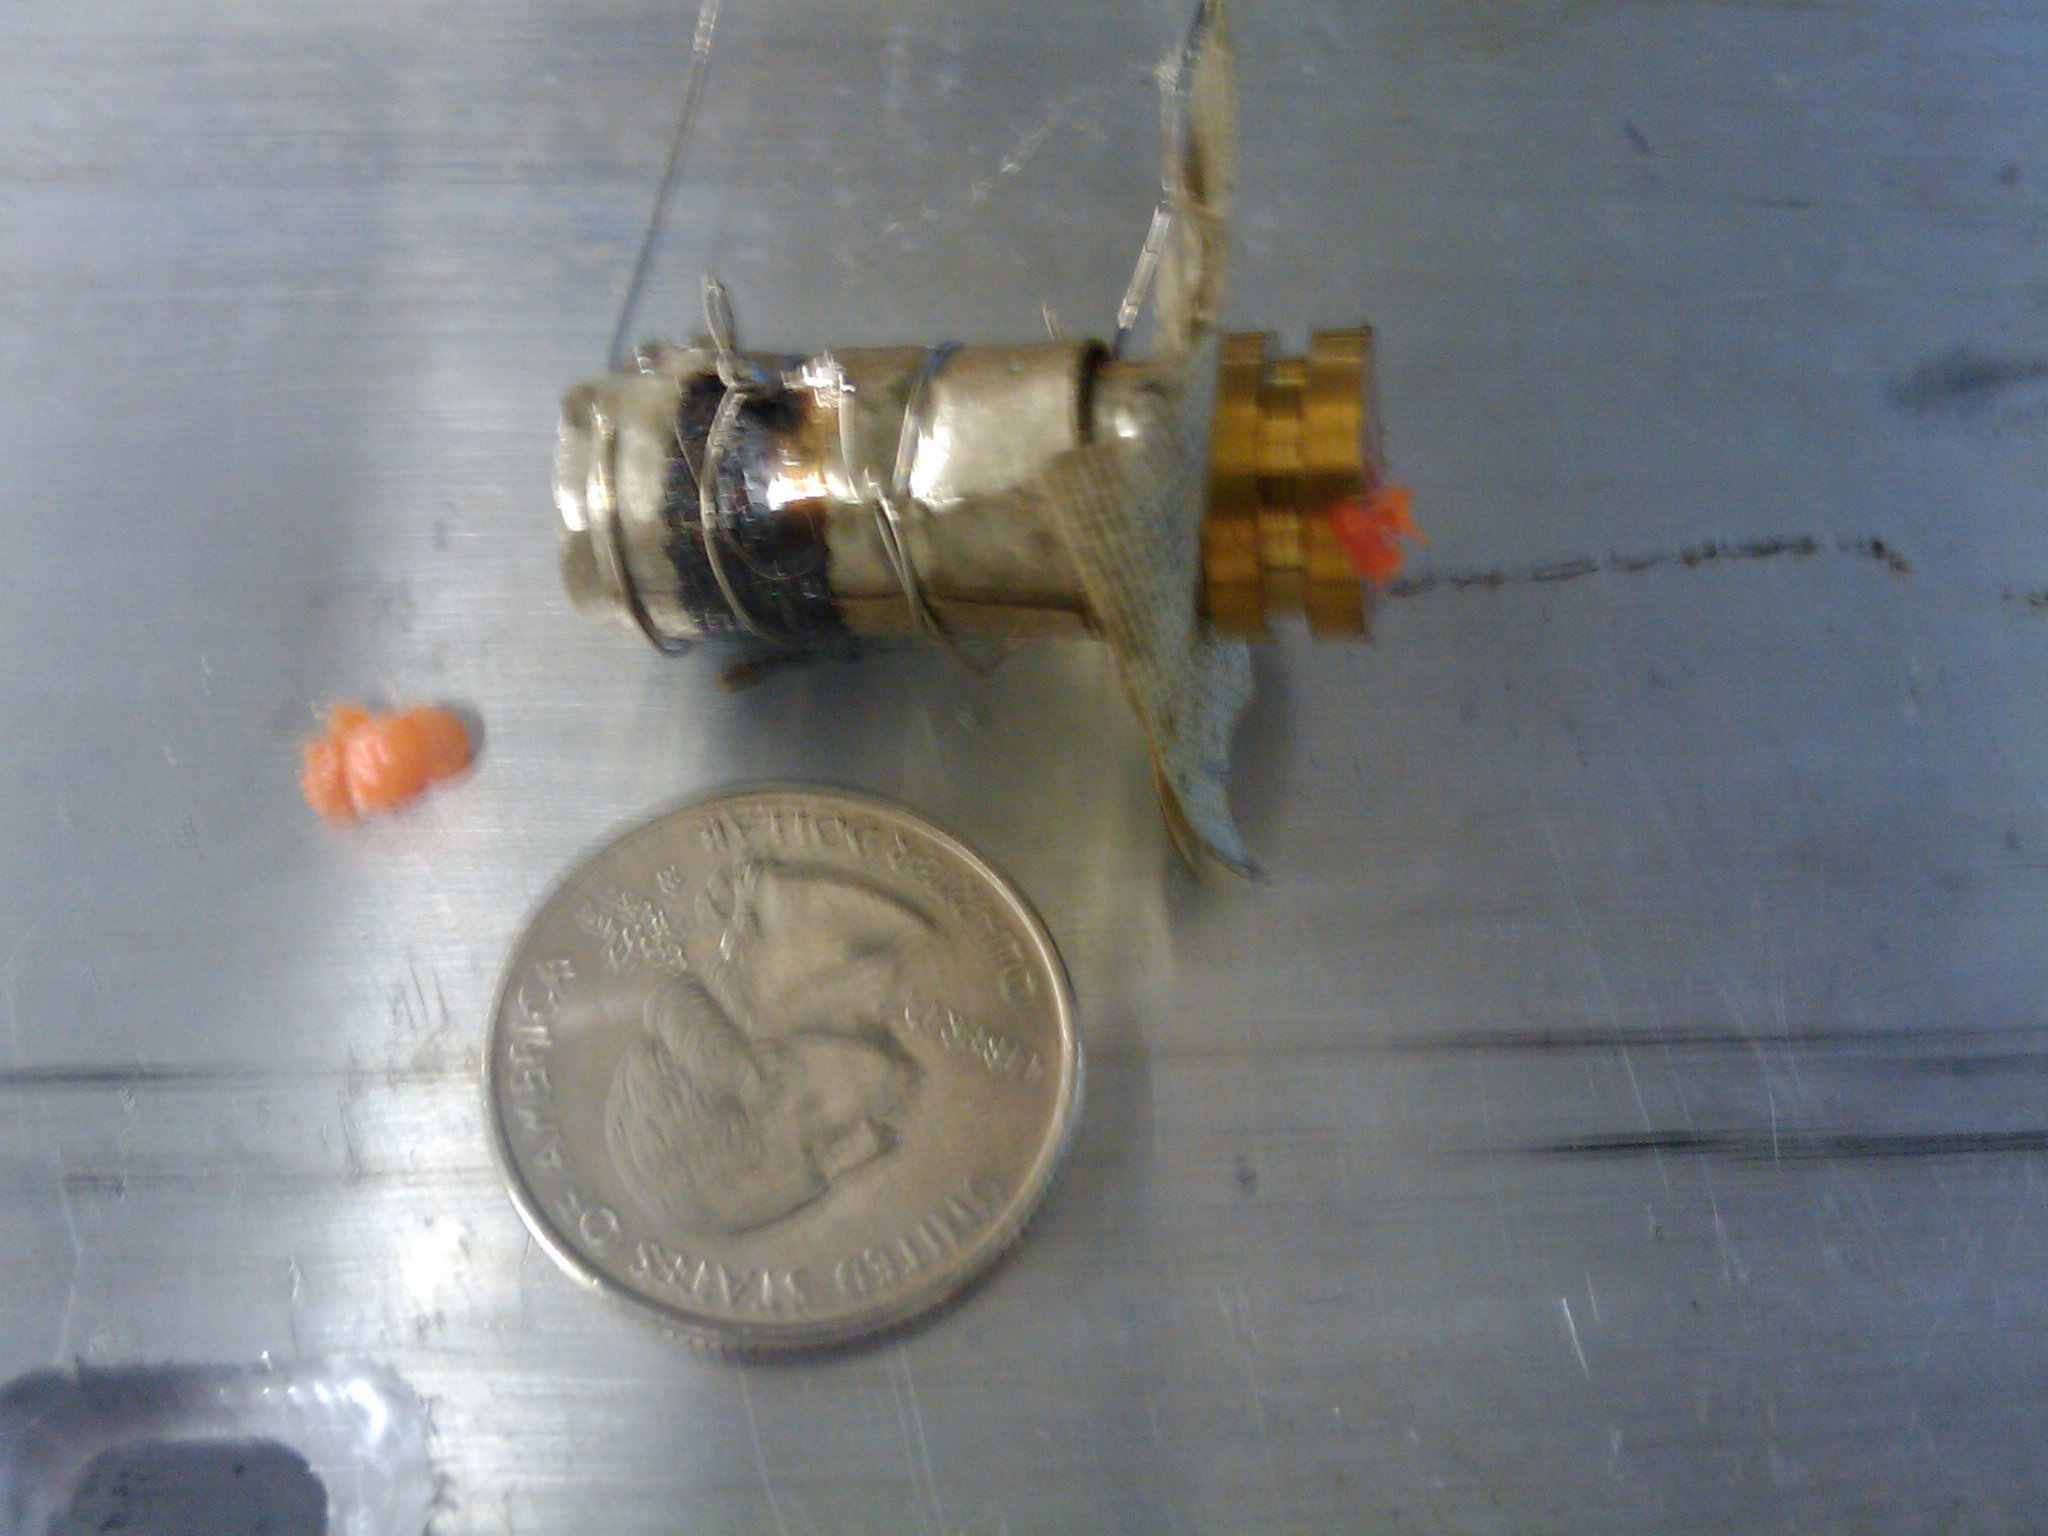
Two pictures are attached. In the barrel_closeup you can get a rough size of the test barrel. The only camera I have is on my cellphone and it does not do a good job of closeups, so that is why that picture is a little fuzzy. I used mica tape on the end of barrel and mica paper was wrapped body of the barrel. The black area is the remains of the scotch tape that was used to hold the outer layer of the mica paper until I could tie the wires. I think I will try some kapton tape to hold things down next time.
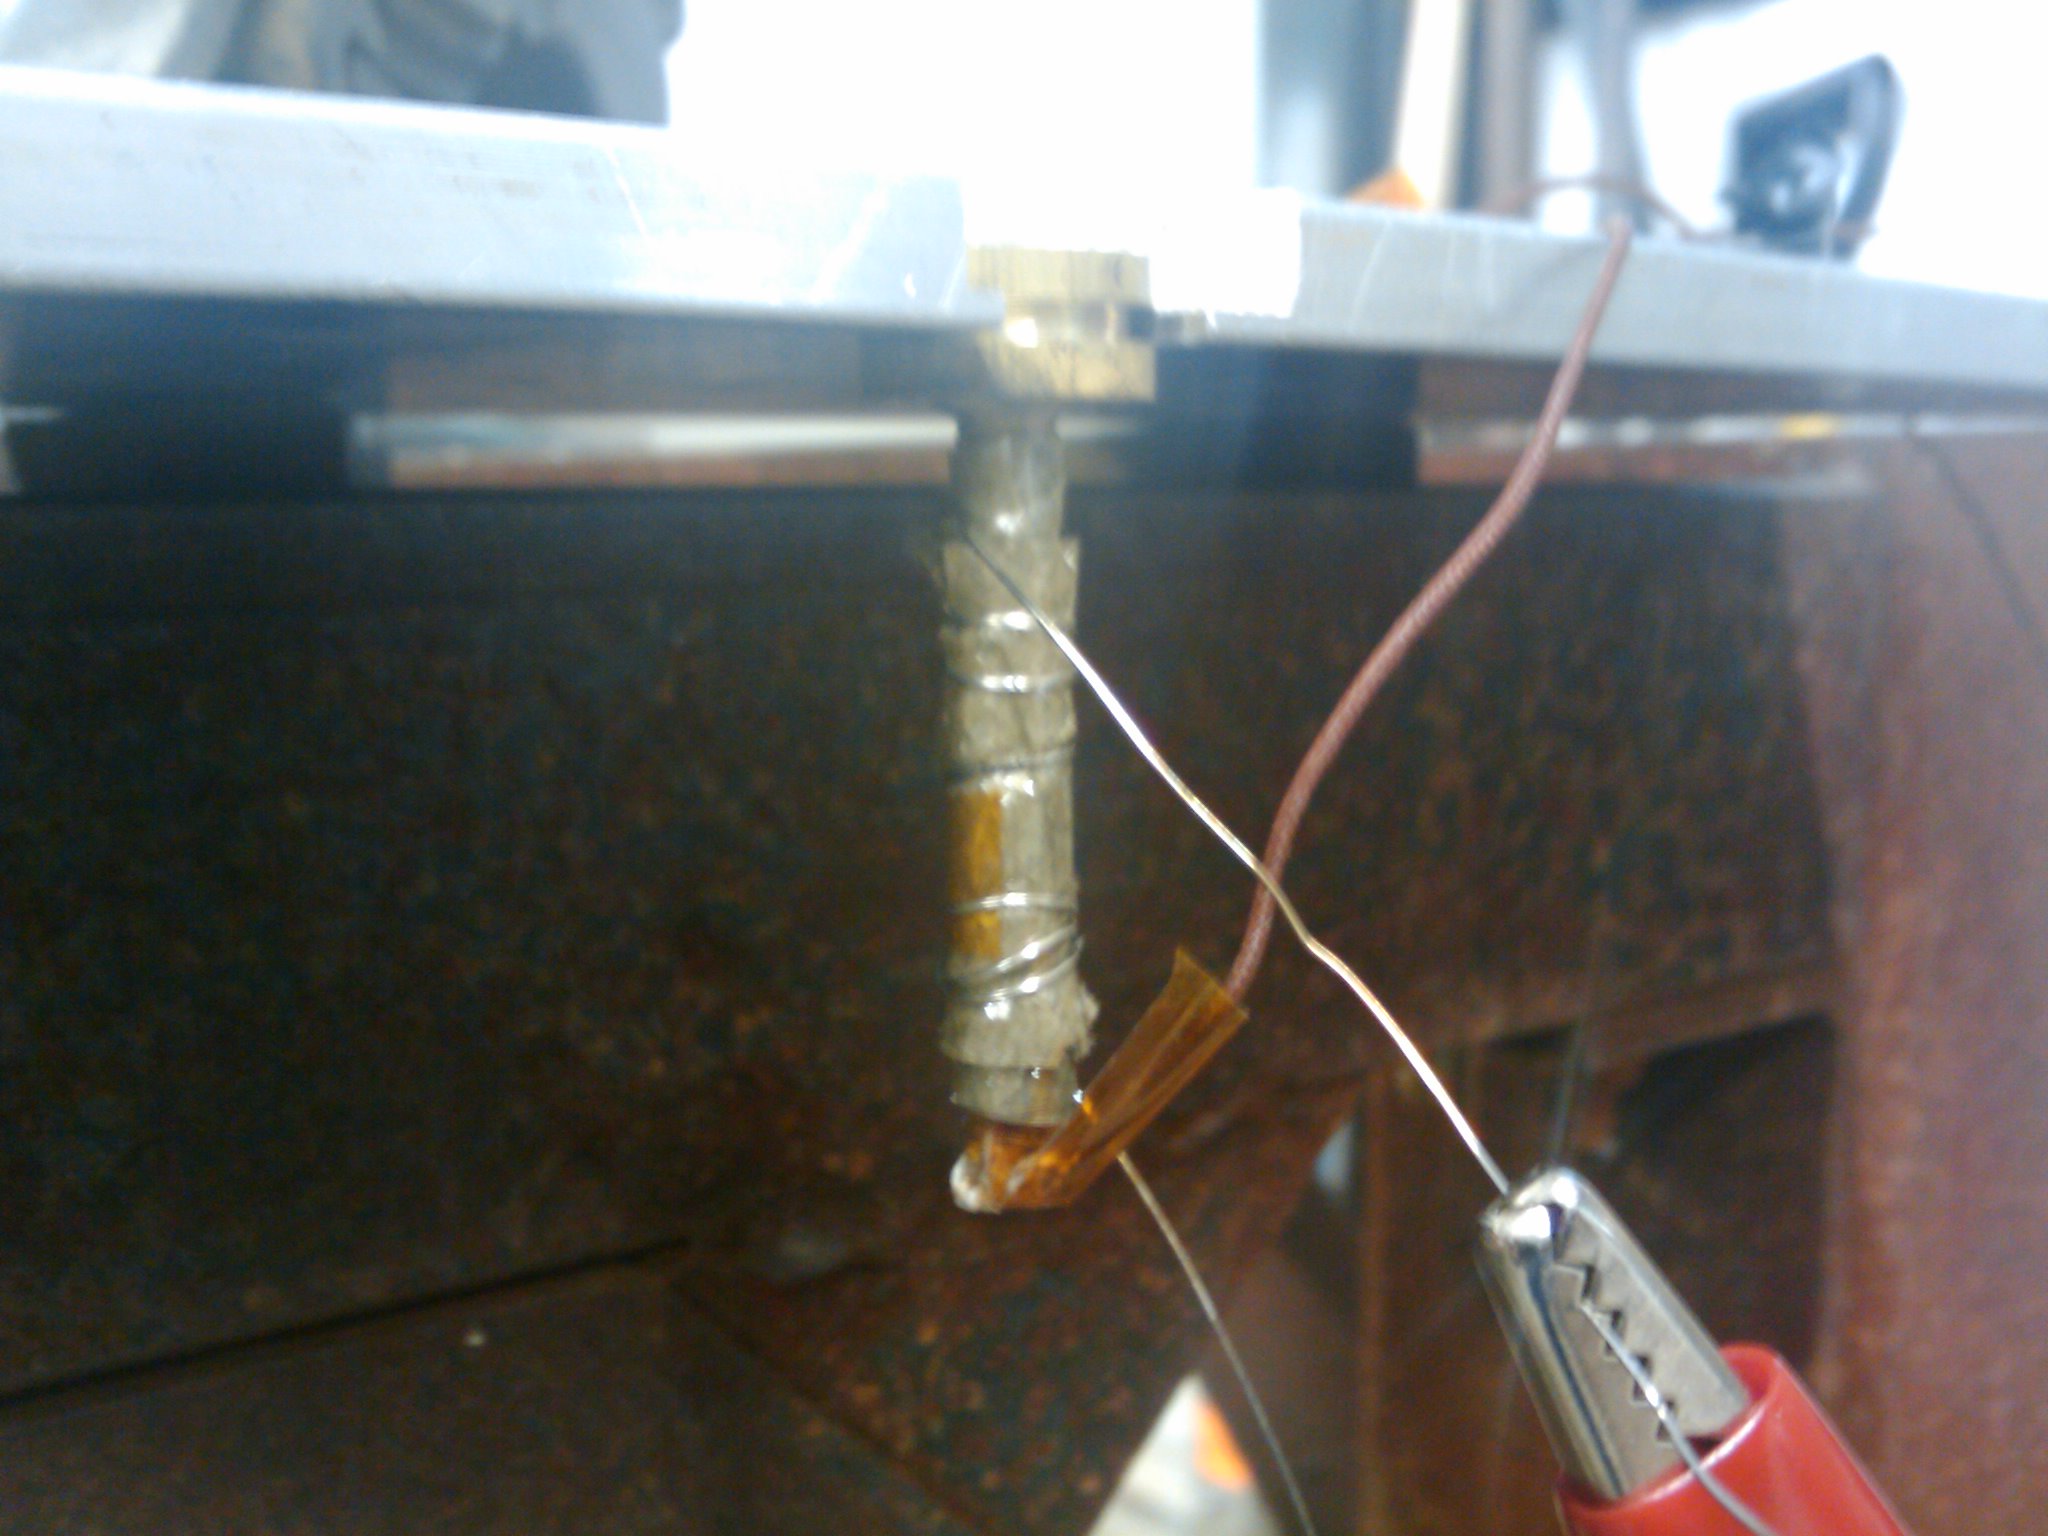
The other picture is of the holder I used to support the barrel. I was hoping I would have enough heat sink to keep the top of the barrel cool, but it was not quite enough.
The next step is to get some thermocouple wire so I can get direct measures of the barrel temperature rather than using my IR thermometer.
The top of the barrel got too hot and I had problems with the weedeater filament melting on the top.
I drilled a .3 mm hole, but the filament extruded was .6mm in side.
Two pictures are attached. In the barrel_closeup you can get a rough size of the test barrel. The only camera I have is on my cellphone and it does not do a good job of closeups, so that is why that picture is a little fuzzy. I used mica tape on the end of barrel and mica paper was wrapped body of the barrel. The black area is the remains of the scotch tape that was used to hold the outer layer of the mica paper until I could tie the wires. I think I will try some kapton tape to hold things down next time.
The other picture is of the holder I used to support the barrel. I was hoping I would have enough heat sink to keep the top of the barrel cool, but it was not quite enough.
The next step is to get some thermocouple wire so I can get direct measures of the barrel temperature rather than using my IR thermometer.
|
Re: Mica paper insulated barrel test May 16, 2009 04:55AM |
Registered: 15 years ago Posts: 186 |
Interesting adaptation of the design. It'll be interesting to see what the differences are with a smaller filament, and whether a drive mechanism is easier or harder.
---
Reprapping blog and other rants: [renoirsrants.blogspot.com]
My Reprap: [sites.google.com]
---
Reprapping blog and other rants: [renoirsrants.blogspot.com]
My Reprap: [sites.google.com]
|
Re: Mica paper insulated barrel test June 03, 2009 10:21PM |
Registered: 16 years ago Posts: 41 |
I finished my second extruder test today. The design of this one was different than the first. The first was machine from a solid piece of 1/2 brass stock. This time I used 1/8 brass tubing. The tip was machined from 1/8 brass rod and silver soldered to the end of the brass tubing. A .3mm hole was drilled through the end of the rod. Also a 1/2 slotted brass mount was made and silver soldered to the other end of the tubing.
I also obtained some 34 gauge J type thermocouple wire from Electronics Goldmine. I used capacitive discharge welding to weld the wires together. I purchased a Labjack and connected the thermocouple to this. Labjack contains a program called DAQ Express that allowed me to setup a display to monitor the temperature. The thermocouple was wrapped in kapton tape and then taped directly towards the tip of the barrel.
As before, the brass tubing was wrapped with 2 layers of mica paper and then several turns of 28 gauge nichrome wire was wrapped around that. Another layer of mica paper was wrapped around the nichrome wire and secured with wires.
My ABS came in so I tested with this instead of the weedeater string like before. I got some flow from ABS when the thermocouple was around 420F, but it was not until the thermocouple reading was around 500F that I started to see some real flow through the nozzle. I did not time it exactly, but I extruded about 2 meters of filament in about 90 seconds which comes out to about 20mm/s. This was by applying hand pressure. While the hole size was about .3mm the extruded filament was about .27mm. Since I was extruding down I am assuming some stretching. So the true flow rate was probably closer to 15mm/s.
The power supply was at about 7V and amps at about 2.5. So the power in was 19.5W. I would expect the power to be a lot less when wrapped in insulation.
I did have a problem with curling when the flow first started. When I drilled my .3mm hole, I did not get it centered, so I am assuming some temperature gradient may have caused the initial curling. After there was enough weight, the material extruded straight down.
One nice thing I noticed was that the temperature at the top was quite a bit less than the first test. Using a second thermocouple, the top of the extruder was about 200F. Undoubtedly the thinner barrel of the new extruder did not conduct as much heat towards the top barrel and allowed it to stay cooler.
Two pictures are attached to the first. One shows the extruder in the test stand. The second shows the first version and second version of the extruders side by side.
I will probably do one one more revision of the extruder. The main change will be silver soldering a piece of stainless steel to the brass tubing. Since stainless steel has a much lower heat conduction, that should help keep the top of the barrel even cooler.
At this point I am satisfied enough with the barrel performance to start work on the filament drive. I will use the pinch roller design, but I think I will try to add a spring tension to the idler wheel and see if I can get better grip. I have some spare steppers and driver boards, so I will use a stepper style.
|
Re: Mica paper insulated barrel test June 04, 2009 12:04AM |
Registered: 15 years ago Posts: 251 |
damonb Wrote:
-------------------------------------------------------
> I also obtained some 34 gauge J type thermocouple
> wire from Electronics Goldmine. I used capacitive
> discharge welding to weld the wires together.
Damon,
I'd be very interested in hearing about what capacitors, etc. you used to do the discharge welding. Perhaps something adapted from a camera-flash circuit? Please post some details, the thermocouple wire isn't that expensive (as you have also seen), but pre-welded thermocouples are a bit expensive.
Thanks,
Larry Pfeffer,
My blog about building repstrap Cerberus:
[repstrap-cerberus.blogspot.com]
|
Re: Mica paper insulated barrel test June 04, 2009 12:37AM |
Registered: 16 years ago Posts: 41 |
My welding of the thermocouples has been very hit and miss. In the simplest form I used some tungsten electrodes connected to about 1200uf electrolytic and charged to anywhere from 16V to 30V. Sometimes I blow the wires apart, sometimes they stick to the electrodes and sometimes they weld to each other.
At this point I have made a small jig to hold the electrodes and I can put the wires between them. The results have been a little better, but still not consistent. I just got some SCR's to discharge capacitors instead of just touching the wires to the electrodes. I will probably test that tomorrow. I will post the results and some pictures of the jig in a day or so.
At this point I have made a small jig to hold the electrodes and I can put the wires between them. The results have been a little better, but still not consistent. I just got some SCR's to discharge capacitors instead of just touching the wires to the electrodes. I will probably test that tomorrow. I will post the results and some pictures of the jig in a day or so.
|
Re: Mica paper insulated barrel test June 04, 2009 12:50AM |
Registered: 15 years ago Posts: 251 |
Interesting,
-- And not anything like what I had imagined for thermocouple welding. I thought that one sent the Cap. discharge down the thermocouple wires themselves, and that, where the bare metals touched, there was a higher resistance, so there would be more power locallized there during the discharge. I didn't think one used separate electrodes, with the thermocouple junction between. I haven't done anything with SCRs in ages. Are their turn-on times faster than a well-driven MOSFET?
-- Larry
|
Re: Mica paper insulated barrel test June 04, 2009 09:08AM |
Registered: 16 years ago Posts: 41 |
I am using the SCR's because they are easier for me to use than MOSFETs. I am hoping part of the inconsistent welding I am seeing is due to the arcing I get when I touch the capacitor to the electrode. That represents wasted energy that should be going into welding the thermocouples together.
|
Re: Mica paper insulated barrel test June 04, 2009 09:58PM |
Registered: 16 years ago Posts: 41 |
I wish I could say that the SCR's helped, but it did not. I was hoping I could get an effect like a dental welder or a hotspot, but it is just not working that way for me. I may go back and look at it at some point in the future, but I have other parts of the project work on.
At this point, the best way for me is to strike an arc between the wires and weld them together that way.
At this point, the best way for me is to strike an arc between the wires and weld them together that way.
|
Re: Mica paper insulated barrel test June 05, 2009 07:01AM |
Registered: 15 years ago Posts: 251 |
Damon,
Where did you get your tungsten electrodes, and how much did they cost?
I might try something similar, using higher voltage capacitors (e.g. from disposable cameras.) Higher voltage (through the same resistance) should lead to higher instantaneous power -- unless inductive effects dominate resistive ones.
Thanks,
Larry
|
Re: Mica paper insulated barrel test June 05, 2009 02:04PM |
Registered: 16 years ago Posts: 41 |
The tungsten electrodes are used in a TIG welder. They are 1/8 inch diameter. I got mine free. I found them under my house of all places and several years ago. Being a packrat comes in handy sometimes. :-) Who knows how they got there. You should be able to find them at any welders supply.
When I do get around to trying again on the welder I will go with some heavier gauge wire. All I had to work with was some 20 gauge. The overall circuit had about .9 ohms resistance. I will also look into getting some photoflash capacitors. I suspect the electrolytics may have have too much ESR as well, which would limit the current.
A picture of the welder is attached. The best results I seemed to get with this setup was to hold the electrodes apart, put the wires between them then lower the top electrode until it arced. The way I thought it would work is I would put the wires in between the electrodes, discharge the capacitors and weld the wires together.
.
|
Re: Mica paper insulated barrel test June 05, 2009 09:53PM |
Registered: 16 years ago Posts: 41 |
I have to take back what I said about the wire welder not working. It works now.
The yellow and green jumper wires you see in the picture in the previous post were total junk. After I rewired them I am able to pretty much blow apart the 34 gauge thermocouple wire with 4800uf and 32 volts.
20V is giving me some pretty good welds but I am still have some trouble with the wire sticking to the electrodes. I have will to look a little closer at that. So at this point, no need for photoflash capacitors.
Sorry, only registered users may post in this forum.