Prusa I3 BOM Help
Posted by Zerker
|
Re: Prusa I3 BOM Help March 05, 2014 04:17PM |
Registered: 10 years ago Posts: 167 |
just got a txt to say my smooth rod has arrived at work, wont get to open them till tonight though, looking forward to seeing if i got ripped or not.
i also found a nuts and bolts list on the Prusa I3 wiki page i ordered the full list from EDL Fastners most of it has to come from Auckland so will be at least tomorrow to pick that up.
i will past the list at the end, i got a quote from them $18.08 incl gst all in stainless with nylock where possible, not bad when the M10 nuts were going to cost me $30 from the hardware. store. i know i will probably have to pick up some extras but thats ok, i just wanted to get an idea of how little i can spend and still get a good printer out of it.
now i have to figure out which STL's i need and beg someone (by paying them) to print them for me. unless someone wants to do a deal where i ship them a roll of filament and they ship me back the parts.
18x M3x10mm bolt
14x M3x30mm bolt
28x M3 nylock nuts
54x M3 washers
2x M4x25mm bolt
2x M4 nuts (non locking)
5x M4 Nylock Nuts
10x M4 washers
2x M5 nuts
22x M8 nylock nuts
22x M8 Washers
12x M10 nylock nuts
12x M10 washers
|
Re: Prusa I3 BOM Help March 06, 2014 06:37AM |
Registered: 10 years ago Posts: 26 |
|
Re: Prusa I3 BOM Help March 17, 2014 04:40PM |
Registered: 10 years ago Posts: 167 |
smooth rods look good, the bearings i have purchased seem a bit snug.
here is the link to the rods
[www.aliexpress.com]
cut to length for boxframe.
i have decided i will just get the default github STL's to get up and going, i can always print any recommended upgrades later.
here is the link to the rods
[www.aliexpress.com]
cut to length for boxframe.
i have decided i will just get the default github STL's to get up and going, i can always print any recommended upgrades later.
|
Re: Prusa I3 BOM Help April 14, 2014 07:26AM |
Registered: 10 years ago Posts: 167 |
printed parts arrived, Jhead arrived. now for the last few pieces, micro switches, hobbed bolt, glass surface, springes for bed and wades extruder.
anyone know what type of springs these are? cheap sources for hobbed bolts that arent junk? and micro switches?
I found one source for Hobbed botls but they only sell 13 at a time, not sure I can find 12 others to buy the remainder, and the Hobbed botls on Diamond age's
Shop is actually a Hobbed threaded rod, I want an actual bolt if I can.
Made all cuts for Y threaded rod, once bearings are sourced I will assemble and take pics.
I'm hoping to cut sand and paint the frame wooden frame this weekend, but that will depend on my wifes youtube Filming schedule.
|
Re: Prusa I3 BOM Help April 14, 2014 05:09PM |
Registered: 10 years ago Posts: 77 |
I bought some 8mm linear shafting off Aliexpress recently and all 4 pieces are rejects. They aren't straight and there are grinding gouges on 3 of them (like someone has used an angle grinder on them to try and hide blemishes). The grinding defects can be felt by running fingers along rods. Flaws are clearly visible. The bend in the shafts is about 0.5mm over the 400mm length. Holding 2 shafts together, I can see 1mm of gap between them when the ends are touching.
Try rolling your shafts on a flat surface - a laminate kitchen bench or plate of glass. Bent rods won't roll at a constant speed. If you are lucky your rods will be straight and defect free. Just be warned - cheap, sometimes also means nasty. Bent shafts will mean inaccurate prints.
I have hassled the seller and they replied that they will send replacements. They said that the rods sometimes get bent in the mail. I seriously doubt this as they are also supposed to be hardened. If they took a hard enough hit to bend them, I'd expect to see some damage to the packaging. I plan to source another few dead scanners or inkjet multifunction printers to complete my current project - those rods are usually straight.
Edited 1 time(s). Last edit at 04/14/2014 05:11PM by n.glasson.
My Prusa Mendel i2 inspired Repstrap with welded steel frame: [youtu.be]
And my Smartrap derived Briefcase 3D printer: [youtu.be]
|
Re: Prusa I3 BOM Help April 14, 2014 06:12PM |
Registered: 11 years ago Posts: 1,592 |
I use the tool steel (silver steel) sourced from TradeTools - wish it was cheaper but the I got what I paid for, so no complaints!
[tradetools.co.nz]
_______________________________________
Waitaki 3D Printer
[tradetools.co.nz]
_______________________________________
Waitaki 3D Printer
|
Re: Prusa I3 BOM Help April 14, 2014 06:31PM |
Registered: 10 years ago Posts: 77 |
Silver steel is not hardened and has poorer tolerance on ground diameter. Manufacturers don't recommend it for use with linear bearings. It will probably work fine with 3D printers because the loads are light and other things will probably crap out before your shafting. Just expect to see grooves appear over time as the balls in the linear bearings bed into the surface. With bushings rather than ball linear bearings, your silver steel will last longer. I prefer hardened shafts.
My Prusa Mendel i2 inspired Repstrap with welded steel frame: [youtu.be]
And my Smartrap derived Briefcase 3D printer: [youtu.be]
My Prusa Mendel i2 inspired Repstrap with welded steel frame: [youtu.be]
And my Smartrap derived Briefcase 3D printer: [youtu.be]
|
Re: Prusa I3 BOM Help April 14, 2014 10:00PM |
Registered: 10 years ago Posts: 167 |
n.glasson, was your Aliexpress seller the same as mine? I have found no defects or bends with the ones I recieved (I will double check them tonight).
from what Mike P said about the smooth rods, it sounds like anything that is smooth and straight should work, althought softer metals will end up with groves like you Say N.Glasson.
from what Mike P said about the smooth rods, it sounds like anything that is smooth and straight should work, althought softer metals will end up with groves like you Say N.Glasson.
|
Re: Prusa I3 BOM Help April 14, 2014 11:25PM |
Registered: 10 years ago Posts: 77 |
My Aliexpress supplier was different from yours. Same sort of rating, price and product description though. Hopefully they come good with replacements. Aliexpress can be a bit of a gamble - sometimes you win, sometimes you loose.
My Prusa Mendel i2 inspired Repstrap with welded steel frame: [youtu.be]
And my Smartrap derived Briefcase 3D printer: [youtu.be]
My Prusa Mendel i2 inspired Repstrap with welded steel frame: [youtu.be]
And my Smartrap derived Briefcase 3D printer: [youtu.be]
|
Re: Prusa I3 BOM Help April 15, 2014 12:41AM |
Registered: 10 years ago Posts: 167 |
Yeah, I've come up Win so far, I'm not looking foward to when the coin flips the other way though, I've almost fallen for a few of the scams before, I will never buy PC parts from Aliexpress, the vendors on there seem to suddenly come up with a scam deal too good to be true and then cut and run, even though they have been there for some time.
however with the CNC supplies I haven't seen too much go wrong other than some general poor workmanship form time to time, not that I follow too closely.
I hope they come through with your parts, have they asked you to send your ones back? some times the cost of return shipping is more than the cost of the item.
|
Re: Prusa I3 BOM Help April 15, 2014 12:46AM |
Registered: 10 years ago Posts: 77 |
I didn't offer to send back the original ones. They would be of no use anyhow. I did send a photo showing the grinding defects.
As you say, return shipping would cost more than they are worth.
My Prusa Mendel i2 inspired Repstrap with welded steel frame: [youtu.be]
And my Smartrap derived Briefcase 3D printer: [youtu.be]
As you say, return shipping would cost more than they are worth.
My Prusa Mendel i2 inspired Repstrap with welded steel frame: [youtu.be]
And my Smartrap derived Briefcase 3D printer: [youtu.be]
|
Re: Prusa I3 BOM Help April 15, 2014 11:39PM |
Registered: 11 years ago Posts: 1,592 |
Quote
n.glasson
Silver steel is not hardened and has poorer tolerance on ground diameter. Manufacturers don't recommend it for use with linear bearings. It will probably work fine with 3D printers because the loads are light and other things will probably crap out before your shafting. Just expect to see grooves appear over time as the balls in the linear bearings bed into the surface. With bushings rather than ball linear bearings, your silver steel will last longer. I prefer hardened shafts.
Silver steel can be hardened if required. I don't require it because I don't use those (awful) chinese linear bearings. Tolerance? - my original Repstrap had about 5mm of slop in the X axis but printed perfectly, not that I would recommend that of course.
_______________________________________
Waitaki 3D Printer
|
Re: Prusa I3 BOM Help April 16, 2014 06:38AM |
Registered: 10 years ago Posts: 77 |
I am aware that silver steel can be hardened but this is not a realistic thing to do for your 3D printer. Hardened and ground linear shafts are manufactured in that order because the hardening process oxidises the surface and causes distortion - both these effects are corrected with the final grinding to the precision diameter. If you try and harden silver steel, the surface will be blackened and scaly and they will most likely end up bent.
The origin of ball linear bearings is not relevant - they all have hardened balls that run in grooves parallel to the axis - and all will eventually wear grooves in softer shafts. Will it happen in the useable life of your 3D printer? - probably not. 3D printers don't see heavy loadings, so you can get away with a lot of things that might not be best engineering practice. Just go with whatever suits your budget, availability and whatever makes sense to you.
My Prusa Mendel i2 inspired Repstrap with welded steel frame: [youtu.be]
And my Smartrap derived Briefcase 3D printer: [youtu.be]
|
Re: Prusa I3 BOM Help April 16, 2014 07:39PM |
Registered: 11 years ago Posts: 1,592 |
|
Re: Prusa I3 BOM Help April 19, 2014 04:52PM |
Registered: 10 years ago Posts: 167 |
Y axis assembly started, and my first thoughts are, screw you whoever recommended Nylock nuts 
I had to lock one end of the threaded rod in with 2 nuts together in order to make sure the one on the other end would spin when I turned the spanner. job done, the threaded rods for Y are all in pretty much the right place and I havent forgotten any of the RP parts for that section.
next Z axis, then Frame to be cut and I can start tightening everything into their final positions.
|
Re: Prusa I3 BOM Help May 23, 2014 04:46AM |
Registered: 10 years ago Posts: 167 |
frame cut, however I can't cut straight, I will get some more wood and use it to screw into instead of screwing the frame parts directly together, in hind site the standard box frame would have been much simpler. tme to get a table saw in the shop, currently only got a jigsaw for working with wood
I've ordered my endstops and hobbed bolt, endstops showed up just fine, however instead of a hobbed bolt I was posted a heated bed. in talks with supplier to sort this out, I may have just scored a free heated bed?
I've ordered my endstops and hobbed bolt, endstops showed up just fine, however instead of a hobbed bolt I was posted a heated bed. in talks with supplier to sort this out, I may have just scored a free heated bed?
|
Re: Prusa I3 BOM Help June 23, 2014 12:40AM |
Registered: 10 years ago Posts: 167 |
took too long from when I bought the wood to when I went to assemble it, the front panel is warped, and I have not been able to correct it. regardless of what I do it springs back into it's gentle curve and the frame begins rocking backwards and forwards again.
I've decided to go to the standard boxframe, it is superior anyway, the other one just looks a little cooler (personal opinion) and I like that it had side supports, something I can add if I really want to.
got my hobbed bolt, the hobbing is not as deep as I thought it would be, guess you get what you pay for.
they let me keep the heated bed they sent as I told them it had bent in shipping, it has a noticeable curve to it but when you clamp it to a piece of glass it flattens out just fine, I'll give it a shot if I ever get the frame to align.
|
Re: Prusa I3 BOM Help July 06, 2014 10:40PM |
Registered: 10 years ago Posts: 167 |
finally got the frame finished, am attaching motor mounts now, and I note the Listed screws are about 5mm too long to fit the motor right, can I keep forcing them in or am I going to hit the coils?
when I went to re-assemble my X axis ( for some reason I Was using the short smooth rods instead of the long ones) the smooth rod pushed some of the balls out of the bearings, now it moves and sounds horrible, I need to get some new bearings but don't want to get the same ones again, any suggestion for local supplier ? just need 3 new ones for x carriage.
not sure why the balls pushed out, looking at the smooth rod it doesn't have a Chamfer? (do I mean Camber?) on the edges and this may have caught on the balls and pushed them out of the bearing.
|
Re: Prusa I3 BOM Help July 07, 2014 05:54PM |
Registered: 10 years ago Posts: 33 |
I think it will hit the end of the bolts holding the motor together - not the coils. Either way don't force the screw in as it will either strip the thread on the screw or worse - strip the thread in the motor. I would put a nut on the screw first then cut it to the required length. Then remove the nut by winding it back and forth over the end of the screw before completely removing it. This will clean up the screw thread ready to use in the motor.
I had balls push out of bearings too. I tried a couple of different brands and while there was a difference in quality all of them popped a ball out occassionally if I wasn't very careful. I suspect it has to do with the ultra small dimensions of these things. I put the bearings back in (if I could find them) by pressing them into the groove using a small screw driver and am happy to report after many many hours of printing they are still working and sound fine. To find which bearing is potentially faulty or missing a ball put one end of a long screw driver on it and the other end against your ear and slide the bearing up and down. You can "hear" the difference of good verses bad.
I had balls push out of bearings too. I tried a couple of different brands and while there was a difference in quality all of them popped a ball out occassionally if I wasn't very careful. I suspect it has to do with the ultra small dimensions of these things. I put the bearings back in (if I could find them) by pressing them into the groove using a small screw driver and am happy to report after many many hours of printing they are still working and sound fine. To find which bearing is potentially faulty or missing a ball put one end of a long screw driver on it and the other end against your ear and slide the bearing up and down. You can "hear" the difference of good verses bad.
|
Re: Prusa I3 BOM Help July 18, 2014 04:14AM |
Registered: 10 years ago Posts: 48 |
I'll chime in from the windy (tonite..really cold!) capital...
Watch those problematic MOSFETs on the ramps board. The one for the heat bed is generally the one that will let the smoke out, so research the many, many posts on the problem and suggested alternatives.
Will watch this thread for your updates, great writeup so far.
Watch those problematic MOSFETs on the ramps board. The one for the heat bed is generally the one that will let the smoke out, so research the many, many posts on the problem and suggested alternatives.
Will watch this thread for your updates, great writeup so far.
|
Re: Prusa I3 BOM Help July 21, 2014 05:28AM |
Registered: 10 years ago Posts: 167 |
Thanks for the Replies guys.
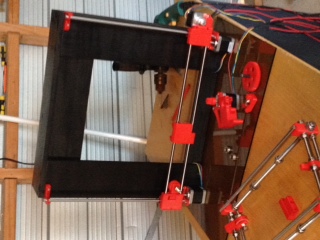
got a chance to do a tiny bit more this weekend, progress pic taken on my new potato camera
need to get washers to position the hobbed bolt, bolts to close the extruder, bolt and nut for setting the small gear of extruder.
need tubing for making Z coupling, still need to get three more bearings for the X axis, Z and Y axis move great. need to cut wood for build platform. lots more work
Edited 1 time(s). Last edit at 07/21/2014 05:37AM by Zerker.
|
Re: Prusa I3 BOM Help August 24, 2014 09:41PM |
Registered: 10 years ago Posts: 167 |
Managed to get some more work done. replaced Bearings in the X carriage, Broke the X Carriage, some two part Epoxy from Holdfast (cheap crud from supermarket, everywhere else was closed ) fixed it up real nice.
bearings now move smooth and don't have that awful grinding noise I was getting before.
Finally found some 4mm ID tubing to use for Z coupling. turns out that Fish Tank Air House has 4MM ID as a standard, most are now using Silicone gel tubing but some stores have older stock of PVC which is the stuff to use. everywhere else that stocks PVC tubing locally (well those that I checked) went straight from 3mm to 5mm, neither of which would suffice
I have found I'm left with a lot of spare nuts that I will not get to use, it looks like the Bill Of Materials I found was for a Single Plate where they would advise to put nuts on the screws that attach parts to the frame, obviously not required for a wood frame where wood screws are used instead. I will have to write out a full parts list once I'm done (I think I'm about 80% there).
I feel like the Z threaded rod could benefit by some sort of Guide at the top of the frame my test fit had them wobbling all over the place, I will also need to Epoxy in the nuts as they are not a tight enough fit in the nut trap of the printed parts, not a big just need to be careful when I do it so I don't gum up the thread.
still haven't tested the electronics yet, probably not a great idea to leave it to last but it's the part that I'm least familiar with so I want to leave that challenge till later, once the Bed is attached and the Extruder is built I will test electronics before fitting belts. the belt fitting will be the last part before test printing.
still haven't cut down the screws for attaching motors to the mounts, if I had a cut off disk this would probably be easier, hacksaw blade is a bit thick for the threads and if I'm not careful I'll have to buy new ones anyway.
lots of work to do, bed plate needs another coat of paint (ran out) and then I pray I', done with cutting sanding and painting wood for some time to come, I'm not a fan of wood work.
EDIT###
I noticed when replacing the Bearings for the X carriage, that only one of my smooth rods had a Chamfer ground on the end, the one that was just the rough cut surface on both ends was the one that popped the balls out. I grabbed a bit of 800 grit sand paper I had lying around and smoothed out the edge on one end. when I rotated the smooth rod as I inserted it into the bearing, you could feel the ball get moved out of the way and they all remained inside the bearing. it was this sharp lip coming in at a slight angle and digging the ball out that caused the original popping.
something to keep in mind if your using cheap LM8UU's like me.
Edited 1 time(s). Last edit at 08/24/2014 09:48PM by Zerker.
|
Re: Prusa I3 BOM Help September 08, 2014 09:38PM |
Registered: 10 years ago Posts: 167 |
All the double posts
update, got some time in the shed over the weekend and things are looking better, I think I'm about 90% of the way through the build now, base plate for Bed has now been attached, used Cable ties as planned, it was relatively easy to do however this is nowhere near as tight a fit as I would like, I will definitely use RP parts if/when I build another, as it is I had to reposition one of the bearings to ensure the X axis will be able to reach the full length of the Y bed, so the only axis that could potentially be smaller than the intended design is the Z axis will have to measure the distance from bed to nozzle tip once I get the extruder built.
all motors are mounted correctly and their screws have been shortened where required, I think this is more of an issue with the RP parts used than the screw size, if I got screws 5 mm shorter they would have been too short for the Extruder and only just thread into the other motors, I took 3mm off all except extruder and they now reach just off the lower end of the motors thread and sit tightly against the RP parts with no play.
Epoxied in Z axis nuts, not sure how well these will hold, I plan to design a Z axis that uses a better nut trap as the current default one would only work if the nut was a tight fit or if you installed the Z Axis RP part upside down in which case perhaps I did
as far as I see it I have to get Glass for bed, build extruder (short bolts to attach extruder to X axis, thermal grease for hotend, bolts to attach hinged part of extruder both the hinge and the long bolts to close the hinge, washers to align big gear and hobbed bolt) need to install belts and connect all the electronics to the ramps, need a fan for ramps board, and to attach the Z threaded rods for which I have all the parts.
4 bolts, a fan, a piece of glass, thermal grease some washers and plastic to test with.
if anyone has some short lengths of 3mm PLA they want to get rid of (enough to print a test cube) I'd be happy to take it off their hands, come and get it from you too if your in the Hamilton area.
or if you know where and what type of glass to use (can I use the glass from a photo frame and just cut it to size?) please let me know
|
Re: Prusa I3 BOM Help September 09, 2014 12:48AM |
Registered: 10 years ago Posts: 33 |
Printer looking awesome and I'm enjoying reading your write ups. It is surprising how much time they eat up and even more so when they are operational 
Normal 3-4mm glass is okay for the printbed but is likely to shatter if it is not heated evenly - in other words the whole piece needs to be on the heated surface. The alternative is tempered glass which is more tolerant to temperature variations.
Normal 3-4mm glass is okay for the printbed but is likely to shatter if it is not heated evenly - in other words the whole piece needs to be on the heated surface. The alternative is tempered glass which is more tolerant to temperature variations.
|
Re: Prusa I3 BOM Help September 15, 2014 02:21AM |
Registered: 10 years ago Posts: 167 |
Cheers AgentX I'll grab some glass soon,
got the extruder mostly assembled, I had to get some MDF to use as the groove mount, I may look to replace this with an aluminium plate instead depending on how hot this part gets.
I have now got the washers and nuts I needed to install the hobbed bolt, turns out that 6 washers was the exact umber I needed, it is now bang on centre.
I still need to wire up the Jhead and get some M4 by 40mm bolts for to keep the hinge closed, I can use the 30mm bolts I have if I don't want to use a spring, however it will hold it too tight, I'd rather use the springs I have.
once the extruder is ready to go I'm going to install the belts and attach the Y axis to the frame. I still really want fans in place before I go and try to do any testing , any idea of how to attach a fan to the Jhead before I print a bracket for it? I'm thinking Cable ties
I still need to grab thermal paste, do you guys recommend Thermal paste or Thermal cement (the gunk with added glue) for mounting the heater? found a post by Nophead where he advises to wrap the resistor in tinfoil to fill the gap, so I will do that, but still not sure if I should use ordinary CPU thermal paste or something else.
Fans to come from china, getting some Kapton tape from www.makershop.com see how it goes
|
Re: Prusa I3 BOM Help September 18, 2014 02:31AM |
Registered: 11 years ago Posts: 72 |
My experience of mounting the resistor in the hotend is to use holts firegum. I've done six different hotends with this and not had any issues. I have read that the thermal paste can dry out and crack letting the resistor overheat and burn out. The better the resistor fits the better everything will be. Resistors vary a little in diameter nad it might be worth finding one that is a tight fit. I also use the firegum to mount the thermistor. Once mounted it is important to heat the hotend as soon as possible and not let it sit around for a day or two.
|
Re: Prusa I3 BOM Help September 21, 2014 09:57PM |
Registered: 10 years ago Posts: 167 |
cheers for that oatridge, looks like Repco stocks it, emailed them for pricing, I saw in a few other threads that similar products were being recommended, something about silicates being better than silicone based products for the temperatures the hot end will be experiencing.
one thing I saw that was interesting, apparently this stuff is an insulator and it was recommended that you should put thermal grease into the hole for the thermistor and then use the firegum to seal it in, thoughts? I'll be doing the wrap resistor in tinfoil till it fits tight trick as well.
Katpon tape arrived promptly, great service form makershop.co.nz as expected, paid for some fans from china at the same time, still waiting for the tracking number to pickup and start tracking, lol.
as for the glass for the heated bed, having trouble finding someone in town that can cut glass (I work in the centre of town) there was a photo framing place but they closed down, will just have to go out on the weekend and get some from a glazier.
I've coupled the Z axis to the Z motors, the Tubing was a pain to work with so I hope it sticks. the right hand side Z rod does not line up perfectly with the Zmotor shaft, I'm hoping the soft coupling will make this not a problem.
|
Re: Prusa I3 BOM Help September 23, 2014 10:39PM |
Registered: 9 years ago Posts: 118 |
Just as a (late) thought,the glass from a pc scanner is usually tempered.How do i know?
I tried to cut a piece.Not a dog,s show.The next day I found shattered glass all over the car and garage floor.
I must have weakened it by scoring,and this set up some enormous pressure wave in the glass,causing it to shatter.
Therefore,the scanner glass is only useful if it fits your use without cutting.
|
Re: Prusa I3 BOM Help September 27, 2014 06:31AM |
Registered: 11 years ago Posts: 72 |
May be worth a visit to the $2 shop. The ones that are local to me have a variety of cheap photo frames with glass that is pretty close to the size we need. i bought a cheap glass cutter and had a go at scoring and cutting. it wasn't that hard once you get over the initial shattering of glass possibility fear. I've done about a dozen now, a couple of wiggly cuts but I found that a nice even score was what was needed. Plenty of glass cutting advice on line. I've only broken one piece of glass on a printer and that was because the Z axis endstop cable had fallen off and I didn't realize. i looked up and the springs on the bed were fully depressed and the stepper was still going. result cracked glass. none have failed in normal use and the thinner glass that comes with photo frames heats up fast and evenly.
|
Re: Prusa I3 BOM Help September 27, 2014 07:52AM |
Admin Registered: 13 years ago Posts: 6,998 |


Sorry, only registered users may post in this forum.