MendelMax / Rostock Experement Using OpenBeam
Posted by BertFromProtoneer
|
Re: MendelMax / Rostock Experement Using OpenBeam November 13, 2012 01:27AM |
Registered: 13 years ago Posts: 862 |
|
Re: MendelMax / Rostock Experement Using OpenBeam November 13, 2012 01:53AM |
Registered: 11 years ago Posts: 525 |
I tried that but it doesn't work as quickly or reliably for me.
_________________________________________________________________________________________
Richmond, New Zealand
Thingiverse ~ YouTube
_________________________________________________________________________________________
Richmond, New Zealand
Thingiverse ~ YouTube
|
Re: MendelMax / Rostock Experement Using OpenBeam November 14, 2012 03:26AM |
Registered: 11 years ago Posts: 72 |
|
Re: MendelMax / Rostock Experement Using OpenBeam November 17, 2012 03:11AM |
Registered: 11 years ago Posts: 525 |
Largely completed all the wiring today, been a bit busy with family etc so it was good to get some quality time in the shed. I'm using the new Azteeg X3 controller which makes it easier as it has screw terminals. Hopefully get some testing in tomorrow if it keeps raining 
_________________________________________________________________________________________
Richmond, New Zealand
Thingiverse ~ YouTube


_________________________________________________________________________________________
Richmond, New Zealand
Thingiverse ~ YouTube
|
Re: MendelMax / Rostock Experement Using OpenBeam November 17, 2012 03:50PM |
Registered: 11 years ago Posts: 103 |
|
Re: MendelMax / Rostock Experement Using OpenBeam November 17, 2012 05:32PM |
Registered: 11 years ago Posts: 72 |
Looks really nice Simon and I see yet another new part that you have created. Did you also make new endstop plastic or use some of the many that are there already? I thought to make it my first attempt at a design and started some bits in autocad laast night. I'm on a remote island with no mains power so can't do any measuring of the actual requiremnets. i'm just playing with nthe software at the moment. i'll be back on the mainland Sunday evening.
|
Re: MendelMax / Rostock Experement Using OpenBeam November 17, 2012 09:58PM |
Registered: 11 years ago Posts: 525 |
Yes it's just you Southrap sorry.
I had to design new end stops for this machine Oatridge, and they are on Thingiverse now along with the rest of the files. The Y-carriage one had to fit in a specific place and needed an adjustable screw mounted on the bottom of the printer plate. The z-axis ones needed to be 10mm and this is the first time I have used the larger rod so I had to make that one too. I could have used any limit switch holder for the x-axis but I was on a roll by then
I also uploaded the Azteeg holder if anyone else was thinking of using one. I am still yet to get this controller working so hopefully it worls as well as it looks.
_________________________________________________________________________________________
Richmond, New Zealand
Thingiverse ~ YouTube
|
Re: MendelMax / Rostock Experement Using OpenBeam November 18, 2012 01:04AM |
Registered: 11 years ago Posts: 72 |
|
Re: MendelMax / Rostock Experement Using OpenBeam November 18, 2012 01:55PM |
Registered: 11 years ago Posts: 103 |
|
Re: MendelMax / Rostock Experement Using OpenBeam November 25, 2012 01:31AM |
Registered: 11 years ago Posts: 525 |
Finally got the wiring finished, updated the firmware and did a test print today. I bought a new HD video camera so super-high definition video here on youtube: Test print video
Edited 4 time(s). Last edit at 11/25/2012 02:11AM by Wired1.
_________________________________________________________________________________________
Richmond, New Zealand
Thingiverse ~ YouTube
Edited 4 time(s). Last edit at 11/25/2012 02:11AM by Wired1.
_________________________________________________________________________________________
Richmond, New Zealand
Thingiverse ~ YouTube
|
Re: MendelMax / Rostock Experement Using OpenBeam November 26, 2012 12:42PM |
Registered: 11 years ago Posts: 103 |

|
Re: MendelMax / Rostock Experement Using OpenBeam November 26, 2012 02:58PM |
Registered: 13 years ago Posts: 862 |
Wired1 Wrote:
-------------------------------------------------------
> I tried that but it doesn't work as quickly or
> reliably for me.
I find it works perfectly well and save me from having to upload stuff all the time
__________________________________________________________________________
Experimenting in 3D in New Zealand
|
Re: MendelMax / Rostock Experement Using OpenBeam December 14, 2012 04:16AM |
Registered: 11 years ago Posts: 525 |
Had a visit from Josh from Auckland yesterday. He is building my OB1 printer and wanted to see how mine looks in the flesh as it were. Josh brought along some of his black anodised open beam extrusions and they look seriously awesome. I've gotta build version 2 out of that stuff with yellow plastics - or maybe black extrusions with black plastics? Hopefully he will start posting something as he is using an interesting belt-pulley combo of a chunky T5 belt and aluminium pulleys. His plastic parts are mostly purple and he is getting another reprapper up there to print them out for him.
I've been building another V2 Prusa on commission for a local so been away from the open beam for a couple of weeks but hope to get back into making improvements over the Christmas break.
How are you getting on with your printer Jason? photos photos photos please...
_________________________________________________________________________________________
Richmond, New Zealand
Thingiverse ~ YouTube
|
Re: MendelMax / Rostock Experement Using OpenBeam December 16, 2012 04:24AM |
Registered: 11 years ago Posts: 72 |
Another OB1 prisim sees the light of day (or late nights). After playing round with different x and y configurations it is up and moving. I've calibrated movement, extruder and hotend PIDs. The only thing left to do is fit the hotbed which has to come from my mendelmax. Which of course means a new hotbed for the mendelmax. Thanks to Simon for his great work and a push to start using heekscad. (also an introduction to the hotbeds he uses, great product). I've just completed and printed my first major part built from scratch in heekscad, a power supply end to contain switch and IEC socket as well as protecting the 230v terminals. Now a question, I can see how to have decimal points for object sizes but I can't see how to move a solid by any thing less than a mm.
|
Re: MendelMax / Rostock Experement Using OpenBeam December 16, 2012 04:52AM |
Registered: 11 years ago Posts: 525 |
Wow, looks pretty awesome in black and the plastics look like great quality. I like the Y carriage you have chosen and those belts and pulleys look perfect - where did you find them? On my Thingiverse page I added microswitch holders recently which you might find useful.
Look down the left side menu, click on digitizing and down the bottom you'll see grid size probably set to 1mm, followed by snap to grid which should be checked. Change the grid size to whatever you want - I change it often on the fly from 1mm down to 0.125mm
I've been fine tuning the OB1 and now have it printing near perfect prints...
Edited 1 time(s). Last edit at 12/16/2012 04:59AM by Wired1.
_________________________________________________________________________________________
Richmond, New Zealand
Thingiverse ~ YouTube
Look down the left side menu, click on digitizing and down the bottom you'll see grid size probably set to 1mm, followed by snap to grid which should be checked. Change the grid size to whatever you want - I change it often on the fly from 1mm down to 0.125mm
I've been fine tuning the OB1 and now have it printing near perfect prints...

Edited 1 time(s). Last edit at 12/16/2012 04:59AM by Wired1.
_________________________________________________________________________________________
Richmond, New Zealand
Thingiverse ~ YouTube
|
Re: MendelMax / Rostock Experement Using OpenBeam December 16, 2012 05:25AM |
Registered: 11 years ago Posts: 72 |
Thanks for all that. The heeks is so obvious once you see it! The belts and pulleys are GT2 from a friend at work. He imported a whole lot from a supplier in the States. I quite like GT2, I have them on my mendelmax as well, though I used the 16 tooth pulleys there rather than the 36 tooth I used on the OB1. The rods are Chinese chromed, they do work better with the self aligning sdp bearings so the OB1 will be a trial with the MM8UUs and LM10UUs in this configuration, The only downside so far is the requiremnt for lubrication. The action is smooth and without belts, movement is easy just by tilting the frame.
|
Re: MendelMax / Rostock Experement Using OpenBeam December 21, 2012 06:35AM |
Registered: 11 years ago Posts: 72 |
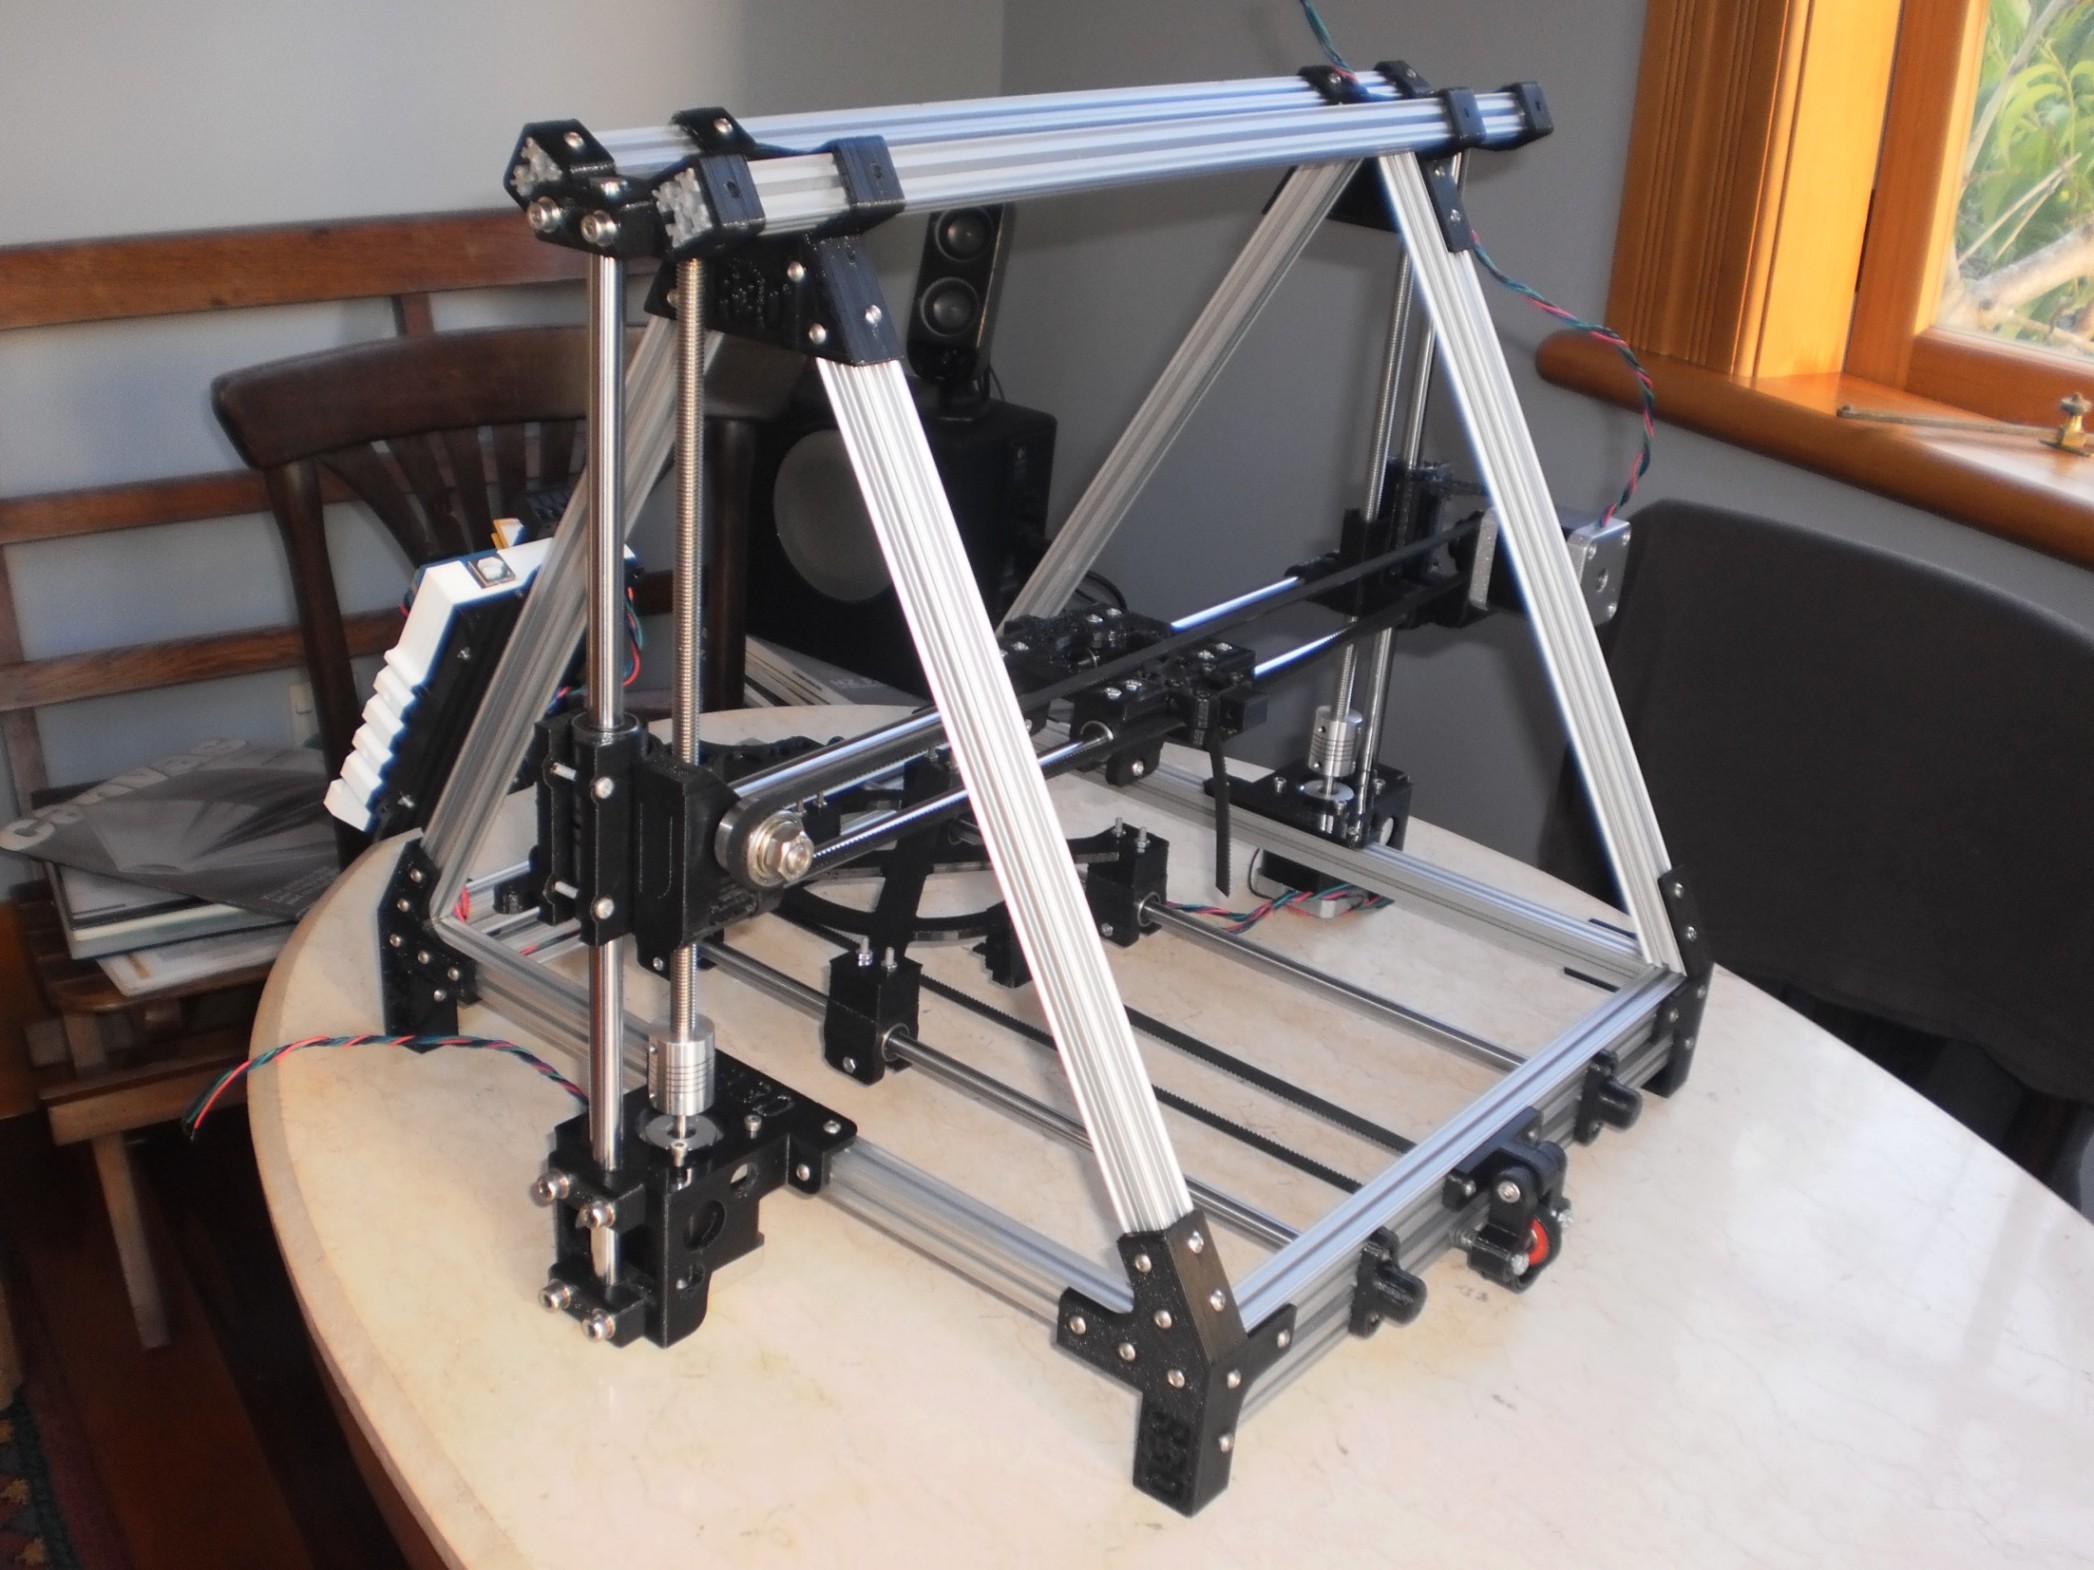
My Prisim OB1 printing is beautifully. Definitely a fine piece of engineering design and very simple to set up. Thanks Simon, there will be a few more underway soon as others have been impressed with the design. Running a ramps controller, hall effect Z stop cause it's simple to adjust and mechanical endstops for x and y.
|
Re: MendelMax / Rostock Experement Using OpenBeam December 21, 2012 03:10PM |
Registered: 11 years ago Posts: 525 |
Awesome, mine is printing beautifully too. The frame is so much more rigid than the Prusa which probably is a large contributor to the print quality.
I am printing a second one at the moment on number 1 which will replace my Prusa in a week or two.
Could you put up a photo of it in action please, I'm interested in your z-axis limit switch too if you could manage a close up.
_________________________________________________________________________________________
Richmond, New Zealand
Thingiverse ~ YouTube
|
Re: MendelMax / Rostock Experement Using OpenBeam December 25, 2012 03:59PM |
Registered: 11 years ago Posts: 103 |

|
Re: MendelMax / Rostock Experement Using OpenBeam December 25, 2012 04:52PM |
Registered: 11 years ago Posts: 525 |
That's how it starts, next thing you have five printers in the shed and no room to move
Among my list of projects these holidays I want to design a water jet cut printer bed for this machine made from 5mm aluminium sheet so I am learning a new CAD program called DraftSight at the moment which is a scaled down version of SolidWorks and is available free. I have sent it to a water jet company in Wellington and will wait and see what they charge. If anyone knows of any other companies to use drop me a line please.
The design will fit with both the Panucatt Helios hot bed (like on my OB1) as well as the original Joseph Prusa heater and has belt clamp holes for the 6mm and 10mm wide belts. The big hole in the middle is for the wiring - I have experimented with several ways of wiring the Y-carriage and find the best way is to bring the wiring up from underneath secured to the carriage at one end and in the case of a Prusa, the middle cross brace at the other.
Edited 1 time(s). Last edit at 12/25/2012 05:12PM by Wired1.
_________________________________________________________________________________________
Richmond, New Zealand
Thingiverse ~ YouTube
Among my list of projects these holidays I want to design a water jet cut printer bed for this machine made from 5mm aluminium sheet so I am learning a new CAD program called DraftSight at the moment which is a scaled down version of SolidWorks and is available free. I have sent it to a water jet company in Wellington and will wait and see what they charge. If anyone knows of any other companies to use drop me a line please.

The design will fit with both the Panucatt Helios hot bed (like on my OB1) as well as the original Joseph Prusa heater and has belt clamp holes for the 6mm and 10mm wide belts. The big hole in the middle is for the wiring - I have experimented with several ways of wiring the Y-carriage and find the best way is to bring the wiring up from underneath secured to the carriage at one end and in the case of a Prusa, the middle cross brace at the other.
Edited 1 time(s). Last edit at 12/25/2012 05:12PM by Wired1.
_________________________________________________________________________________________
Richmond, New Zealand
Thingiverse ~ YouTube
|
Re: MendelMax / Rostock Experement Using OpenBeam January 06, 2013 05:13PM |
Registered: 11 years ago Posts: 72 |
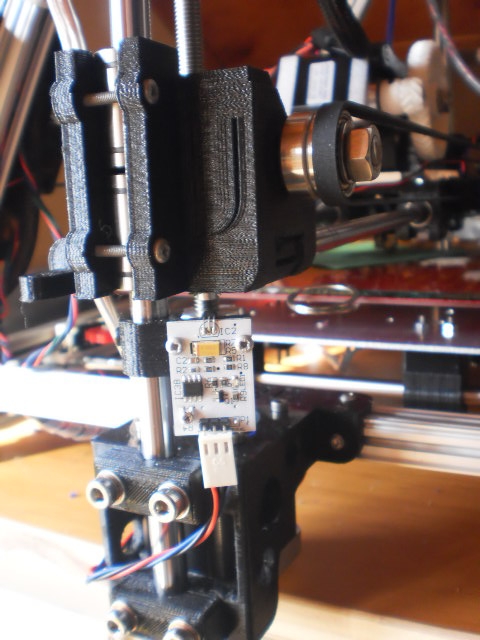
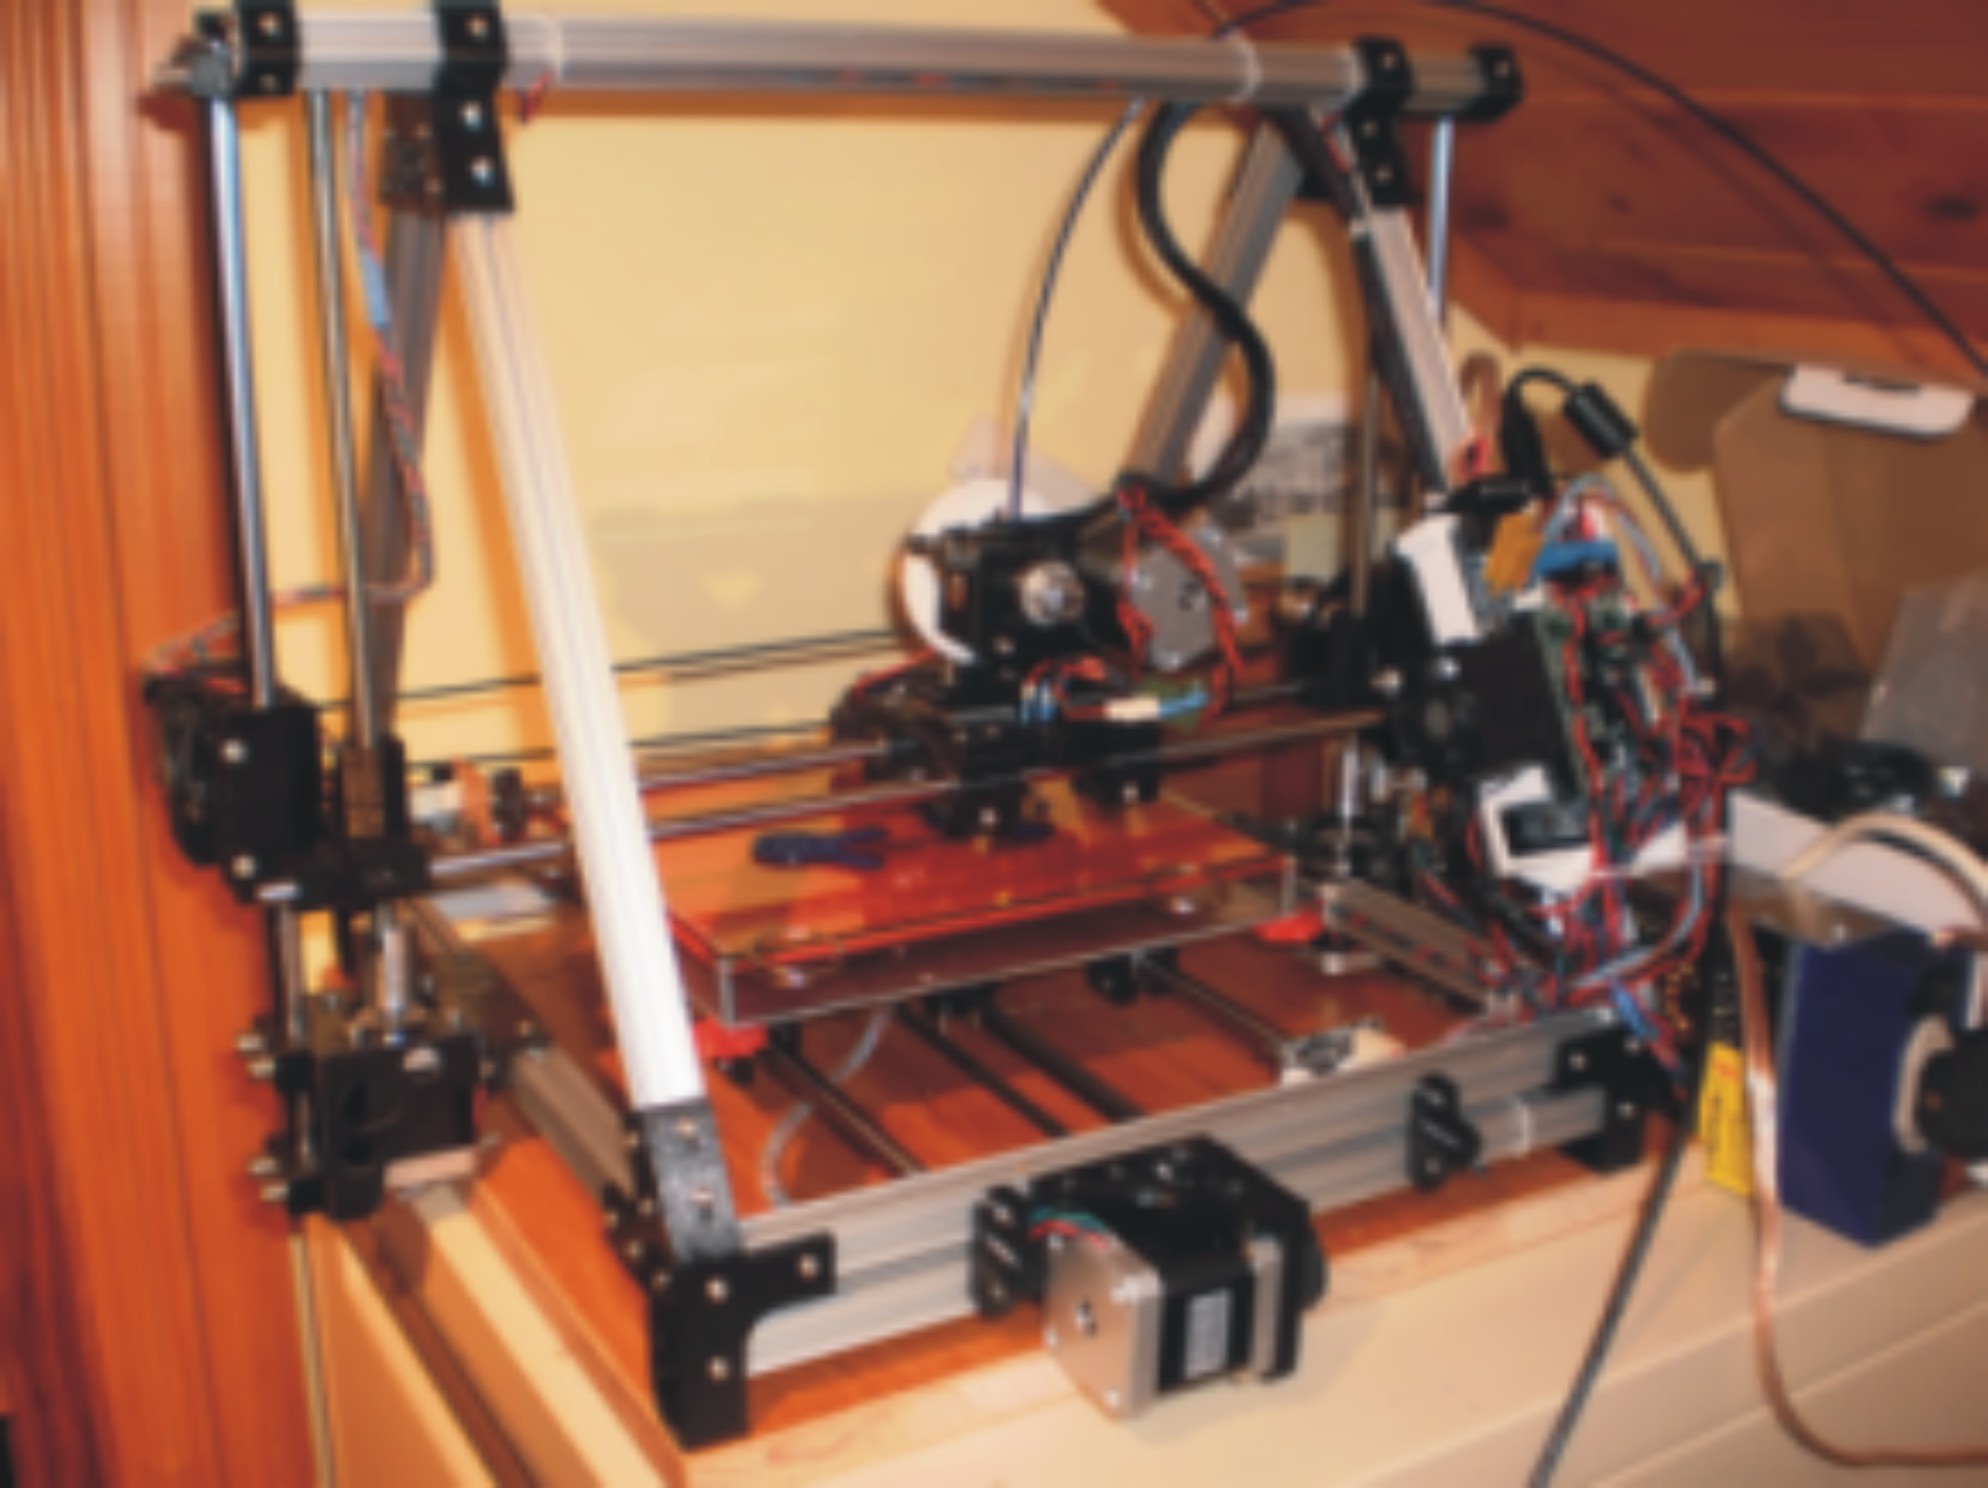
A couple of photos attached of the OB1 Prisim in action and a closeup of the Z axis endstop. It is a hall effect device and there is a small magnet on the X idler which activates the hall device, because the sensitivity is adjusted by a pot, it is easy to get precise z positioning. The x and y endstops are plain microswitches though the carrier board has a led to indicate when they activate.
|
Re: MendelMax / Rostock Experement Using OpenBeam January 06, 2013 08:02PM |
Admin Registered: 17 years ago Posts: 7,879 |
Does anybody know what the repeatability of hall effect switches is with changes in temperature, supply voltage, earth's magnetic field, etc.
[www.hydraraptor.blogspot.com]
[www.hydraraptor.blogspot.com]
|
Re: MendelMax / Rostock Experement Using OpenBeam January 07, 2013 04:12AM |
Registered: 11 years ago Posts: 1,592 |
Hall effect switches? Not sure about them, but I am using tiny glass encapsulated reed switches with 5mm rare earth magnets to actuate them. These devices are totally unaffected by temperature change, moisture, dust, harsh environments, earths magnetic field or aliens from Mars. They need no powering. Repeatability is their middle name and resolution is second to none. I can set my home positions to within a cigarette paper with total confidence that they will stop in the exact position every time. They are good for millions of actuations!
|
Re: MendelMax / Rostock Experement Using OpenBeam January 07, 2013 04:25AM |
Registered: 11 years ago Posts: 525 |
Good to see it all working Oatridge and liking that black and silver colour combo. Good work also on the z-switch. Anything that makes it easier to adjust has to be worth doing
_________________________________________________________________________________________
Richmond, New Zealand
Thingiverse ~ YouTube
_________________________________________________________________________________________
Richmond, New Zealand
Thingiverse ~ YouTube
|
Re: MendelMax / Rostock Experement Using OpenBeam January 10, 2013 03:49AM |
Registered: 11 years ago Posts: 525 |
Few mods in the pipeline...
_________________________________________________________________________________________
Richmond, New Zealand
Thingiverse ~ YouTube

_________________________________________________________________________________________
Richmond, New Zealand
Thingiverse ~ YouTube
|
Re: MendelMax / Rostock Experement Using OpenBeam January 10, 2013 04:41AM |
Registered: 11 years ago Posts: 72 |
|
Re: MendelMax / Rostock Experement Using OpenBeam January 10, 2013 07:09PM |
Registered: 11 years ago Posts: 525 |

_________________________________________________________________________________________
Richmond, New Zealand
Thingiverse ~ YouTube
|
Re: MendelMax / Rostock Experement Using OpenBeam January 12, 2013 01:14AM |
Registered: 11 years ago Posts: 525 |
Bit more on the new x-ends today, starting with the motor end. The aim is to get the motor mass as central as possible to the x-rails.
_________________________________________________________________________________________
Richmond, New Zealand
Thingiverse ~ YouTube


_________________________________________________________________________________________
Richmond, New Zealand
Thingiverse ~ YouTube
|
Re: MendelMax / Rostock Experement Using OpenBeam January 12, 2013 02:13AM |
Registered: 11 years ago Posts: 103 |
|
Re: MendelMax / Rostock Experement Using OpenBeam January 12, 2013 02:24AM |
Registered: 11 years ago Posts: 525 |
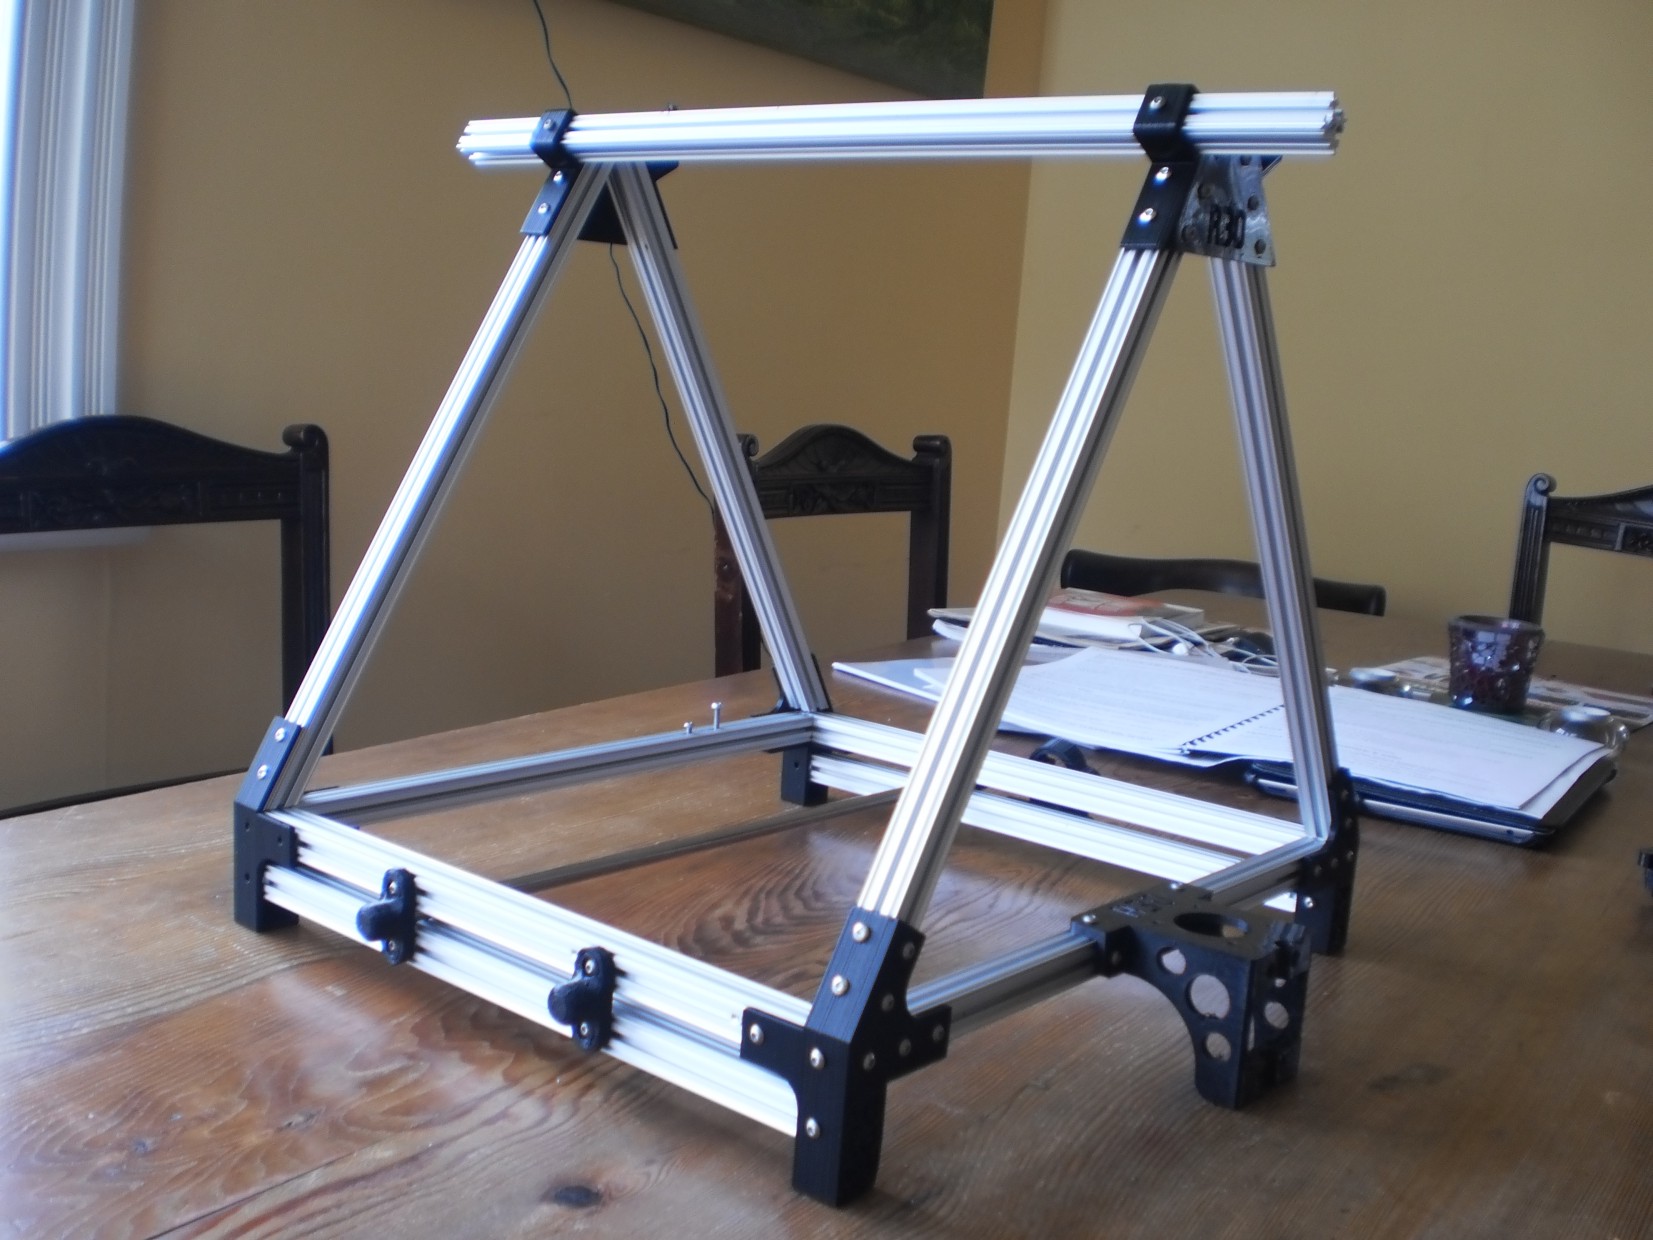
Cheers I gotta say the more I use this Open Beam the more I like it. I am still building a Mendel Max but it is so clumsy big it makes the OB1 next to it look like a Ferrari next to a tractor. The extrusion doesn't bend or twist or change shape in any way so it is very easy to build a rigid structure that barely needs any sort of triangulation to maintain it's shape.
I am also working with someone building a very large 3D printer at the moment and I can see that the 20/20 extrusion would be better suited to a machine in the A2 or A1 kind of size but not the desk top machines we are building.
_________________________________________________________________________________________
Richmond, New Zealand
Thingiverse ~ YouTube
I gotta say the more I use this Open Beam the more I like it. I am still building a Mendel Max but it is so clumsy big it makes the OB1 next to it look like a Ferrari next to a tractor. The extrusion doesn't bend or twist or change shape in any way so it is very easy to build a rigid structure that barely needs any sort of triangulation to maintain it's shape. I am also working with someone building a very large 3D printer at the moment and I can see that the 20/20 extrusion would be better suited to a machine in the A2 or A1 kind of size but not the desk top machines we are building.
_________________________________________________________________________________________
Richmond, New Zealand
Thingiverse ~ YouTube


Sorry, only registered users may post in this forum.