RepRap Guru i3 Printer Kit (Official Thread)
Posted by REPRAPGURU
|
Re: RepRap Guru i3 Printer Kit (Official Thread) January 27, 2017 01:41AM |
Registered: 7 years ago Posts: 8 |
Quote
Has anybody been able to find an extruder cooling fan shroud that will work with this extruder?
I recently made one - it is here: [www.thingiverse.com]
It works pretty well - print quality is significantly better with the shroud, especially when printing single small items. Before using this I'd have to print multiple copies of a small item at the same time, otherwise it would get melty looking.
I've also found this compatible cooling fan setup someone else made: [www.thingiverse.com] I haven't tested it yet - I'm waiting on some wiring so I can control the print cooling fans separately from the extruder heat sink fan.
|
Re: RepRap Guru i3 Printer Kit (Official Thread) January 27, 2017 08:43AM |
Registered: 7 years ago Posts: 11 |
Thanks MostTornBrain, that second one looks like what I was looking for. I tried another version of the first one that did not fit very good. I think I will print the first one and install to help printing out the second one. Looks like the dual shroud version uses the same size fan that is on the extruder?
|
Re: RepRap Guru i3 Printer Kit (Official Thread) January 27, 2017 08:47AM |
Registered: 7 years ago Posts: 11 |
|
Re: RepRap Guru i3 Printer Kit (Official Thread) January 27, 2017 10:08AM |
Registered: 7 years ago Posts: 8 |
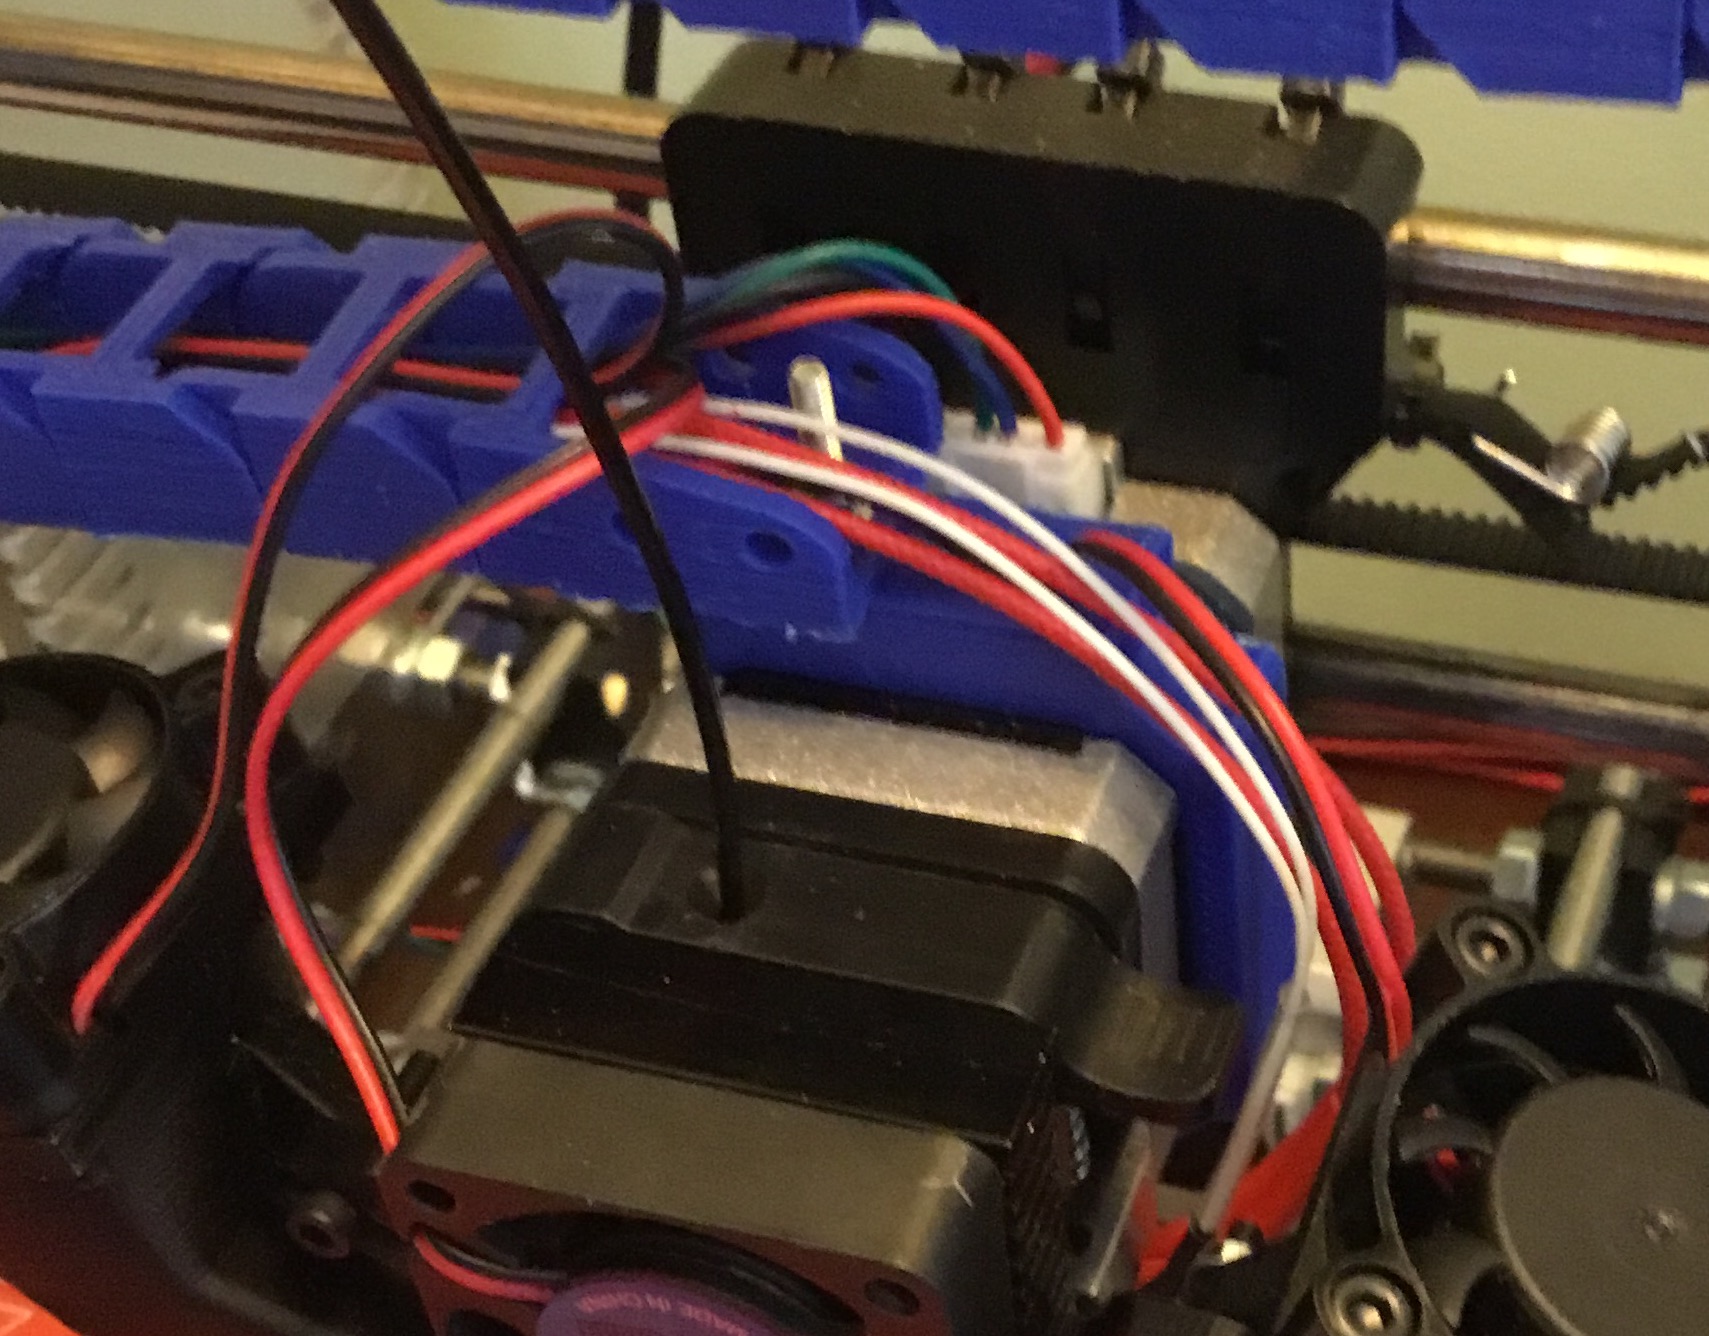
The blue rectangle is a mount for the cable chain. It clips onto the stepper motor - no screws needed, so it is easily removable. It's a modified version of this: [www.thingiverse.com] I printed the horizontal version but used a connecting link from the chain model rather than one that sticks up so high.
Regarding the 1st fan shroud, I custom designed it to fit my Prusa Guru, so it should fit a lot better than other ones that were deaigned for other printers.
I am switching to the dual fan design because I want even more cooling. :-)
The fans are the same size as the extruder one (40mm 12volt). I bought mine from ReprapGuru.com. The nice thing with their is they come with a very long cable.
Edited 2 time(s). Last edit at 01/27/2017 12:03PM by MostTornBrain.
|
Re: RepRap Guru i3 Printer Kit (Official Thread) January 31, 2017 09:27AM |
Registered: 7 years ago Posts: 7 |
there is a way to use the reprap in Microsoft 3D builder. here is the link How to use RepRapGuru in Microsoft 3D builder.
|
Re: RepRap Guru i3 Printer Kit (Official Thread) January 31, 2017 03:29PM |
Registered: 7 years ago Posts: 5 |
Here are two questions:
1. how to set in the slicer so that the both bed and nozzle temperature automatically cool down after the printing? Right now, only the nozzle temperature cool down and the bed temperature remain as it is during the printing
2. is there an instruction on how to use the LCD controller?
Thanks
1. how to set in the slicer so that the both bed and nozzle temperature automatically cool down after the printing? Right now, only the nozzle temperature cool down and the bed temperature remain as it is during the printing
2. is there an instruction on how to use the LCD controller?
Thanks
|
Re: RepRap Guru i3 Printer Kit (Official Thread) January 31, 2017 05:59PM |
Registered: 7 years ago Posts: 8 |
Quote
DavidKing
Here are two questions:
1. how to set in the slicer so that the both bed and nozzle temperature automatically cool down after the printing? Right now, only the nozzle temperature cool down and the bed temperature remain as it is during the printing
2. is there an instruction on how to use the LCD controller?
Thanks
1. I use Slic3r. With it I added this to "Custom G-Code" under the Printer Settings for "End G-Code":
M104 S0 ; turn off temperature
M140 S0 ; turn off bed temperature
G28 X0 ; home X axis
M84 ; disable motors
2. I haven't found a good tutorial. I've figure most of it out reading the Marlin source code from marlinfw.org
|
Re: RepRap Guru i3 Printer Kit (Official Thread) February 02, 2017 08:57AM |
Registered: 7 years ago Posts: 11 |
Hey, sorry I went silent. Blew up a driver board so been catching up on other things.
Printed out the fan shroud but it fail on the upper horizontal face as it could not span that gap. Took the model and split it to 2 pieces then glued them together, looks great. The tried printing a new fan shroud in one piece but still could not span that gap. Ordered some new drivers and other spare parts including some extra fans. Thanks for the excellent suggestion on getting them from RepRapGuru as I had not thought about having them already terminated and to length! I am going to print that double cooling fan set-up you linked to once I get the printer back up and running.
Kind of weird. I had smell some magic smoke one day but could not identify where it was coming from. A few days later I was looking at my print in process from the backside and I could see a small waft of smoke coming forming the circuit card stack. Pulled the drivers and found the y axis driver had a trace that was failing. Being in a hurry, I then mispinned the drivers when I replaced them and fried another driver! Hoping that is all I fired. Got an extra ramps board just to have but did not get another Arduino.
I got the PrintinZ print bed sheet . Looks excellent! Got a nice thickness to it that should hold pretty flat during cooling. I bought a sheet of PEI that improved print adhesion tremendously but it is only .8mm thick so I did see some slight warpage during cooling on larger/longer parts. The PrintinZ sheet is 4.5mm .
I received the Nema 17 dampers and they good. Need to print out a new Y axis motor mount and the supplied one only use 2 holes directly acorss from each other. The damper mounts using holes diagonally from each other. I am going to try this one -
Bought a roll of glow in the dark filament as my daughters what a bunch of things printed so I got a hardened steel nozzle reeady to replace also.
|
Re: RepRap Guru i3 Printer Kit (Official Thread) February 03, 2017 03:36PM |
Registered: 7 years ago Posts: 4 |
|
Re: RepRap Guru i3 Printer Kit (Official Thread) February 03, 2017 04:40PM |
Registered: 7 years ago Posts: 8 |
Quote
adlammons
I am running REPRAP_GURU_MARLIN_V.2 but it doesn't include auto bed leveling. MARLIN 1.1.0RC8 does have auto bed leveling. However, I can't tell if it would be an issue to use it instead.
Is there a newer version of the Marlin software?
Or, can I just load the Marlin-1.1.0-RC8?
I've switched to the RC8 version of Marlin and it is working well for me, however I have not enabled the bed leveling as I don't have the hardware for it. The RC8 firmware has some new features which are very nice. However, the Marlin firmware configuration files have changed a lot since the REPRAP_GURU version (which was from 2014, I think) so it is a bit tedious having to make sure you bring over all the right settings from configuration.h and configuration_adv.h.
One key thing is they've changed the algorithm for how the jerk and acceleration are calculated, so you may need to adjust the value your were using (I've found cutting it by 50% was needed) otherwise you may notice some worse ringing in the walls of your prints after the nozzle turns a corner.
If you enable and calibrate the LIN_ADVANCE feature, it makes a significant improvement in the quality of the prints. There's a tutorial here for it: [marlinfw.org]
|
Re: RepRap Guru i3 Printer Kit (Official Thread) February 03, 2017 04:54PM |
Registered: 7 years ago Posts: 4 |
|
Re: RepRap Guru i3 Printer Kit (Official Thread) February 04, 2017 01:43PM |
Registered: 7 years ago Posts: 10 |
I fixed the stepper drivers that I fried. Now, ll of the steppers move, but when I print, 2 things happen: The X and Y axis don't go all the way to the edge of the 200*200 MM bed, even though the settings show that the bed is that size, as well as say that the axis are all the way there. I checked the voltage to make sure that the stepper were simply getting enough voltage, and they are. Second, the heated bed doesn't turn on at all. ideas? I have been able to get prints out of the machine, but only by scaling them on the Y and X axis by 25% because the 10 mm cube I printed measured 7.5mm/7.5mm/10mm. I've had this printer for about a month and a half, so I'm beginning to discouraged. 
Edited 1 time(s). Last edit at 02/04/2017 01:44PM by Tyborg.
Edited 1 time(s). Last edit at 02/04/2017 01:44PM by Tyborg.
|
Re: RepRap Guru i3 Printer Kit (Official Thread) February 04, 2017 05:58PM |
Registered: 7 years ago Posts: 8 |
Quote
Tyborg
I fixed the stepper drivers that I fried. ... I have been able to get prints out of the machine, but only by scaling them on the Y and X axis by 25% because the 10 mm cube I printed measured 7.5mm/7.5mm/10mm. I've had this printer for about a month and a half, so I'm beginning to discouraged.
Sounds like your firmware is not using the correct number of steps for the X and Y axis. Take a look at configuration.h in your Marlin firmware (using the Arduino IDE) and look for a section like this:
/**
* Default Axis Steps Per Unit (steps/mm)
* Override with M92
* X, Y, Z, E0 [, E1[, E2[, E3]]]
*/
#define DEFAULT_AXIS_STEPS_PER_UNIT { 80, 80, 4000, 96 }
If your X and Y is off by 25%, then increase the first 2 numbers by 25%, re-download the firmware, and see if things seem more accurate. For example, if the value for X and Y are both 80 (like they are in the above example) change them to 100.
You could also test various values using the M92 G-code command (without having to download new firmware) to see what values give you the most accurate X and Y positioning.
|
Re: RepRap Guru i3 Printer Kit (Official Thread) February 04, 2017 07:04PM |
Registered: 7 years ago Posts: 1 |
|
Re: RepRap Guru i3 Printer Kit (Official Thread) February 06, 2017 09:42AM |
Registered: 7 years ago Posts: 11 |
Well, I am back up and running. Had to replace all stepper drivers, Ramps and Arduino, oh well, live and learn. Note to self - PAY ATTENTION DUMMY!!!
Thanks for posting up that question Tyborg as I encountered the same problem originally and also when reloading everything. Funny how quickly I forgot everything I had tweaked. The settings in the RepRap_Guru_Marlin V2 zip file for the software are not correct. As you mentioned, x and y are set at 80 - should be 100. The z axis setting is correct at 4000. I also found the extruder value to be off. It is set at 90 in original software and I measured 90 when commanding 100. I set mine at around 96 so it is just slightly under extruding.
Edited 1 time(s). Last edit at 02/06/2017 10:50AM by JB01245.
|
Re: RepRap Guru i3 Printer Kit (Official Thread) February 06, 2017 10:14AM |
Registered: 7 years ago Posts: 10 |
Quote
MostTornBrain
Quote
Tyborg
I fixed the stepper drivers that I fried. ... I have been able to get prints out of the machine, but only by scaling them on the Y and X axis by 25% because the 10 mm cube I printed measured 7.5mm/7.5mm/10mm. I've had this printer for about a month and a half, so I'm beginning to discouraged.
Sounds like your firmware is not using the correct number of steps for the X and Y axis. Take a look at configuration.h in your Marlin firmware (using the Arduino IDE) and look for a section like this:
/**
* Default Axis Steps Per Unit (steps/mm)
* Override with M92
* X, Y, Z, E0 [, E1[, E2[, E3]]]
*/
#define DEFAULT_AXIS_STEPS_PER_UNIT { 80, 80, 4000, 96 }
If your X and Y is off by 25%, then increase the first 2 numbers by 25%, re-download the firmware, and see if things seem more accurate. For example, if the value for X and Y are both 80 (like they are in the above example) change them to 100.
You could also test various values using the M92 G-code command (without having to download new firmware) to see what values give you the most accurate X and Y positioning.
Thanks so much for the fix. You can actually do this, as I found out, on the printer using the LCD screen and buttons. All I need to do now is set the extrusion steps per MM to 95, not 90, as that is under-extruding.
|
Re: RepRap Guru i3 Printer Kit (Official Thread) February 08, 2017 09:09AM |
Registered: 7 years ago Posts: 11 |
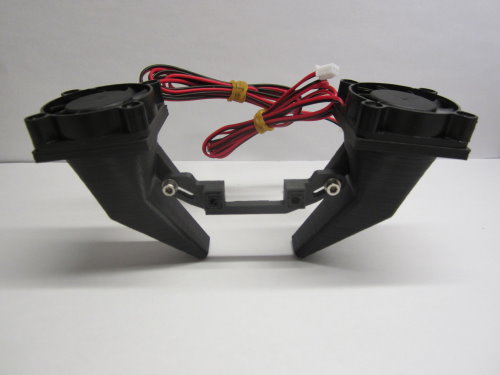
Printed the new cooling ducts last night and pulled them off the printer this morning. They look great. Thanks again MostTornBrain for pointing me to them. I also found this remixed bracket for the dual fan ducts - FolgerTech Dual Fan Mount I have attached a picture of my dual cooling fan set-up that is ready to be installed.
|
Re: RepRap Guru i3 Printer Kit (Official Thread) February 09, 2017 11:18PM |
Registered: 7 years ago Posts: 1 |
I've designed an X-Axis tension block as a drop-in part for the RepRapGuru. Works with the V1 and V2:
[www.thingiverse.com]
It requires some very inexpensive hardware from the likes of Ace Hardware. I'm using it right now, it works like a charm.
I also started a group for RepRapGuru group on Thingiverse:
[www.thingiverse.com]
-L. Smith
[www.thingiverse.com]
It requires some very inexpensive hardware from the likes of Ace Hardware. I'm using it right now, it works like a charm.
I also started a group for RepRapGuru group on Thingiverse:
[www.thingiverse.com]
-L. Smith
|
Re: RepRap Guru i3 Printer Kit (Official Thread) February 10, 2017 08:44AM |
Registered: 7 years ago Posts: 11 |
ISmith1437 - Thanks for joining the forum and starting the group on Thingiverse! Hoping we can use the forum to build of each other knowledge and experience. I had searched for a RepRepGuru group earlier and did not find anything. Nice collection of bits to get started with. Nice x -axis tension block design. I just tightened by x-axis belt as after about 2 months of printing it had become stretched a little bit. What a pain that was. Now I want to print and use your design!
|
Re: RepRap Guru i3 Printer Kit (Official Thread) February 11, 2017 11:50PM |
Registered: 7 years ago Posts: 12 |
Well. Everything was going great for about a week. We completed several small print jobs and were getting familiar with different materials. Then the heated bed stopped reading the temperature. It just reads 0. The LCD says it knows when a target temperature has been assigned, but nothing happens. Motors and other sensors work just fine. I can heat and cool the extruder just fine.
Any suggestions on what to check?
This is my first 3D printer and without the instructions I have very little idea what I'm doing.
Thanks.
Any suggestions on what to check?
This is my first 3D printer and without the instructions I have very little idea what I'm doing.
Thanks.
|
Re: RepRap Guru i3 Printer Kit (Official Thread) February 12, 2017 01:29PM |
Registered: 7 years ago Posts: 8 |
Quote
CutterNorth
Well. Everything was going great for about a week. We completed several small print jobs and were getting familiar with different materials. Then the heated bed stopped reading the temperature. It just reads 0. The LCD says it knows when a target temperature has been assigned, but nothing happens. Motors and other sensors work just fine. I can heat and cool the extruder just fine.
Any suggestions on what to check?
Thanks.
Sounds like there is a loose connection in the thermistor (bed temperature sensor). Check the two thinner wires coming from the bed - if you've been printing a lot, the back and forth motion of the bed can break the wire at the solder joint on the heat plate. If that happened, you'd need to resolder them. Also, check where those wires plug into the RAMPS board - maybe something bumped the connector loose.
Cheers,
Brian
|
Re: RepRap Guru i3 Printer Kit (Official Thread) February 12, 2017 06:20PM |
Registered: 7 years ago Posts: 181 |
|
Re: RepRap Guru i3 Printer Kit (Official Thread) February 13, 2017 11:54AM |
Registered: 7 years ago Posts: 12 |
Right. Sorry. Everything is connected correctly and securely. Here is the information on my printer.
Thank you
3D Printer:
Prusa i3 V2 DIY kit by RepRapGuru
Microcontroller: Arduino mega 2560 R3 clone
Print area: 8 x 8 borosilicate glass
Bearing: LM8UU linear bearings; 623ZZ bearings
Heated bed: Dual power 12V/24V (Pre setup for 12V)
Extruder: Mk8/9 Direct drive
Power supply: 360W 12V 30A
Stepper motor: 5 NEMA 17 4.8kg/cm
Belt: GT2
Board: RAMPS 1.4
Stepper driver: A4988
Endstop: Electronic end stop circuits w/ LED (3)
Upgrades:
Plywood mounted
|
Re: RepRap Guru i3 Printer Kit (Official Thread) February 15, 2017 08:50AM |
Registered: 7 years ago Posts: 11 |
I really wish someone could help you out CutterNorth. I know how it is to be digging on the new printer and then have it go down for a time and not being able to use it. I am brand new to 3D printers also so I have not encountered a heated bed failure yet. Does sound like something to do with the thermistor if you are getting proper voltage to the bed.
|
Re: RepRap Guru i3 Printer Kit (Official Thread) February 15, 2017 06:50PM |
Registered: 7 years ago Posts: 8 |
|
Re: RepRap Guru i3 Printer Kit (Official Thread) February 18, 2017 08:39AM |
Registered: 7 years ago Posts: 13 |
I posted this in a separate thread but the problem with the X Axis rods is not that they are too long, I believe it is because once you put the bearings in the body of the right side it warps the whole assembly and this causes the precut holes to be misaligned (meaning no longer straight). I think cutting the rods is a huge mistake. It is not easy to drill the holes because once the bearings are in, the drill will try to follow the misaligned hole so you have to actually cut a new path. I was able to finally get my rods in once I forced the drill to go in at an angle but it took many many times. You could try a drill press with the right (X Axis Stepper motor mount) end unit firmly clamped to the drill press bed and slowly drill with the bearing assembly installed and a chrome rod inserted into the bearing assembly to keep from losing the internal bead bearings.
Simba
Edited 2 time(s). Last edit at 02/18/2017 08:18PM by Simba028.
Simba
Edited 2 time(s). Last edit at 02/18/2017 08:18PM by Simba028.
|
Re: RepRap Guru i3 Printer Kit (Official Thread) February 18, 2017 09:03AM |
Registered: 7 years ago Posts: 759 |
|
Re: RepRap Guru i3 Printer Kit (Official Thread) February 18, 2017 03:29PM |
Registered: 7 years ago Posts: 13 |
Quote
obewan
You would do better using a cheapo 8 mm reamer than a drill,allso the rods to not have to so tight you cant push them in the holes, a nice snug fit will do.
I don't know... one of the reasons the holes are so deep, I think, is to ensure that the fit is stable and aligned properly as well as eliminating flex. While a drill could could also wallow out the holes I think the reamer would cause more wallowing and leave less meat to hold the rods. You might be right though.
You could also insert both chrome rods into the piece before installing the bearings. As tough as it was to get the bearings in first, I am sure it is even harder when the piece won't flex as much with the rods installed.
Cheers
Simba
|
Re: RepRap Guru i3 Printer Kit (Official Thread) February 21, 2017 05:22PM |
Registered: 7 years ago Posts: 7 |
|
Re: RepRap Guru i3 Printer Kit (Official Thread) February 22, 2017 01:58PM |
Registered: 7 years ago Posts: 7 |


Sorry, only registered users may post in this forum.