RepRap Guru i3 Printer Kit (Official Thread)
Posted by REPRAPGURU
|
Re: RepRap Guru i3 Printer Kit (Official Thread) August 31, 2017 11:20PM |
Registered: 6 years ago Posts: 28 |
My guess is yes but wondering if you were able to try this when you returned from work. I believe I linked my repo above with the updated configuration for working with the heat bed and I also updated the config to use the thermocouple value for the e3d v6 hot end since I upgraded that but otherwise it should basically work (I tried just moving all the old config values to their new place in the updated code). I believe in my repo I may have still had the acceleration values too high but I did some final tweaking via the LCD to get the right values for the extruder steps and acceleration.
|
Re: RepRap Guru i3 Printer Kit (Official Thread) August 31, 2017 11:24PM |
Registered: 6 years ago Posts: 28 |
The part cooling fan can be plugged into the fan port on the ramps board since it can vary the speed on that one so the part sticks to the bed without the fan on at first and it kicks on to help cool layers after the first few, or in other scenarios you might want to adjust the part cooling fan speed.
Edited snippet
[forums.reprap.org]
For 12V power source ^^
Regarding a computer deciding to go rogue mid print I recommend getting a Raspberry Pi 3 with wifi and downloading the OctoPi image. Basically you download the image, put it on an SD card, load it in the raspberry pi, follow some steps to get it on your network and then you have a wifi network connected printer you can queue up jobs on from any computer on your network. If you add a pi camera to it you can also get timelapses and a live web view of the printer which is handy if you want to stuff it in a corner somewhere far away from where you sleep and/or work.
[octopi.octoprint.org]
Edited 1 time(s). Last edit at 08/31/2017 11:33PM by wafflejock.
|
Re: RepRap Guru i3 Printer Kit (Official Thread) August 31, 2017 11:36PM |
Registered: 6 years ago Posts: 7 |
|
Re: RepRap Guru i3 Printer Kit (Official Thread) August 31, 2017 11:37PM |
Registered: 6 years ago Posts: 7 |
|
Re: RepRap Guru i3 Printer Kit (Official Thread) September 14, 2017 09:30AM |
Registered: 6 years ago Posts: 10 |
|
Re: RepRap Guru i3 Printer Kit (Official Thread) September 15, 2017 03:26PM |
Registered: 6 years ago Posts: 10 |
|
Re: RepRap Guru i3 Printer Kit (Official Thread) September 15, 2017 05:24PM |
Registered: 6 years ago Posts: 28 |
I don't but I do want to get one and I did update to the latest firmware by just copying over the old values from the original firmware that came with my kit. I linked the updated firmware on the previous page (fork of the latest when I decided to update mine). I do want the bed leveling features eventually but was personally just looking to get the thing close to new version of the firmware, for the most part what I did works you can just download open the ino file in arduino IDE plug the arduino into your computer via USB and hit upload. There are a few things you'll have to modify in the configuration files (Configuration.h) if you want to turn on the auto bed leveling but sure you can find that with a quick googling, also after loading this firmware I have to manually set the acceleration down a bit from what I have in the configs after it's loaded or a get too much jerkiness (too high an acceleration) but this will vary some depending on your build rigidity and other factors.
---
Basically when you get the new firmware you need to update the values for the bed heater type, the thermistor type in your hot end (so it predicts the temperatures correctly based on the values it's reading) and the steps per mm in the x, y, z and extruder. Beyond that enable a display if you have it by uncomment the right part of the config (part related to your display) same with the bed leveling.
Edited 1 time(s). Last edit at 09/15/2017 05:26PM by wafflejock.
|
Re: RepRap Guru i3 Printer Kit (Official Thread) September 17, 2017 11:31AM |
Registered: 6 years ago Posts: 2 |
|
Re: RepRap Guru i3 Printer Kit (Official Thread) September 17, 2017 11:39AM |
Registered: 6 years ago Posts: 2 |
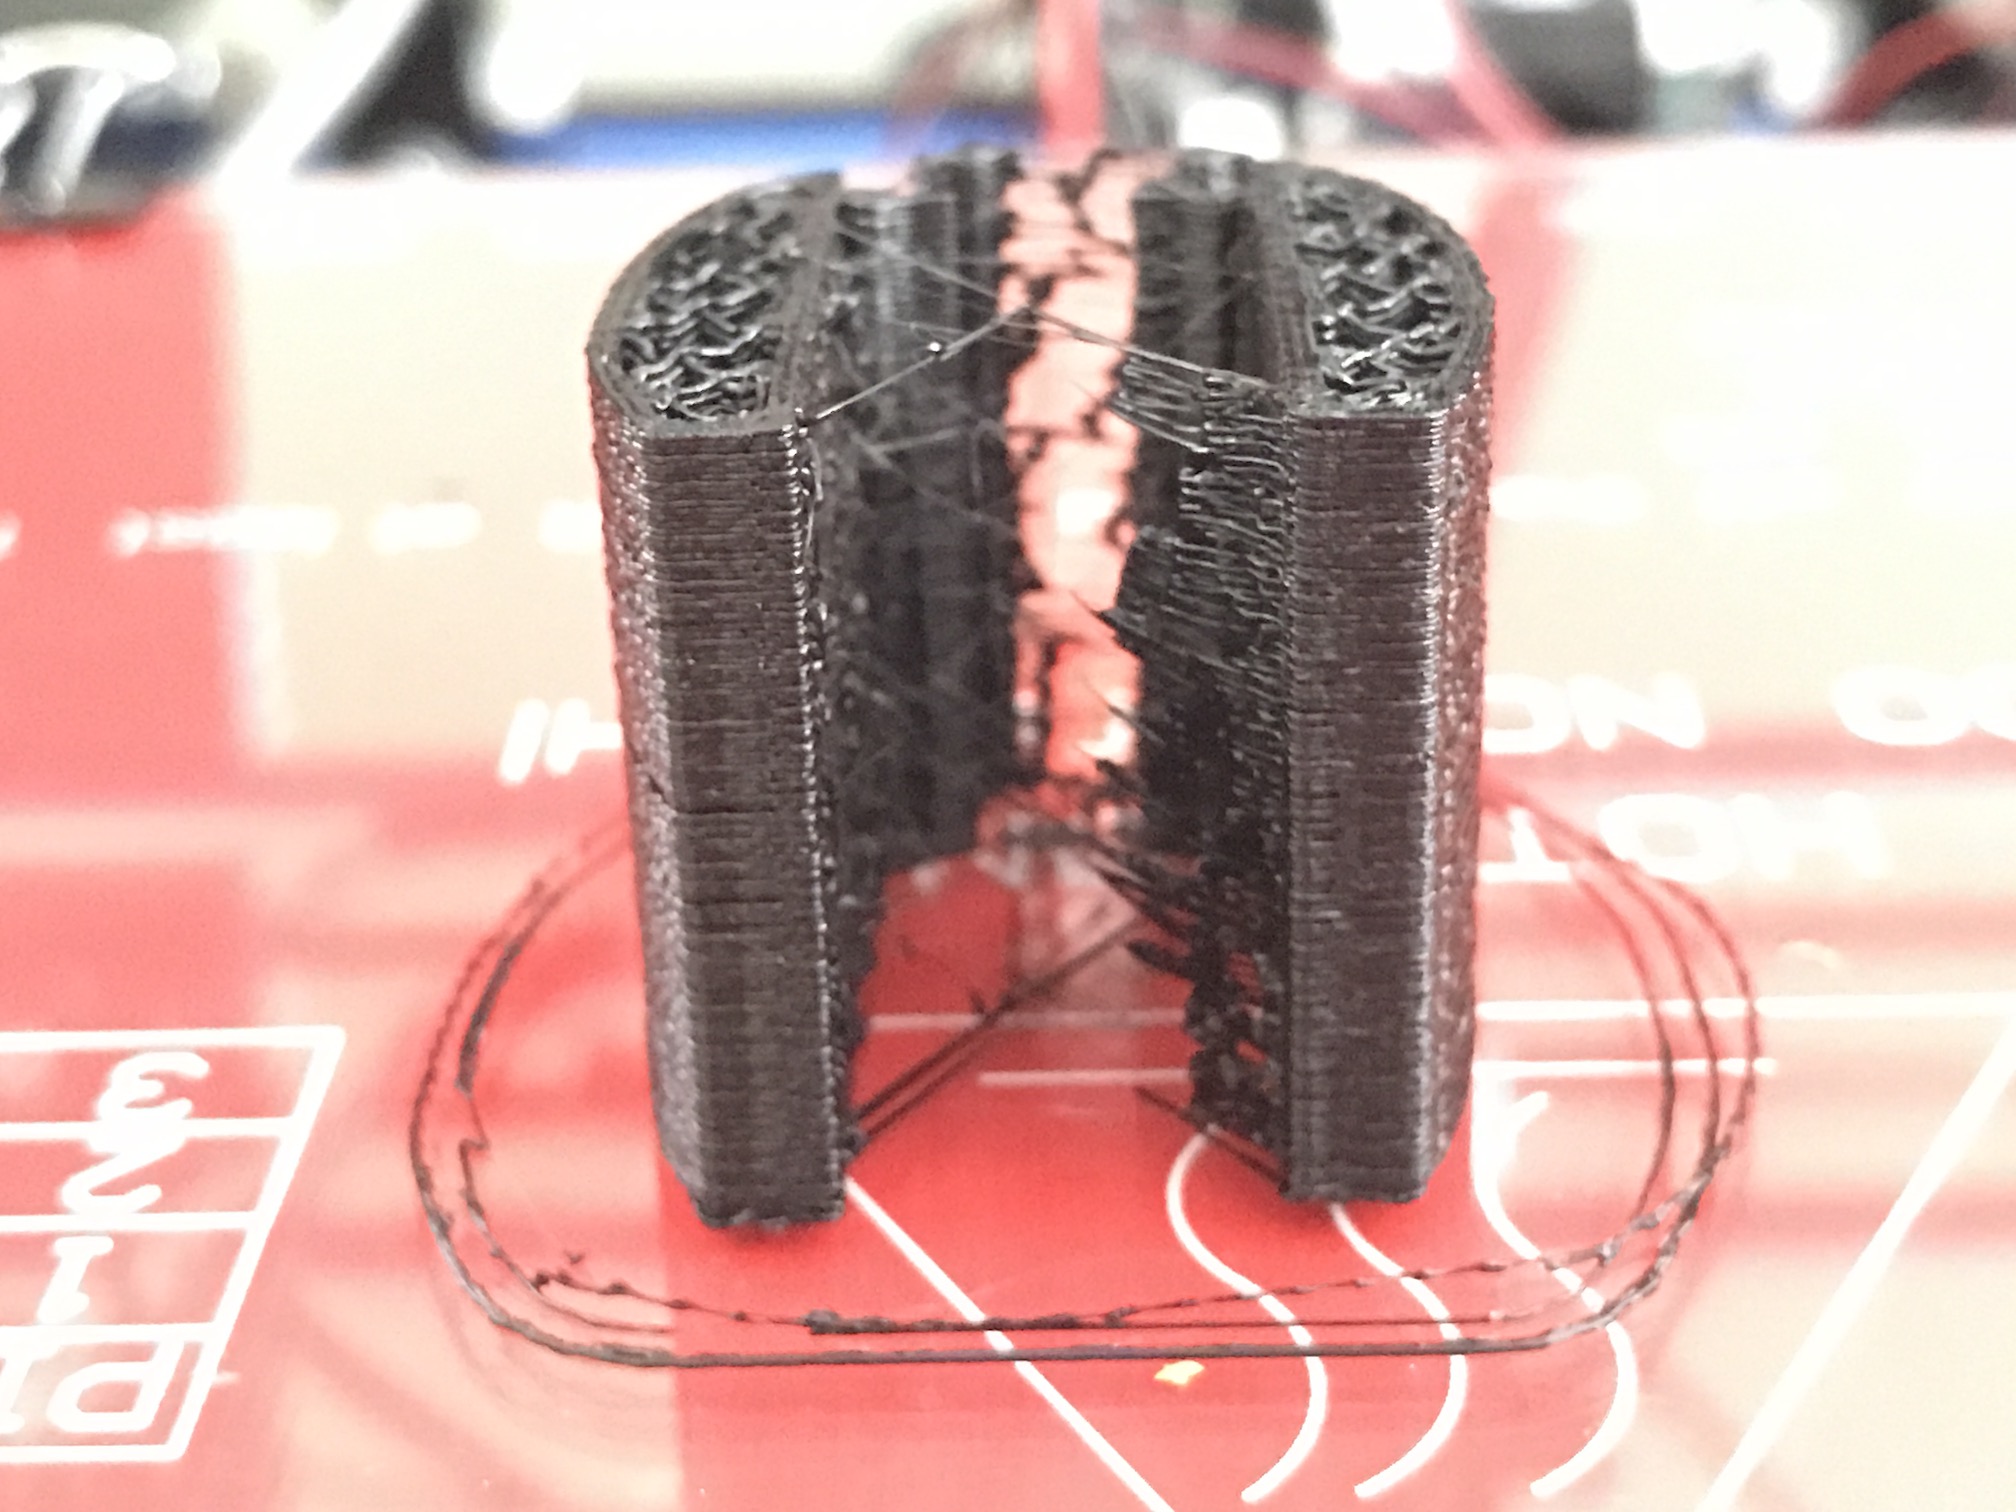
I'm having an awful time getting parts to stick, and not warp, and am having what I assume is a retraction issue?
Settings: PLA running at 190C (tried 180 and 185 before), bed at 45C (tried 70 and 65 before). Slic3r settings are as given in the reprapguru config suggestions.
At first I thought it was a bed leveling issue. I re-leveled the bed with a piece of paper, and tried again, getting this:
There's some glassiness, but I'm not sure if it's adequate. For this print, one of the pieces stuck, the other still lifted, warped, and got hit by the nozzle (which is how everything I've printed so far has ended up).
I'm also getting uneven extrusion as you can see in the skirt in
Any suggestions would be much appreciated.
Edited 1 time(s). Last edit at 09/17/2017 11:39AM by kolosy.
Settings: PLA running at 190C (tried 180 and 185 before), bed at 45C (tried 70 and 65 before). Slic3r settings are as given in the reprapguru config suggestions.
At first I thought it was a bed leveling issue. I re-leveled the bed with a piece of paper, and tried again, getting this:

There's some glassiness, but I'm not sure if it's adequate. For this print, one of the pieces stuck, the other still lifted, warped, and got hit by the nozzle (which is how everything I've printed so far has ended up).
I'm also getting uneven extrusion as you can see in the skirt in

Any suggestions would be much appreciated.
Edited 1 time(s). Last edit at 09/17/2017 11:39AM by kolosy.
|
Re: RepRap Guru i3 Printer Kit (Official Thread) October 02, 2017 05:37PM |
Registered: 6 years ago Posts: 1 |
|
Re: RepRap Guru i3 Printer Kit (Official Thread) October 02, 2017 11:32PM |
Registered: 6 years ago Posts: 70 |
|
Re: RepRap Guru i3 Printer Kit (Official Thread) October 11, 2017 01:41PM |
Registered: 7 years ago Posts: 10 |
|
Re: RepRap Guru i3 Printer Kit (Official Thread) October 11, 2017 01:59PM |
Registered: 6 years ago Posts: 28 |
Yup it's a few pages back in the topic here but will link again:
[github.com]
I upgraded to E3D v6 hotend and tried to keep the rest of the configuration values the same (also updated to the latest Marlin firmware that was out at the time so can get auto bed levelling if i add the sensor for it ever). Other things to look out for I think the acceleration and jerk in the x and y probably need to be reduced I typically have been doing this after booting up the machine manually but would be good to update those values in the config, currently 3000 for the acceleration 2000 is safer and the Vx and Vy are set for 30 I think 20 is safer in terms of not getting so much fast jitter that you wobble things loose or skip motions.
If you want to stick with the current version of Marlin and just update the temp sensor pretty sure you're looking for this definition (in your Configuration.h most likely):
[github.com]
Edited 2 time(s). Last edit at 10/11/2017 03:53PM by wafflejock.
[github.com]
I upgraded to E3D v6 hotend and tried to keep the rest of the configuration values the same (also updated to the latest Marlin firmware that was out at the time so can get auto bed levelling if i add the sensor for it ever). Other things to look out for I think the acceleration and jerk in the x and y probably need to be reduced I typically have been doing this after booting up the machine manually but would be good to update those values in the config, currently 3000 for the acceleration 2000 is safer and the Vx and Vy are set for 30 I think 20 is safer in terms of not getting so much fast jitter that you wobble things loose or skip motions.
If you want to stick with the current version of Marlin and just update the temp sensor pretty sure you're looking for this definition (in your Configuration.h most likely):
[github.com]
Edited 2 time(s). Last edit at 10/11/2017 03:53PM by wafflejock.
|
Re: RepRap Guru i3 Printer Kit (Official Thread) October 13, 2017 09:18AM |
Registered: 6 years ago Posts: 2 |
Quote
Tyborg
ajlewis3008: When you buy the kit, they give you the link to a Google Drive that has the v2 instructions manual. The v2 has updated instructions. A slip of paper with the link is actually found in the box first thing when you open it.
If you end up buying the kit, have fun!
I searched through the box again after stumbling across this post. I don't see any slip of paper. Are the v2 instructions available online without google drive or is that google drive URL something public? I'm still building and have wondered about the instructions and the videos and the kit all not quite matching up.
Thanks
-Dan
|
Re: RepRap Guru i3 Printer Kit (Official Thread) October 13, 2017 12:12PM |
Registered: 6 years ago Posts: 2 |
Here is an example of one of the things I'm trying to figure out where there are inconsistencies. In the file "RRG Build Manual V1.4.pdf" from the web site on p. 19 it says "No washer are to be used here". Yet hardware bag #4 has 4 washers and the video shows the use of washers. In addition, the motor in the picture is rotated 180 degrees from the video. A good comparison point is the picture at the top of p. 21 which shows the motor at the right of the X mount having the connector coming off the top. Build video #17 at 0:09 has a nice shot of that section and the connector is on the bottom not the top.
Any tips on which works better (washers or no washers, connector on top/connector on bottom) would be appreciated.
In a related note, is there a distinguishing feature I can look at to verify that this is indeed a v2 kit which is what I ordered?
Thanks
-Dan
Any tips on which works better (washers or no washers, connector on top/connector on bottom) would be appreciated.
In a related note, is there a distinguishing feature I can look at to verify that this is indeed a v2 kit which is what I ordered?
Thanks
-Dan
|
Re: RepRap Guru i3 Printer Kit (Official Thread) October 28, 2017 09:04PM |
Registered: 6 years ago Posts: 1 |
Hello everyone - I just recently bought a Prusa i3 V2 from the RepRapGuru online store and completed the mechanical assembly without any major issues so far.
I have several extra parts: 2 metal springs, one 125mm threaded rod and two acrylic pieces. I'm assuming that the acrylic pieces are for a spool holder? If so, how does the spool holder attach to the frame?
I would appreciate it If anyone could tell me what the springs and rod are used for.
Thanks in advance for your help and I'm really looking forward to my first print.
|
Re: RepRap Guru i3 Printer Kit (Official Thread) October 30, 2017 02:54PM |
Registered: 6 years ago Posts: 2 |
Quote
mfmellone
Hello everyone - I just recently bought a Prusa i3 V2 from the RepRapGuru online store and completed the mechanical assembly without any major issues so far.
I have several extra parts: 2 metal springs, one 125mm threaded rod and two acrylic pieces. I'm assuming that the acrylic pieces are for a spool holder? If so, how does the spool holder attach to the frame?
I would appreciate it If anyone could tell me what the springs and rod are used for.
Thanks in advance for your help and I'm really looking forward to my first print.
It's been a while since I built my RRG i3 V2, but I remember having extra parts. As for the acrylic pieces, you should have more then 2 pieces for the spool holder, as well as some more bolts and spacers. Make sure you double check your shipping box for additional pieces and instructions. They weren't labeled clearly, and I almost missed them completely.
Of course, my original package was missing the stepper drivers, so another possibility is that you are missing pieces...
To answer how it attaches: an additional acrylic "shelf" is mounted above and behind the LCD. I will add a picture of mine when I get home.
|
Re: RepRap Guru i3 Printer Kit (Official Thread) October 30, 2017 02:56PM |
Registered: 6 years ago Posts: 2 |
Quote
danmc
Here is an example of one of the things I'm trying to figure out where there are inconsistencies. In the file "RRG Build Manual V1.4.pdf" from the web site on p. 19 it says "No washer are to be used here". Yet hardware bag #4 has 4 washers and the video shows the use of washers. In addition, the motor in the picture is rotated 180 degrees from the video. A good comparison point is the picture at the top of p. 21 which shows the motor at the right of the X mount having the connector coming off the top. Build video #17 at 0:09 has a nice shot of that section and the connector is on the bottom not the top.
Any tips on which works better (washers or no washers, connector on top/connector on bottom) would be appreciated.
In a related note, is there a distinguishing feature I can look at to verify that this is indeed a v2 kit which is what I ordered?
Thanks
-Dan
The "V2" simply denotes that it comes with the LCD and spool holder, whereas V1 does not.
If memory serves, I was consistent and used washers. I will have to double check how my motors are installed when I get home.
|
Re: RepRap Guru i3 Printer Kit (Official Thread) December 06, 2017 10:48PM |
Registered: 6 years ago Posts: 6 |
I have the fan and the shroud printed, and am looking for a place to power it up from the RAMPS board (RepRap Guru I3 kit). I have the heat sink fan connected as per the instructions, But I noticed that when I use Craft ware slicer and tell it to disable fan on the first layer or two, it actually disables the heat sink fan... The question is, can I put the secondary fan in those terminals and piggy back the heat sink fan with the extruder heater or another source of always on power?
Or is there a place on the ramps board that I can connect the part cooling fan to? (without getting into messing with Marlin code)
Edit... I just saw above the post about pluging the cooling fan into the fan plug on the ramps board.... Where do I find that plug... could you post a pic..
Thanks..
Gary
Edited 1 time(s). Last edit at 12/06/2017 11:01PM by grgrimley.
|
Re: RepRap Guru i3 Printer Kit (Official Thread) December 06, 2017 10:59PM |
Registered: 6 years ago Posts: 6 |
@ mfmellone -- Do the springs look like the springs out of close-pin? If so then they are for adding some tension to the belts in case you do not get them tight enough in the assembly. They work well, I used them on the "Y" belt and it made a big difference... when i put it on the X axis it got too tight and things bound up. I have subsequently printed the x-belt tightener from thingsiverse mentioned above... I have not yet installed it as my x belt seems about right... but it will stretch
|
Re: RepRap Guru i3 Printer Kit (Official Thread) December 06, 2017 11:01PM |
Registered: 6 years ago Posts: 28 |
Basically directly on the power supply is the answer for the always on fan it's a 12V fan so can hook it right to 12V power supply connections. The part cooling fan should be hooked to D9 next to the heater connections on the RAMPS 1.4 board.
Quote
wafflejock
The part cooling fan can be plugged into the fan port on the ramps board since it can vary the speed on that one so the part sticks to the bed without the fan on at first and it kicks on to help cool layers after the first few, or in other scenarios you might want to adjust the part cooling fan speed.
Edited snippet
[forums.reprap.org]
For 12V power source ^^
Regarding a computer deciding to go rogue mid print I recommend getting a Raspberry Pi 3 with wifi and downloading the OctoPi image. Basically you download the image, put it on an SD card, load it in the raspberry pi, follow some steps to get it on your network and then you have a wifi network connected printer you can queue up jobs on from any computer on your network. If you add a pi camera to it you can also get timelapses and a live web view of the printer which is handy if you want to stuff it in a corner somewhere far away from where you sleep and/or work.
[octopi.octoprint.org]
|
Re: RepRap Guru i3 Printer Kit (Official Thread) December 06, 2017 11:04PM |
Registered: 6 years ago Posts: 6 |
 . I was going to try that, but did not want to let the smoke out of anything... I am into electric RC planes... and once the smoke gets out, it is impossible to put it back in...
 |
Re: RepRap Guru i3 Printer Kit (Official Thread) December 06, 2017 11:10PM |
Registered: 6 years ago Posts: 28 |
|
Re: RepRap Guru i3 Printer Kit (Official Thread) February 18, 2018 09:22AM |
Registered: 10 years ago Posts: 11 |
Just received my RepRapGuru I3 V2 kit on Friday, built it yesterday, build was fairly straight forward only issue I noticed was the Y endstop was catching on the hot bed plates thumb screw so I moved it over to the left side threaded rod and that solved that problem. but now i'm getting one of two errors, Error:Heating failed, system stopped! Heater_ID: bed or if the bed gets to temp I'll get an Error:Heating failed, system stopped! Heater_ID: nozzle. any ideas?
thanks,
Jason
thanks,
Jason
|
Re: RepRap Guru i3 Printer Kit (Official Thread) February 18, 2018 10:11AM |
Registered: 6 years ago Posts: 28 |
Are you using custom firmware or the firmware that came with the kit? Also have you tried covering the whole printer with a box to see if it's better able to control temp (possibly it is in a drafty area so it isn't getting stable readings from the thermistors)
Edited 1 time(s). Last edit at 02/18/2018 10:11AM by wafflejock.
Edited 1 time(s). Last edit at 02/18/2018 10:11AM by wafflejock.
|
Re: RepRap Guru i3 Printer Kit (Official Thread) February 18, 2018 12:48PM |
Registered: 10 years ago Posts: 11 |
firmware that came with the kit. I ordered a replacement hotend. i'm thinking the thermistor is bad voltage at the block is good. the bed seems to basically be good now after a little fiddling with but the nozzle wont even start to heat up after 10 seconds it fails but the temp scale hasn't moved on the monitor so led me to think thermistor.
|
Re: RepRap Guru i3 Printer Kit (Official Thread) February 19, 2018 10:40AM |
Registered: 10 years ago Posts: 11 |
|
Re: RepRap Guru i3 Printer Kit (Official Thread) February 20, 2018 04:00AM |
Registered: 6 years ago Posts: 3 |
|
Re: RepRap Guru i3 Printer Kit (Official Thread) February 21, 2018 02:40PM |
Registered: 6 years ago Posts: 22 |
|
Re: RepRap Guru i3 Printer Kit (Official Thread) February 25, 2018 06:10PM |
Registered: 6 years ago Posts: 6 |
Hello!
I have the [REPRAPGURU] DIY RepRap Prusa I3 3D Printer Kit:
[www.amazon.com]
I'm following these two guides:
- Video - [www.youtube.com]
- PDF - [drive.google.com]
In the video, the instructor says the D9 terminals slots are for a "print cooling fan" and the Extruder fan should be plugged directly into the power supply. This contradicts what's listed in the PDF which reads "Connect the Fan wires to the blue screw terminals marked “D9” on the RAMPS board".
Here is the cable that runs off of the extruder fan:
Extruder Cable
Here is the RAMPS board:
RAMPS board
Any thoughts? Should i cut and strip the wire? Its weird that it already has the piece at the end.
Thanks for all the info!!!!


Sorry, only registered users may post in this forum.