Folger Tech 2020 i3 Printer Kit (Official Thread)
Posted by Dan_FolgerTech
|
Re: Folger Tech 2020 i3 Printer Kit (Official Thread) November 15, 2015 11:22PM |
Registered: 8 years ago Posts: 367 |
Quote
watlooazn
Guys my bearings have a tendency to fall off/slide down sometimes from the chrome rods and 3d printed supports (these are the chrome rods which are supposed to be right beside the threaded rods). Any tips?
Another thing is that sometimes the nut of the threaded rods doesn't stay in place in the 3d printed fixtures. Again, any tips?
Im pretty much a noob builder and am having alot of issues (but this stuff is fun so im keeping on going !). Anyone have any motivational tips, or reassurance that their build didn't go as smoothly as they thought it would? Could really use some words of wisdom right now.
Thanks guys
No problems with the bearings on mine, but one of the nuts for the threaded rods slipped. As I recall, I shimmed it by wrapping a little tape around it.
I'm glad you are having fun with the build. If you want some reassurance about builds not going smoothly, take a look at my blog, especially [moosteria.blogspot.com].
One of the good things about this printer is when you do get it working, it's a really good base machine (the frame is very solid, for example), and you can make a lot of improvements by printing new parts or buying alternative ones. I've had mine for nearly 6 months now, and have made many changes, and the fact that it was pretty good to start with really helped me in things like tuning temperatures and print speeds before I began modifying it.
See my blog at [moosteria.blogspot.com].
|
Re: Folger Tech 2020 i3 Printer Kit (Official Thread) November 15, 2015 11:47PM |
Registered: 8 years ago Posts: 430 |
Quote
watlooazn
Guys my bearings have a tendency to fall off/slide down sometimes from the chrome rods and 3d printed supports (these are the chrome rods which are supposed to be right beside the threaded rods). Any tips?
Another thing is that sometimes the nut of the threaded rods doesn't stay in place in the 3d printed fixtures. Again, any tips?
Im pretty much a noob builder and am having alot of issues (but this stuff is fun so im keeping on going !
Thanks guys
I had the opposite problem where the bearings and nuts were too tight but just read through this thread and you will see many people have had problems
Do you have it all together and the nuts come out? I would think the weight of the x axis would help hold them in there when it's together.
Newbie with Folgertech 2020 i3.
|
Re: Folger Tech 2020 i3 Printer Kit (Official Thread) November 15, 2015 11:53PM |
Registered: 8 years ago Posts: 430 |
So I was installing the aluminum bed plate I got [www.ebay.com] and noticed there is a lot of air flowing over the bed from the fan on the E3D lite6. Has anyone else noticed this? I wonder if that could be one reason for the bed heating slowly or prints not sticking? Not sure if I could do anything about it the fan needs to be there.
Edited 1 time(s). Last edit at 11/15/2015 11:54PM by msaeger.
Newbie with Folgertech 2020 i3.
Edited 1 time(s). Last edit at 11/15/2015 11:54PM by msaeger.
Newbie with Folgertech 2020 i3.
|
Re: Folger Tech 2020 i3 Printer Kit (Official Thread) November 16, 2015 12:33AM |
Registered: 8 years ago Posts: 276 |
Quote
Mrfus
I'm looking to do the autolevel thing on my printer (I'm going for the moving little arm holding the switch one because I have glass)... It's there a guide for how to do it right like what to change on the firmware and what wire goes where, how long is the arm holding the switch?
Thanks!
I would suggest using an inductive/capactive sensor instead of the servo arm. If you go back about 20 pages or so there's conversation on how I did it, along with the optocoupler circuit (that you may or may not need). Tom's Guide has a good video telling you what it all entails.
Need help? Visit the Folgertech Wikia Page
The latest Marlin firmware with Folgertech Prusa i3 settings merged in, get it here
And check out my designs on Thingiverse, and follow me if you like what you see!
|
Re: Folger Tech 2020 i3 Printer Kit (Official Thread) November 16, 2015 03:24AM |
Registered: 8 years ago Posts: 51 |
Quote
elkayem
Quote
peeejayz
Spent every minute I had free trying to get this printer printing happily.
Finally after 3/4 of a kg of PLA I think I'm there:
[attachment 65977 12268577_10153266379991188_1189186789_o.jpg]
Nice! Your next step is a full 3D printed copter. Here's mine. Frame is 100% PLA (except the bolts and standoffs of course!). Here's a shot of it flying yesterday. The frame is off Thingiverse, called the "Crossfire 2".
[attachment 65984 IMG_0896.JPG]
[attachment 65985 FullSizeRender.jpg]
I wish I could find an interest in a full 3d printed one, I only fly/race 250 and smaller. I sold my TBS discovery as it hadn't moved for 6months. And a printed 250 isn't strong/ridged enough.
The protectors are for a prototype frame a friend of mine is bringing to market.
|
Re: Folger Tech 2020 i3 Printer Kit (Official Thread) November 16, 2015 05:26AM |
Registered: 8 years ago Posts: 268 |
Quote
therippa
Also, if anyone is interested in that extruder I posted earlier - [www.thingiverse.com]
I'm following you on thingi so this pooped up the other day...nice work as always :-)
|
Re: Folger Tech 2020 i3 Printer Kit (Official Thread) November 16, 2015 05:42AM |
Registered: 8 years ago Posts: 268 |
Quote
therippa
Quote
Yelloow-Snow
Quote
msaeger
Quote
Yelloow-Snow
Quote
therippa
Is anyone else starting to have problem printing now that the weather is getting colder? It doesn't get very cold in San Francisco, but my printer is right next to a window and I've been having warping/layer separation issues. It may be time to resurrect the idea of building an enclosure...
Nope tho its still warm in Louisiana. that and my large reef tank in the room keeps it hot.
Maybe PID Tuning again when the weather changes?
That was a good idea my stuff wasn't sticking as good so I ran auto tune on the bed again and it's sticking much better.
Awesome! Maybe run it on the extruder also? :: shrug :: I'm still a noob.
I ordered a new hot end. Going to do Bowden but i want to do something different. I want to mount the extruder right above the hot end on the top rail. Reduce the distance and keep the weight low on the X axis. It will feed it straight down.
hmmm Why hasent anyone else done this?
Also... after hours and hours of work here is my S3D starting script.
I unchecked "Wait for temp to stablize before beginning build" This allows me to auto level with 16 points while the bed is heating up.
Also things to note: I disabled the checkbox "Relative extrusion distances" and "Update firmware configuration"
Still confused why I have to G92 after G29. At the end of G29 it says X is -36 which is the distance of the probe.
G21 ; Units to mm
G90 ; Absolute positioning
M82 ; Use absolute distances for extruder
G92 E0 ; Zero the extruder position
G28 ; Center all Axis
G0 X0 Y13 ; Move to start of auto leveling
G29 ; Auto Leveling
G92 X0 Y210 ;Set the extruder to the actually coordinates. Back left.
M105 ; Read current temp
M190 S110 ; Set bed temp and wait to be reached
M109 S230 ; Set extruder temp and wait to be reached
M105 ; Read current temp
So, tonight I installed my new extruder (happy with it, but it needs improvements. this was a remix, expect a RippaStruder in the future), and ran into the same problem you had with Marlin losing track of coordinates after autoleveling. Turns out it's a bug (it happens if your probe offset is greater than [some formula]). The new release candidate of Marlin fixes it (1.9RC2), and I got it to work and created a new branch with my personal settings here - [github.com] . If you are brave and know how to run a diff on the config files, I suggest you give it a try. One big change they made is the PROBE_POSITION settings for autoleveling already have the offsets accounted for, so you will treat the center of your probe as the extruder when setting them (this took me a while to figure out, and I filed a ticket against it).
After going through this upgrade migration process, I realized a lot of setting behaviors were changed (off the top of my head: lcd support, very different configuration.h structure which makes it hard to run a diff, default booleans from the 1.8 config file flipped, and autolevel behavior) , and a lot new ones were added. I still plan on releasing an update to my Folgertech Marlin firmware once the final version is out, but since my printer is now very far from stock configuration, I might need someone here who hasn't tinkered around with the physical aspects of the printer too much and understands how the configuration file works to help.
Also, here's the video of it doing a stressing print with the new bushings...so quiet:
[www.youtube.com]


This is interesting, when I was running the threaded rods on Z I could see them moving and making the necessary adjustments to maintain a level print. I upgraded to Lead Screws and now I don't see them move at all. At first I thought it was simply resolution (the lower step count not being as visual as the higher count), but I could see that my first layer or two was not evenly distributed. So I put my finger on the Z coupling to see if I could feel them move...they don't'!!! So what the hell changed in my case, I wouldn't think changing the step count would have done anything concerning the auto-leveling!?!?
|
Re: Folger Tech 2020 i3 Printer Kit (Official Thread) November 16, 2015 06:14AM |
Registered: 8 years ago Posts: 268 |
I need help with DVR8825 Stepper Driver...
When I got my FT printer i had a bad driver (A4988) so I decided to order a few spares. Due to simple ignorance I assumed the DVR8825 would be better...they have a higher working amperage so they would have no over heating issues. Now that I've upgraded to dual extruders I needed not only one, but two drivers, so in went the DVR8825s. I installed both and tried a few prints...I know, I should have calibrated them first, but I was too excited to see the dual extruders working.
I could see right away they were not extruding enough filament, so I ran calibration on the extruder. I was getting only 50% of the requested 50mm of filament. After a bit of research I realized the DVR8825 was capable of a higher microstep count, 1/32 compared to the A4988s at 1/16. With the standard Ramps jumper settings configuring the highest microstep count it made since I was only extruding 50% of the filament requested.
So I change my jumpers from Y,Y,Y to N,N.Y. and tried to re-calibrate. I request 50mm of filament at 315 step count (this count worked great for my extruder with the A4988) but I still only get 25mm!?!? So I simply did the math and went to 630 steps to see what happened. When I did this I got 105mm of filament when requesting 50mm WTF!?!? At 630 step count I getting twice the filament (what it should do if I'm running 1/16 mcrosteps) but at 315 step count I get 25mm like it's running at 1/32!?!?
Am I missing something!?!? Is there a firmware change I need to make to run the DVR8825s at 1/16, or is it the simple jumper change?
I've also read that the Ramps board doesn't like the 1/32 microstep count, even if this is so it should run them at 1/16 fine fine...correct!?!?
I still have a A4988, I might drop it in tonight and see if everything goes back to normal...if so I might just switch back to these and forego the 8825's all together...although I'd have to buy more 4988s :-(
|
Re: Folger Tech 2020 i3 Printer Kit (Official Thread) November 16, 2015 10:21AM |
Registered: 8 years ago Posts: 80 |
|
Re: Folger Tech 2020 i3 Printer Kit (Official Thread) November 16, 2015 10:28AM |
Registered: 8 years ago Posts: 268 |
Quote
Putzer
I believe you double the steps in the firmware and put the jumpers back in.
Okay thanks, but where in the firmware do I find the steps to double...I tried searching confg.h but didn't see where to make the change!?!? Also, would this change effect the steps for all the motors or just the two extruder motors?
FYI: I'm still running the A4988's on X,Y & Z. I have enough drivers to change them all though...so I can do that as well.
Edit: I've been thinking about this a bit more ,are you referencing the E-Steps in the firmware??? If so I've tried that already with no luck!?!?
Edited 2 time(s). Last edit at 11/16/2015 12:23PM by sonnylowe.
|
Re: Folger Tech 2020 i3 Printer Kit (Official Thread) November 16, 2015 11:12AM |
Registered: 8 years ago Posts: 4 |
I made a 40 to 60mm adapter and filament cooler. Works well on my printer.

|
Re: Folger Tech 2020 i3 Printer Kit (Official Thread) November 16, 2015 11:29AM |
Registered: 8 years ago Posts: 57 |
Quote
therippa
I would suggest using an inductive/capactive sensor instead of the servo arm. If you go back about 20 pages or so there's conversation on how I did it, along with the optocoupler circuit (that you may or may not need). Tom's Guide has a good video telling you what it all entails.
That requires aluminum bed, though, right?
I'm not at the point where I have any reason to change the bed out. FWIW my servo arm setup works great, especially now that I have a good mount for the servo directly on the X Carriage. I posted it a few pages back
|
Re: Folger Tech 2020 i3 Printer Kit (Official Thread) November 16, 2015 11:48AM |
Registered: 8 years ago Posts: 276 |
Quote
srcga
Quote
therippa
I would suggest using an inductive/capactive sensor instead of the servo arm. If you go back about 20 pages or so there's conversation on how I did it, along with the optocoupler circuit (that you may or may not need). Tom's Guide has a good video telling you what it all entails.
That requires aluminum bed, though, right?
I'm not at the point where I have any reason to change the bed out. FWIW my servo arm setup works great, especially now that I have a good mount for the servo directly on the X Carriage. I posted it a few pages back
The inductive one requires metal, but the capacitive will work with glass (although I wasn't able to find a 12mm version, only the 18mm)
Edited 1 time(s). Last edit at 11/16/2015 12:59PM by therippa.
Need help? Visit the Folgertech Wikia Page
The latest Marlin firmware with Folgertech Prusa i3 settings merged in, get it here
And check out my designs on Thingiverse, and follow me if you like what you see!
|
Re: Folger Tech 2020 i3 Printer Kit (Official Thread) November 16, 2015 12:02PM |
Registered: 8 years ago Posts: 57 |
|
Re: Folger Tech 2020 i3 Printer Kit (Official Thread) November 16, 2015 01:45PM |
Registered: 8 years ago Posts: 20 |
Quote
therippa
Quote
srcga
Quote
therippa
I would suggest using an inductive/capactive sensor instead of the servo arm. If you go back about 20 pages or so there's conversation on how I did it, along with the optocoupler circuit (that you may or may not need). Tom's Guide has a good video telling you what it all entails.
That requires aluminum bed, though, right?
I'm not at the point where I have any reason to change the bed out. FWIW my servo arm setup works great, especially now that I have a good mount for the servo directly on the X Carriage. I posted it a few pages back
The inductive one requires metal, but the capacitive will work with glass (although I wasn't able to find a 12mm version, only the 18mm)
Do you use the inductive or capacitive?
Everyone on #reprap says the sensors are not as good as a servo if you live in an area with a volatile climate
|
Re: Folger Tech 2020 i3 Printer Kit (Official Thread) November 16, 2015 02:21PM |
Registered: 8 years ago Posts: 276 |
Quote
Yelloow-Snow
Quote
therippa
Quote
srcga
Quote
therippa
I would suggest using an inductive/capactive sensor instead of the servo arm. If you go back about 20 pages or so there's conversation on how I did it, along with the optocoupler circuit (that you may or may not need). Tom's Guide has a good video telling you what it all entails.
That requires aluminum bed, though, right?
I'm not at the point where I have any reason to change the bed out. FWIW my servo arm setup works great, especially now that I have a good mount for the servo directly on the X Carriage. I posted it a few pages back
The inductive one requires metal, but the capacitive will work with glass (although I wasn't able to find a 12mm version, only the 18mm)
Do you use the inductive or capacitive?
Everyone on #reprap says the sensors are not as good as a servo if you live in an area with a volatile climate
I use the inductive one, and I guess the weather here is non-volatile enough

Edited 1 time(s). Last edit at 11/16/2015 03:31PM by therippa.
Need help? Visit the Folgertech Wikia Page
The latest Marlin firmware with Folgertech Prusa i3 settings merged in, get it here
And check out my designs on Thingiverse, and follow me if you like what you see!
|
Re: Folger Tech 2020 i3 Printer Kit (Official Thread) November 16, 2015 09:03PM |
Registered: 8 years ago Posts: 4 |
Quote
Smuggler17
If your prints are still mirrored after making that change then it is likely the X axis that is inverted. In this case make the following changes:
#define INVERT_X_DIR false
#define X_HOME_DIR 1
Connect the X endstop to the pins for max position (6th from the left)
In Repetier set you X home position as max
I had an issue with inverted prints and the above setup took care of it for me, so let me know if it doesn't work
I'm having a similar issue. However, none of my attempts to modify the config (and settings in REPetier) seem to be working.
Prints are X-mirrored with the following settings:
//  #define ENDSTOPPULLUP_XMAX
//  #define ENDSTOPPULLUP_YMAX
//  #define ENDSTOPPULLUP_ZMAX
  #define ENDSTOPPULLUP_XMIN   //X Endstop is on the RIGHT side of the printer (near the X motor); X Endstop is in XMIN RAMPS pins (7th from the left).
  #define ENDSTOPPULLUP_YMIN
  #define ENDSTOPPULLUP_ZMIN
INVERT_X_DIR false
X_HOME_DIR -1
In REPetier: X Home: MIN
However, these config changes leave the "G28 X" command doing noting (no movement on the X axis in either direction)
  #define ENDSTOPPULLUP_XMAX  //pluged the X enstop in to the XMAX pin (6th from the left); endstop is still on the RIGHT side of the bed, near the motor.
//  #define ENDSTOPPULLUP_YMAX
//  #define ENDSTOPPULLUP_ZMAX
//  #define ENDSTOPPULLUP_XMIN
  #define ENDSTOPPULLUP_YMIN
  #define ENDSTOPPULLUP_ZMIN
INVERT_X_DIR true  //so it thinks that 0 is on the LEFT of the bed
X_HOME_DIR 1 // so it thinks the HomeDir is TowardMax instead of TowardMin.
In REPetier: X Home: MAX
If I leave The top config+INVERT_X_DIR=true, then the Home button still works, but it heads to the LEFT of the bed, where there's no X endstop.
I can do anything i want to the rest of the settings, but if I modify X_HOME_DIR to "1" (max), "G28 X" does Nothing.
I've tried nearly all variations of INVERT_X_DIR true/false, X_HOME_DIR 1/-1, and ENDSTOPPULLUP_X MAX/MIN.
Any suggestions would be greatly useful.
Thanks!
|
Re: Folger Tech 2020 i3 Printer Kit (Official Thread) November 17, 2015 09:03AM |
Registered: 8 years ago Posts: 268 |
Quote
sonnylowe
I need help with DVR8825 Stepper Driver...
When I got my FT printer i had a bad driver (A4988) so I decided to order a few spares. Due to simple ignorance I assumed the DVR8825 would be better...they have a higher working amperage so they would have no over heating issues. Now that I've upgraded to dual extruders I needed not only one, but two drivers, so in went the DVR8825s. I installed both and tried a few prints...I know, I should have calibrated them first, but I was too excited to see the dual extruders working.
I could see right away they were not extruding enough filament, so I ran calibration on the extruder. I was getting only 50% of the requested 50mm of filament. After a bit of research I realized the DVR8825 was capable of a higher microstep count, 1/32 compared to the A4988s at 1/16. With the standard Ramps jumper settings configuring the highest microstep count it made since I was only extruding 50% of the filament requested.
So I change my jumpers from Y,Y,Y to N,N.Y. and tried to re-calibrate. I request 50mm of filament at 315 step count (this count worked great for my extruder with the A4988) but I still only get 25mm!?!? So I simply did the math and went to 630 steps to see what happened. When I did this I got 105mm of filament when requesting 50mm WTF!?!? At 630 step count I getting twice the filament (what it should do if I'm running 1/16 mcrosteps) but at 315 step count I get 25mm like it's running at 1/32!?!?
Am I missing something!?!? Is there a firmware change I need to make to run the DVR8825s at 1/16, or is it the simple jumper change?
I've also read that the Ramps board doesn't like the 1/32 microstep count, even if this is so it should run them at 1/16 fine fine...correct!?!?
I still have a A4988, I might drop it in tonight and see if everything goes back to normal...if so I might just switch back to these and forego the 8825's all together...although I'd have to buy more 4988s :-(
I could not find enough info to solve this problem, so I have gone back to the A4988 drivers. Maybe I'll try the DRV8825 again at some point, but for now I just want my printer working again...which I have :-)
|
Re: Folger Tech 2020 i3 Printer Kit (Official Thread) November 17, 2015 09:46AM |
Registered: 8 years ago Posts: 541 |
Quote
sonnylowe
Quote
sonnylowe
I need help with DVR8825 Stepper Driver...
When I got my FT printer i had a bad driver (A4988) so I decided to order a few spares. Due to simple ignorance I assumed the DVR8825 would be better...they have a higher working amperage so they would have no over heating issues. Now that I've upgraded to dual extruders I needed not only one, but two drivers, so in went the DVR8825s. I installed both and tried a few prints...I know, I should have calibrated them first, but I was too excited to see the dual extruders working.
I could see right away they were not extruding enough filament, so I ran calibration on the extruder. I was getting only 50% of the requested 50mm of filament. After a bit of research I realized the DVR8825 was capable of a higher microstep count, 1/32 compared to the A4988s at 1/16. With the standard Ramps jumper settings configuring the highest microstep count it made since I was only extruding 50% of the filament requested.
So I change my jumpers from Y,Y,Y to N,N.Y. and tried to re-calibrate. I request 50mm of filament at 315 step count (this count worked great for my extruder with the A4988) but I still only get 25mm!?!? So I simply did the math and went to 630 steps to see what happened. When I did this I got 105mm of filament when requesting 50mm WTF!?!? At 630 step count I getting twice the filament (what it should do if I'm running 1/16 mcrosteps) but at 315 step count I get 25mm like it's running at 1/32!?!?
Am I missing something!?!? Is there a firmware change I need to make to run the DVR8825s at 1/16, or is it the simple jumper change?
I've also read that the Ramps board doesn't like the 1/32 microstep count, even if this is so it should run them at 1/16 fine fine...correct!?!?
I still have a A4988, I might drop it in tonight and see if everything goes back to normal...if so I might just switch back to these and forego the 8825's all together...although I'd have to buy more 4988s :-(
I could not find enough info to solve this problem, so I have gone back to the A4988 drivers. Maybe I'll try the DRV8825 again at some point, but for now I just want my printer working again...which I have :-)
An extruder step count of 315 is your normal step count??? Are you running the stock extruder from FT? You haven't had something correct from the beginning if you are using 315 in your configuration.h file for the extruder! It should be around 100.
|
Re: Folger Tech 2020 i3 Printer Kit (Official Thread) November 17, 2015 02:00PM |
Registered: 8 years ago Posts: 268 |
Quote
tjnamtiw
Quote
sonnylowe
Quote
sonnylowe
I need help with DVR8825 Stepper Driver...
When I got my FT printer i had a bad driver (A4988) so I decided to order a few spares. Due to simple ignorance I assumed the DVR8825 would be better...they have a higher working amperage so they would have no over heating issues. Now that I've upgraded to dual extruders I needed not only one, but two drivers, so in went the DVR8825s. I installed both and tried a few prints...I know, I should have calibrated them first, but I was too excited to see the dual extruders working.
I could see right away they were not extruding enough filament, so I ran calibration on the extruder. I was getting only 50% of the requested 50mm of filament. After a bit of research I realized the DVR8825 was capable of a higher microstep count, 1/32 compared to the A4988s at 1/16. With the standard Ramps jumper settings configuring the highest microstep count it made since I was only extruding 50% of the filament requested.
So I change my jumpers from Y,Y,Y to N,N.Y. and tried to re-calibrate. I request 50mm of filament at 315 step count (this count worked great for my extruder with the A4988) but I still only get 25mm!?!? So I simply did the math and went to 630 steps to see what happened. When I did this I got 105mm of filament when requesting 50mm WTF!?!? At 630 step count I getting twice the filament (what it should do if I'm running 1/16 mcrosteps) but at 315 step count I get 25mm like it's running at 1/32!?!?
Am I missing something!?!? Is there a firmware change I need to make to run the DVR8825s at 1/16, or is it the simple jumper change?
I've also read that the Ramps board doesn't like the 1/32 microstep count, even if this is so it should run them at 1/16 fine fine...correct!?!?
I still have a A4988, I might drop it in tonight and see if everything goes back to normal...if so I might just switch back to these and forego the 8825's all together...although I'd have to buy more 4988s :-(
I could not find enough info to solve this problem, so I have gone back to the A4988 drivers. Maybe I'll try the DRV8825 again at some point, but for now I just want my printer working again...which I have :-)
An extruder step count of 315 is your normal step count??? Are you running the stock extruder from FT? You haven't had something correct from the beginning if you are using 315 in your configuration.h file for the extruder! It should be around 100.
Yes, 315 is my normal step count. No, not running stock extruder (see above). I am aware of the required stock step count, however this was an issue with the DRV Driver, not my extruder setup. No worries now as I've gone back to the A4988s....Thanks for the input though.
|
Re: Folger Tech 2020 i3 Printer Kit (Official Thread) November 18, 2015 01:05AM |
Registered: 8 years ago Posts: 18 |
|
Re: Folger Tech 2020 i3 Printer Kit (Official Thread) November 18, 2015 02:27AM |
Registered: 8 years ago Posts: 45 |
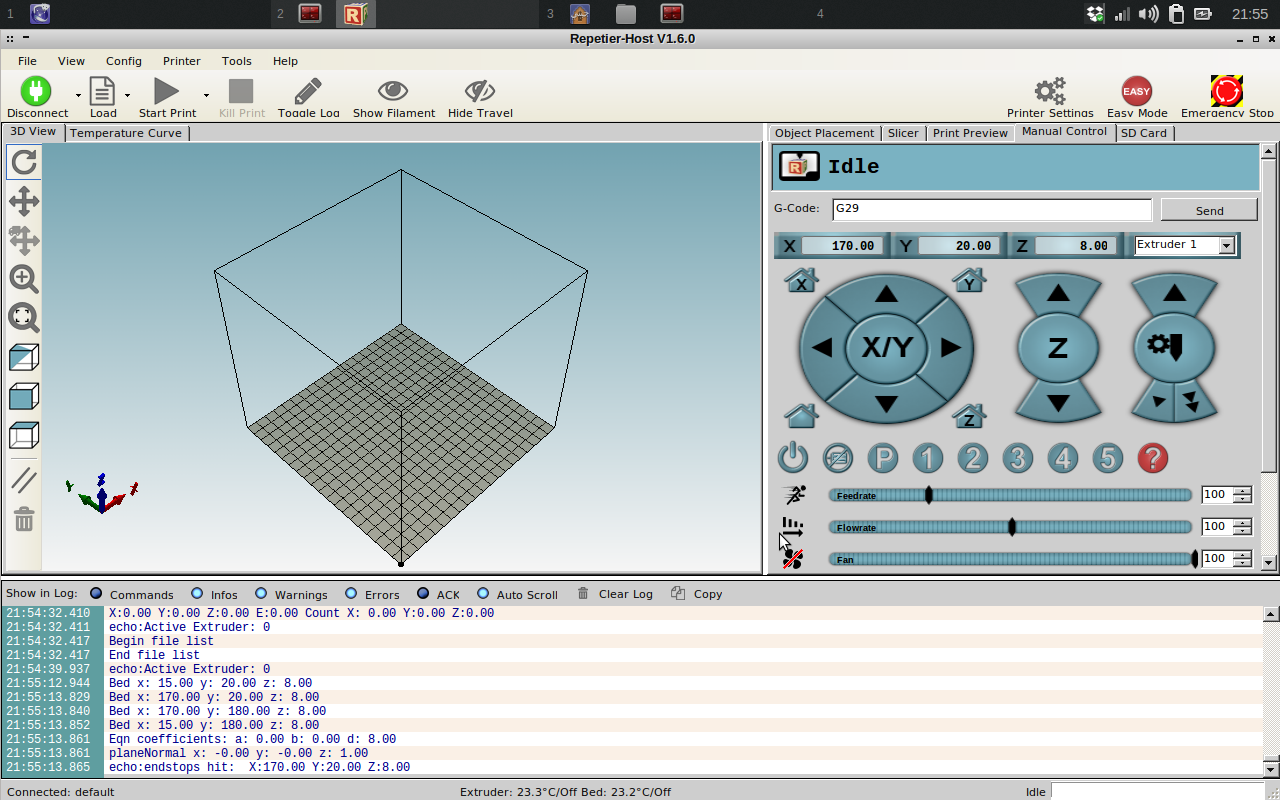
I got my inductive sensor and hooked it all up and changed my conf file as per Tom's guide on youtube and the instructable. I am using TheRippa's Marlin firmware.
As a z-end stop it works fantastically, no problems there. But when I run G29 (auto bed level routine) then the extruder moves until it hits the X or Y-endstop and then nothing (it's supposed to probe 4 points)...
I've attached the log from repetier showing that it quits the routine after it hits the (x and/or y) endstop (presumably on it's way to the first probe point.
My probe points should be within the bed according to the conf (also attached), not beyond it. I.e. X and Y between 15-180 for every point. I've set the probe offset to x,y=0,0 to simply things while I figure things out.
Any ideas?
|
Re: Folger Tech 2020 i3 Printer Kit (Official Thread) November 18, 2015 12:21PM |
Registered: 8 years ago Posts: 276 |
Quote
Uncertainty
I got my inductive sensor and hooked it all up and changed my conf file as per Tom's guide on youtube and the instructable. I am using TheRippa's Marlin firmware.
As a z-end stop it works fantastically, no problems there. But when I run G29 (auto bed level routine) then the extruder moves until it hits the X or Y-endstop and then nothing (it's supposed to probe 4 points)...
I've attached the log from repetier showing that it quits the routine after it hits the (x and/or y) endstop (presumably on it's way to the first probe point.
My probe points should be within the bed according to the conf (also attached), not beyond it. I.e. X and Y between 15-180 for every point. I've set the probe offset to x,y=0,0 to simply things while I figure things out.
Any ideas?
Did you move your x-endstop to the left side of the printer?
Need help? Visit the Folgertech Wikia Page
The latest Marlin firmware with Folgertech Prusa i3 settings merged in, get it here
And check out my designs on Thingiverse, and follow me if you like what you see!
|
Re: Folger Tech 2020 i3 Printer Kit (Official Thread) November 18, 2015 12:23PM |
Registered: 8 years ago Posts: 45 |
Quote
therippa
Quote
Uncertainty
I got my inductive sensor and hooked it all up and changed my conf file as per Tom's guide on youtube and the instructable. I am using TheRippa's Marlin firmware.
As a z-end stop it works fantastically, no problems there. But when I run G29 (auto bed level routine) then the extruder moves until it hits the X or Y-endstop and then nothing (it's supposed to probe 4 points)...
I've attached the log from repetier showing that it quits the routine after it hits the (x and/or y) endstop (presumably on it's way to the first probe point.
My probe points should be within the bed according to the conf (also attached), not beyond it. I.e. X and Y between 15-180 for every point. I've set the probe offset to x,y=0,0 to simply things while I figure things out.
Any ideas?
Did you move your x-endstop to the left side of the printer?
No... Is that important?
|
Re: Folger Tech 2020 i3 Printer Kit (Official Thread) November 18, 2015 02:57PM |
Registered: 8 years ago Posts: 276 |
Quote
Uncertainty
Quote
therippa
Quote
Uncertainty
I got my inductive sensor and hooked it all up and changed my conf file as per Tom's guide on youtube and the instructable. I am using TheRippa's Marlin firmware.
As a z-end stop it works fantastically, no problems there. But when I run G29 (auto bed level routine) then the extruder moves until it hits the X or Y-endstop and then nothing (it's supposed to probe 4 points)...
I've attached the log from repetier showing that it quits the routine after it hits the (x and/or y) endstop (presumably on it's way to the first probe point.
My probe points should be within the bed according to the conf (also attached), not beyond it. I.e. X and Y between 15-180 for every point. I've set the probe offset to x,y=0,0 to simply things while I figure things out.
Any ideas?
Did you move your x-endstop to the left side of the printer?
No... Is that important?
Yes, autolevel (G29) needs an x-min endstop to work properly (this is where it is meant to be on prusa's anyway). If you move your endstop to the left side things will work. You can reference my personal settings for the config changes - [github.com]
Edited 1 time(s). Last edit at 11/18/2015 05:01PM by therippa.
Need help? Visit the Folgertech Wikia Page
The latest Marlin firmware with Folgertech Prusa i3 settings merged in, get it here
And check out my designs on Thingiverse, and follow me if you like what you see!
|
Re: Folger Tech 2020 i3 Printer Kit (Official Thread) November 18, 2015 09:45PM |
Registered: 8 years ago Posts: 45 |
Quote
therippa
Quote
Uncertainty
Quote
therippa
Quote
Uncertainty
I got my inductive sensor and hooked it all up and changed my conf file as per Tom's guide on youtube and the instructable. I am using TheRippa's Marlin firmware.
As a z-end stop it works fantastically, no problems there. But when I run G29 (auto bed level routine) then the extruder moves until it hits the X or Y-endstop and then nothing (it's supposed to probe 4 points)...
I've attached the log from repetier showing that it quits the routine after it hits the (x and/or y) endstop (presumably on it's way to the first probe point.
My probe points should be within the bed according to the conf (also attached), not beyond it. I.e. X and Y between 15-180 for every point. I've set the probe offset to x,y=0,0 to simply things while I figure things out.
Any ideas?
Did you move your x-endstop to the left side of the printer?
No... Is that important?
Yes, autolevel (G29) needs an x-min endstop to work properly (this is where it is meant to be on prusa's anyway). If you move your endstop to the left side things will work. You can reference my personal settings for the config changes - [github.com]
Right as always! Works like a charm, now to tame the initialization process
Thanks a lot TheRippa!
|
Re: Folger Tech 2020 i3 Printer Kit (Official Thread) November 19, 2015 10:26AM |
Registered: 8 years ago Posts: 20 |
|
Re: Folger Tech 2020 i3 Printer Kit (Official Thread) November 19, 2015 04:18PM |
Registered: 8 years ago Posts: 20 |
|
Re: Folger Tech 2020 i3 Printer Kit (Official Thread) November 19, 2015 05:05PM |
Registered: 8 years ago Posts: 45 |
Note that this circuit or the circuit that TheRippa used (optocoupler based) are assuming the sensor is PNP type.
The one I am using is the LJ18A3-8-Z/BX NPN type 8mm inductive sensor.
For those of you not too familiar with electronics, you would need a slightly different circuit.
Here's a useful picture showing the difference.

Edited 1 time(s). Last edit at 11/19/2015 05:06PM by Uncertainty.
|
Re: Folger Tech 2020 i3 Printer Kit (Official Thread) November 19, 2015 06:08PM |
Registered: 8 years ago Posts: 16 |


Sorry, only registered users may post in this forum.