Folger Tech 2020 i3 Printer Kit (Official Thread)
Posted by Dan_FolgerTech
|
Re: Folger Tech 2020 i3 Printer Kit (Official Thread) October 01, 2015 11:36PM |
Registered: 8 years ago Posts: 57 |
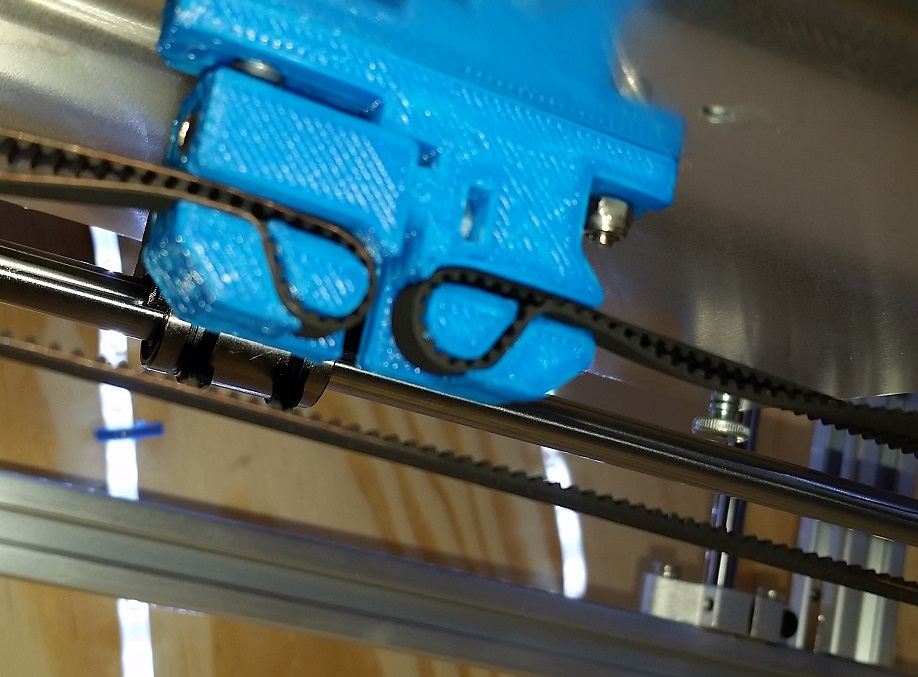
This is the Y tensioner I use
[www.thingiverse.com]
Going to take apart Y and X carriages soon when I feel like it, to lube up the bearings
[www.thingiverse.com]
Going to take apart Y and X carriages soon when I feel like it, to lube up the bearings
|
Re: Folger Tech 2020 i3 Printer Kit (Official Thread) October 02, 2015 10:11AM |
Registered: 8 years ago Posts: 99 |
Quote
srcga
This is the Y tensioner I use
[www.thingiverse.com]
Going to take apart Y and X carriages soon when I feel like it, to lube up the bearings
MMMMMM I like that tensioner! You said you are using it. It it hard to tighten the belt. Looks like the screw is hard to get at? Id be interested in trying that.
|
Re: Folger Tech 2020 i3 Printer Kit (Official Thread) October 02, 2015 11:30AM |
Registered: 8 years ago Posts: 59 |
|
Re: Folger Tech 2020 i3 Printer Kit (Official Thread) October 02, 2015 12:29PM |
Registered: 8 years ago Posts: 285 |
|
Re: Folger Tech 2020 i3 Printer Kit (Official Thread) October 02, 2015 12:48PM |
Registered: 8 years ago Posts: 99 |
Quote
woodknack
Quote
srcga
This is the Y tensioner I use
[www.thingiverse.com]
Going to take apart Y and X carriages soon when I feel like it, to lube up the bearings
MMMMMM I like that tensioner! You said you are using it. It it hard to tighten the belt. Looks like the screw is hard to get at? Id be interested in trying that.
Do you have any picture of yours mounted? Is the the bolt facing towards the front on the mount that holds it to the aluminum plate with the head facing down? So the nut is on top of the aluminum plate? If so does that give you enough room to adjust your heat plate up and down?
I liked it so much I just printed one off. Thanks. Im not going to install it until I redesign the bearing holder for the y axis. Then I'll swap them all over at the same time.


Edited 1 time(s). Last edit at 10/02/2015 01:43PM by woodknack.
|
Re: Folger Tech 2020 i3 Printer Kit (Official Thread) October 02, 2015 02:53PM |
Registered: 8 years ago Posts: 57 |
Quote
woodknack
Quote
woodknack
Quote
srcga
This is the Y tensioner I use
[www.thingiverse.com]
Going to take apart Y and X carriages soon when I feel like it, to lube up the bearings
MMMMMM I like that tensioner! You said you are using it. It it hard to tighten the belt. Looks like the screw is hard to get at? Id be interested in trying that.
Do you have any picture of yours mounted? Is the the bolt facing towards the front on the mount that holds it to the aluminum plate with the head facing down? So the nut is on top of the aluminum plate? If so does that give you enough room to adjust your heat plate up and down?
Sorry for the crappy pic but just built an enclosure for the printer.. not at a position to lift everything out right now. Soon enough I'll do lead screws and when I do that I'll take apart all the carriages and get better pics.
The adjuster screw faces the front of the printer. If I extend the bed all the way to the front, it's easy to adjust with a long allen
|
Re: Folger Tech 2020 i3 Printer Kit (Official Thread) October 02, 2015 04:38PM |
Registered: 8 years ago Posts: 99 |
Quote
srcga
Quote
woodknack
Quote
woodknack
Quote
srcga
This is the Y tensioner I use
[www.thingiverse.com]
Going to take apart Y and X carriages soon when I feel like it, to lube up the bearings
MMMMMM I like that tensioner! You said you are using it. It it hard to tighten the belt. Looks like the screw is hard to get at? Id be interested in trying that.
Do you have any picture of yours mounted? Is the the bolt facing towards the front on the mount that holds it to the aluminum plate with the head facing down? So the nut is on top of the aluminum plate? If so does that give you enough room to adjust your heat plate up and down?
Sorry for the crappy pic but just built an enclosure for the printer.. not at a position to lift everything out right now. Soon enough I'll do lead screws and when I do that I'll take apart all the carriages and get better pics.
The adjuster screw faces the front of the printer. If I extend the bed all the way to the front, it's easy to adjust with a long allen
I see yours came out much nicer! Are you using pla or abs? I still may have some setting off a little(using s3d). But I also was printing it at 200%speed. Maybe I should have slowed it down. It's still usable just not as pretty as yours.lol. I printed it at .2 with 50% infill pla.
|
Re: Folger Tech 2020 i3 Printer Kit (Official Thread) October 02, 2015 07:12PM |
Registered: 8 years ago Posts: 57 |
Quote
woodknack
I see yours came out much nicer! Are you using pla or abs? I still may have some setting off a little(using s3d). But I also was printing it at 200%speed. Maybe I should have slowed it down. It's still usable just not as pretty as yours.lol. I printed it at .2 with 50% infill pla.
I print ABS. .2mm layer height, .3mm first layer. Can't remember what infill this was, possibly 70%. If it's a printer part I do either 70% or the unnecessary 100%

|
Re: Folger Tech 2020 i3 Printer Kit (Official Thread) October 02, 2015 08:01PM |
Registered: 8 years ago Posts: 276 |
Probably a simple question, but I cannot find the answer to it anywhere on google. When overriding movement (issuing M220 Sxxx), what settings does that effect? I can't tell if adjusts the rates specified in the generated g-code for the object being printed or if it adjusts the feedrates in the firmware. I've been printing at 110% for the last couples weeks with no problems and would like to make it permanent in the firmware (I know I can add it to the start g-code, but would like to do it the right way)
Also, if anyone is interested in some quality filament, I can give two big thumbs up to IC3D ABS. Just used up my last bit of Hatchbox printing half of the new y-tensioner, and am printing the other half with the IC3D, I can literally see the (albeit small, Hatchbox is still good stuff) difference as its going along.
Edited 2 time(s). Last edit at 10/02/2015 09:32PM by therippa.
|
Re: Folger Tech 2020 i3 Printer Kit (Official Thread) October 03, 2015 12:01PM |
Registered: 8 years ago Posts: 57 |
Quote
therippa
Also, if anyone is interested in some quality filament, I can give two big thumbs up to IC3D ABS. Just used up my last bit of Hatchbox printing half of the new y-tensioner, and am printing the other half with the IC3D, I can literally see the (albeit small, Hatchbox is still good stuff) difference as its going along.
Worth the price difference?
|
Re: Folger Tech 2020 i3 Printer Kit (Official Thread) October 03, 2015 04:14PM |
Registered: 8 years ago Posts: 276 |
Quote
srcga
Quote
therippa
Also, if anyone is interested in some quality filament, I can give two big thumbs up to IC3D ABS. Just used up my last bit of Hatchbox printing half of the new y-tensioner, and am printing the other half with the IC3D, I can literally see the (albeit small, Hatchbox is still good stuff) difference as its going along.
Worth the price difference?
Well, it's $10 more, but a spool lasts so long that difference is negligible. Here is a photo showing the difference - both parts were sliced with the same settings, IC3D is on the left, Hatchbox is on the right...

|
Re: Folger Tech 2020 i3 Printer Kit (Official Thread) October 04, 2015 12:13AM |
Registered: 10 years ago Posts: 444 |
|
Re: Folger Tech 2020 i3 Printer Kit (Official Thread) October 04, 2015 12:27AM |
Registered: 8 years ago Posts: 276 |
Quote
RRuser
Could be that the Hatchbox just has a higher heat capacity, and if you don't heat it enough it does not flow out enough. But if you do heat it enough it will stay melted longer and give a stronger bond on the lower layer.
Or not.
I had experimented with temperatures throughout the whole spool (sooo many calibration cubes), and the pic above was as good as I could get it (and it's still very good, not complaining). If I go higher in heat, bridges start sagging, this temp is the sweet spot for me. The only variable I can think of, outside of manufacturing/recipes between the two companies, is the new filament hasn't been exposed to humidity, but the old spool has been sitting out for about two months.
Edited 2 time(s). Last edit at 10/04/2015 03:39AM by therippa.
|
Re: Folger Tech 2020 i3 Printer Kit (Official Thread) October 04, 2015 11:30AM |
Registered: 8 years ago Posts: 62 |
|
Re: Folger Tech 2020 i3 Printer Kit (Official Thread) October 04, 2015 12:23PM |
Registered: 8 years ago Posts: 367 |
Quote
Mrfus
I should be getting my printer tomorrow Monday!
I tried to read as much as I was able but after page 23 of 58 started getting lost... what are the basic tips and pointers for the assembly?
thanks!
I agree that it's hard to get to grips with such a deluge of information. When I was building mine, I kept some notes in my blog (see the link below). It's not a how-to guide, just some description of things that I noticed along the way.
As general advice, I would say:
- identify all the parts and check you have the right quantities of them before you start. Check whether any of them look poor quality (e.g. the RAMPS board and the printed parts). Ask Folger for a replacement if necessary.
- read the whole construction guide before you start, or at least read a few sections ahead.
- take it easy. If something seems difficult or the instructions aren't clear, stop, take a break and think about it.
- ask questions here, even if they've been asked before. This has been a really helpful and constructive forum.
- take special care with the electronics. Several people have blown them up and/or had difficulty getting the connections right.
- periodically remind yourself that you are having fun :-)
See my blog at [moosteria.blogspot.com].
|
Re: Folger Tech 2020 i3 Printer Kit (Official Thread) October 04, 2015 12:42PM |
Registered: 8 years ago Posts: 285 |
Quote
Mrfus
I should be getting my printer tomorrow Monday!
I tried to read as much as I was able but after page 23 of 58 started getting lost... what are the basic tips and pointers for the assembly?
thanks!
1. Make sure to plug in you stepper drives with the potentiometer away from the power connection. Plugging them in backwards will destroy them
2. Make sure to plug in your endstops with the red wire inwards. Plugging these in backwards will destroy your arduino
3. If you test the voltages on your steppers, connect the positive lead(red) from the multimeter to the pot, and the ground lead(black) to one of the ground connections on the terminal block going to the power supply. Make sure not to let the positive probes slip as it will most likely cause a short that will destroy your steppers.
4. Have a hex wrench tool ready.
5. You may need extra or longer screws than what is provided since your kit may not come with enough screws, or enough screws of proper length.
6. When installing the bed, one of the printed bearing holders may have been printed with a slight slant at the top, so be sure to install them so that the slanted piece does not cause your bed plate to slant.
7. Use therippa's marlin build instead of what FT provided on their site
8. Inspect to back of your ramps board for bridges in the soldering joints. Remove any bridges that you see.
These are just a few tips. Ask for help anytime, and have fun
|
Re: Folger Tech 2020 i3 Printer Kit (Official Thread) October 04, 2015 01:27PM |
Registered: 8 years ago Posts: 62 |
Thanks guys...
I guess I will start tomorrow afternoon with the sorting of parts and will work slowly through the week, I hope I will have all assembled by the end of the week so I can start adjusting the settings at software level on my next day off if I get a chance, I ordered one spool of Hatchbox PLA and one of ABS from amazon to start, I have some PLA for my M3D so if is needed I can reprint some parts if something goes wrong or just print upgraded parts and put them on the prusa from the start!
Mr.Fus
<------------------------------------------------->
Green M3D (Running v.1.3.6.3Beta)
FolgerTech Prusa i3 (2020 Frame)
<------------------------------------------------>
|
Re: Folger Tech 2020 i3 Printer Kit (Official Thread) October 04, 2015 02:15PM |
Registered: 8 years ago Posts: 70 |
Hi, I am new to the forum and have one of these now for 2 week. Pointers I can give, defiantly check parts count (I was short set screws and bearing), instructions need updated (They swapped out parts and change varies steps since the release of the printer).
I have some questions, 1. Does one need to tune the stepper driver? If so, how? I've been lurking here during my build looking for info when I run into issues and so far I have seen this info. 2. What a good source to get spare parts like the mega and the ramp boards? Popped the mega this morning while checking the driver boards with a meter. I questioned my board when I first got them due to bad solder connection and bent pins.
Thank you for the discussion, it's helped a lot.
|
Re: Folger Tech 2020 i3 Printer Kit (Official Thread) October 04, 2015 03:05PM |
Registered: 8 years ago Posts: 62 |
If you go to the Pololu website there is a video on how to do the math and adjust the stepper control for max performance... it's not too hard but you need to be patient and take your time to do it.
I have a couple of Arduino boards laying around, I got some from amazon and some from ebay (some of the Nano ones for $2 and free shipping!)... there are many clones on the market so quality it's a hit and miss, I have the Geeetech ones and I'm satisfied with the quality .
Edited 1 time(s). Last edit at 10/04/2015 03:08PM by Mrfus.
|
Re: Folger Tech 2020 i3 Printer Kit (Official Thread) October 04, 2015 08:09PM |
Registered: 8 years ago Posts: 4 |
After I finished my printer within 3 days a few weeks ago, I am really satisfied with this device, the results are o.k. The microprocessor-system runs without even one break-down so far. the printer is recommandable to everyone who wants a good printer for an acceptable price.
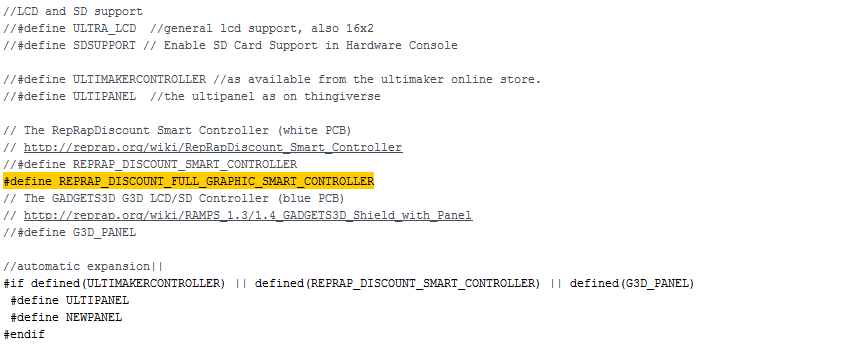
A few days ago I bought a "riprapdiscount - full graphic display" here in Austria/Europe via an e-store. I followed all hints and explanations in the web but it does not work. Supply and backlights are on, the display shows an empty matrix with one horizontal line in the middle.
according to the instructions I added the instruction line shown in the attached screenshot, the additional files were stored into the library-directory. the compilation and the upload were successfull, but there is nothing to read on the display after connecting.
can to check the screenshot - please, I am shure you will find out whats wrong - maybe there is something missing in the programm
|
Re: Folger Tech 2020 i3 Printer Kit (Official Thread) October 04, 2015 09:21PM |
Registered: 8 years ago Posts: 62 |
Quote
Mach
Quote
Mrfus
I should be getting my printer tomorrow Monday!
I tried to read as much as I was able but after page 23 of 58 started getting lost... what are the basic tips and pointers for the assembly?
thanks!
1. Make sure to plug in you stepper drives with the potentiometer away from the power connection. Plugging them in backwards will destroy them
2. Make sure to plug in your endstops with the red wire inwards. Plugging these in backwards will destroy your arduino
3. If you test the voltages on your steppers, connect the positive lead(red) from the multimeter to the pot, and the ground lead(black) to one of the ground connections on the terminal block going to the power supply. Make sure not to let the positive probes slip as it will most likely cause a short that will destroy your steppers.
4. Have a hex wrench tool ready.
5. You may need extra or longer screws than what is provided since your kit may not come with enough screws, or enough screws of proper length.
6. When installing the bed, one of the printed bearing holders may have been printed with a slight slant at the top, so be sure to install them so that the slanted piece does not cause your bed plate to slant.
7. Use therippa's marlin build instead of what FT provided on their site
8. Inspect to back of your ramps board for bridges in the soldering joints. Remove any bridges that you see.
These are just a few tips. Ask for help anytime, and have fun
What are the differences between the FT firmware and the therippa's marlin one?
|
Re: Folger Tech 2020 i3 Printer Kit (Official Thread) October 04, 2015 09:53PM |
Registered: 8 years ago Posts: 276 |
Quote
Mrfus
Quote
Mach
Quote
Mrfus
I should be getting my printer tomorrow Monday!
I tried to read as much as I was able but after page 23 of 58 started getting lost... what are the basic tips and pointers for the assembly?
thanks!
1. Make sure to plug in you stepper drives with the potentiometer away from the power connection. Plugging them in backwards will destroy them
2. Make sure to plug in your endstops with the red wire inwards. Plugging these in backwards will destroy your arduino
3. If you test the voltages on your steppers, connect the positive lead(red) from the multimeter to the pot, and the ground lead(black) to one of the ground connections on the terminal block going to the power supply. Make sure not to let the positive probes slip as it will most likely cause a short that will destroy your steppers.
4. Have a hex wrench tool ready.
5. You may need extra or longer screws than what is provided since your kit may not come with enough screws, or enough screws of proper length.
6. When installing the bed, one of the printed bearing holders may have been printed with a slight slant at the top, so be sure to install them so that the slanted piece does not cause your bed plate to slant.
7. Use therippa's marlin build instead of what FT provided on their site
8. Inspect to back of your ramps board for bridges in the soldering joints. Remove any bridges that you see.
These are just a few tips. Ask for help anytime, and have fun
What are the differences between the FT firmware and the therippa's marlin one?
I maintain a fork of the current release of the latest Marlin software with all of the Folgertech settings already merged in, so you don't have to go through all of the configuration files and do it yourself. The firmware Folgertech provides is pretty outdated, and since then, a lot of bugs have been fixed and new features have been added.
Edited 1 time(s). Last edit at 10/04/2015 09:54PM by therippa.
|
Re: Folger Tech 2020 i3 Printer Kit (Official Thread) October 04, 2015 10:12PM |
Registered: 8 years ago Posts: 541 |
For you guys building now, this little tidbit is in here somewhere and it helped me with the X stop on the right. I assume rippa has made the config.h changes but check the FT files, if you are using them, as I am. Everything works so I have dragged my feet putting his super files in my machine, Sorry rippa.
Change the following in configuration.h
#define INVERT_X_DIR true to #define INVERT_X_DIR false
#define X_HOME_DIR -1 to #define X_HOME_DIR 1
With the printer off PHYSICALLY move the x-axis stopper to the left one set of pins (this makes it so it's the x max instead of x-min)
Now if you are using rep host, you need to go to printer settings > printer shape and change home X: from min to Max.
One big glaring mistake in the build manual is putting the X stop plug in the wrong place on the board. It should be right next to the Y stop plug, not two over as the manual says. Also, for the X motor plug wires, keep them as you see. It's not a mistake to have them reversed from the others. I DID end up reversing the extruder motor plug because it was pushing the filament out the top!
The new spring design extruder has a brass feed gear that, for me, was rubbing inside the motor housing and causing it to drag and skip steps. You can read about that a few pages back too. I still haven't figured out on here how to reference specific posts.
|
Re: Folger Tech 2020 i3 Printer Kit (Official Thread) October 04, 2015 10:34PM |
Registered: 8 years ago Posts: 62 |
Thanks! I will download the files right now together with the rest of the things from the FT site.
To see how fast and active the forum is make me feel really confident that the whole assembly process it's going to be really smooth, if I have a question or I'm in doubt I can post pictures and ask questions !
!
---> I almost forget to ask you if there is a .ZIP file with the whole set?
------> hahaha... I'm such a dumb, I got the Zip file from the GitHub site downloaded, THANKS!!!
Edited 2 time(s). Last edit at 10/04/2015 10:59PM by Mrfus.
Mr.Fus
<------------------------------------------------->
Green M3D (Running v.1.3.6.3Beta)
FolgerTech Prusa i3 (2020 Frame)
<------------------------------------------------>
To see how fast and active the forum is make me feel really confident that the whole assembly process it's going to be really smooth, if I have a question or I'm in doubt I can post pictures and ask questions
!---> I almost forget to ask you if there is a .ZIP file with the whole set?
------> hahaha... I'm such a dumb, I got the Zip file from the GitHub site downloaded, THANKS!!!
Edited 2 time(s). Last edit at 10/04/2015 10:59PM by Mrfus.
Mr.Fus
<------------------------------------------------->
Green M3D (Running v.1.3.6.3Beta)
FolgerTech Prusa i3 (2020 Frame)
<------------------------------------------------>
|
Re: Folger Tech 2020 i3 Printer Kit (Official Thread) October 04, 2015 10:57PM |
Registered: 8 years ago Posts: 276 |
Quote
tjnamtiw
For you guys building now, this little tidbit is in here somewhere and it helped me with the X stop on the right. I assume rippa has made the config.h changes but check the FT files, if you are using them, as I am. Everything works so I have dragged my feet putting his super files in my machine, Sorry rippa.
Change the following in configuration.h
#define INVERT_X_DIR true to #define INVERT_X_DIR false
#define X_HOME_DIR -1 to #define X_HOME_DIR 1
With the printer off PHYSICALLY move the x-axis stopper to the left one set of pins (this makes it so it's the x max instead of x-min)
Now if you are using rep host, you need to go to printer settings > printer shape and change home X: from min to Max.
One big glaring mistake in the build manual is putting the X stop plug in the wrong place on the board. It should be right next to the Y stop plug, not two over as the manual says. Also, for the X motor plug wires, keep them as you see. It's not a mistake to have them reversed from the others. I DID end up reversing the extruder motor plug because it was pushing the filament out the top!
The new spring design extruder has a brass feed gear that, for me, was rubbing inside the motor housing and causing it to drag and skip steps. You can read about that a few pages back too. I still haven't figured out on here how to reference specific posts.
Those changes are already there on my fork
I should probably put a note up saying you should set X home to MAX in your host and move the X-endstop plug to max, but if anyone is getting to the point of loading my firmware they've probably already been made aware of this. Really though, you should consider moving the X-endstop to the left side, where it really belongs on Prusa i3 printers, as having it on the right will cause some issues if you decide to start using autolevel (which is awesome and you should do). If you get that far, you can look at the branch I use for my personal setup, which has the X-endstop on the left and inductive autoleveling - [github.com]Edited 1 time(s). Last edit at 10/04/2015 10:58PM by therippa.
|
Re: Folger Tech 2020 i3 Printer Kit (Official Thread) October 05, 2015 03:25AM |
Registered: 8 years ago Posts: 84 |
Quote
therippa
Quote
Mrfus
Quote
Mach
Quote
Mrfus
I should be getting my printer tomorrow Monday!
I tried to read as much as I was able but after page 23 of 58 started getting lost... what are the basic tips and pointers for the assembly?
thanks!
1. Make sure to plug in you stepper drives with the potentiometer away from the power connection. Plugging them in backwards will destroy them
2. Make sure to plug in your endstops with the red wire inwards. Plugging these in backwards will destroy your arduino
3. If you test the voltages on your steppers, connect the positive lead(red) from the multimeter to the pot, and the ground lead(black) to one of the ground connections on the terminal block going to the power supply. Make sure not to let the positive probes slip as it will most likely cause a short that will destroy your steppers.
4. Have a hex wrench tool ready.
5. You may need extra or longer screws than what is provided since your kit may not come with enough screws, or enough screws of proper length.
6. When installing the bed, one of the printed bearing holders may have been printed with a slight slant at the top, so be sure to install them so that the slanted piece does not cause your bed plate to slant.
7. Use therippa's marlin build instead of what FT provided on their site
8. Inspect to back of your ramps board for bridges in the soldering joints. Remove any bridges that you see.
These are just a few tips. Ask for help anytime, and have fun
What are the differences between the FT firmware and the therippa's marlin one?
I maintain a fork of the current release of the latest Marlin software with all of the Folgertech settings already merged in, so you don't have to go through all of the configuration files and do it yourself. The firmware Folgertech provides is pretty outdated, and since then, a lot of bugs have been fixed and new features have been added.
Hey have you seen the new release of marlin? Have you worked with it yet?
|
Re: Folger Tech 2020 i3 Printer Kit (Official Thread) October 05, 2015 11:50AM |
Registered: 8 years ago Posts: 276 |
Quote
built350camaro
Quote
therippa
Quote
Mrfus
Quote
Mach
Quote
Mrfus
I should be getting my printer tomorrow Monday!
I tried to read as much as I was able but after page 23 of 58 started getting lost... what are the basic tips and pointers for the assembly?
thanks!
1. Make sure to plug in you stepper drives with the potentiometer away from the power connection. Plugging them in backwards will destroy them
2. Make sure to plug in your endstops with the red wire inwards. Plugging these in backwards will destroy your arduino
3. If you test the voltages on your steppers, connect the positive lead(red) from the multimeter to the pot, and the ground lead(black) to one of the ground connections on the terminal block going to the power supply. Make sure not to let the positive probes slip as it will most likely cause a short that will destroy your steppers.
4. Have a hex wrench tool ready.
5. You may need extra or longer screws than what is provided since your kit may not come with enough screws, or enough screws of proper length.
6. When installing the bed, one of the printed bearing holders may have been printed with a slight slant at the top, so be sure to install them so that the slanted piece does not cause your bed plate to slant.
7. Use therippa's marlin build instead of what FT provided on their site
8. Inspect to back of your ramps board for bridges in the soldering joints. Remove any bridges that you see.
These are just a few tips. Ask for help anytime, and have fun
What are the differences between the FT firmware and the therippa's marlin one?
I maintain a fork of the current release of the latest Marlin software with all of the Folgertech settings already merged in, so you don't have to go through all of the configuration files and do it yourself. The firmware Folgertech provides is pretty outdated, and since then, a lot of bugs have been fixed and new features have been added.
Hey have you seen the new release of marlin? Have you worked with it yet?
It's still listed as a release candidate, I'll update when it's final.
|
Re: Folger Tech 2020 i3 Printer Kit (Official Thread) October 05, 2015 01:32PM |
Registered: 8 years ago Posts: 84 |
Awesome news on the new marlin.
I want to thank all you guys for all the info on this printer. I have mine up and running flawlessly.
Modded it a bit even. Got the Z height stands so I can print tall stuff, the adjustable z home switch that was just posted the other day makes setting home so much easier.
Prints are coming out amazing.
|
Re: Folger Tech 2020 i3 Printer Kit (Official Thread) October 05, 2015 02:53PM |
Registered: 8 years ago Posts: 285 |
Quote
mc.ro.lab
After I finished my printer within 3 days a few weeks ago, I am really satisfied with this device, the results are o.k. The microprocessor-system runs without even one break-down so far. the printer is recommandable to everyone who wants a good printer for an acceptable price.
A few days ago I bought a "riprapdiscount - full graphic display" here in Austria/Europe via an e-store. I followed all hints and explanations in the web but it does not work. Supply and backlights are on, the display shows an empty matrix with one horizontal line in the middle.
according to the instructions I added the instruction line shown in the attached screenshot, the additional files were stored into the library-directory. the compilation and the upload were successfull, but there is nothing to read on the display after connecting.
can to check the screenshot - please, I am shure you will find out whats wrong - maybe there is something missing in the programm
I tried setting up the full graphics controller on my printer, but had the same problem. I bought a second full graphics controller to make sure that it was not the controller that was causing the problem, but it still did not work. Alot of people have had the same issue with the controller, so I am pretty sure it is either a problem with the some manufacturers not making the controller according to the proper schematic, or the u8glib library not having the proper constructor. You can try testing the controller by opening one of the example files in the u8glib folder, adding ( U8GLIB_ST7920_128X64_1X u8g(23, 17, 16); ) to where it says to uncomment a constructor, and then upload that to the arduino. If is displays graphics on the screen after uploading, then it most likely has something to do with the firmware and the controller's pinout. Also, make sure that the ribbon cables are not reversed, the encoder should beep when pressed. One thing to note with the problem, even though the display is blank, the kill button and the encoder button still work when pressed, so keep that in mind if you press them when the printer is plugged in the wall, as the printer may do something unintended. Some people have gotten the display to work without a problem, but I am not quite sure how. I think the reprap smart controller (the smaller version of the full graphics controller) works properly with the current marlin, but I have yet to try it out. Also, I forgot to mention that only the newer versions of marlin support the full graphics controller. The version that FT has on their site is outdated. Here is the newer version of marlin that also has the FT config merged in. I would suggest keeping your current config.h file in a text document so that you can easily transfer your current settings over to the new firmware.
Edited 2 time(s). Last edit at 10/05/2015 07:10PM by Mach.
|
Re: Folger Tech 2020 i3 Printer Kit (Official Thread) October 05, 2015 07:21PM |
Registered: 8 years ago Posts: 3 |


Sorry, only registered users may post in this forum.