My Replikeo Prusa i3 Rework Build
Posted by Trike
|
Re: My Replikeo Prusa i3 Rework Build June 15, 2014 11:56AM |
Registered: 9 years ago Posts: 137 |
Yea no problem, I realized that when I saw size of the compiled file (over 120K vs. 56K usual) so I figured it was due to LCD and or SD cardQuote
gadget_greg
I just realized that the configuration.h file that I uploaded is configured for a Full Graphics LCD Controller. You'll need to comment out this line:
#define REPRAP_DISCOUNT_FULL_GRAPHIC_SMART_CONTROLLER
Sorry about that! My config has changed a little since then too...

Thermistor was easy fix! Like everything else it was just bad crimp job (wire was inserted too far into crimp pin). I cut it and re-crimped it (man I'm happy I bought that crimp tool a while back) and it's now registering temperature!
But hotend still not heating up!
 Must be setting somewhere in the config? HB heats up just fine, but when I set HE to 185 nothing happens...
How to you read this output anyway? (I think B is hotbed)
Quote
SENDING:M105
ok T:20.0 /185.0 B:31.7 /0.0 T0:20.0 /185.0 @:127 B@:0
|
Re: My Replikeo Prusa i3 Rework Build June 15, 2014 12:25PM |
Registered: 9 years ago Posts: 197 |
Nice job on the thermistor fix!
Are you using Pronterface? It has a very nice and easy interface and it gives you a lot of feedback. Plus you can look up the command set and issue specific commands to get whatever it is your looking for. That's how I figured out the problem with my endstops.
Are you using Pronterface? It has a very nice and easy interface and it gives you a lot of feedback. Plus you can look up the command set and issue specific commands to get whatever it is your looking for. That's how I figured out the problem with my endstops.
|
Re: My Replikeo Prusa i3 Rework Build June 15, 2014 12:46PM |
Registered: 9 years ago Posts: 137 |
Yes I'm using Pronterface (Printrun). I use it to turn on HE, but nothing happens... I'm sure I'll figure it out tho
Another question. Does rework build uses endstops for MAX or MIN? I'm having trouble with them. They seem to be either completely ignored (server tries to move even tho endstop is engaged) or when endstop is hit, I cannot move AWAY from it, but can still move toward... What are correct settings for endstops (considering my Y endstop is in the back)?
For example, I move extruder part all the to the endstop. Then I connect via Printrun. If move it X+1 it keeps trying to move past endstop. But If I try tomove to X-1 it reports error "echo:endstops hit: X:2.99". I think it thinks it's min endstop not max..
Edited 1 time(s). Last edit at 06/15/2014 12:59PM by Bratan.
|
Re: My Replikeo Prusa i3 Rework Build June 15, 2014 12:59PM |
Registered: 9 years ago Posts: 197 |
My endstops are all on MIN. The command M119 will tell you the current disposition of all of your enstops. 
If you set the Y endstop to -1 and the motor to push the tray forward/out you should be good. That said, you might get mirror image prints. If you print the first layer of the z-endstop holder you'll know.
I never was able to get a non-mirrored print with the motor and endstop in the back. Once I put the motor in the front all was right with the world...
|
Re: My Replikeo Prusa i3 Rework Build June 15, 2014 01:16PM |
Registered: 9 years ago Posts: 124 |
Guys, don´t know why you don´t want use another FW, but I had many problems with endstops, axis movement etc. with Marlin. When i switched to Repetier 99% problems were gone. Repetier is imho more user friendly with their web config tool and they have nice host (Repetier Host)
Edited 1 time(s). Last edit at 06/15/2014 01:17PM by Allnei.
Edited 1 time(s). Last edit at 06/15/2014 01:17PM by Allnei.
|
Re: My Replikeo Prusa i3 Rework Build June 15, 2014 07:48PM |
Registered: 9 years ago Posts: 197 |
|
Re: My Replikeo Prusa i3 Rework Build June 15, 2014 08:05PM |
Registered: 9 years ago Posts: 124 |
|
Re: My Replikeo Prusa i3 Rework Build June 15, 2014 08:40PM |
Registered: 9 years ago Posts: 137 |
Thanks for the info! I just installed it, it's not super easy to configure thoQuote
Allnei
Guys, don´t know why you don´t want use another FW, but I had many problems with endstops, axis movement etc. with Marlin. When i switched to Repetier 99% problems were gone. Repetier is imho more user friendly with their web config tool and they have nice host (Repetier Host)
Do you mind sharing your config file to get me started? I'll modify it as needed.Also it looks like my extruder's heating element is really busted. When I turn it on, I see LED on RAMPS lights up and I'm getting 12V on the connections, but extruder won't heat up at all
Not sure if there are any serviceable parts inside (can wires be reattached somehow?).Edited 1 time(s). Last edit at 06/15/2014 09:09PM by Bratan.
|
Re: My Replikeo Prusa i3 Rework Build June 15, 2014 09:41PM |
Registered: 9 years ago Posts: 124 |
My Repetier config is somewhere on page 9, you can upload it here [www.repetier.com] and change what you want (disable Z-probe in features and LCD in "User Interface" - do display). About heating element I don´t know. Do you get some error in host SW, or just HE don´t heat up?
Edited 2 time(s). Last edit at 06/15/2014 09:43PM by Allnei.
Edited 2 time(s). Last edit at 06/15/2014 09:43PM by Allnei.
|
Re: My Replikeo Prusa i3 Rework Build June 15, 2014 10:07PM |
Registered: 9 years ago Posts: 137 |
|
Re: My Replikeo Prusa i3 Rework Build June 16, 2014 02:32AM |
Registered: 9 years ago Posts: 197 |
|
Re: My Replikeo Prusa i3 Rework Build June 16, 2014 05:33AM |
Registered: 9 years ago Posts: 124 |
|
Re: My Replikeo Prusa i3 Rework Build June 16, 2014 09:21AM |
Registered: 9 years ago Posts: 37 |
Regarding the mirrored prints, Replikeo's configuration.h suggestions for endstop settings aren't entirely correct. Well, not for me anyways 
Link to their blog: Replikeo's Arduino Firmware Configuration
Here's their setup:
Here's mine:
Because our X-axis endstop is on the right hand side, the direction for home is MAX. Now that I have stipulated the endstop as MAX, I had to plug the X-axis endstop connector into the MAX endstop pins on the RAMPS board.
See photo attached. The first connecter is X-axis MIN, the next is X-axis MAX, then Y-axis MIN, Y-axis MAX, and Z-axis MIN, lastly Z-axis MAX.
Now for Y-axis, the endstop is at the rear of the Y-axis. Where is the Hotend nozzle relative to the heatbed when the Y-axis is homed? It's at 0, which is the lowest value, MIN. Now because the Y-axis endstop is MIN, make sure it's plugged into the first Y-axis endstop pins.
Same with Z-axis endstop, it's at the bottom which is 0, so plug in the Z-axis endstop connector into the first Z-axis endstop pins.
Once you've changed your endstop connections on the RAMPS board and compiled/uploaded into the arduino, confirm the direction of the motors. If they're reversed either turn the motor wires around or invert the motor direction in configuration.h.
Finally in Pronterface, goto settings->options and change the "X home pos." from 0 to 200. Now you will have correctly orientated prints
Link to their blog: Replikeo's Arduino Firmware Configuration
Here's their setup:
// ENDSTOP SETTINGS:
// Sets direction of endstops when homing; 1=MAX, -1=MIN
#define X_HOME_DIR -1
#define Y_HOME_DIR 1
#define Z_HOME_DIR -1
Here's mine:
// ENDSTOP SETTINGS:
// Sets direction of endstops when homing; 1=MAX, -1=MIN
#define X_HOME_DIR 1
#define Y_HOME_DIR -1
#define Z_HOME_DIR -1
Because our X-axis endstop is on the right hand side, the direction for home is MAX. Now that I have stipulated the endstop as MAX, I had to plug the X-axis endstop connector into the MAX endstop pins on the RAMPS board.
See photo attached. The first connecter is X-axis MIN, the next is X-axis MAX, then Y-axis MIN, Y-axis MAX, and Z-axis MIN, lastly Z-axis MAX.
Now for Y-axis, the endstop is at the rear of the Y-axis. Where is the Hotend nozzle relative to the heatbed when the Y-axis is homed? It's at 0, which is the lowest value, MIN. Now because the Y-axis endstop is MIN, make sure it's plugged into the first Y-axis endstop pins.
Same with Z-axis endstop, it's at the bottom which is 0, so plug in the Z-axis endstop connector into the first Z-axis endstop pins.
Once you've changed your endstop connections on the RAMPS board and compiled/uploaded into the arduino, confirm the direction of the motors. If they're reversed either turn the motor wires around or invert the motor direction in configuration.h.
Finally in Pronterface, goto settings->options and change the "X home pos." from 0 to 200. Now you will have correctly orientated prints
|
Re: My Replikeo Prusa i3 Rework Build June 16, 2014 09:41AM |
Registered: 9 years ago Posts: 137 |
Tech2C, thanks for awesome explanation!
Two questions.
In your picture you highlighted unconnected pins, this got me confused. Are you saying that if you solder another row of pins there, looking from left, first top pins are X-MIN, then Middle land Bottom pins X-MAX?
There's Y-axis 0 located? Is it all the way in the back of the printer or front (I'm guessing back).
So from what I understand printer coordinate system is like this (when looking from the front)
X-axes: Leftmost =0(MIN), Rightmost=200(MAX)
Y-axes (not sure if this correct): All way in the back = 0 (MIN), All the way forward = 200 (MAX)
Z-axes: Bottom = 0 (MIN), Top =200 (MAX)
|
Re: My Replikeo Prusa i3 Rework Build June 16, 2014 09:50AM |
Registered: 9 years ago Posts: 37 |
Brantan, that photo I found on google images as it had the connector zoomed. I didn't edit it. Disregard the missing row of pins, just look at each set of pins from left to right as normal.
The coordinate system is relative to the print surface viewed from above. From left to right is 0 to 200. Bottom to top is 0 to 200.
Edited 1 time(s). Last edit at 06/16/2014 10:32AM by Tech2C.
The coordinate system is relative to the print surface viewed from above. From left to right is 0 to 200. Bottom to top is 0 to 200.
Edited 1 time(s). Last edit at 06/16/2014 10:32AM by Tech2C.
|
Re: My Replikeo Prusa i3 Rework Build June 16, 2014 10:37AM |
Registered: 10 years ago Posts: 22 |
|
Re: My Replikeo Prusa i3 Rework Build June 16, 2014 10:41AM |
Registered: 9 years ago Posts: 197 |
|
Re: My Replikeo Prusa i3 Rework Build June 16, 2014 11:06AM |
Registered: 9 years ago Posts: 137 |
Cool got it!Quote
Tech2C
Brantan, that photo I found on google images as it had the connector zoomed. I didn't edit it. Disregard the missing row of pins, just look at each set of pins from left to right as normal.
The coordinate system is relative to the print surface viewed from above. From left to right is 0 to 200. Bottom to top is 0 to 200.
So since my Y endstop is in the back, it will become MIN since it's touched when Y is at 0 right?
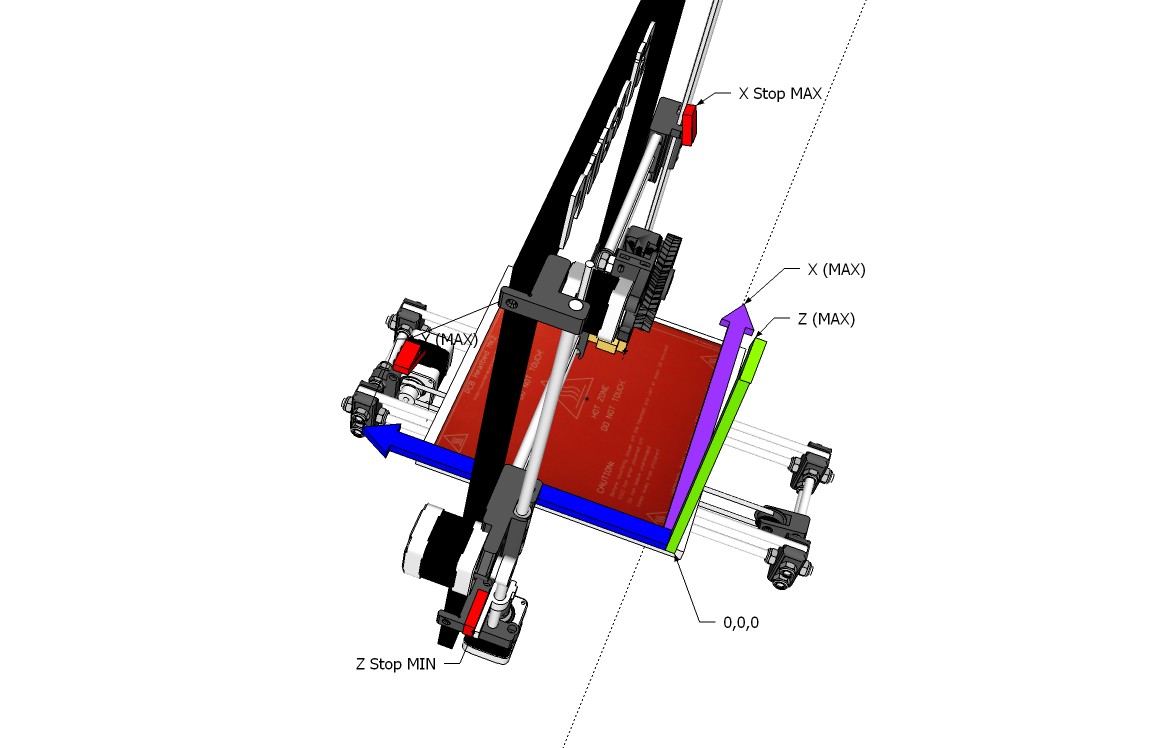
I made a quick sketchup model (img attached) with my understanding of the Prusa i3 axes and coordinates. Is it correct?
|
Re: My Replikeo Prusa i3 Rework Build June 16, 2014 02:43PM |
Registered: 9 years ago Posts: 197 |
My Home is diagonally across from where yours is.
My X-axis motor is reversed from what's pictured here (body facing 'back'). I can't see your Y-motor.
Endstops are all in the same places.
All motor wires are Green-down (closest to the power plug).
All endstops are plugged into MIN.
My config:
#define INVERT_X_DIR true
#define INVERT_Y_DIR true
#define INVERT_Z_DIR false
#define INVERT_E0_DIR true
#define X_HOME_DIR -1
#define Y_HOME_DIR -1
#define Z_HOME_DIR -1
My prints are finally oriented correctly.
I'm still using Marlin/Pronterface but I'm looking into Repetier...
|
Re: My Replikeo Prusa i3 Rework Build June 16, 2014 02:58PM |
Registered: 9 years ago Posts: 137 |
Congrads!Quote
gadget_greg
My Home is diagonally across from where yours is.
My X-axis motor is reversed from what's pictured here (body facing 'back'). I can't see your Y-motor.
Endstops are all in the same places.
All motor wires are Green-down (closest to the power plug).
All endstops are plugged into MIN.
Z_DIR false
#define INVERT_E0_DIR true
#define X_HOME_DIR -1
#define Y_HOME_DIRMy config:
#define INVERT_X_DIR true
#define INVERT_Y_DIR true
#define INVERT_ -1
#define Z_HOME_DIR -1
My prints are finally oriented correctly.
I'm still using Marlin/Pronterface but I'm looking into Repetier...
Yeah I didn't realize X motor was not oriented properly on the image. I corrected it. I also adding one that shows Y motor.
So when you move X+, your extruder part moves from right to left? Interesting...
I guess as long as it's configured correclty in firmware you can have XY origin in any of the four corners
Not making it easier for me, but oh well And freaking hot end is still not working. I contacted Replikeo, and they asked for pics. I suspect power resistor's wire got disconnected somewhere in the HE, I'm thinking of just taking it apart, although I'm a bit scared... I read resistor needs thermal grease to fit nicely in the opening and transfer heat, but I only have CPU thermal compound, maybe it will work...
|
Re: My Replikeo Prusa i3 Rework Build June 16, 2014 03:41PM |
Registered: 9 years ago Posts: 197 |
That sucks about the HE. You might be able to get one cheaply and QUICKLY on eBay. Obviously Replikeo ships via the slow boat... :/
And, yes!, my X homes on the right (MIN) and X+ moves left. I understand a bit more about the whole thing now and I probably didn't have to reverse my Y-axis but it was the easiest way to get it working properly at the time.
I went back to HE@200 and HB@60 (PLA) and my prints have improved significantly. I'm still tweaking though...
|
Re: My Replikeo Prusa i3 Rework Build June 16, 2014 05:46PM |
Registered: 9 years ago Posts: 124 |
|
Re: My Replikeo Prusa i3 Rework Build June 17, 2014 01:03AM |
Registered: 9 years ago Posts: 37 |
Quote
Cool got it!
So since my Y endstop is in the back, it will become MIN since it's touched when Y is at 0 right?
I made a quick sketchup model (img attached) with my understanding of the Prusa i3 axes and coordinates. Is it correct?
Brantan, correct - the Y-axis endstop is at the back of the Y-axis carriage so when the heatbed is homed, the Hotend nozzle is at Y coordinate 0 (the front of the heatbed) so it's MIN. As we increment the Y-axis coordinate positive, it moves from 0 all the way to 200. It seems counter-intuitive because the carriage is moving toward us but we should instead be looking at it from the Hotend nozzle point of view.
With your CAD drawings, the Y endstop should say Y stop (MIN).
Edited 1 time(s). Last edit at 06/17/2014 01:04AM by Tech2C.
|
Re: My Replikeo Prusa i3 Rework Build June 17, 2014 05:54AM |
Registered: 9 years ago Posts: 4 |
I just got my kit from Replikeo a few days ago, and I have to say that they were pretty easy to deal with. The shipping options they listed (as of June 4th) were $70 for the hellish China Post with a 60-90 day shipping time, or $130 for DHL with a 3-5 day shipping time. After the horror stories here, I sprung for DHL. I got the confirmation email about 18 hours after I'd paid, listing a 1-5 day lead time. Nothing until the fifth day, when I got an email with a China Post/17Track tracking number. I didn't pay much attention, for a few days, until it showed up as in transit in China. I emailed them, asking for clarification that my package was being shipped DHL. I got a response within a few hours saying that the package was indeed going through DHL and that they'd get me a new tracking number. The next morning, I got an email with a new tracking number for DHL, which seemed to indicate that the package had just left their location in Hong Kong. Regardless of all of that, the package was at my door in Houston, TX within 36 hours of getting their email with the DHL tracking info. Pretty impressive. Also, based on stories here, their packaging has been substantially upgraded. Everything was wrapped up tight in a pretty amazing nesting system of three separate boxes, and the final boxes containing the parts fit together with their interiors having been specifically formed to fit parts like the stepper motors. Heat bed and carbon fiber plates were double insulated with cardboard and styrofoam sheets, and the more fragile printed parts, like the fan duct, had been stuffed and wrapped with styrofoam sheeting. I guess they got the message and DHL certainly takes better care of their packages.
I got the plexiglass model which came with one extra longer threaded rod and two plexiglass a-frame type supports for the upright frame. I emailed about having an extra long rod before I realized that it fits the supports and I got a response within a few hours. This is my first 3d printer kit, so I'm sure I'll have a few questions, but this board has been extremely helpful so far. Got quick answers to the common questions like attaching endstops with the connector in the way and the M3x14 screws being too long for the motors. Thanks!
I got the plexiglass model which came with one extra longer threaded rod and two plexiglass a-frame type supports for the upright frame. I emailed about having an extra long rod before I realized that it fits the supports and I got a response within a few hours. This is my first 3d printer kit, so I'm sure I'll have a few questions, but this board has been extremely helpful so far. Got quick answers to the common questions like attaching endstops with the connector in the way and the M3x14 screws being too long for the motors. Thanks!
|
Re: My Replikeo Prusa i3 Rework Build June 17, 2014 11:35AM |
Registered: 9 years ago Posts: 197 |
|
Re: My Replikeo Prusa i3 Rework Build June 17, 2014 05:55PM |
Registered: 9 years ago Posts: 137 |
DHL shipping is well worth it! I got my printer kit in 2 weeks after ordering it! Now good luck with assembling it!
BTW Update on my story. I decided to try and repair hotend, and it was a success! As i suspected it was (again) bad connection as I was getting infinite resistance when probing with DMM. I unwrapped kapton tape and then tested continuity with DMM and found that one lead going into heating resistor was not connected. It was crimped to the wire with some kind of weird connector. I pulled wire and it came out easy. I tried soldering, but solder won't stick to power resistor's lead no matter what temperature I used or how much flux I put on it. So I went to Radioshack and got bag of butt connectors. I used it to crimp wires together with pliers. Wrapped it back with kapton tape and it's now heating up!
I also had great success with Repetier and Allnei's config file. I was able to modify it for my settings and it's homing perfectly now!
I didn't realize that Replikeo included ABS instead of PLA, so I was trying to do my first print with PLA settings and failed miserably Gonna try adjusting for ABS and see if it works.
BTW I finally got borosilicate glass, it helped a lot with leveling. I'm attaching some pictures of the Hotend repair
Edited 1 time(s). Last edit at 06/17/2014 05:58PM by Bratan.
BTW Update on my story. I decided to try and repair hotend, and it was a success! As i suspected it was (again) bad connection as I was getting infinite resistance when probing with DMM. I unwrapped kapton tape and then tested continuity with DMM and found that one lead going into heating resistor was not connected. It was crimped to the wire with some kind of weird connector. I pulled wire and it came out easy. I tried soldering, but solder won't stick to power resistor's lead no matter what temperature I used or how much flux I put on it. So I went to Radioshack and got bag of butt connectors. I used it to crimp wires together with pliers. Wrapped it back with kapton tape and it's now heating up!
I also had great success with Repetier and Allnei's config file. I was able to modify it for my settings and it's homing perfectly now!
I didn't realize that Replikeo included ABS instead of PLA, so I was trying to do my first print with PLA settings and failed miserably
Gonna try adjusting for ABS and see if it works.BTW I finally got borosilicate glass, it helped a lot with leveling. I'm attaching some pictures of the Hotend repair
Edited 1 time(s). Last edit at 06/17/2014 05:58PM by Bratan.
|
Re: My Replikeo Prusa i3 Rework Build June 18, 2014 05:25AM |
Registered: 10 years ago Posts: 14 |
Hi,
Is there a side for the heating bed PCB ?
Bratan, on your photos, the heating circuit seems to be up, despite thingiverse assembly (http://www.thingiverse.com/make:59391) and wiki (http://reprap.org/wiki/Prusa_i3_Rework_Heated_bed_assembly).
So, one side is better than another ?
Thanks
Is there a side for the heating bed PCB ?
Bratan, on your photos, the heating circuit seems to be up, despite thingiverse assembly (http://www.thingiverse.com/make:59391) and wiki (http://reprap.org/wiki/Prusa_i3_Rework_Heated_bed_assembly).
So, one side is better than another ?
Thanks
|
Re: My Replikeo Prusa i3 Rework Build June 18, 2014 06:24AM |
Registered: 9 years ago Posts: 124 |
|
Re: My Replikeo Prusa i3 Rework Build June 18, 2014 06:32AM |
Registered: 9 years ago Posts: 137 |
It's installed with heating traces up. Maybe it wrong way, but it made sense to me at the time :-)
Speaking of hotbed, does anyone have carbon fiber sheet on top of glass? Mine is, but so far abs doesn't stick to it well. I had bed temp at 110c.
Edited 1 time(s). Last edit at 06/18/2014 06:32AM by Bratan.
Speaking of hotbed, does anyone have carbon fiber sheet on top of glass? Mine is, but so far abs doesn't stick to it well. I had bed temp at 110c.
Edited 1 time(s). Last edit at 06/18/2014 06:32AM by Bratan.
|
Re: My Replikeo Prusa i3 Rework Build June 18, 2014 11:06AM |
Registered: 9 years ago Posts: 197 |
I haven't tried ABS yet but if you take the glass off and spray it with an aerosol hairspray (e.g., Aquanet Extra Super Hold) it works GREAT for PLA! Should be easy to clean too. I got two pieces of glass so I can alternate. Though I didn't opt for borosilicate glass at this point, at PLA temperatures regular window glass is working fine and it's so small the local guy gave them to me for nothing! I AM going to make him something with the printer though.
BTW, I installed my HB the same way, traces UP.
Edited 1 time(s). Last edit at 06/18/2014 11:07AM by gadget_greg.
BTW, I installed my HB the same way, traces UP.
Edited 1 time(s). Last edit at 06/18/2014 11:07AM by gadget_greg.


Sorry, only registered users may post in this forum.