Home
>
Reprappers
>
Topic
I'm Thinking Of Building My Own Large Scale 3D Printer, And I'm Looking For Some Advice On Part Choices, And Advice On Overstraining Familier Parts From Smaller Printers
Posted by dailafing
|
I'm Thinking Of Building My Own Large Scale 3D Printer, And I'm Looking For Some Advice On Part Choices, And Advice On Overstraining Familier Parts From Smaller Printers September 27, 2014 01:39PM |
Registered: 9 years ago Posts: 48 |
After realising the simplicity and potential expandability of the Printrbot Simple, I have decided to build a printer that resembles the Solidoodle design. Square/Cubic design, to avoid Y axis sag.
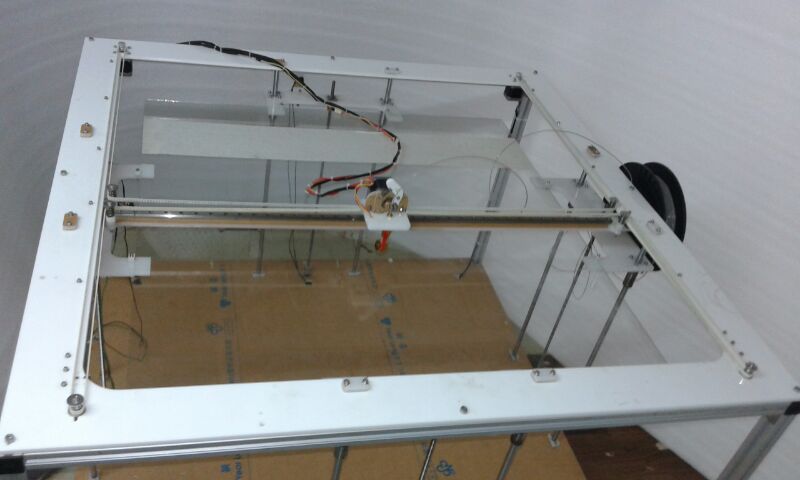
I want it to be 150x80x70cm... So pretty big... I found the attached images on google images, so this is the kind of thing I'm looking to create.
I'm wondering if I could just take a printrbot circuit board and use that with longer wires, and change the M-code to accommodate the larger print surface? In fact, I'm struggling to find a good reason why I don't just use the motors, end stops, and circuit board in this build?
In reality, its the same thing, just larger build platform, right?
So I'm looking for comments and general advice, or anything at all that can give me the heads up on what problems I may encounter along the way.
I've already arranged for the frame to be made, so the ball is already in motion! bit scared, but that's to be expected I guess...
Edited 2 time(s). Last edit at 09/27/2014 02:18PM by dailafing.
I want it to be 150x80x70cm... So pretty big... I found the attached images on google images, so this is the kind of thing I'm looking to create.
I'm wondering if I could just take a printrbot circuit board and use that with longer wires, and change the M-code to accommodate the larger print surface? In fact, I'm struggling to find a good reason why I don't just use the motors, end stops, and circuit board in this build?
In reality, its the same thing, just larger build platform, right?
So I'm looking for comments and general advice, or anything at all that can give me the heads up on what problems I may encounter along the way.
I've already arranged for the frame to be made, so the ball is already in motion! bit scared, but that's to be expected I guess...


Edited 2 time(s). Last edit at 09/27/2014 02:18PM by dailafing.
|
Re: I'm Thinking Of Building My Own Large Scale 3D Printer, And I'm Looking For Some Advice On Part Choices, And Advice On Overstraining Familier Parts From Smaller Printers September 27, 2014 07:56PM |
Registered: 10 years ago Posts: 240 |
First off let me say, while it seems easy enough to expand a design, it really, really isn't. A minor scale up is one thing but much more requires a near total rework of everything and from the sounds of it, you're much more invested in this than you realize and you have only just begun.
Yes, your controller can work to an extent, you motors... maaaaybe.
Your z axis may not quite cut it. You may need gear reduction in order to turn the screws to lift the z axis with so much weight. Your Z axis is where a LOT of your money will likely end up.
X/Y is mostly a matter of momentum, use small pulleys, and expect it to move slow and it will probably work fine. You may need gear reduced motors here too, however, I would consider a belt driven gear reduction rather than gears to remove slop. Z axis you can fudge a bit on gear slop (gravity!), but not your X/Y where you move back and forth in jerky movements.
If you need bigger motors though (certainly a possibility), your investment in all of this will rise very quickly. What starts as $1-2000 project can quickly balloon to many thousands.
Now some bad news...
Your print time with a normal nozzle will be DREADFULL,
I'm working on a lifesize Cylon bust and even after trimming and heavy hollowing, it's expected to be 160 hours on a .4mm nozzle, and that's only 30x30x45cm. Using a large nozzle helps... somewhat.
If you try doing such a large print with a normal nozzle, slicing programs don't deal well with such huge files. Cura is being tweaked after we (Griffin 3d) crashed it repeatedly (private testing is underway on a fix) while doing a full size, one piece Halo helmet. Slic3r crashed even worse.
Using a large nozzle doesn't solve everything either, SeeMeCNC ran into a problem with their Part Daddy when some software they used had a limit in place to stop extruder over-run. Trying to extrude as fast as they needed to triggered a shut down.
FIlament is also a problem on such large bots, 5pound spools are about it unless you order custom, which is $$$$. I believe Scott (Griffin co-owner) was looking at $500 per 25 pound spool. This is why many of the larger format systems, such as Part Daddy are using pellet feed. Unfortunately this complicates things a lot and slows you down. This also means MUCH more power, and stronger motors.
I'll send a note to Scott and get him to chime in, since he has a bit more experience at the scale you want.
You also may want to look into the Part Daddy, it's more than you plan on, but yours system will fall in between a desktop printer and theirs, so some problems will be shared. Also, big printers are a pain in the neck at times. My Griffin XL (1000mm tall 500mm wide) usually rides in the back of my pickup or an SUV. I hope you considered where you plan to store it.
|
Re: I'm Thinking Of Building My Own Large Scale 3D Printer, And I'm Looking For Some Advice On Part Choices, And Advice On Overstraining Familier Parts From Smaller Printers September 27, 2014 10:04PM |
Registered: 9 years ago Posts: 48 |
Hi there Sheepdog43, Thank you for a detailed post. I love these, lots to read and plenty to take in (Looks sarcastic, but I'm serious)
Ok, let firstly answer some easy ones....
Yes, I know where its gonna be stored, the sizing 1500x800x700mm is a carefully planned out size so that it fits through my front door, and will still be able to print what it is being built for.
I defiantly want to hear more about your nozzle recommendations... Since 160 hours is clearly unacceptable...
What I'm printing will be fairly hollowed out... Imagine a large rally car roll cage in one piece. Then the corners of the frame will hold very strong magnets, and then the panels of the object will align with the object I'm producing... The panels will be thin balsawood, painted, and nothing to do with this printer....
Ok, Z axis...... Yep, I understand that there is going to be a large weight here, and I'm still undecided on what I should use as a platform? any recommendations. I nearly said I'm going to use PLA, but PLA is all I know... Perhaps someone would recommend I switch since I may now be looking at a larger nozzle, different spec stuff etc...
My idea was to have 4 motors (one in each corner if the bed) wired in parallel (like the Printrbot Plus, has 2). But then I wonder how I can power those motors separately from the Printrbot main board? Because x4 power drain would undoubtedly cause a burn out on the board (I'm guessing, am I right?). So, cant motors be powered separately, but controlled from the logic board?
If not, then I'm looking at moving to a different logic board? and that's something I'd like advice on...
This project MUST happen.... I have a seriously good idea that I think could earn a lot of money, and desperately want to bring it to the world. Nothing like it exists, and producing it myself under lock and key is the only way to protect my interests at the moment....
Those who help here will be credited where desired....
Thanks again, and I look forward to your friend/colleague having a look over, and also look forward to your response to my reply.
Cheers
|
Re: I'm Thinking Of Building My Own Large Scale 3D Printer, And I'm Looking For Some Advice On Part Choices, And Advice On Overstraining Familier Parts From Smaller Printers September 28, 2014 02:07AM |
Registered: 13 years ago Posts: 70 |
Before I say anything to encourage or discourage or even point you in the right direction, I have a few questions if you would be so kind as to answer them that will help with my response.
What is your budget? (HUGE thing to consider)
Do you have a time line you are working with/on?
What is your experience?
Do you have experience with designing in any kind of CAD program? If so which one? (Solidworks, Inventor, Revit, TinkerCAD, 123D, Sketchup, etc)
What is your targeted "acceptable" print times?
What materials do you want to run?
Do you need a heated bed?
Do you have any experience as a machinist? If no, do you have the ability to draft plans to give to a machinist?
Is the 1500 x 800 x 700 the build volume or the machine foot print?
Which large scale machines have you researched?
If you can answer most of these then I can help with some advice as someone who has designed several big machines and build 2 of them. Some of those questions will help simply because they need to be answered before you start to act.
Also, forget using NEMA 17 anything. Just flat out forget it. I tried it in my stubbornness and if I had to do it over again I would swap everything to NEMA 23's. If you look closely in your first image as well, at the bottom right of the machine they are using double stack NEMA 23's to drive the gantry up and down.
|
Re: I'm Thinking Of Building My Own Large Scale 3D Printer, And I'm Looking For Some Advice On Part Choices, And Advice On Overstraining Familier Parts From Smaller Printers September 28, 2014 06:31AM |
Registered: 11 years ago Posts: 203 |
|
Re: I'm Thinking Of Building My Own Large Scale 3D Printer, And I'm Looking For Some Advice On Part Choices, And Advice On Overstraining Familier Parts From Smaller Printers September 28, 2014 07:28AM |
Registered: 13 years ago Posts: 70 |
|
Re: I'm Thinking Of Building My Own Large Scale 3D Printer, And I'm Looking For Some Advice On Part Choices, And Advice On Overstraining Familier Parts From Smaller Printers September 28, 2014 09:59AM |
Registered: 11 years ago Posts: 203 |
I'm not saying it wasn't heavy but their planning didn't seem to be very good as they appear to have tried to stand it up in several places from the commentary before finally getting it to go, and as someone in the video says it's trigonometry guys or words to that effect.
For the height of it it can produce quite narrow things as well so I wonder what objects it's been targeted at building.
Ben
For the height of it it can produce quite narrow things as well so I wonder what objects it's been targeted at building.
Ben
|
Re: I'm Thinking Of Building My Own Large Scale 3D Printer, And I'm Looking For Some Advice On Part Choices, And Advice On Overstraining Familier Parts From Smaller Printers September 28, 2014 10:23AM |
Registered: 9 years ago Posts: 48 |
Quote
Iceman086
What is your budget? (HUGE thing to consider)
Do you have a time line you are working with/on?
What is your experience?
Do you have experience with designing in any kind of CAD program? If so which one? (Solidworks, Inventor, Revit, TinkerCAD, 123D, Sketchup, etc)
What is your targeted "acceptable" print times?
What materials do you want to run?
Do you need a heated bed?
Do you have any experience as a machinist? If no, do you have the ability to draft plans to give to a machinist?
Is the 1500 x 800 x 700 the build volume or the machine foot print?
Which large scale machines have you researched?
Hi there Iceman, I'm going to try and answer as best I can..... Ok, here we go....
1) Budget is £500-1k... But in reality, I'll drip feed what I can into the project as the money comes in, so I'm not too worried about budget at the moment...
2) No time line, just sooner the better. I'm not contracted for the product, so I just need to get it on the market before someone else does.
3) My hand on experience in 3d printing is simply the use of a Printrbot Simple 1405. But my online research has been thorough, and the only area I lack at the moment is firmware alterations.
4) My modelling experience started with Gmax by Discreet (back in the day), and I modelled maps of the school I attended and played death matching online, in my school (I was 12, 2000), since then I've played about with modeming with 3DS Max (Autodesk), and not with the purchase of a 3D Printer I got myself Autodesk Inventor 2015 Professional. I'm pretty confidant with the software, and if there's something I cant achieve I can find the answers on YouTube. I'm a very fast learner due to having a very mild form of autism that aids my memory, and also allows me to intensely focus on an interest, quickly absorbing as much information as possible in a very short space of time. In the day time, I am a computer Software & Hardware tech (Both mac & pc), I also build iPhone & iPad games (look up Kitty Katch), I also program Linux based call centre dialler systems with SIP/IAX trunking.
5) The dimensions are the foot print of the unit, not including the over hang of the castor wheels.
6) The research into large scale "Repraps" end with the pictures you see above, as far as I can tell a lot of people want to hold their cards to their chest since there appears to be a lot of money in building and selling these machines. I guess that's why I'm here asking you great people for some advice on the build, and component selection.
I've seen things being mentioned in the above responses that are typed in a way 'as though' I should already know what they are. Like, what is a NEMA 17/23? Yes I could google it, and probably will. But I feel over the next few days as we post to each other, and as other people in the many years to come view our discussion, it may be wise to spell a lot of stuff out. Don't go too detailed, lol... Just little things like that.
I'm really glad your asking me the right questions, I am really looking forward to hearing some thoughts soon on things like, what I should use as a platform, motors, how to power motors from a separate PSU, maybe ATX?
|
Re: I'm Thinking Of Building My Own Large Scale 3D Printer, And I'm Looking For Some Advice On Part Choices, And Advice On Overstraining Familier Parts From Smaller Printers September 28, 2014 10:58AM |
Registered: 9 years ago Posts: 9 |
Quote
dailafing
My idea was to have 4 motors (one in each corner if the bed) wired in parallel (like the Printrbot Plus, has 2). But then I wonder how I can power those motors separately from the Printrbot main board? Because x4 power drain would undoubtedly cause a burn out on the board (I'm guessing, am I right?). So, cant motors be powered separately, but controlled from the logic board?
If not, then I'm looking at moving to a different logic board? and that's something I'd like advice on...
Hi,
I don't know of how much help I would be to you, but I have built two RepRaps, the second being a vertically scaled Prusa i3 (laser cut) designed by me in autoCAD to have a 30cm Z printing ability.
About Z axis, running 4 motors of one driver in parallel won't work, although as we all know, running two is ok. Have you heard of the RUMBA board? Its a very nice printer controller with lots of functionality. It allows triple extruder, or dual Z axis drivers and dual extrusion (by using the 3rd extruder driver as a Z driver, (can be specified in the firmware)). This means, you could use 4 motors for your Z axis, by running two motors in parallel on two Z drivers. this would make your 4 Z motor idea work.
Just thought I would put that idea out there to start a discussion.
Good luck with the build
|
Re: I'm Thinking Of Building My Own Large Scale 3D Printer, And I'm Looking For Some Advice On Part Choices, And Advice On Overstraining Familier Parts From Smaller Printers September 28, 2014 11:51AM |
Registered: 10 years ago Posts: 553 |
Im currently building a ~600 x 600 x 600mm CoreXY printer. Just some notes:
-You're going to need at least double your budget. I think I've already put ~1200 USD into mine and I haven't even gotten to the z-axis yet...
-NEMA 23s all the way. I'm building mine so that when the time comes I can upgrade to double stacks by simply swapping out the motors and probably the drivers.
-For boards, I'm using a RAMPS 1.4 with DRV8825 drivers. I haven't looked into it too much, but I'd be will to bet you would be able to upgrade to industrial drivers later on.
-Don't even think of using printed parts for structural components. Just don't
-There is a pretty thorough CoreXY build thread in the CoreXY section. The guys (zeoglity or something like that) has a pretty nice design. If you like it, use it. No need to reinvent the wheel, that doesn't seem to be your goal.
-That said, you wont be able to use unsupported rods. Thankfully supported rods aren't terribly expensive when you order them from China.
-It will take at least 6 months to source, build, and commission.
That's all I can think of right now.
greghoge.com
HUGE 3D PRINTER PARTS SALE!!!
|
Re: I'm Thinking Of Building My Own Large Scale 3D Printer, And I'm Looking For Some Advice On Part Choices, And Advice On Overstraining Familier Parts From Smaller Printers September 28, 2014 03:49PM |
Registered: 9 years ago Posts: 105 |
Quote
dailafing
...
Ok, Z axis...... Yep, I understand that there is going to be a large weight here, and I'm still undecided on what I should use as a platform? any recommendations. I nearly said I'm going to use PLA, but PLA is all I know... Perhaps someone would recommend I switch since I may now be looking at a larger nozzle, different spec stuff etc...
My idea was to have 4 motors (one in each corner if the bed) wired in parallel (like the Printrbot Plus, has 2). But then I wonder how I can power those motors separately from the Printrbot main board? Because x4 power drain would undoubtedly cause a burn out on the board (I'm guessing, am I right?). So, cant motors be powered separately, but controlled from the logic board?
If not, then I'm looking at moving to a different logic board? and that's something I'd like advice on...
Cheers
You could use the controler board to run a 2 way relay. There would be a lag but I am not sure if it would be great enough to matter with a 3dPrinter.
Thank Mike
|
Re: I'm Thinking Of Building My Own Large Scale 3D Printer, And I'm Looking For Some Advice On Part Choices, And Advice On Overstraining Familier Parts From Smaller Printers September 29, 2014 03:05AM |
Registered: 13 years ago Posts: 70 |
Quote
dailafing
I'm really glad your asking me the right questions, I am really looking forward to hearing some thoughts soon on things like, what I should use as a platform, motors, how to power motors from a separate PSU, maybe ATX?
Before I continue with my comments please understand that this community is here to help, not to give you a full build out. You have to do the legwork and then ask questions. Not sure which build platform to use? Find a few online, learn what the different styles are, then come back and ask folks about the pros and cons of them. Not sure about motors? Find out what the difference between a NEMA 17 and a NEMA 23 is, then ask questions. I won't lie, when I first started getting into this community I made the same mistake but I have since learned from it. People don't want to be used like google but they are almost always willing to elaborate upon the things that you find.
That being said, your research is seriously lacking. You haven't even scratch the surface of Big 3D Printers. When I looked into building mine, El Monstro, I looked all over and started contacting people when I found their documentation lacking. The biggest thing is just being able to analyze the pictures.
There are 3 machines you should look into if you want to look at big printers. The KamerMaker, The BigRep, and The Part Daddy by SeeMeCNC. Those are 3 of the biggest FDM/FFF style machines. I worked on a machine called El Monstro for quite a while but it has fallen to the wayside in recent months due to a lack of time and funds to continue working on it.
As mentioned above, you need to reconsider your budget. Before you start buying parts consider research and see what you will need. For example, if I built a big machine from scratch I would budget it at about $2500 USD. That price comes in at that level because I know what I am doing and I know what I will need to do it. For someone who is new to 3D printing in general and wanting to jump into a big machine, I would double that to about $5000.
For driving multiple motors or even bigger motors than what your controller board is rated for, you need to use external stepper drivers. Those run between $50 USD and $250 USD for Gecko Drivers. The external stepper drivers will allow you to use larger, higher amperage motors to push heavier things around. In the case of your Z platform, you can run 4 motors off of 1 stepper driver but I would recommend doing 2 external stepper drivers for the Z and 4 motors.
You asked about power and using an ATX is something I would throw out the window. Use dedicated power supplies. They are much easier to use and provide a much higher amperage to help drive your motors. Depending on how big you go in the end you may need 2 of them in order to provide the total amperage that you need.
You will need to consider how long you want big prints to take as well. It is one of the questions you skipped over. This is important because a large scale print can take a week or more to run if you use a smaller nozzle. The KamerMaker for example uses a 2mm nozzle and has a direct pellet feed of plastic. The nozzle though is one of the most important parts of a big printer. Usually they have to be custom 1 off designs due to each machine being setup/designed differently. Look into all of the nozzles out there and which ones are used for the big machines that are out there. The Part Daddy for example uses a piece of pipe with band heaters around it while the BigRep uses 2 heater cartridges and a large heater block. The reason for the large thermal areas on these big machine nozzles is because you are moving a MUCH larger volume of material through them which means that you need to heat more plastic faster in order to compensate for this.
The next thing I would look into is if you are planning on using rolls of filament or if you want to eventually move to a direct pellet feed for your extrusion. Using rolls of filament is going to get expensive very quickly as some big prints will fly through 2.5 Kg rolls like they are nothing.
With your foot print being 1500 x 800 x 700 your build volume will be considerably smaller in order to accommodate the internal parts. That is the reason Sheepdog was talking about needing a place to store the machine. A machine with a foot print of 1500 x 800 x 700 will likely have a build volume of about 800 x 500 x 400.
I am sure I am missing a few things.... well a ton of stuff as machine like this get out of hand really, really quickly and are a big challenge to do. Keep asking questions but please do a lot more research, there are some great machines you missed.
|
Re: I'm Thinking Of Building My Own Large Scale 3D Printer, And I'm Looking For Some Advice On Part Choices, And Advice On Overstraining Familier Parts From Smaller Printers September 29, 2014 07:52PM |
Registered: 10 years ago Posts: 240 |
I'll tackle print times and nozzle a bit more since it was asked specifically.
A smaller nozzle will let you take better control of your prints, and save plastic. If you use a 3mm nozzle, you can't very easily do a 4mm wide wall (some slicers can fake it with one or two passes). That said a 1mm nozzle will, but needs at least 4 passes to do a wall that size. A 2mm nozzle is about the largest you can go with 3mm filament, beyond that, you need custom filament or pellet feed.
You don't want 160 hour prints, I have some bad news for you... If you want large items, you are looking at days to print big items, that's just all there is to it. It doesn't matter big nozzle or not, because if you go small nozzle, it's slow due to the number of passes, and if you go big nozzle, until you get a good nozzle design, your speeds will be slow anyhow. Get it working right and yes, you can go down in print times, but your big nozzle will have some caveats regardless (quality). You may want to load your objects into a slicer and play with nozzle sizes to see what I mean (hoping you don't crash the program in the process). I think you will be disappointed in what you find regarding times and nozzles.
As Iceman kind of touched on (yes, he only scratched the surface on that discussion!), nozzles are kind of a big deal, and he was talking generally. You can't exactly call up Hotends.com and request a 4mm nozzle. Nozzles can take a TON of engineering. We have been talking to several hot end manufacturers lately, and even started on our own design. Printer motion mechanical and electrical, nozzles are both of those plus hydraulic and thermodynamic as well. You can sort of fudge your way through to some extent, but it's not nuts and bolts. The original J-head has gone through over 12 different releases, and these are just the ones released for sale. They are an art unto themselves. Needless to say, you can spend more time on your hot end than the printer itself. Since you need larger, a plastics extrusion nozzle may get you started, just adapt this to a custom machined body with a teflon liner (for filament) or put a Lyman extruder behind it. Either way, you need some serious power to power it and both are much, much easier said than done. If you do the Lyman, it will be more than Ramps can handle, meaning you will need a relay or a step up on that as well.
Unfortunately, I probably just spent an easy $700 of your money right there and still no idea how well it will work. Big machines equal cubic dollars. As Iceman said, being your first self build, expect twice as much. Your first big build as well, double it again. Like him, I can see you breaching 5k USD before you are happy. It stinks, but that's the reality of what you are doing.
On your Z axis, honestly, I'm not sure. I will default to Iceman's judgment here. I'm a delta person, and while I have partly converted him to deltas, he is who I go to for cartesian advice on parts I'm unsure of, and z axis for the H-bot I was looking at was one particular place I was stumped on. There's just no cheap way to do it. I would expect at bare minimum several hundred for your Z axis, probably closer to $1000.
See how the money is adding up? It only gets worse when things don't work how you expect, and things WILL go wrong/not work how you like. I went through 3 power supplies on my Rostock, two heated beds, two pieces of glass, 3 hot ends... Most of that in the first few months. My $700 printer had $1200 in it before I was happy with it. On the other hand, I built my first Griffin OS for $550 because I learned so much on the Rostock.
As for why no one is describing what they are doing, it's not industry secrets, it's pretty simple really. It's the same reason Reprap documentation stinks, people are too busy using their machines to document what they did. If you can find ways to contact them, they will often give you a brief rundown, but they won't give you everything. They don't want to do your homework. I'm not saying you can't do this, but it's not a small thread or a few posts worth of info you need. Scaling up like this is more like a multi month magazine article or a small book. Lots of theory, ideas, changes, etc... What works for one person, won't always work for you. The documentation stinks because in Open Source, documentation is secondary at best and it takes a while before you find someone willing to bother.
This brings up something you may really want to consider.
Build a smaller Reprap, or a smaller version of what you want first, then build your big one. A thousand now can save you double that later. This gets you used to designing and understanding how and what will effect what, without the cubic dollars spent on larger parts later. Remember, this isn't like designing a single part, you are designing multiple parts, that need to work together with a high degree of accuracy. Printers are deceptively simple.
RE: Part Daddy...
It's partly built because they could and it got them a lot of publicity. They didn't really seem to have an idea of what to do with it, it was just of those “why not” type of projects. Sometimes it's better to ask why not, rather than why. I personally I like to think they were just scared that our XL would have been the biggest printer at the show, but I could be wrong. HAHA.
Anyhow, your idea of modularity goes back to why I think you need to build a smaller scale printer first. In their case, the printer can't be modular because two piece rails would create printing errors. In their warehouse it was the first time putting it up. When things don't go as planned on your PrintRbot, it's easy to dismiss, when things go wrong erecting an 800 pound printer/object, people get seriously hurt. You take your time and try and be safe about it, even if it means trying a few different things before that happens.
|
Re: I'm Thinking Of Building My Own Large Scale 3D Printer, And I'm Looking For Some Advice On Part Choices, And Advice On Overstraining Familier Parts From Smaller Printers September 29, 2014 08:13PM |
Registered: 10 years ago Posts: 553 |
Quote
dailafing
What I'm printing will be fairly hollowed out... Imagine a large rally car roll cage in one piece. Then the corners of the frame will hold very strong magnets, and then the panels of the object will align with the object I'm producing... The panels will be thin balsawood, painted, and nothing to do with this printer....
Are you actually trying to print out a rally car cage? What is going to be the final material your object is made out of? plastic? metal?
If your final product is supposed to have vastly different properties and requirements than a 3d printed part, I would highly suggest looking at other methods of prototyping.
greghoge.com
HUGE 3D PRINTER PARTS SALE!!!
|
Re: I'm Thinking Of Building My Own Large Scale 3D Printer, And I'm Looking For Some Advice On Part Choices, And Advice On Overstraining Familier Parts From Smaller Printers October 16, 2014 12:43AM |
Registered: 9 years ago Posts: 48 |
Hello everyone!
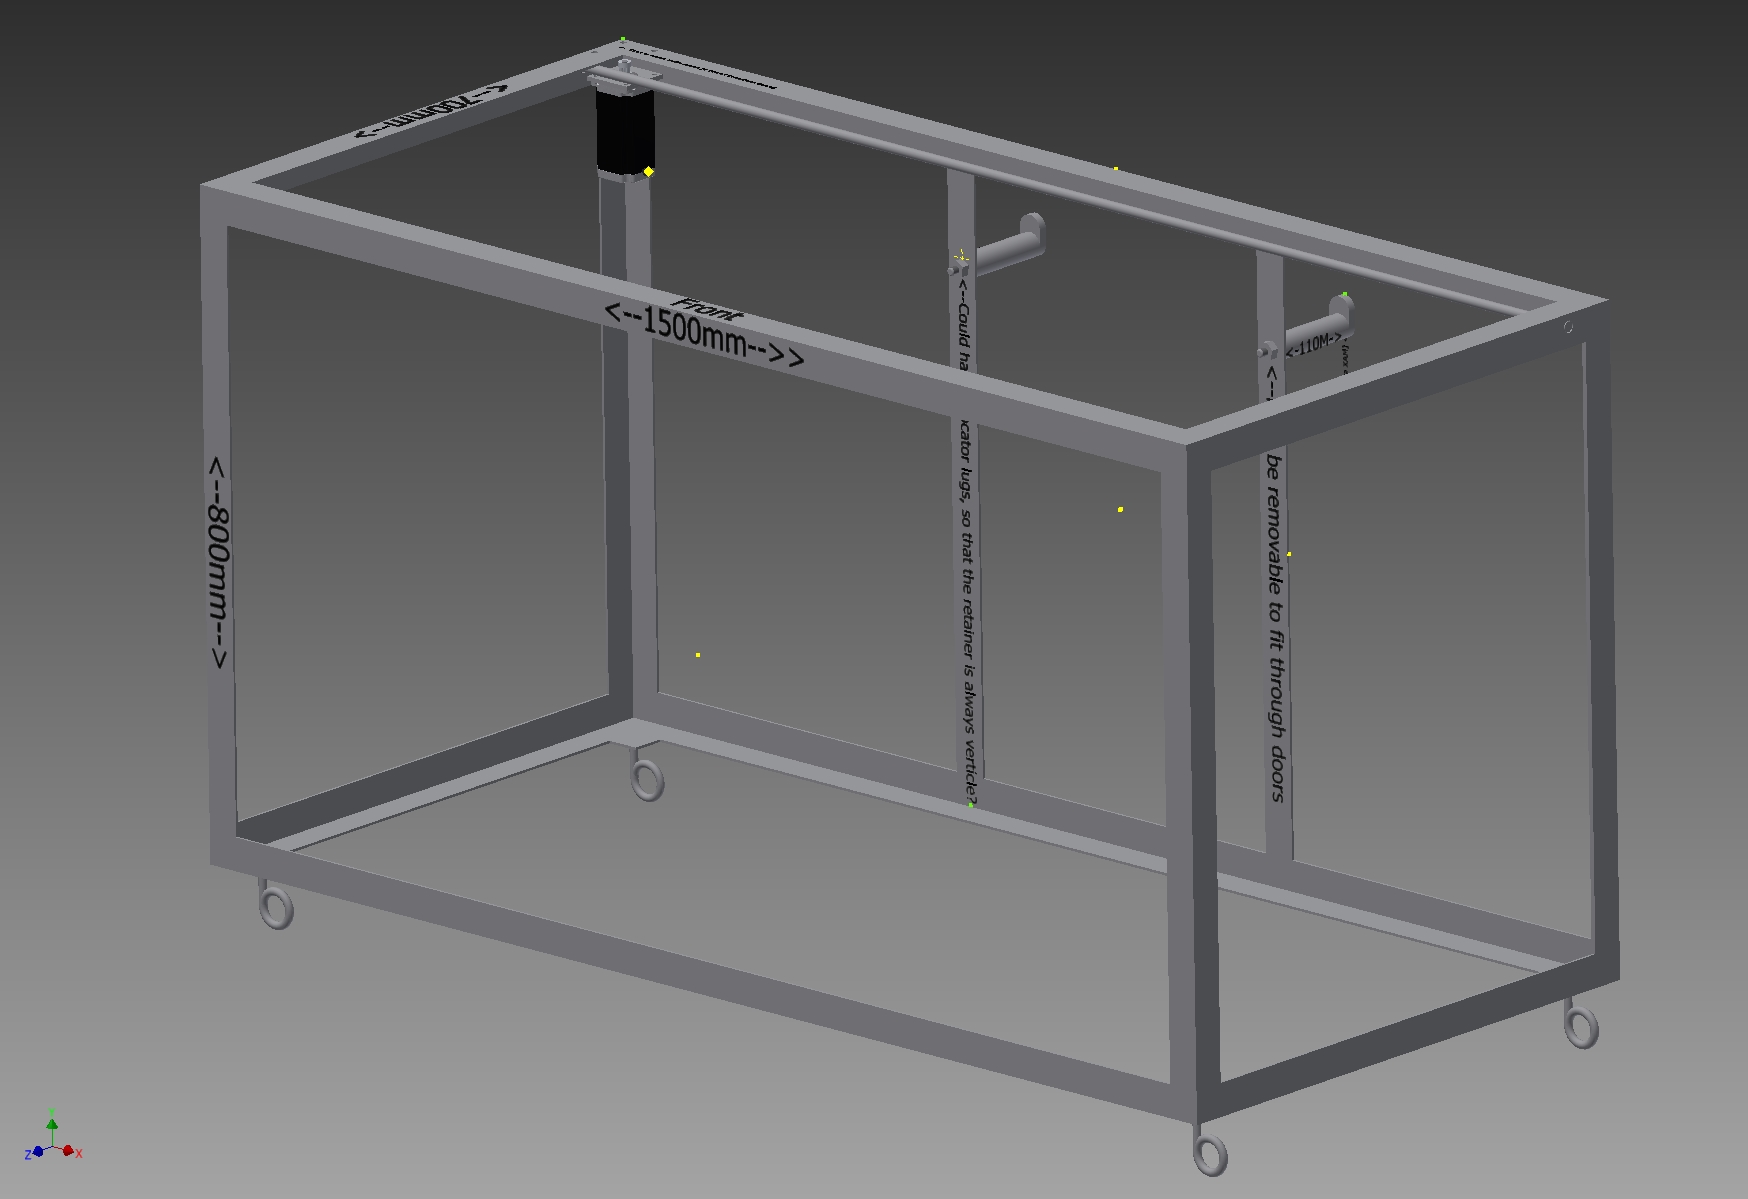
I thought I'd pop back for an update. The picture attached is the frame in construction. Closest to camera you'll see the squares that will hold the castor wheels.
Previous to this post I've seen that my questions have been quite broad, and I've understandable been getting complex answers (which is great because it makes me go away and research)
My current hurdle is choosing the correct electronics.
My current hands on experience is with a Printrbot Simple 1405.
I've read that these Revision D Printrbot boards are not supplying as much power as they should be to the stock NEMA 17's, and they are in fact capable of much more.
With that in mind, and when I look at the bigger picture, I see that since my carrage will most likely be duel Bowden, and it will be incredibly light in comparison to the demands on the Printrbot 1405.
The only real demand will be upon the Z axis which will be duel direct drive Acme setup, with one motor on either end of the glass sheet. I'm thinking these should be high torque motors of some kind?
So with the above in mind, my question is, what motors should I use to get high speed XY, and high torque Z (But as fast as possible), and should I risk the Printrboard D, or would it surly burn out?
If you think I should use a different board, for me that's a whole new can of worms... I've no idea where to begin on choosing one, and/or separate power supply. Totally confused me.
I look forward to your replies, and continued enthusiasm in to this project.
Thanks
Edited 1 time(s). Last edit at 10/16/2014 12:44AM by dailafing.
I thought I'd pop back for an update. The picture attached is the frame in construction. Closest to camera you'll see the squares that will hold the castor wheels.
Previous to this post I've seen that my questions have been quite broad, and I've understandable been getting complex answers (which is great because it makes me go away and research)
My current hurdle is choosing the correct electronics.
My current hands on experience is with a Printrbot Simple 1405.
I've read that these Revision D Printrbot boards are not supplying as much power as they should be to the stock NEMA 17's, and they are in fact capable of much more.
With that in mind, and when I look at the bigger picture, I see that since my carrage will most likely be duel Bowden, and it will be incredibly light in comparison to the demands on the Printrbot 1405.
The only real demand will be upon the Z axis which will be duel direct drive Acme setup, with one motor on either end of the glass sheet. I'm thinking these should be high torque motors of some kind?
So with the above in mind, my question is, what motors should I use to get high speed XY, and high torque Z (But as fast as possible), and should I risk the Printrboard D, or would it surly burn out?
If you think I should use a different board, for me that's a whole new can of worms... I've no idea where to begin on choosing one, and/or separate power supply. Totally confused me.
I look forward to your replies, and continued enthusiasm in to this project.
Thanks

Edited 1 time(s). Last edit at 10/16/2014 12:44AM by dailafing.
|
Re: I'm Thinking Of Building My Own Large Scale 3D Printer, And I'm Looking For Some Advice On Part Choices, And Advice On Overstraining Familier Parts From Smaller Printers October 19, 2014 12:17AM |
Registered: 9 years ago Posts: 48 |
I couldn't seem to find my own post for a second? I had to manually search my name, so I'm concerned nobody has seen this yet hence no replies.
I even went to my control Center and couldn't find it under the posts I have subscribed to, and I couldn't find the button to view my own posts? Peculiar...
If anyone has any advice let me know as I'm eager to hear people's thoughts on my project progression...
PBS. Here's another picture...
Edited 1 time(s). Last edit at 10/19/2014 12:17AM by dailafing.
I even went to my control Center and couldn't find it under the posts I have subscribed to, and I couldn't find the button to view my own posts? Peculiar...
If anyone has any advice let me know as I'm eager to hear people's thoughts on my project progression...
PBS. Here's another picture...

Edited 1 time(s). Last edit at 10/19/2014 12:17AM by dailafing.
|
Re: I'm Thinking Of Building My Own Large Scale 3D Printer, And I'm Looking For Some Advice On Part Choices, And Advice On Overstraining Familier Parts From Smaller Printers October 19, 2014 03:24PM |
Registered: 10 years ago Posts: 553 |
|
Re: I'm Thinking Of Building My Own Large Scale 3D Printer, And I'm Looking For Some Advice On Part Choices, And Advice On Overstraining Familier Parts From Smaller Printers October 19, 2014 11:23PM |
Registered: 9 years ago Posts: 48 |
|
Re: I'm Thinking Of Building My Own Large Scale 3D Printer, And I'm Looking For Some Advice On Part Choices, And Advice On Overstraining Familier Parts From Smaller Printers October 20, 2014 09:49AM |
Registered: 10 years ago Posts: 553 |
Idk if you're planning non it but you should ad triangular beams at the corners and possible a beam in the middle to stiff it up.
greghoge.com
HUGE 3D PRINTER PARTS SALE!!!
greghoge.com
HUGE 3D PRINTER PARTS SALE!!!
|
Re: I'm Thinking Of Building My Own Large Scale 3D Printer, And I'm Looking For Some Advice On Part Choices, And Advice On Overstraining Familier Parts From Smaller Printers October 20, 2014 02:41PM |
Registered: 11 years ago Posts: 1,049 |
For electronics consider:
TinyG ---- Affordable Industrial Grade Motion Control $130
[synthetos.myshopify.com]
[github.com]
Integrated motion control system with embedded microcontroller (Atmel ATxmega192)
4 stepper motor drivers (TI DRV8818) integrated on a ~4 inch square board
Stepper drivers handle 2.5 amps per winding which will handle NEMA17 motors and most NEMA23s
Accepts Gcode from USB port and interprets it locally on the board
6-axis control (XYZ + ABC rotary axes) maps to any 4 motors
Constant jerk acceleration planning (3rd order S curves) for smooth and fast motion transitions
Very smooth step pulse generation using phase-optimized fractional-step DDA running at 50 Khz with very low jitter
Microstepping up to 1/8 (optimized DDA makes this smoother than many 1/16 implementations)
|
Re: I'm Thinking Of Building My Own Large Scale 3D Printer, And I'm Looking For Some Advice On Part Choices, And Advice On Overstraining Familier Parts From Smaller Printers October 20, 2014 02:52PM |
Registered: 9 years ago Posts: 48 |
Quote
cozmicray
For electronics consider:
TinyG ---- Affordable Industrial Grade Motion Control $130
Hi Cozmicray,
I've been doing a lot of looking at this RAMPS 1.4 after some above suggestions.
And after looking at this TinyG board, the first thing I noticed is that while it is physically smaller, it doesn't have a 5th controller that I planned to use as a 2nd extruder. and is 3 times the price.
I also have noticed that the RAMPS system is extremely cheap for what you get on paper. So perhaps I'm missing something important?
Also the site said: "If you are interested in TinyG please understand that it is still very much in development, and you will probably want to upgrade the firmware at some point in the future." Which leads me to think that its really not that tried and tested, where as this RAMPS system seems to be the way forward?
Let me be clear, I'm not disagreeing with you, but I'm asking for someone to help me understand why one is better than the other. Which should I use?
|
Re: I'm Thinking Of Building My Own Large Scale 3D Printer, And I'm Looking For Some Advice On Part Choices, And Advice On Overstraining Familier Parts From Smaller Printers October 20, 2014 05:16PM |
Registered: 10 years ago Posts: 553 |
I'd say go with RAMPS. Especially if you just want to print. There is lots of support which is really nice.
greghoge.com
HUGE 3D PRINTER PARTS SALE!!!
greghoge.com
HUGE 3D PRINTER PARTS SALE!!!
|
Re: I'm Thinking Of Building My Own Large Scale 3D Printer, And I'm Looking For Some Advice On Part Choices, And Advice On Overstraining Familier Parts From Smaller Printers October 23, 2014 05:08PM |
Registered: 9 years ago Posts: 48 |
Quote
gmh39
I'd say go with RAMPS. Especially if you just want to print. There is lots of support which is really nice.
Updates:
- I've ordered my RAMPS 1.4 kit, and went for the extra large Graphical LCD. I went for this because with my little Printrbot 1405 if I do as little as fart next to it, the USB disconnect on my PC sounds, and the printer stops a few commands after! So providing the ability to print from the SD card, keeping the system independent from a computer.
- I've decided on a name.... Cuboid
- I've started work on a CAD model, specifically IPT. This is mainly to help my welder do as much as he can before I receive it.
Questions:
- What do people think about me having chosen for the RAMPS 1.4 board?
- Looking at the attached picture, you can see I've put in the first motor. But I would like some advice on where to put the Y motor? I'm having trouble working out where I can put it other than on the track of the X carriage? I want to keep the weight down as much as I can so I can keep my vibrations low, accelerations up, and make the best use of the Bowden system.


Edited 2 time(s). Last edit at 10/23/2014 05:10PM by dailafing.
|
Re: I'm Thinking Of Building My Own Large Scale 3D Printer, And I'm Looking For Some Advice On Part Choices, And Advice On Overstraining Familier Parts From Smaller Printers October 23, 2014 10:38PM |
Registered: 11 years ago Posts: 1,049 |
What are you going to put your RAMPs on --- Mega 2560
Perhaps you should look at RAMPS FD on a Due
[reprap.org]
More compute power, acceleration, jerk algorythims long axes to manage
more output for heaters -- other things
Have you thought about Firmware (Marlin, Repetier) software (Repetier-Host)
Perhaps you should look at RAMPS FD on a Due
[reprap.org]
More compute power, acceleration, jerk algorythims long axes to manage
more output for heaters -- other things
Have you thought about Firmware (Marlin, Repetier) software (Repetier-Host)
|
Re: I'm Thinking Of Building My Own Large Scale 3D Printer, And I'm Looking For Some Advice On Part Choices, And Advice On Overstraining Familier Parts From Smaller Printers October 24, 2014 06:09AM |
Registered: 9 years ago Posts: 48 |
Quote
cozmicray
What are you going to put your RAMPs on --- Mega 2560
Perhaps you should look at RAMPS FD on a Due
[reprap.org]
More compute power, acceleration, jerk algorythims long axes to manage
more output for heaters -- other things
Have you thought about Firmware (Marlin, Repetier) software (Repetier-Host)
Hi cozmicray, my ramps board arrived this morning. To answer your question, I see that the Arduino Mega came in the kit, and I'm currently uploading the U boxing video to YouTube now. I assumed that it was only Arduino that worked with ramps because of how the pins are aligned? Ah well lol
I'll look up this RAMPS FD you speak of, since if there is a major improvement, then it would be worth me ditching this kit, put it down to experience, and enjoy the benefits of a better system.
To answer your question about firmware, From all the YouTube videos I've seen, it appears as though there is a simple way to get it running, but I'm yet to find a video that gives good instruction on exactly what to do. Any advice on where to look on setting up the RAMPS 1.4 from scratch?
|
Re: I'm Thinking Of Building My Own Large Scale 3D Printer, And I'm Looking For Some Advice On Part Choices, And Advice On Overstraining Familier Parts From Smaller Printers October 24, 2014 06:56AM |
Registered: 9 years ago Posts: 1,159 |
have a read of this thread Ramps for Due and you will not even consider Ramps-FD however there is some coverage of RADDS in there and that is a much better board IMHO.
|
Re: I'm Thinking Of Building My Own Large Scale 3D Printer, And I'm Looking For Some Advice On Part Choices, And Advice On Overstraining Familier Parts From Smaller Printers October 24, 2014 07:15AM |
Registered: 9 years ago Posts: 48 |
Quote
dougal1957
have a read of this thread Ramps for Due and you will not even consider Ramps-FD however there is some coverage of RADDS in there and that is a much better board IMHO.
Hi Dougal, I've had a little look in to RADDS as a result of your suggestion. Seems very new, and I'm not writing it off, but there's not a lot of support that I could find about it...
The biggest reason I went for RAMPS 1.4 is the large LCD screen and independent printing without a pc, since it accepts g-code from an SD card...
So if you could explain why you prefer RADDS over any of the others mentioned, it would support this thread and help me make some decisions.
Also, I am currently looking for some advice on how to set up my new RAMPS 1.4 board, its burning a hold in my workbench, and I'm dying to test it on my Printrbot 1405 Simple's components, just to see it all working...
Any objections to running a RAMPS 1.4 to turn the stock parts on a 1405 Simple?
Thanks
|
Re: I'm Thinking Of Building My Own Large Scale 3D Printer, And I'm Looking For Some Advice On Part Choices, And Advice On Overstraining Familier Parts From Smaller Printers October 24, 2014 08:27AM |
Registered: 9 years ago Posts: 48 |
This morning I've been assembling my RAMPS 1.4 via some very basic images from google. I think I've got it right...
Now I "think" the next step is to put power into it? I've got a spare generic 12V 6A adapter from my printrbot kit, I "think" this is the best option...
But I'm really hoping to find some confirmation online that I'm doing it all right...
I still cant find a tutorial style guide, and I really really hate this raprap wiki, says nothing about which way to put in the stepper controllers!!!
Would really love a link to a good set up tutorial video or site before I put power into this thing, just so I can check everything is good...
But then, I've no idea how to proceed? firmware? Do I flash the arduino or the ramps? I'm lost at that stage, and after a little search, theres nothing jumping out at me as being the one stop shop for how to treat the board with care during delicate setup...
Also: There was a loose component selotaped to the back of the RAMPS board? Not sure what to do with that? (See Pic/vid)
Video of the loose component rotating
Edited 3 time(s). Last edit at 10/24/2014 08:36AM by dailafing.
Now I "think" the next step is to put power into it? I've got a spare generic 12V 6A adapter from my printrbot kit, I "think" this is the best option...
But I'm really hoping to find some confirmation online that I'm doing it all right...
I still cant find a tutorial style guide, and I really really hate this raprap wiki, says nothing about which way to put in the stepper controllers!!!
Would really love a link to a good set up tutorial video or site before I put power into this thing, just so I can check everything is good...
But then, I've no idea how to proceed? firmware? Do I flash the arduino or the ramps? I'm lost at that stage, and after a little search, theres nothing jumping out at me as being the one stop shop for how to treat the board with care during delicate setup...
Also: There was a loose component selotaped to the back of the RAMPS board? Not sure what to do with that? (See Pic/vid)


Video of the loose component rotating
Edited 3 time(s). Last edit at 10/24/2014 08:36AM by dailafing.
|
Re: I'm Thinking Of Building My Own Large Scale 3D Printer, And I'm Looking For Some Advice On Part Choices, And Advice On Overstraining Familier Parts From Smaller Printers October 24, 2014 08:52AM |
Registered: 9 years ago Posts: 1,159 |
I wasn't actually saying you should go with RADDS but that the RAMPS-FD is virtually dead and the only variants available are buggy.
The Radds uses an Arduino DUE Board which is 32 bit and is much more powerfull than the Ramps1.4 setup (I Have both)
The loose component that you have is a Diode and its purpose is so the the Ramps board will deliver power to the Arduino underneath it (You will need to fit this into the board and solder it in if you want to go standalone printing without the PC Connected)
IIRC it is soldered in underneath the bottom left stepper driver that you have fitted to the board make sure you get it the right way round!!.
|
Re: I'm Thinking Of Building My Own Large Scale 3D Printer, And I'm Looking For Some Advice On Part Choices, And Advice On Overstraining Familier Parts From Smaller Printers October 24, 2014 08:56AM |
Registered: 9 years ago Posts: 48 |
Quote
dougal1957
The loose component that you have is a Diode and its purpose is so the the Ramps board will deliver power to the Arduino underneath it (You will need to fit this into the board and solder it in if you want to go standalone printing without the PC Connected)
IIRC it is soldered in underneath the bottom left stepper driver that you have fitted to the board make sure you get it the right way round!!.
Looking at the board, I see a similar component already soldered on to the board near the two yellow square things... Lol, as I type this I must sound like such a n00b haha..
Ok, where can I find some instructions on how to get this Diode installed, since yes, the intended design will be PC independent.
As for getting it the right way around, yes, that's exactly why I need instructions lol... Cant afford to be blowing stuff up!
P.S. Did you see my post where I'm asking for some kind of tutorial instructions on this setup... any advice??
Edited 1 time(s). Last edit at 10/24/2014 08:57AM by dailafing.

Sorry, only registered users may post in this forum.