Problems with X axis, and homing
Posted by Oka...czikcziks
|
Problems with X axis, and homing February 02, 2017 05:00AM |
Registered: 7 years ago Posts: 7 |
Hi guys,
I've found Ormerod 1 printer in my company and now im trying to assemble it and start working.
I was looking for similar problems as mine but nothing was the same.
First about the X axis.
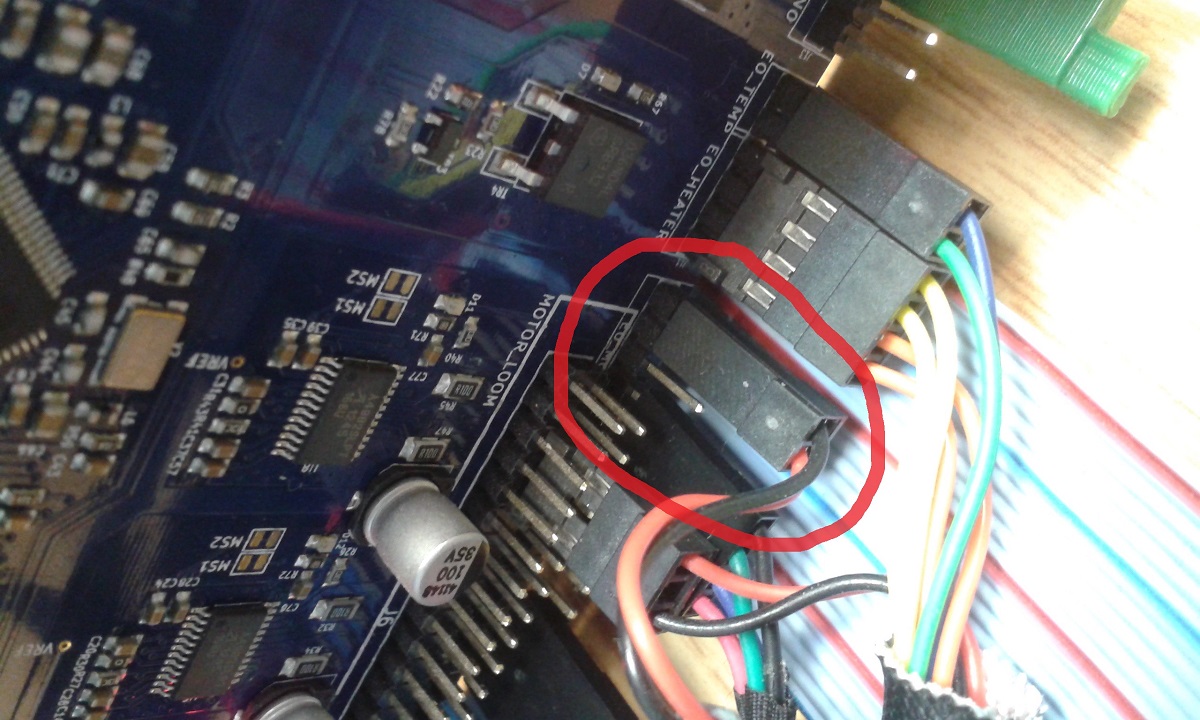
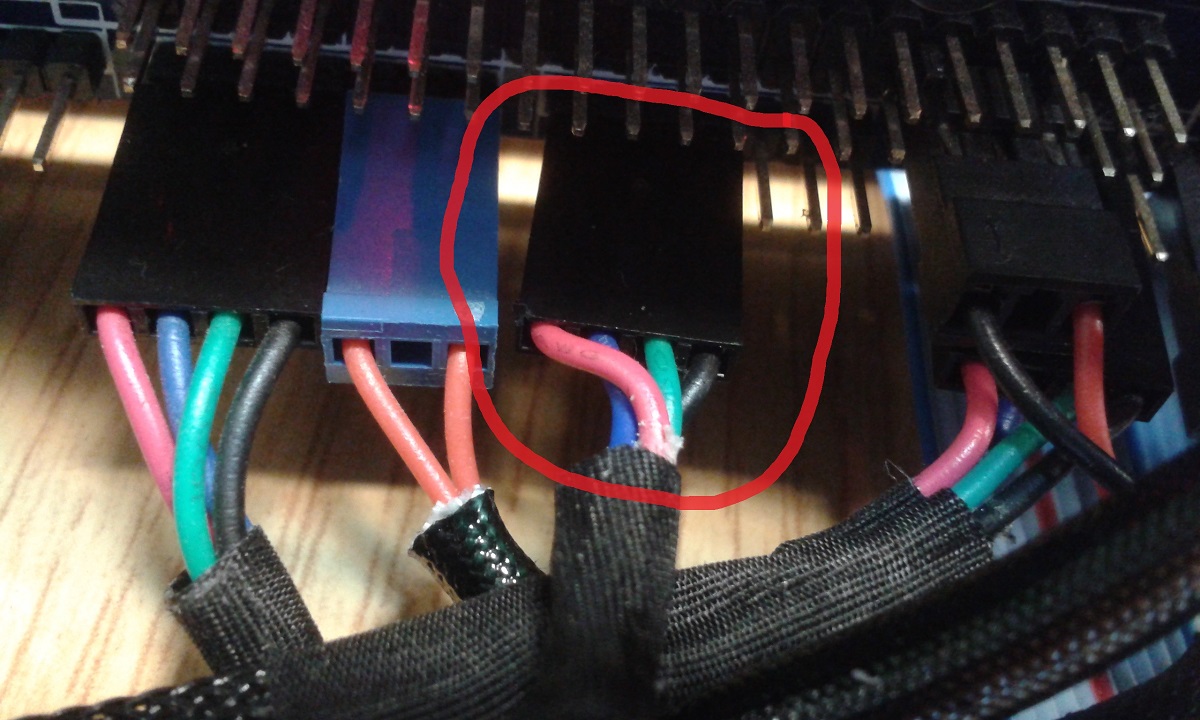
When i've assembled the wiring of the X axis motor as in the instruction it occured that when i hit G1 X100 Y0 in pronterface (or any other positive value) the head is moving towards the Z axis column. As i read the instruction is should move the other side. The wiring at the X- axis motor seems to be ok. I've changed the wiring on Duet (as you can see on photo) so now the cables are : (from left to right) RED, BLUE, GREEN, BLACK. Now it works as it should but it still concerns me why my printer is different than the others..
Homing.
X homing.
When i've type G28 X0 or push the X homing button in Pronterface the head is moving up and then about 17mm right and down (no mother where it stands), every time when i hit homing button it's the same. As i understand the instruction it should towards the Z axis column and it sould stop before it hits the end.
Z homing.
I've done everything what was in the instruction and my Probe height and threshold numbers are G31 Z2.1 P593. The sensor seems to give good values (when it's far from the table G31 is giving back about 60 and when its close its giving something about 970. When im hiting Z homing its not going the the same values. Every time im hitting Z homing its going up and then down but only few mm so every next time its 2mm higher then before.
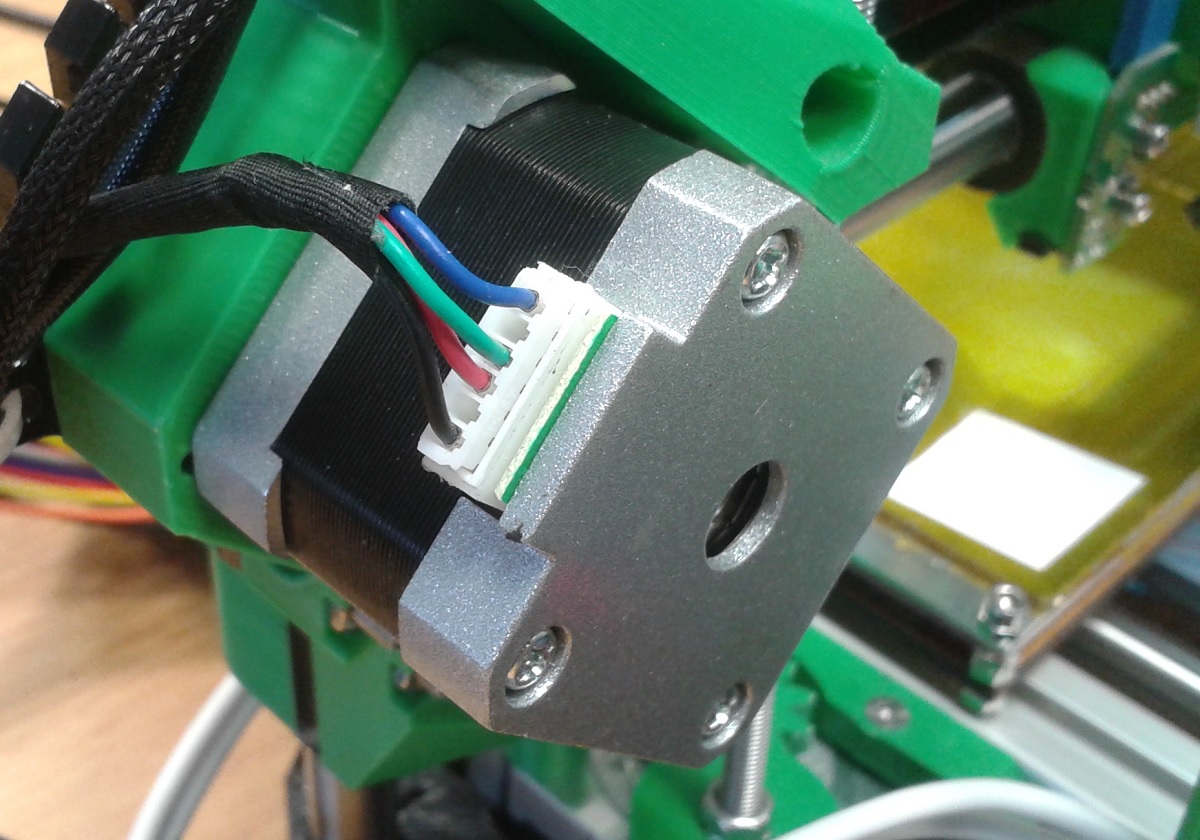
I've attached photos of wiring so you can see its ok.
Do you have some ideas what am i doing wrong? or maby there is a problem with the sensor?
I've found Ormerod 1 printer in my company and now im trying to assemble it and start working.
I was looking for similar problems as mine but nothing was the same.
First about the X axis.
When i've assembled the wiring of the X axis motor as in the instruction it occured that when i hit G1 X100 Y0 in pronterface (or any other positive value) the head is moving towards the Z axis column. As i read the instruction is should move the other side. The wiring at the X- axis motor seems to be ok. I've changed the wiring on Duet (as you can see on photo) so now the cables are : (from left to right) RED, BLUE, GREEN, BLACK. Now it works as it should but it still concerns me why my printer is different than the others..
Homing.
X homing.
When i've type G28 X0 or push the X homing button in Pronterface the head is moving up and then about 17mm right and down (no mother where it stands), every time when i hit homing button it's the same. As i understand the instruction it should towards the Z axis column and it sould stop before it hits the end.
Z homing.
I've done everything what was in the instruction and my Probe height and threshold numbers are G31 Z2.1 P593. The sensor seems to give good values (when it's far from the table G31 is giving back about 60 and when its close its giving something about 970. When im hiting Z homing its not going the the same values. Every time im hitting Z homing its going up and then down but only few mm so every next time its 2mm higher then before.
I've attached photos of wiring so you can see its ok.
Do you have some ideas what am i doing wrong? or maby there is a problem with the sensor?
|
Re: Problems with X axis, and homing February 02, 2017 05:12AM |
Registered: 10 years ago Posts: 14,672 |
Which firmware version are you using? There have been numerous firmware changes since the Ormerod 1 was shipped, and some of them required wiring changes too, such as reversing the X motor connector.
Edited 1 time(s). Last edit at 02/02/2017 05:15AM by dc42.
Large delta printer [miscsolutions.wordpress.com], E3D tool changer, Robotdigg SCARA printer, Crane Quad and Ormerod
Disclosure: I design Duet electronics and work on RepRapFirmware, [duet3d.com].
Edited 1 time(s). Last edit at 02/02/2017 05:15AM by dc42.
Large delta printer [miscsolutions.wordpress.com], E3D tool changer, Robotdigg SCARA printer, Crane Quad and Ormerod
Disclosure: I design Duet electronics and work on RepRapFirmware, [duet3d.com].
|
Re: Problems with X axis, and homing February 02, 2017 05:28AM |
Registered: 7 years ago Posts: 7 |
|
Re: Problems with X axis, and homing February 02, 2017 05:39AM |
Registered: 10 years ago Posts: 14,672 |
That's very old firmware, however there have been no wiring changes since then so you should be able to get it working with that firmware and upgrade later.
When you upgraded the firmware, did you also upgrade the homing files on the SD card, making sure to use the Ormerod 1 files not the Ormerod 2 files?
What happens when you positiion the head 5mm or higher over one of the white tapes and send G30?
The proximity sensor on the Ormerod 1 is sensitive to background IR from incandescent lamps (especially halogen) and bright sunlight.
Edited 1 time(s). Last edit at 02/02/2017 05:40AM by dc42.
Large delta printer [miscsolutions.wordpress.com], E3D tool changer, Robotdigg SCARA printer, Crane Quad and Ormerod
Disclosure: I design Duet electronics and work on RepRapFirmware, [duet3d.com].
|
Re: Problems with X axis, and homing February 02, 2017 05:58AM |
Registered: 7 years ago Posts: 7 |
I would like to upgrade the firmware to the newest version. What is the number of it? I'll make that and make sure that files on SD card are for the same version and for Ormerod 1. I'll do it in 1 hour.
Sensor readings:
6mm - G31 - 364
15.5mm - G31 - 138
34,5mm - G31 - 79
No sunlight and only Fluorescent lamps in office
Sensor readings:
6mm - G31 - 364
15.5mm - G31 - 138
34,5mm - G31 - 79
No sunlight and only Fluorescent lamps in office
|
Re: Problems with X axis, and homing February 02, 2017 07:29AM |
Registered: 7 years ago Posts: 7 |
hmm,
I didn't find newer version of firmware than 1.09. I'm using link from this site: [reprappro.com] which directed me here: [github.com]
I didn't find newer version of firmware than 1.09. I'm using link from this site: [reprappro.com] which directed me here: [github.com]
|
Re: Problems with X axis, and homing February 02, 2017 09:37AM |
Registered: 7 years ago Posts: 7 |
|
Re: Problems with X axis, and homing February 02, 2017 11:22AM |
Registered: 10 years ago Posts: 14,672 |
I'm glad you got it working. For more recent versions of he firmware and the web interface, see [forums.reprap.org].
Large delta printer [miscsolutions.wordpress.com], E3D tool changer, Robotdigg SCARA printer, Crane Quad and Ormerod
Disclosure: I design Duet electronics and work on RepRapFirmware, [duet3d.com].
Large delta printer [miscsolutions.wordpress.com], E3D tool changer, Robotdigg SCARA printer, Crane Quad and Ormerod
Disclosure: I design Duet electronics and work on RepRapFirmware, [duet3d.com].
|
Re: Problems with X axis, and homing February 14, 2017 02:34AM |
Registered: 7 years ago Posts: 7 |
|
Re: Problems with X axis, and homing February 14, 2017 02:48AM |
Registered: 10 years ago Posts: 14,672 |
You can adjust the axis steps/mm to get the scaling right.
Large delta printer [miscsolutions.wordpress.com], E3D tool changer, Robotdigg SCARA printer, Crane Quad and Ormerod
Disclosure: I design Duet electronics and work on RepRapFirmware, [duet3d.com].
Large delta printer [miscsolutions.wordpress.com], E3D tool changer, Robotdigg SCARA printer, Crane Quad and Ormerod
Disclosure: I design Duet electronics and work on RepRapFirmware, [duet3d.com].
|
Re: Problems with X axis, and homing February 20, 2017 02:16AM |
Registered: 7 years ago Posts: 7 |
|
Re: Problems with X axis, and homing March 24, 2017 06:32AM |
Registered: 7 years ago Posts: 3 |
|
Re: Problems with X axis, and homing March 24, 2017 08:14AM |
Registered: 10 years ago Posts: 2,472 |
The sensor board will work the same, but you will probably need to adjust or modify the tab to get it the right distance from the board to trigger the sensor. Use the LED on the sensor board to get the tab in the correct position. It may be possible to simply glue a piece of stiff white cardboard onto the tab.
Meanwhile you can home the printer by hand. After power-on, just move the X & Y by hand to position the nozzle exactly over the far left corner (looking at the printer from the end of the X arm), and send the command "G92 X0 Y0" No need to be super-accurate unless you are printing something that takes up almost all the build plate. Make sure there are no homing commands in any of your G-code files.
I fitted a different Z screw which needed a modified X homing tab which I decided to design and print later. But I found it is so painless to home by hand after power-up and takes just a few seconds (quicker than homing automatically in fact), that I've been putting off fitting a tab since last year!
Dave
Sorry, only registered users may post in this forum.