Upgrade: Y-Axis Idler Bracket, adjusting twisted bars
Posted by fotomas
|
Upgrade: Y-Axis Idler Bracket, adjusting twisted bars January 21, 2015 05:06PM |
Registered: 9 years ago Posts: 191 |
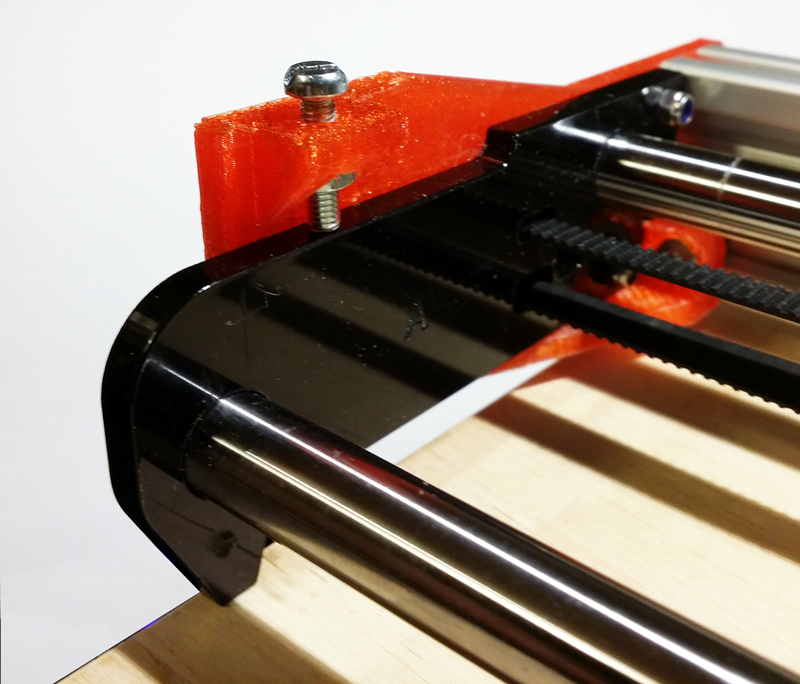
I have made an modified Y-Axis idler bracket for Ormerod 2. I helps in adjusting the twist among the Y-Axis bars.
I got this idea after struggling to get my bed leveled. Getting rid of the wist was not easy by loosening the bolts in the Y-Axis idler bracket and carefully push it. The measurements went all over the place, back and forth.
So by using this bracket I could fine tune the Y-Axis bars in to being almost perfect parallel. I also extended the bracket 5 mm in the back since my original cracked had cracked. You can almost see in the photo that it goes past the aluminium profile.
These are the G32 results settled with.
Bed equation fits points [28.0, 15.0, 0.240] [28.0, 194.0, 0.251] [196.0, 194.0, 0.230] [196.0, 15.0, 0.220]
On my Ormerod these values are within the variation of just doing two constitutive G32.
I hope may help someone else.
/Tomas
On thingiverse
Edited 1 time(s). Last edit at 01/21/2015 05:07PM by fotomas.
|
Re: Upgrade: Y-Axis Idler Bracket, adjusting twisted bars January 22, 2015 01:47AM |
Registered: 10 years ago Posts: 1,230 |
|
Re: Upgrade: Y-Axis Idler Bracket, adjusting twisted bars January 22, 2015 04:27AM |
Registered: 9 years ago Posts: 73 |
Good idea Tomas. I've been looking at my O2 and think I have a similar issue with levelling. I've modified my Y-idler bracket to have a spring loaded tensioner but may have to include a similar mod to this bracket.
I'm thinking of also making it have a base plate so that I can screw the printer down to the bench.
Does anyone know how the O2 is supposed to sit? Mine appears to just balance on the front 2 feet and the bracket under the Z axis. My Y-idler end at the rear is always 3 or 4 mm off the deck, Only just noticed this as the machine was previously sat on a piece of corrugated card which took up the slack. Now not sure if it is supposed to only balance on 3 points or not?
|
Re: Upgrade: Y-Axis Idler Bracket, adjusting twisted bars January 22, 2015 04:50AM |
Registered: 9 years ago Posts: 191 |
It is my understanding that it is supposed to rest on three points. That way it will always stand firmly even on uneven surfaces.
Modifying to include the spring loaded tension would be a nice mod to my mod
Bolting down the printer would have its benefits on keeping its calibration better but it would not work that well with my mod. The idler bracket has to be able to move and the weight of the printer is the adjustment screws counter force (during the calibration/adjustment). But that can surely be solved with another design.
|
Re: Upgrade: Y-Axis Idler Bracket, adjusting twisted bars January 22, 2015 05:56AM |
Registered: 9 years ago Posts: 73 |
I assumed that was the case, 3 points always being level. My O2 is in bits everywhere at the minute and I can't decide how best to screw it down to the bench. Think I may just modify the bottom Z bracket and make some restraint brackets for the front 2 feet. I can find the stl file for my sprung idler bracket later if you want. It's not very pretty but it works. I also have the SketchUp file if that is easier for you to remodel?
Edited 2 time(s). Last edit at 01/22/2015 06:13AM by jsv555.

Edited 2 time(s). Last edit at 01/22/2015 06:13AM by jsv555.
|
Re: Upgrade: Y-Axis Idler Bracket, adjusting twisted bars January 22, 2015 06:14AM |
Registered: 9 years ago Posts: 191 |
|
Re: Upgrade: Y-Axis Idler Bracket, adjusting twisted bars January 22, 2015 06:16AM |
Registered: 9 years ago Posts: 73 |
|
Re: Upgrade: Y-Axis Idler Bracket, adjusting twisted bars January 22, 2015 06:59AM |
Registered: 9 years ago Posts: 32 |
Nice idea, I have had the same problems on my O2. Ended up printing two 4mm high cubes as support for the extruded alu in y direction and a 0.5 mm high shim as support that goes under the x-axis rod. I then strapped the front y-axis rod and the extruded alu with zip ties to a 16 mm MDF piece. Your solution was a bit more elegant 
|
Re: Upgrade: Y-Axis Idler Bracket, adjusting twisted bars January 23, 2015 03:05AM |
Registered: 9 years ago Posts: 395 |
|
Re: Upgrade: Y-Axis Idler Bracket, adjusting twisted bars January 23, 2015 07:42AM |
Registered: 10 years ago Posts: 780 |
I have a modified version for the ormerod 1 if anybody is interested.
appjaws-Y-Idler-Modified - Jan 2015 - based on a modified part from:-
johneato Y belt tension adjustment and
fotomas Y Idler Bracket - adjustment of twisted bars
Thanks to both johneato and fotomas for the designs
You will need to print appjaws-Y-Idler-Modified.stl with support for the adjusting boss overhang.
You will also need to print y-idler-bracket2.stl which is the tension adjustment fitment for the Y belt.
Have fun
appjaws - Core XYUV Duet Ethernet Duex5
firmware 3.1.1 Web Interface 3.1.1
Ormerod 1-converted to laser engraver, Duet wifi
OpenSCAD version 2020.07
slic3r-1.3.0, Simplify3D 4.1.2, Cura-4.4.1
appjaws-Y-Idler-Modified - Jan 2015 - based on a modified part from:-
johneato Y belt tension adjustment and
fotomas Y Idler Bracket - adjustment of twisted bars
Thanks to both johneato and fotomas for the designs


You will need to print appjaws-Y-Idler-Modified.stl with support for the adjusting boss overhang.
You will also need to print y-idler-bracket2.stl which is the tension adjustment fitment for the Y belt.
Have fun
appjaws - Core XYUV Duet Ethernet Duex5
firmware 3.1.1 Web Interface 3.1.1
Ormerod 1-converted to laser engraver, Duet wifi
OpenSCAD version 2020.07
slic3r-1.3.0, Simplify3D 4.1.2, Cura-4.4.1
|
Re: Upgrade: Y-Axis Idler Bracket, adjusting twisted bars January 23, 2015 08:03AM |
Registered: 9 years ago Posts: 191 |
|
Re: Upgrade: Y-Axis Idler Bracket, adjusting twisted bars January 23, 2015 10:32AM |
Registered: 9 years ago Posts: 191 |
Here is the merge between my design and jsv555 design.
I have also extended it for reinforcement around the big bolts.
I have also extended it for reinforcement around the big bolts.

|
Re: Upgrade: Y-Axis Idler Bracket, adjusting twisted bars January 29, 2015 07:48AM |
Registered: 9 years ago Posts: 37 |
|
Re: Upgrade: Y-Axis Idler Bracket, adjusting twisted bars January 29, 2015 08:44AM |
Registered: 9 years ago Posts: 73 |
Hi Mick
I never got around to writing any instructions, the mod was basically just a test that some people have picked up on.
In short you will need an additional bearing, the same as the original idler bearing. I left the original in place to make sure the belt was still running in-line. You will also need a longer belt. I think it is about 60-75mm longer but not near my printer so can't check at the minute. All the nuts and bolts are M3 afraid again I can't remember the lengths off the top of my head. I chucked mine together with whatever I had laying about (as you can probably tell from the photo). The tricky bit is findingthe right spring. I found some on ebay where a chap was clearing out his shed. As far as I can remember they are about 3-4kg strength (they are quite strong) expansion springs and are about 25mm long but don't quote me on that. The bracket was designed to suit the springs not the other way around. I've still got about 90 left so if you are in the UK / Europe I can stick some in the post for you if you want to PM me your address. Sorry I can't be more accurate at the minute. I can probably give you a better answer when I am near my printer
Jon
Edited 1 time(s). Last edit at 01/29/2015 09:12AM by jsv555.
|
Re: Upgrade: Y-Axis Idler Bracket, adjusting twisted bars January 29, 2015 10:51AM |
Registered: 9 years ago Posts: 191 |
After running with my design for some prints I have a tip.
The black part is bolted to the printed Y-idler bracket with two M3 bolts.
It seems these can not keep everythin in place by them self. In the original design the black part rests against the aluminum profile and in my design it rests against the adjustment bolt. If the bolt moves the black part moves.
So... I recommend using a nylon lock but or an extra nut locking the bolt in place.
If you are trying this design please share your experiences.
/Tomas
|
Re: Upgrade: Y-Axis Idler Bracket, adjusting twisted bars February 08, 2015 04:37PM |
Registered: 10 years ago Posts: 47 |
Quote
appjaws1
I have a modified version for the ormerod 1 if anybody is interested.
appjaws-Y-Idler-Modified - Jan 2015 - based on a modified part from:-
johneato Y belt tension adjustment and
fotomas Y Idler Bracket - adjustment of twisted bars
Thanks to both johneato and fotomas for the designs
[attachment 47726 appjaws-Y-Idler-Modified-1.png]
[attachment 47727 appjaws-Y-Idler-Modified-2.png]
You will need to print appjaws-Y-Idler-Modified.stl with support for the adjusting boss overhang.
You will also need to print y-idler-bracket2.stl which is the tension adjustment fitment for the Y belt.
Have fun
I have checked appjaws-Y-Idler-Modified.stl, It seems to be to high, it don't fit under the bed... It's for O1? I don't understand...
|
Re: Upgrade: Y-Axis Idler Bracket, adjusting twisted bars February 09, 2015 04:09AM |
Registered: 10 years ago Posts: 780 |
You are quite right. I thought I had published my amended version.
I will post an update as soon as I can get to my computer.
Sorry for the error.
edit This version is no good for the ormerod 1, new ormerod 1 version out soon.
Edited 1 time(s). Last edit at 02/10/2015 11:42AM by appjaws1.
appjaws - Core XYUV Duet Ethernet Duex5
firmware 3.1.1 Web Interface 3.1.1
Ormerod 1-converted to laser engraver, Duet wifi
OpenSCAD version 2020.07
slic3r-1.3.0, Simplify3D 4.1.2, Cura-4.4.1
|
Re: Upgrade: Y-Axis Idler Bracket, adjusting twisted bars February 09, 2015 06:38AM |
Registered: 10 years ago Posts: 780 |
Deleted, new version for the ormerod 1 out soon
Edited 1 time(s). Last edit at 02/10/2015 11:40AM by appjaws1.
appjaws - Core XYUV Duet Ethernet Duex5
firmware 3.1.1 Web Interface 3.1.1
Ormerod 1-converted to laser engraver, Duet wifi
OpenSCAD version 2020.07
slic3r-1.3.0, Simplify3D 4.1.2, Cura-4.4.1
Edited 1 time(s). Last edit at 02/10/2015 11:40AM by appjaws1.
appjaws - Core XYUV Duet Ethernet Duex5
firmware 3.1.1 Web Interface 3.1.1
Ormerod 1-converted to laser engraver, Duet wifi
OpenSCAD version 2020.07
slic3r-1.3.0, Simplify3D 4.1.2, Cura-4.4.1
Sorry, only registered users may post in this forum.