Ormerod Building Tips
Posted by KimBrown
|
Ormerod Building Tips January 17, 2014 05:26AM |
Registered: 10 years ago Posts: 859 |
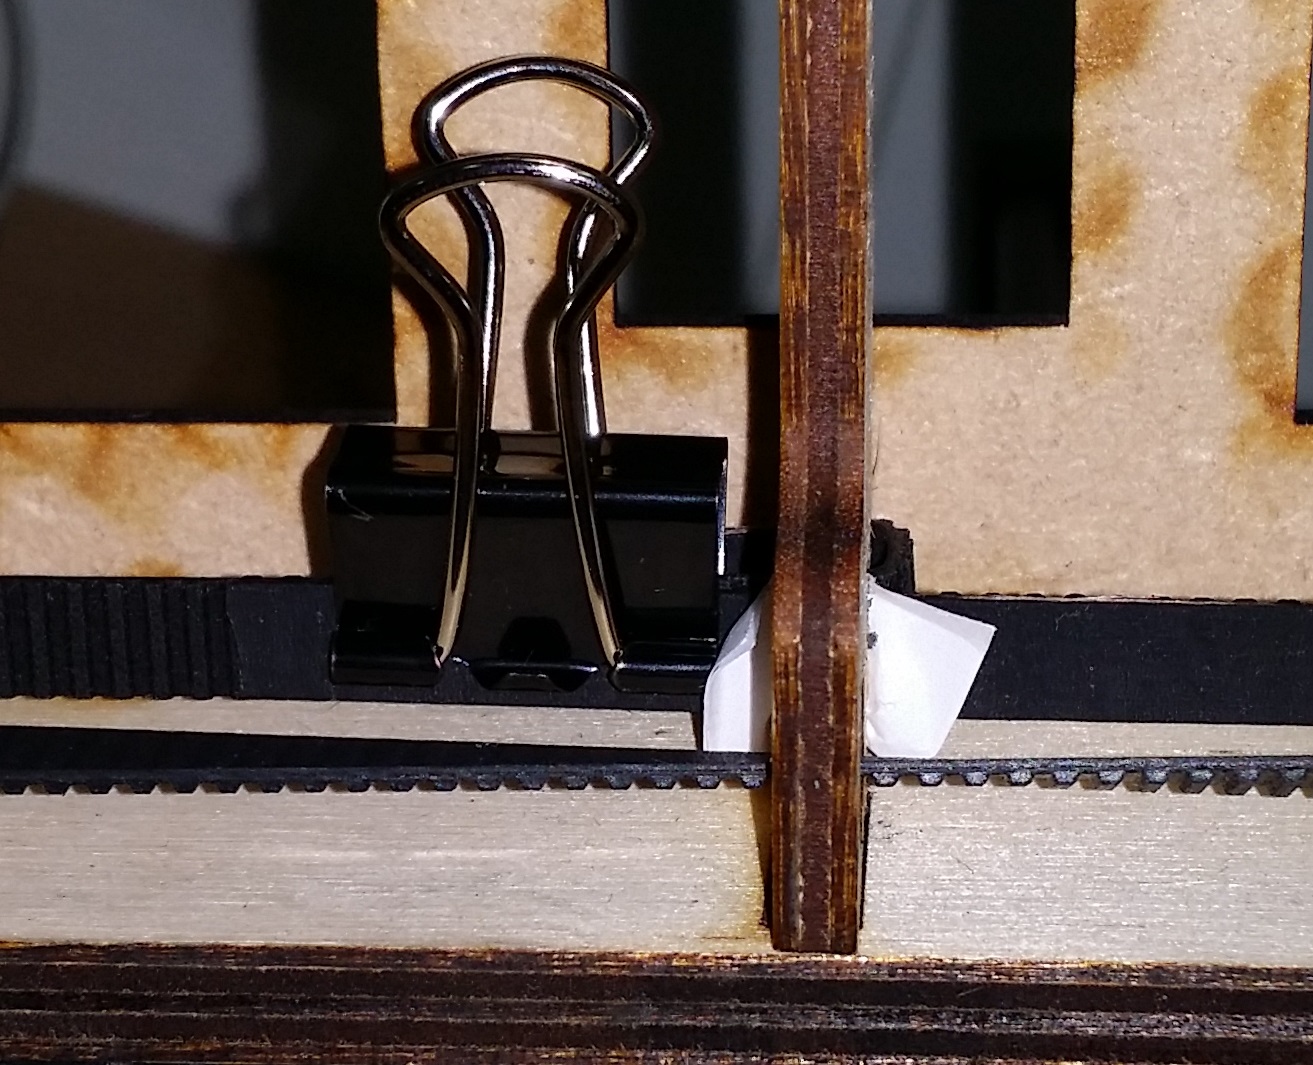
Hi guys, yesterday I started building my Ormerod. Now the build phase is a little bit different from the norm as I'm on a ship and building the printer here in my cabin. Looking around the forum I saw that a few people had issues with the 'Y' drive belt, which is as far as I've got at the moment. As we're rolling about alittle at the moment, tensioning the belt was getting tricky, so I hit on the idea of using a foldback clip. Simple and affective.
In fact, I might nip up shop when we get back alongside and buy some more and keep a clip on the belt (minus it's handles maybe).
This really is a first class kit. I can't fault it so far.
Kim..
In fact, I might nip up shop when we get back alongside and buy some more and keep a clip on the belt (minus it's handles maybe).
This really is a first class kit. I can't fault it so far.
Kim..
|
Re: Ormerod Building Tips January 17, 2014 05:38AM |
Registered: 10 years ago Posts: 157 |
|
Re: Ormerod Building Tips January 17, 2014 06:04AM |
Registered: 10 years ago Posts: 578 |
Hi Kim,
I also used one of the bed-holding bulldog clips for clamping my Y belt (I use tape to hold the bed together), I'll be printing a set of iamburny's clamps [forums.reprap.org] today though - the clip needs adjusting every few prints (especially if I go past the end of the axis, which happens at times). I think these clamps may still need the addition of a tensioner like markbee's or one of the many others that have been suggested in the same thread since (like the original clamps) they rely on engaging with the teeth of the belt, which might sit between too tight and too slack (unless one of them can be moved and fastened down after the belt is clamped, maybe using slots rather than holes for the fixing screws) - but it doesn't look like iamburny needs this.
Ray
|
Re: Ormerod Building Tips January 17, 2014 07:44AM |
Registered: 10 years ago Posts: 859 |
Hi ES & Ray, thanks for the replies. Well maybe later today/tomorrow I'll get to the printing stage, but I'll keep a look out for that
problem 'if' it happends. LoL if it was made by Microsoft they'd call it a 'feature'.... I don't think it will be a problem, the belts only
have to fight the mass and acceleration of the table, and I've used thier paper shim idea to wedge the belts in for now. I see others
have had problems thou.
I'm busy on the X axis now... hihihihi maybe it's tiredness, I don't know, but the fitting of the X idler really had me stumped for
a while. After allot of head scratching the Penny finaly dropped... In the hope it might help others here's a picture that shows
the end of the X axis. I've just noticed I need to tweek it in to line abit, but that's they way the devil goes on.....
The instructions says to get 4 M3 nuts out for this assembly, but you only use two ????? Just wondering if I've missed something..
Thanks...
Edited 1 time(s). Last edit at 01/17/2014 07:45AM by KimBrown.
|
Re: Ormerod Building Tips January 17, 2014 11:02AM |
Registered: 10 years ago Posts: 859 |
X-Axis Drive Belt Threading..
Hmmm ok, this one little chore took me an hour to crack. When I hit on the solution it took seconds.
1) Make a hole at the end of the belt.
2) Thread stronge thread through the hole (I ended up using Dental Floss).
3) Remove the motor, and thread the thread through the holes.
4) Loop the thread around the motor pulley, and replace the motor.
5) Gently pull the thread out.... It drags the belt around the pulley and back out....
6) Retire for a cup of Tea....
Edited 1 time(s). Last edit at 01/18/2014 03:16PM by KimBrown.
|
Re: Ormerod Building Tips January 17, 2014 12:58PM |
Registered: 10 years ago Posts: 119 |
Hello Kim
Yeah, I did it the hard way and threaded it by had then turning the stepper motor round by hand (I had to disconnect the wire loom to that motor due to back EMF) but yeah it took 3 tries and a few harsh words was said also.
But yeah with a bit of thread would make it easier to pull it round the motor and back out.
Paul
RS Ormerod No 436
|
Re: Ormerod Building Tips January 18, 2014 04:46PM |
Registered: 10 years ago Posts: 859 |
Hi Paul, thanks for the reply, it's good to see feedback on my ideas.
Yes I tried and tried to thread the belt the way they said, and have the bald patches to prove it, then came up with the simple solution.
We thread electric cables here at work occasionally by sending a thin flexible rod with thin cord, then use the cord to pull the cable through
Simples....
Well the Printer is finally finished. Untested, as I wanted a break, and to update this thread before I start the final process of getting the thing to work.
I don't think there will be any problems, as the kit really is first class in my eyes. A couple of niggles, but these are a mix of easy fixes, and a part or two I'd suggest the company add, or alter just slightly. My only real grip if any is I think they should really count up the number of M3x12mm bolts needed by the builder and add 6 more as spares or a miss count when packing the kits. M4 T nuts are another thing I'd like to see another 3 off.
My kit had 3 M3x12 counter sunk screws missing and 5 M3 nuts missing. Luckily I carried on building the rest of the machine, then came back to the parts I was stuck on, and managed to find ways around the shortages. Being on a ship I can't nip up the road and buy some....
Still at least it IS finished now. And again I would like to say it's a first class kit. Been lots of fun building. And it looks great to..
Would I suggest it to someone who hasn't made anything like this before. Well yes if you've put a shelf up with out making a hole in your hand with the screw driver, and can follow simple instructions...Yes... But don't expect to build it in the 2 hours they suggest... 16 to 20 hours if you want something working and at all reasonable.
Back to the Building Tips.....
X-Axis Cable Run.....
Here I tried the route the online manual suggested, but found that the proximity switch plug was slowly working its way of the pins each time I moved the HotHead. The solution was to cable tie it to the PTFE tubing for extra support.
Heated Bed Cabling.....
Ok when I was trying to get the ribbon cable to lay nicely under the work surface I found that move the table up and down the Y axis sometimes resulted in the ribbon cable piling up the Y axis motor end and would have jammed up the movement. So here's my simple solution to fix that problem... Please see the picture.
Table Cardboard Mod:-
A silly simple mod this. The thermistor is taller than the Heating Plate, and needs to be flush with the top.
Put the heating plate on top of the cardboard, and use a screw driver to puncture the cardboard, but leave the bottom layer alone. Then score to the thermistor hole and run your thumb nail alone the score to make a trench for the wires... Now you won't have a table with a hump in it.....
Please see picture.
Table Frame Mod:-
I found that the front face of the table was a little to portable for my liking. Not having any PVA glue handy I drilled a couple of holes and cable tied it.
I did a similar fix with the front table bearing... Now it's all pretty solid. Please see picture.
Y-Axis-Micro Switch Leads:-
In the instructions is suggests to have these either side of the pulley. I thought about this, and decided that having the leads go down under the motor shaft might be a safer bet.... (Bear in mind my Ormerod will be doing allot of traveling during it's life. Please see picture.
I hope these ideas will help people who are building. Maybe you can think of better ways of doing things or have mods your self. Share your views and ideas.... That's what this project is all about... Happy printing...
One mod/Idea I am planning once I start printing is two small cylindrical spacers for the top two screws of the electronics box, so that the top two screws can be replaced by longer screws, with their heads outside the back cover, to hold the thing on....
Good Luck,
Kim..
Attachments:
open | download - 20140118_145750 (X-axis-Cable Run).jpg (121.8 KB)
open | download - 20140118_185857 (Hot Bed Cable Fix).jpg (139.9 KB)
open | download - 20140118_160735 (Table Cardboard Mod).jpg (179 KB)
open | download - 20140118_193021 (Table frame mod).jpg (273.8 KB)
open | download - 20140118_212212 (Y-axis-micro switch Leads).jpg (191.6 KB)
open | download - 20140118_213340[1] (Finished Printer).jpg (70.6 KB)
|
Re: Ormerod Building Tips January 18, 2014 05:22PM |
Registered: 10 years ago Posts: 1,230 |
Quote
KimBrown
Heated Bed Cabling.....
Ok when I was trying to get the ribbon cable to lay nicely under the work surface I found that move the table up and down the Y axis sometimes resulted in the ribbon cable piling up the Y axis motor end and would have jammed up the movement. So here's my simple solution to fix that problem... Please see the picture.
Kim..
Brilliant! - esp. the hot bed cable fix

Erik
|
Re: Ormerod Building Tips January 19, 2014 04:20PM |
Registered: 10 years ago Posts: 859 |

Glad you liked the Tips... Hope other people add their own tips here as well.
Built the printer in my spare time at work onboard ship...(Yes that is a Port Hole in the picture...)..
The printer worked first time once a problem with the SD card was sorted, and the machine oil cleared the nozzle.
(I think unfortunately the SD card that was supplied might (?) be the wrong speed for the Duet board to read
as the card reads and writes fine in the Laptop, but refuses to work in the printer.
That was the only real problem I had getting it up and running.
A First Class Kit... I'd make another kit from this company....
Just my inexperience of 3D printing to fix now....

One Last Tip...
I don't know if it was the machine oil inside the nozzle, or my greasy mits having been all over the table.
But in the first run the plastic refused to stick to the table. Being on a ship there's no where to get Meths
or Acetone to clean it..... So my last tip is use aftershave..... It smelt good to.......LoL
Happy Days....
Kim..
|
Re: Ormerod Building Tips January 19, 2014 04:47PM |
Registered: 10 years ago Posts: 14,672 |
Quote
KimBrown
Being on a ship there's no where to get Meths or Acetone to clean it.
Can you get nail varnish remover? [Generally either pure acetone or nearly so.]
Large delta printer [miscsolutions.wordpress.com], E3D tool changer, Robotdigg SCARA printer, Crane Quad and Ormerod
Disclosure: I design Duet electronics and work on RepRapFirmware, [duet3d.com].
|
Re: Ormerod Building Tips January 19, 2014 05:13PM |
Registered: 10 years ago Posts: 859 |
|
Re: Ormerod Building Tips January 19, 2014 05:14PM |
Registered: 13 years ago Posts: 1,611 |
|
Re: Ormerod Building Tips January 19, 2014 05:31PM |
Registered: 10 years ago Posts: 14,672 |
Quote
KimBrown
LoL um no.... I work on a large Harbour Tug bringing super tankers in...
There's no Ladies around here. Hopefully I'll manage to get to Tesco soon and grab some, the next time we're along side.
Building this kit in a moving environment has been interesting to say the least.....
Kim..
I had visions of you on a luxury cruise!
Large delta printer [miscsolutions.wordpress.com], E3D tool changer, Robotdigg SCARA printer, Crane Quad and Ormerod
Disclosure: I design Duet electronics and work on RepRapFirmware, [duet3d.com].
|
Re: Ormerod Building Tips January 19, 2014 06:21PM |
Registered: 10 years ago Posts: 2,472 |
|
Re: Ormerod Building Tips January 19, 2014 06:27PM |
Registered: 10 years ago Posts: 859 |
|
Re: Ormerod Building Tips January 19, 2014 06:27PM |
Registered: 10 years ago Posts: 275 |

|
Re: Ormerod Building Tips January 20, 2014 03:39AM |
Registered: 10 years ago Posts: 1,230 |
Quote
KimBrown
The printer worked first time once a problem with the SD card was sorted, and the machine oil cleared the nozzle.
ditto, SD card did not work, first print slipped
Quote
Just my inexperience of 3D printing to fix now....
ditto, complete new to 3D, lot's of fun ahead
Quote
Being on a ship there's no where to get Methsor Acetone to clean it..... So my last tip is use aftershave..... It smelt good to.......LoL
No acces to alcohol?? - what kind of ship is that!
I use only the very finest 95% Ethanol, highly recommended (hic!)

Erik
|
Re: Ormerod Building Tips January 20, 2014 01:52PM |
Registered: 10 years ago Posts: 859 |
Hihihihihi it's good to see the comments....
Yep the Merchant Navy is dry these days. Our limit is 1/4 of what you can have for driving.
Any way another Tip.......
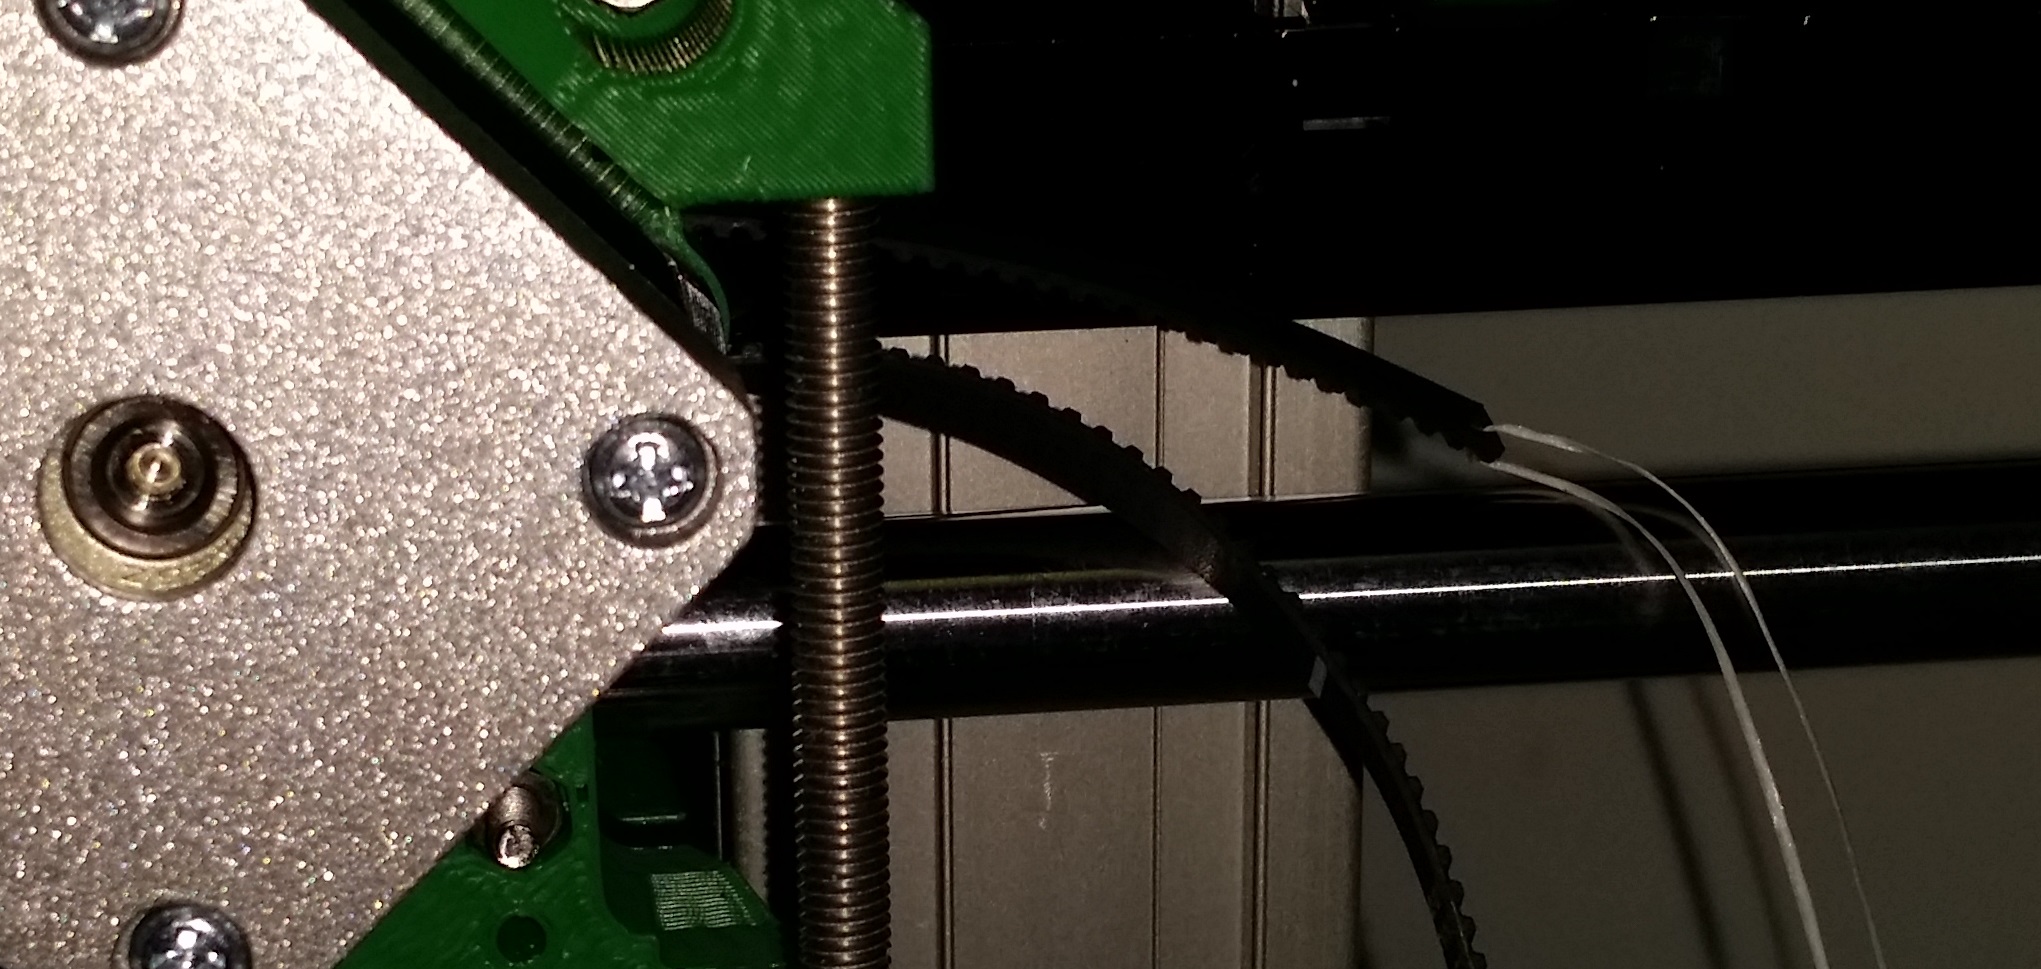
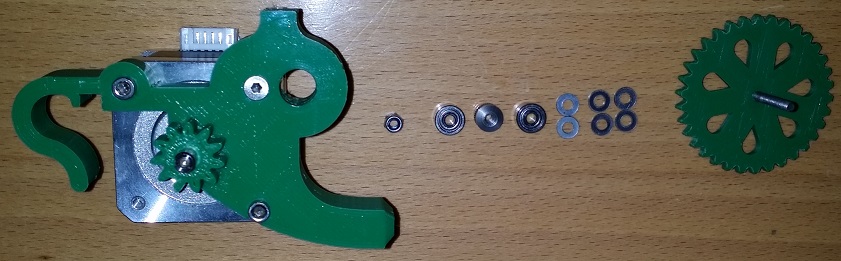
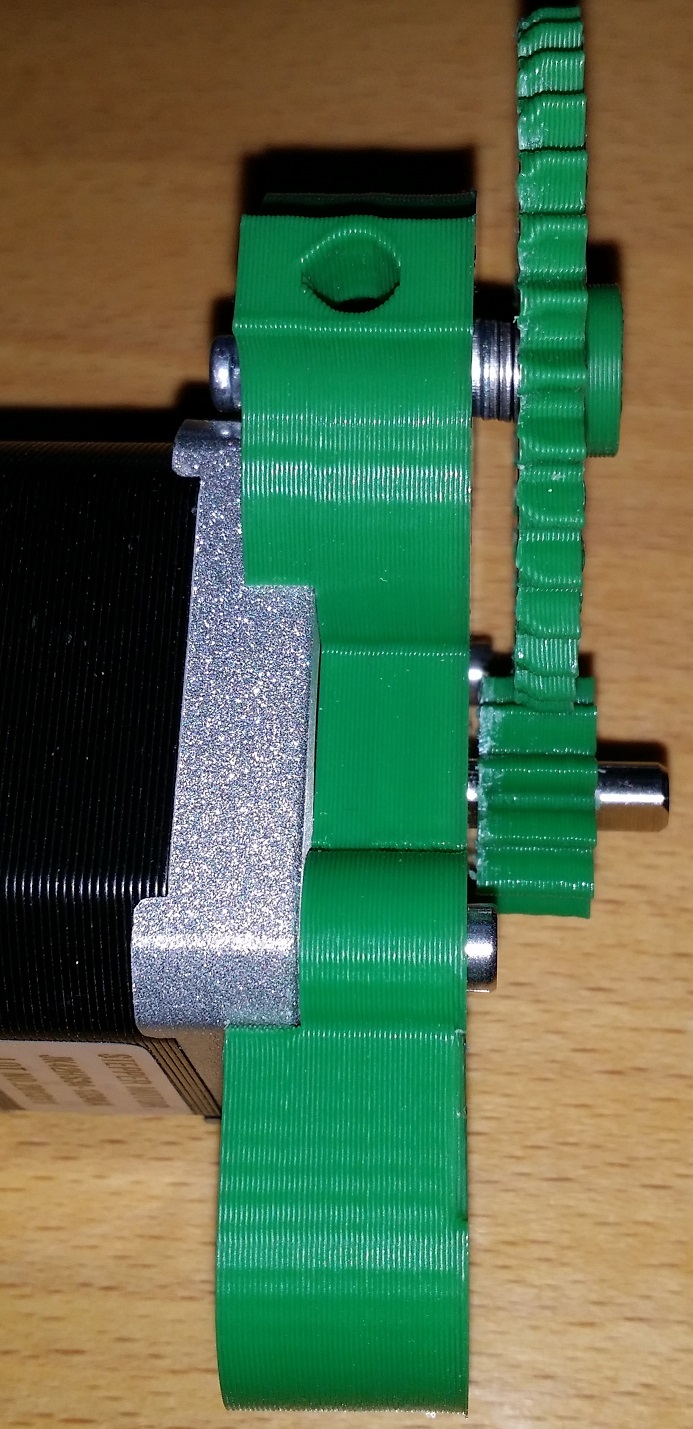
Extruder Drive Assembly Mod:-
In the instructions is says to use 1 washer on the main screw.
When I looked at my gear wheel after it had done a couple of prints the teeth on the large gear wheel were showing signs of ware.
So, my Mod is to add extra washers behind the large gear to move the gear wheel into the center of the smaller gear.
This should cure the problem. (See Pictures) (Personally I think I might thicken the gear wheel a little when I make my spares).
Is your Hobbed Insert Centered?:-
A way to check is to eject some filament from it after it's gone through.
The front should have grooved teeth in it, and the back should be rolled flat.
The grooved teeth should go right across the filament, and not off to one side.
Normally if the side bearing (the other side of the Drive assembly is level with the outside it should be centered).
See picture of some scrap filament....
Hope this helps people...

Yep the Merchant Navy is dry these days. Our limit is 1/4 of what you can have for driving.
Any way another Tip.......
Extruder Drive Assembly Mod:-
In the instructions is says to use 1 washer on the main screw.
When I looked at my gear wheel after it had done a couple of prints the teeth on the large gear wheel were showing signs of ware.
So, my Mod is to add extra washers behind the large gear to move the gear wheel into the center of the smaller gear.
This should cure the problem. (See Pictures) (Personally I think I might thicken the gear wheel a little when I make my spares).
Is your Hobbed Insert Centered?:-
A way to check is to eject some filament from it after it's gone through.
The front should have grooved teeth in it, and the back should be rolled flat.
The grooved teeth should go right across the filament, and not off to one side.
Normally if the side bearing (the other side of the Drive assembly is level with the outside it should be centered).
See picture of some scrap filament....
Hope this helps people...
|
Re: Ormerod Building Tips January 20, 2014 06:44PM |
Registered: 10 years ago Posts: 859 |
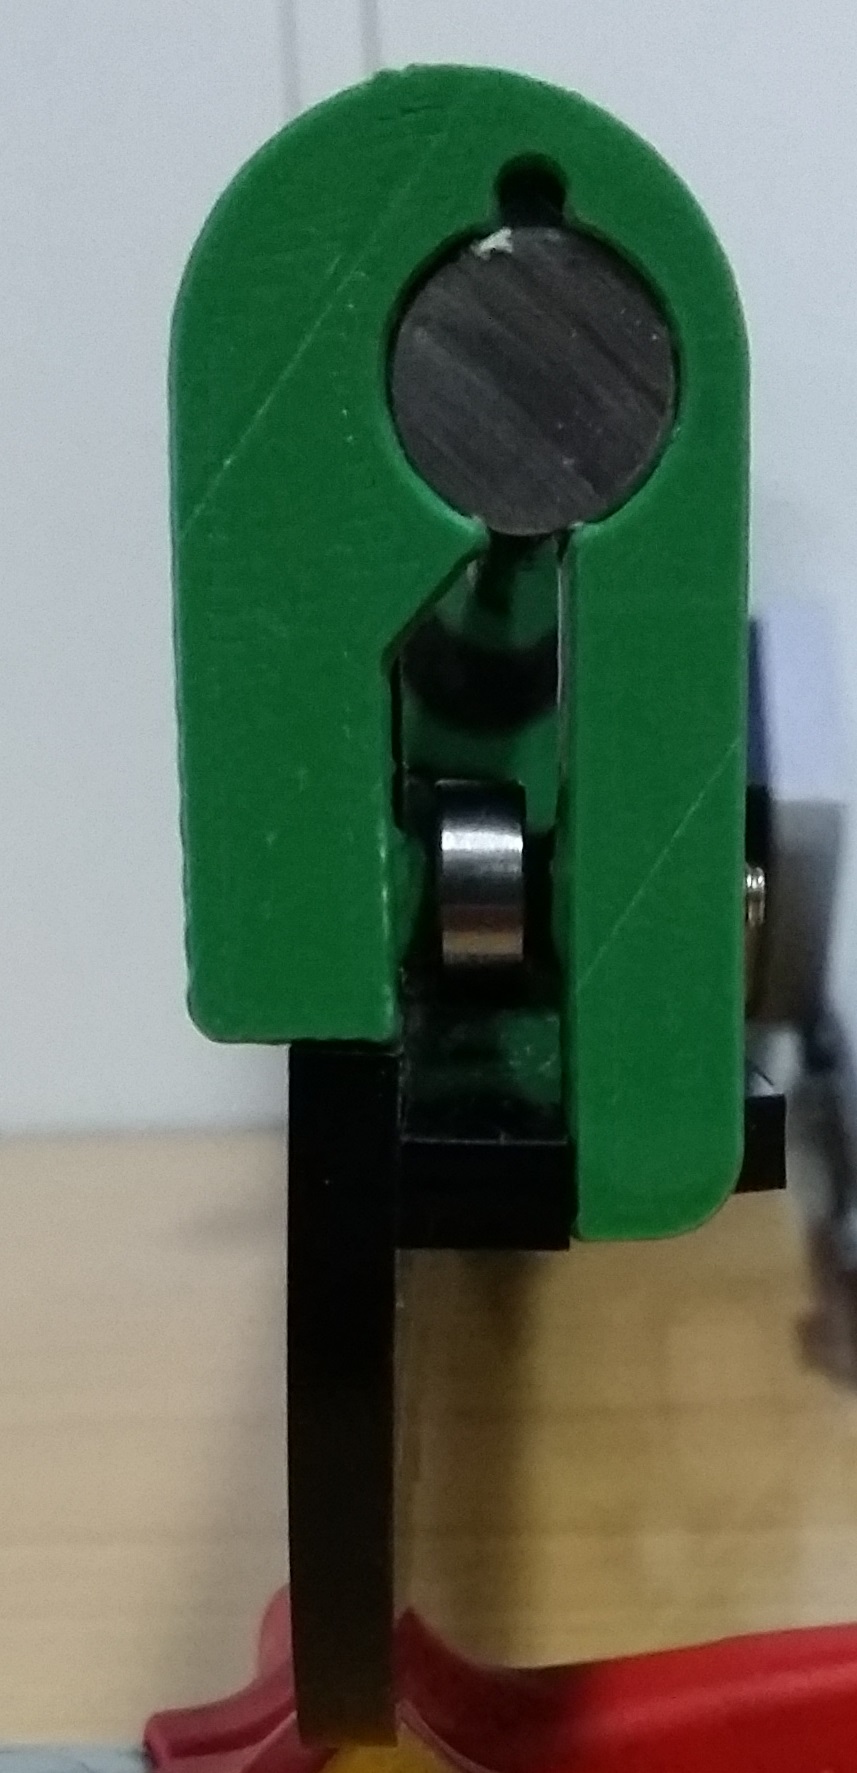
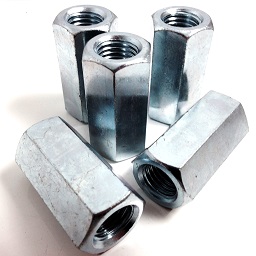
Another Tip:-
Z Drive Screw Nut:-
Sat here watching the printer being very busy got me to thinking that there's a fair bit of loading on that M5 Z axis Lead Screw.....
When you think it's just a single nut holding that lot up it's not going to be happy.....
So I've just order a replacement that should I hope last a lot longer... (Cheap as chips....)
(See Picture)
Ebay Page
|
Re: Ormerod Building Tips January 20, 2014 08:11PM |
Registered: 10 years ago Posts: 275 |
Quote
KimBrown
Another Tip:-
Z Drive Screw Nut:-
Sat here watching the printer being very busy got me to thinking that there's a fair bit of loading on that M5 Z axis Lead Screw.....
When you think it's just a single nut holding that lot up it's not going to be happy.....
So I've just order a replacement that should I hope last a lot longer... (Cheap as chips....)
(See Picture)
Ebay Page
Thanks!
Dario
|
Re: Ormerod Building Tips January 22, 2014 03:15PM |
Registered: 10 years ago Posts: 859 |
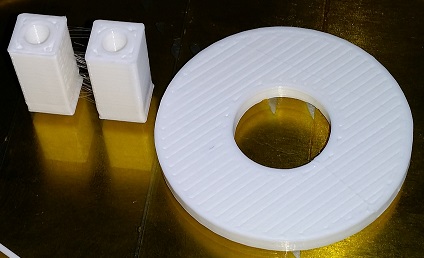
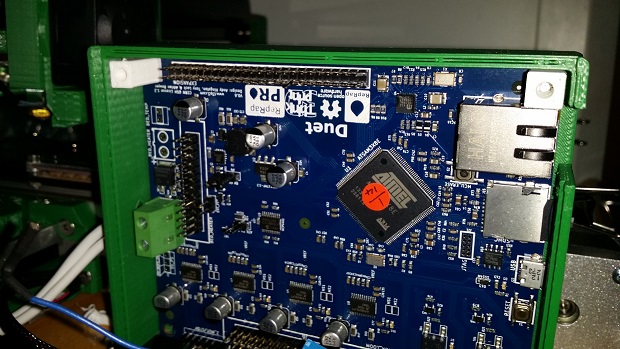
Here's a Mod you might like for keeping the Electronic Control Box together, the way it should be.
Basically I printed two square pillars 15mm tall with holes in to accept the cover screws.
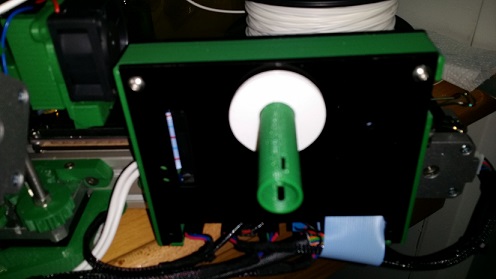
On the front cover (The one next to the Y slide) I drilled out the top two holes to 4.5mm, as the new screws have to go in from that side, and self tap into the two new pillars. (see the picture). Once done, the connections are remade, and the back cover is held on by the original screw from the from. They also tap into the pillars. Onboard ship here, I'm limited for what I can lay my hands on, so I decided to make a washer to go behind the reel on the spigot. The box looks neat, and tidy now, and the back doesn't keep falling of.
Pictures and g-code files attached.
Kim..
Basically I printed two square pillars 15mm tall with holes in to accept the cover screws.
On the front cover (The one next to the Y slide) I drilled out the top two holes to 4.5mm, as the new screws have to go in from that side, and self tap into the two new pillars. (see the picture). Once done, the connections are remade, and the back cover is held on by the original screw from the from. They also tap into the pillars. Onboard ship here, I'm limited for what I can lay my hands on, so I decided to make a washer to go behind the reel on the spigot. The box looks neat, and tidy now, and the back doesn't keep falling of.
Pictures and g-code files attached.
Kim..
Attachments:
open | download - 20140122_182825 (Pillars and Washer).jpg (43 KB)
open | download - 20140122_190206 (Pillars in Place).jpg (119.5 KB)
open | download - 20140122_192241 (Tidy back Cover).jpg (44.5 KB)
open | download - Control Box Pillars and Washer.gcode (504.5 KB)
open | download - Control Box Pillars and Washer.stl (26.8 KB)
|
Re: Ormerod Building Tips January 22, 2014 03:20PM |
Registered: 10 years ago Posts: 578 |
|
Re: Ormerod Building Tips January 22, 2014 07:23PM |
Registered: 10 years ago Posts: 275 |
|
Re: Ormerod Building Tips January 25, 2014 07:52PM |
Registered: 10 years ago Posts: 859 |
Two minor mods:-
1) During the wait to print filament in the PTFE tube chills down:-
This makes the initial start of printing real hard work for the feeder to push the plastic through, and also means the initial plastic
isn't up to temp, and might not stick to the table. To fix this wrap the last 30-40 mm of PTFE tubing in kitchen towel and tape in
place. It's improved things allot here...
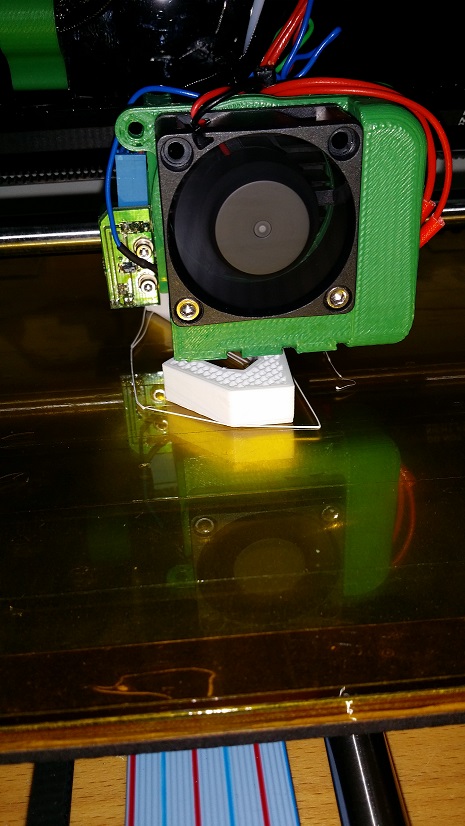
2)When setting up the Z home, a PiP of hard plastic is sometimes on the nozzle:-
Here I used Kapton tape to blank off the hole from the fan that was blowing on the extruder tip....
It doesn't totaly stop it, but it does help allot
Something that might help for the Firmware Update....
Here attached you will find the two files you need together to Flash the FirmWare. Please read the manual for the instructions to use.
(The zip file just saves you searching for the files....).
Kim
Edited 1 time(s). Last edit at 01/25/2014 07:54PM by KimBrown.
1) During the wait to print filament in the PTFE tube chills down:-
This makes the initial start of printing real hard work for the feeder to push the plastic through, and also means the initial plastic
isn't up to temp, and might not stick to the table. To fix this wrap the last 30-40 mm of PTFE tubing in kitchen towel and tape in
place. It's improved things allot here...
2)When setting up the Z home, a PiP of hard plastic is sometimes on the nozzle:-
Here I used Kapton tape to blank off the hole from the fan that was blowing on the extruder tip....
It doesn't totaly stop it, but it does help allot
Something that might help for the Firmware Update....
Here attached you will find the two files you need together to Flash the FirmWare. Please read the manual for the instructions to use.
(The zip file just saves you searching for the files....).
Kim
Edited 1 time(s). Last edit at 01/25/2014 07:54PM by KimBrown.
|
Re: Ormerod Building Tips January 25, 2014 09:43PM |
Registered: 10 years ago Posts: 32 |
I found doing this:
1. remove the motor
2. feed the belt into the bottom inlet then out of the top outlet (at this point ensure at least 75mm of belt comes out the top outlet)
3. pull enough slack through into the gear area so it sits on the walls with at least 50mm out of the topside hole
4. grab the belt in the hole with some small long nose pliers and pull out through the main opening ensuring the belt exiting through the top outlet does not come back through and that your grip on the belt is gentle so as not to damage it
5. wrap the belt on the gear of the motor, hold the belt outside the top and bottom outlet / inlet and pull the belt from there to remove any slack as you position the motor in the housing.
6. fix motor
7. toke on electronic cigarette
EDIT:this is for attaching the x axis belt to the motor gear..
Edited 1 time(s). Last edit at 01/25/2014 09:44PM by badman.teddy.edward.
|
Re: Ormerod Building Tips February 14, 2014 04:12AM |
Registered: 10 years ago Posts: 859 |
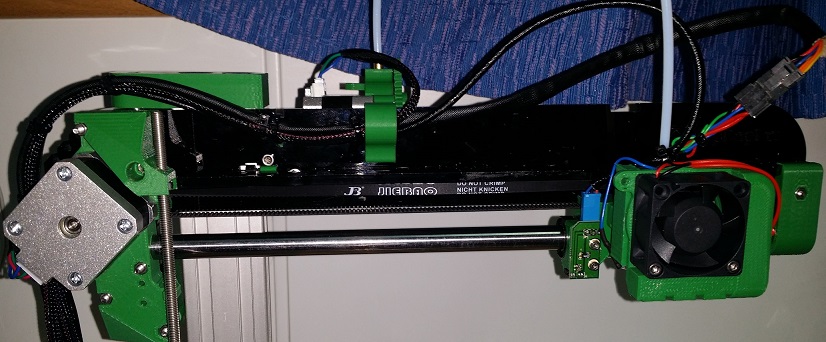
Being limited for space at work I came up with this simple spool holder that can handle both 32mm & 57mm Spools.
Kim..


Kim..
|
Re: Ormerod Building Tips February 14, 2014 04:28AM |
Registered: 10 years ago Posts: 14,672 |
It looks useful, but how freely does the spool rotate?
Large delta printer [miscsolutions.wordpress.com], E3D tool changer, Robotdigg SCARA printer, Crane Quad and Ormerod
Disclosure: I design Duet electronics and work on RepRapFirmware, [duet3d.com].
Large delta printer [miscsolutions.wordpress.com], E3D tool changer, Robotdigg SCARA printer, Crane Quad and Ormerod
Disclosure: I design Duet electronics and work on RepRapFirmware, [duet3d.com].
|
Re: Ormerod Building Tips February 14, 2014 05:15AM |
Registered: 10 years ago Posts: 1,230 |
|
Re: Ormerod Building Tips February 14, 2014 05:22AM |
Registered: 10 years ago Posts: 859 |
Hi DC, I was pleasantly surprised... It's nice and free, and is quite happy with a 1kg spool. The spool tends to act as the bearing on the spacers.
I needed something that didn't take up to much desk space, was lite and easily portable as the printer goes every where I go now and has clocked up 1200 miles in the last month.. It doesn't like standing up in the 100mph winds we've had and the high seas, but then neither do I.....
Hi Erik, yes I did think about it, but it didn't need a ball race. Which I'm glad of as I could just see me chasing them around the cabin here...
Things are getting quite aerodynamic at the moment, so the printers tucked up in it's travel case until we get to calmer waters....
Edited 1 time(s). Last edit at 02/14/2014 05:28AM by KimBrown.
|
Re: Ormerod Building Tips February 14, 2014 05:42AM |
Registered: 10 years ago Posts: 28 |
Hi Kim,
I tried a horizontal reel holder for 1 kg filament. I used a ballbearing and it rolled very very smooth, too smooth I guess since the filmanet got jammed several times. You need some resistance to keep the filament fixed on the reel. I switched to vertical movement, no ball bearing (could install them, will test is later) but for now it works fine for me. In case you run in to problems with jamming filament you could consider a vertical stand with a foorprint which fits in the psu
Old horizontal bearing
And the new traditional vertical stand
I tried a horizontal reel holder for 1 kg filament. I used a ballbearing and it rolled very very smooth, too smooth I guess since the filmanet got jammed several times. You need some resistance to keep the filament fixed on the reel. I switched to vertical movement, no ball bearing (could install them, will test is later) but for now it works fine for me. In case you run in to problems with jamming filament you could consider a vertical stand with a foorprint which fits in the psu
Old horizontal bearing


And the new traditional vertical stand


Sorry, only registered users may post in this forum.