Cable Z axis
Posted by Sublime
|
Cable Z axis February 27, 2013 04:20PM |
Registered: 13 years ago Posts: 2,947 |
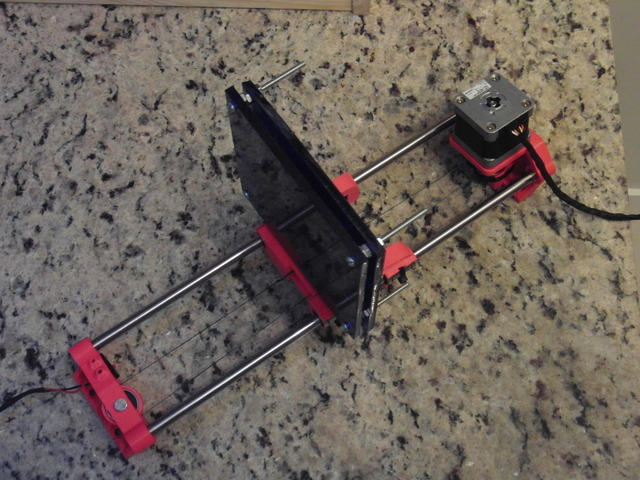
I decided to start the expansion panels for the Printed case and started with the Z axis. This meant I needed to replace the Z-lead screw with a longer one but figured while I had the machine apart why not try out a cable driven Z-axis especially after seeing how well the belt driven Z-axis works on bots like Printxel.
It includes a cable tensioner that allows you to get the cable extremely tight.
I have uploaded the files and source to [github.com] . Please note these are the first release of the cable driven Z-axis.
Known issues:
The endstop mount is now integrated into the upper Z mount bracket and does not work well with long hotends (J-head MK-IVb) and may also have a slight issue with the J-head MK-Vb's I supplied with kits since they are slightly longer than normal MK-Vb's. There is an easy work around using the original endstop bracket.
BOM:
2 - 608 bearings
5 - #4 or M3 grub screws
3 - #4 or M3 nuts
4 - #6 x 5/8" or M4 x 16mm socket head cap screws
1 - zip tie
1 - 5/16" (maybe 8m) x 22mm smooth rod for upper idler bearing
+ original hardware used to install Z brackets
Notes:
Print the lower drum with only perimeters, zero retract, no wipe (it must be perfectly smooth).
Depending on the hotend used it can give you an additional 15mm of travel on Z.
You may need to re-tension the cable a few times adding knots until all the slack has come out of the knots and stretched the cable as far as it can be stretched.
My new steps per mm on Z are 100.66
New max acceleration on Z is 8000
New Z jerk is 10.0
Complete assembly for 215mm tall build area machine.
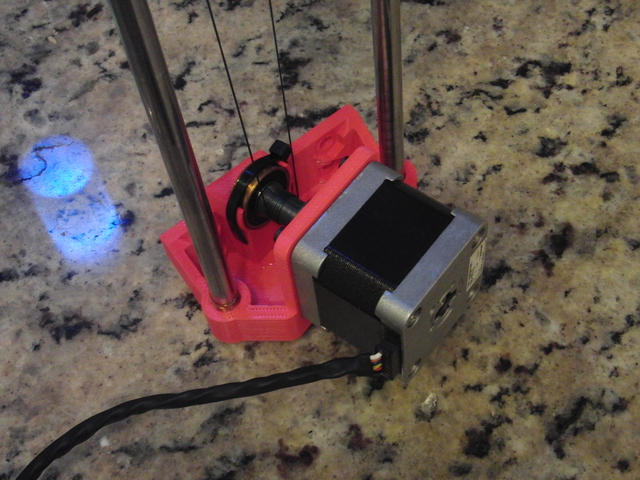
Lower bracket with motor, bearing and cable drum.
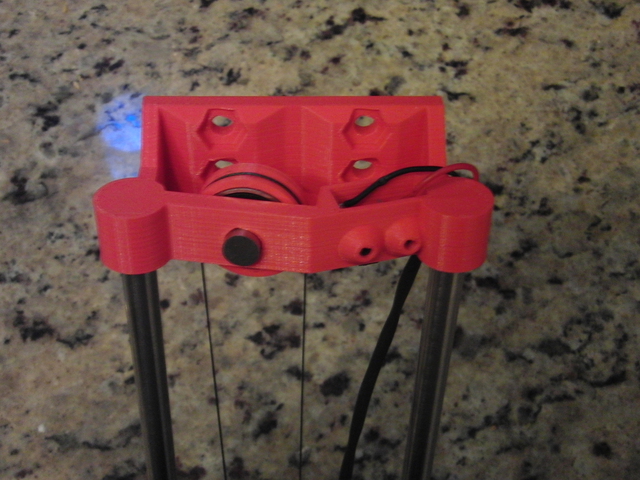
Upper bracket with idler and built in endstop mount.
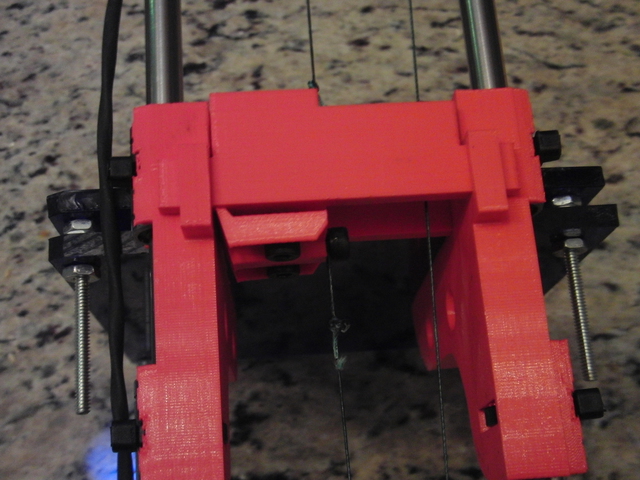
Cable tensioner.
I will try and upload some pictures of the finished machine soon.
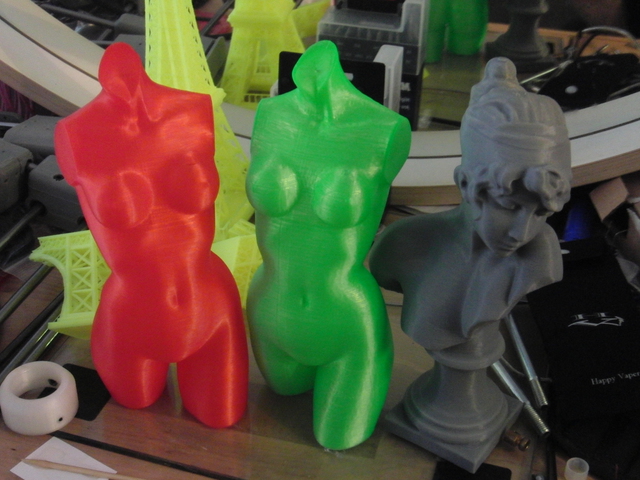
Here are some prints from it. They are 215mm tall and the line near the top of Sappho's head is from my bed clips hitting the case and stopping the z-axis from moving down properly.
It includes a cable tensioner that allows you to get the cable extremely tight.
I have uploaded the files and source to [github.com] . Please note these are the first release of the cable driven Z-axis.
Known issues:
The endstop mount is now integrated into the upper Z mount bracket and does not work well with long hotends (J-head MK-IVb) and may also have a slight issue with the J-head MK-Vb's I supplied with kits since they are slightly longer than normal MK-Vb's. There is an easy work around using the original endstop bracket.
BOM:
2 - 608 bearings
5 - #4 or M3 grub screws
3 - #4 or M3 nuts
4 - #6 x 5/8" or M4 x 16mm socket head cap screws
1 - zip tie
1 - 5/16" (maybe 8m) x 22mm smooth rod for upper idler bearing
+ original hardware used to install Z brackets
Notes:
Print the lower drum with only perimeters, zero retract, no wipe (it must be perfectly smooth).
Depending on the hotend used it can give you an additional 15mm of travel on Z.
You may need to re-tension the cable a few times adding knots until all the slack has come out of the knots and stretched the cable as far as it can be stretched.
My new steps per mm on Z are 100.66
New max acceleration on Z is 8000
New Z jerk is 10.0
Complete assembly for 215mm tall build area machine.

Lower bracket with motor, bearing and cable drum.

Upper bracket with idler and built in endstop mount.

Cable tensioner.

I will try and upload some pictures of the finished machine soon.
Here are some prints from it. They are 215mm tall and the line near the top of Sappho's head is from my bed clips hitting the case and stopping the z-axis from moving down properly.

| FFF Settings Calculator | Gcode post processors | Geometric Object Deposition Tool Blog |
| Tantillus.org | Mini Printable Lathe | How NOT to install a Pololu driver |
|
Re: Cable Z axis February 27, 2013 11:16PM |
Registered: 13 years ago Posts: 301 |
|
Re: Cable Z axis February 27, 2013 11:53PM |
Registered: 13 years ago Posts: 2,947 |
billyzelsnack Wrote:
-------------------------------------------------------
> So what's your verdict so far?
Extremely fast at 150mm/s with the acceleration settings mentioned above. Zero Z wobble at all. A little strange that it drops when the motors are disabled but I can not see any reason why this would be a problem. Over all I have to say I prefer it to the lead screw so far, but it has only been printing for a week so I may still find issues.
| FFF Settings Calculator | Gcode post processors | Geometric Object Deposition Tool Blog |
| Tantillus.org | Mini Printable Lathe | How NOT to install a Pololu driver |
|
Re: Cable Z axis February 28, 2013 01:23AM |
Registered: 13 years ago Posts: 301 |
|
Re: Cable Z axis February 28, 2013 02:29AM |
Registered: 13 years ago Posts: 2,947 |
Thank you for blazing the trail and making a machine with a belt driven Z. Your results in the very first competition with Sappho's head made it clear that it worked and worked well. It was also your results that got me to try Kisslicer.
I think with Delta bots having vertical belts and in the case of the Kossel cables it is even clearer that they are up to the job on a vertical axis.
Edited 1 time(s). Last edit at 02/28/2013 02:32PM by Sublime.
I think with Delta bots having vertical belts and in the case of the Kossel cables it is even clearer that they are up to the job on a vertical axis.
Edited 1 time(s). Last edit at 02/28/2013 02:32PM by Sublime.
| FFF Settings Calculator | Gcode post processors | Geometric Object Deposition Tool Blog |
| Tantillus.org | Mini Printable Lathe | How NOT to install a Pololu driver |
|
Re: Cable Z axis February 28, 2013 04:16AM |
Registered: 11 years ago Posts: 111 |
Sweet design nice work, might give this a go when I install my new compact heated bed (more to come on this, bit more machining and testing to do......).
I would love to compare this to a ball screw and see what the accuracy is, something I have always wanted to do at work, but I always fall back on ball screws as they are quick and work well. Pitty about the price though when you have to pay for it yourself.
I would love to compare this to a ball screw and see what the accuracy is, something I have always wanted to do at work, but I always fall back on ball screws as they are quick and work well. Pitty about the price though when you have to pay for it yourself.
|
Re: Cable Z axis February 28, 2013 12:59PM |
Registered: 13 years ago Posts: 301 |
|
Re: Cable Z axis February 28, 2013 01:56PM |
Registered: 13 years ago Posts: 2,947 |
@ WWFP since you will most likely make it in metric before trying it I should tell you some of the specs to speed up your modelling. The motor / drum assembly is rotated 12.5 degrees and the upper idler is rotated the opposite direction 10 degrees resulting in an angle of 22.5 degrees between the drum and the idler. This is so the cables line up with as little angle as possible. Also note that the Z resolution goes down with this system from 0.0004mm per step on the imperial lead screw version to 0.0099mm per step which will reduce possible layer heights.
@ BillyZelsnack I thought your machine had some things in common with an Up but never realized the belt driven Z was one of them.
@ BillyZelsnack I thought your machine had some things in common with an Up but never realized the belt driven Z was one of them.
| FFF Settings Calculator | Gcode post processors | Geometric Object Deposition Tool Blog |
| Tantillus.org | Mini Printable Lathe | How NOT to install a Pololu driver |
|
Re: Cable Z axis March 04, 2013 09:10AM |
Registered: 11 years ago Posts: 23 |
Thank you Sublime!
I took some time this weekend and build the cable z-carriage.
Issues I found:
--
And yes, z-axis is pulled down +-1cm when steppers are off. This is surprising, since the z-axis does not lower on its own. Anybody needs metric versions of the bracket and the drums? I use your original LC case.
I took some time this weekend and build the cable z-carriage.
- It looks awesome,
- Works as advertised - gone is the wobble!
- Takes less volume inside the printer enclosure,
- Less noise.
Issues I found:
- Lower bracket idler holder in github misses ziptie pass-through hole (not a biggie),
- Had to scale 102% the top idler wheel to fit on a bearing,
- 5mm drum is at a weird angle in github (luckily I used only 4mm version),
- I had to reroute some of the cables, as I previously passed them in between the z-axis engine and the lower bracket. Now, there is nothing to limit them on top, since there is no motor there anymore, and they could get in between z-axis arms and rods, as the axis goes down.
- I am not sure if I use the cable tensioner well. Currently it pulls the z-lift down on the right (slight off center).
This makes the lift develop a small angle in between the two arms holding the lower bed. I may need to use lift and arms that have a snug fit. This would prevent most of the angle. For now, I compensated with leveling the upper bed.
--
And yes, z-axis is pulled down +-1cm when steppers are off. This is surprising, since the z-axis does not lower on its own. Anybody needs metric versions of the bracket and the drums? I use your original LC case.
|
Re: Cable Z axis March 04, 2013 05:20PM |
Registered: 13 years ago Posts: 2,947 |
mfeherpataky Wrote:
-------------------------------------------------------
> Thank you Sublime!
> I took some time this weekend and build the cable
> z-carriage.
>
>
> [*] It looks awesome,
> [*] Works as advertised - gone is the wobble!
> [*] Takes less volume inside the printer
> enclosure,
> [*] Less noise.
Great to here. Did you use my Z steps per mm 100.66 or did yours turn out a little different?
>
>
> Issues I found:
>
> [*] Lower bracket idler holder in github misses
> ziptie pass-through hole (not a biggie),
Oops that was how I printed the first one and then added it manually and must not have exported the one with the hole. I will fix that.
> [*] Had to scale 102% the top idler wheel to fit
> on a bearing,
Yeah that only has 0.05mm of clearance which worked well on my machine that prints almost flawless prints but would be a huge issue on my Prusa. I am glad scaling worked and I think I will leave it as it is easy to scale and reprint without wasting much time.
> [*] 5mm drum is at a weird angle in github
> (luckily I used only 4mm version),
I will look into that as I used the 4mm one too. Thanks
> [*] I had to reroute some of the cables, as I
> previously passed them in between the z-axis
> engine and the lower bracket. Now, there is
> nothing to limit them on top, since there is no
> motor there anymore, and they could get in between
> z-axis arms and rods, as the axis goes down.
Yup that was the way I had mine wired too and now it is not as clean . But I think it would be easy to add a clip that bolts to the original motor bracket holes.
> [*] I am not sure if I use the cable tensioner
> well. Currently it pulls the z-lift down on the
> right (slight off center).
> This makes the lift develop a small angle in
> between the two arms holding the lower bed. I may
> need to use lift and arms that have a snug fit.
> This would prevent most of the angle. For now, I
> compensated with leveling the upper bed.
>
Strange. The entire reason the bearings are angled and the bolt holes for the tensioner are misaligned are to make sure the cables are as vertical as possible and line up right in the center. Can you post a picture so I can try and figure this out? Also I had thought of making the Z-lift as part of one of the Z-arms since it no longer needs to float to allow the lead screw to wobble. If you would like you could also glue one side of the z-lift to one of the z-arms. Although I would like to figure out why yours is off center.
Thank you for taking the dive into this and testing it. I will get those fixed tonight and will post here once they have been updated.
One thing is how many wraps did you go around the drum? I used 7.5 since my Z is so tall and it is also the max I could get on the spool without causing run out that pushed the line off the drum.
Edited 1 time(s). Last edit at 03/04/2013 06:44PM by Sublime.
| FFF Settings Calculator | Gcode post processors | Geometric Object Deposition Tool Blog |
| Tantillus.org | Mini Printable Lathe | How NOT to install a Pololu driver |
|
Re: Cable Z axis March 05, 2013 05:04AM |
Registered: 11 years ago Posts: 23 |
Here come the photos. Let me present you Tantillus from Europe. It is your original LC case with all metric rods, bolts and nuts. There is a small modification to the LC case - a SD card slot which I find a great addition and it uses cheap 2$/€ SD card reader from eBay.
The printer uses @willworkforplastic printed elements, with exception of hotend carriage elements and all corners. Top rear corners I modified so they can be removed without firstly removing the rods.
To keep the cost down I used sanguinololu with 1284p chip, and it turned out to be more then enough. LCD is connected over I2C to save pins. There is even a cheap 8$ bluetooth module broadcasting "Tantillus_3D" at 115,2kbps. So no need for USB cable anymore.
After the cable z-axis upgrade, the quality changed dramatically! Must have also been a bad threaded rod I had.
First print, just finished. It is HTD-3m pulley I use to power X&Y axis replacing the gears. I find them much more reliable and quiet.
And a closeup. It does look like nothing I have seen printed before. There are still some absolutely minor issues, but I will slowly reprint all the important parts - the cable drum and pulleys - and install them. Then it will be absolutely glorious.
Now how does the cable z-axis look like in the printer?
The lower bed was perfectly flat until tension was applied to the cable then the right side, where the two tensioner screws are, lowered slightly. It is small - level difference is 1mm in between the arms now. There are two reasons I guess - one that lift lose fits into both arms (as it had with the threaded rod) and I have run out of zip-ties for the bearings, though bearings do snug fit in the both arms.
As for the steps per mm - 100.66 did the trick, though I have not run extensive tests how accurate it is.
Overall I am very pleased with the result. Thank you for the design!
---
EDIT1: Forgot about the drum - I use 6 loops on it, though even as little as 4 seemed good enough with proper tension. The clip to hold cables is a great idea, for now I use Kapton tape to hold cables flat.
Edited 1 time(s). Last edit at 03/05/2013 05:11AM by mfeherpataky.
The printer uses @willworkforplastic printed elements, with exception of hotend carriage elements and all corners. Top rear corners I modified so they can be removed without firstly removing the rods.

To keep the cost down I used sanguinololu with 1284p chip, and it turned out to be more then enough. LCD is connected over I2C to save pins. There is even a cheap 8$ bluetooth module broadcasting "Tantillus_3D" at 115,2kbps. So no need for USB cable anymore.
After the cable z-axis upgrade, the quality changed dramatically! Must have also been a bad threaded rod I had.

First print, just finished. It is HTD-3m pulley I use to power X&Y axis replacing the gears. I find them much more reliable and quiet.

And a closeup. It does look like nothing I have seen printed before. There are still some absolutely minor issues, but I will slowly reprint all the important parts - the cable drum and pulleys - and install them. Then it will be absolutely glorious.
Now how does the cable z-axis look like in the printer?

The lower bed was perfectly flat until tension was applied to the cable then the right side, where the two tensioner screws are, lowered slightly. It is small - level difference is 1mm in between the arms now. There are two reasons I guess - one that lift lose fits into both arms (as it had with the threaded rod) and I have run out of zip-ties for the bearings, though bearings do snug fit in the both arms.
As for the steps per mm - 100.66 did the trick, though I have not run extensive tests how accurate it is.
Overall I am very pleased with the result. Thank you for the design!
---
EDIT1: Forgot about the drum - I use 6 loops on it, though even as little as 4 seemed good enough with proper tension. The clip to hold cables is a great idea, for now I use Kapton tape to hold cables flat.
Edited 1 time(s). Last edit at 03/05/2013 05:11AM by mfeherpataky.
|
Re: Cable Z axis March 06, 2013 04:59PM |
Registered: 13 years ago Posts: 2,947 |
I still have not had the chance to fix the issues you pointed out but I will get to them. In the mean time I noticed a couple of things on your machine. One the tensioner does not have the little hinge in the notch on the Z-lift. Is this on purpose to try and correct the lean? Two is the tensioner is still really far away from being as tight as possible which could cause the cable to be on a slight angle.
| FFF Settings Calculator | Gcode post processors | Geometric Object Deposition Tool Blog |
| Tantillus.org | Mini Printable Lathe | How NOT to install a Pololu driver |
|
Re: Cable Z axis March 08, 2013 04:13AM |
Registered: 11 years ago Posts: 23 |
Thanks for noticing it.
- Lack of the hinge is not by design, but rather my lack of full understanding how z-lift and the tensioner should work together. I will print a new lift today with arms and make sure the hinge is there.
- As for the tensioner not being closer to the lift - at the time of the assembly it was very tense already and getting it any closer felt like something would break. Now after few prints I am able to take it closer still.
|
Re: Cable Z axis March 13, 2013 02:55AM |
Registered: 13 years ago Posts: 2,947 |
Ok the mistakes you pointed out have been fixed and the repo is updated.
| FFF Settings Calculator | Gcode post processors | Geometric Object Deposition Tool Blog |
| Tantillus.org | Mini Printable Lathe | How NOT to install a Pololu driver |
|
Re: Cable Z axis March 13, 2013 07:00PM |
Registered: 12 years ago Posts: 26 |
|
Re: Cable Z axis March 13, 2013 07:21PM |
Registered: 13 years ago Posts: 2,947 |
I used #4 x 1/4" which is really close to m3 x 6mm I would say any length from 4 - 8mm would work.
| FFF Settings Calculator | Gcode post processors | Geometric Object Deposition Tool Blog |
| Tantillus.org | Mini Printable Lathe | How NOT to install a Pololu driver |
|
Re: Cable Z axis March 18, 2013 12:48AM |
Registered: 12 years ago Posts: 26 |
|
Re: Cable Z axis March 18, 2013 01:43AM |
Registered: 13 years ago Posts: 2,947 |
robtbldr Wrote:
-------------------------------------------------------
> How does the z axis switch work with this setup.
> I had a tough time getting the z axis with the
> regular tantillus perfect for printing and was
> hoping that this would be a solution to
> eliminating the minutia of adjusting the micro
> switch.
The switch is in a fixed location when you use a J-head mk-V and uses the original bracket with the mk-IV. So with the fixed location one you are forced to use the bed bolts to adjust it and then use the Z offset in the start code to fine tune it. For the original one you could go about it the same way where you get it close and then use the bed bolts to get it closer and then use the Z offset in the start code to fine tune it.
| FFF Settings Calculator | Gcode post processors | Geometric Object Deposition Tool Blog |
| Tantillus.org | Mini Printable Lathe | How NOT to install a Pololu driver |
|
Re: Cable Z axis March 19, 2013 12:22AM |
Registered: 12 years ago Posts: 26 |
|
Re: Cable Z axis March 19, 2013 12:25AM |
Registered: 13 years ago Posts: 2,947 |
robtbldr Wrote:
-------------------------------------------------------
> I was looking at printing the lower drum but am
> not clear where i might find the settings for only
> perimeters, no wipe and no retract might be in
> kisslicer. Thanks.
Ok the way I do it is set the perimeters to say 10 and then it will not have room for infill. Then in the materials tab set the wipe distance to 0 and in the style tab uncheck the de-string box and that should print it solid with no retraction and only perimeters.
| FFF Settings Calculator | Gcode post processors | Geometric Object Deposition Tool Blog |
| Tantillus.org | Mini Printable Lathe | How NOT to install a Pololu driver |
|
Re: Cable Z axis March 19, 2013 01:35AM |
Registered: 12 years ago Posts: 26 |
|
Re: Cable Z axis March 19, 2013 02:21AM |
Registered: 13 years ago Posts: 2,947 |
Yeah I print a lot of structural parts with the coarse settings. You can also slide the speed slider all the way to the fastest setting, you may need to up the temperature by as much as 25degrees depending on your filament. I would start by raising it by 10 and see how the part looks or if the extruder skips.
| FFF Settings Calculator | Gcode post processors | Geometric Object Deposition Tool Blog |
| Tantillus.org | Mini Printable Lathe | How NOT to install a Pololu driver |
|
Re: Cable Z axis March 20, 2013 03:52PM |
Registered: 12 years ago Posts: 26 |
|
Re: Cable Z axis March 20, 2013 03:59PM |
Registered: 13 years ago Posts: 2,947 |
robtbldr Wrote:
-------------------------------------------------------
> It could be just me and it probably is, but I ave
> tried to print out the 4mm and 5mm drum but can't
> get it to fit over the motor shaft. I had to
> drill it out but introduced a wobble. That and
> the nut holder seems way small for #4 nut. Did I
> mess up the settings somewhere? Thanks.
This makes me think the flow may be a little high. You could try reducing the flow tweak a little in Kisslicer or follow the high resolution calibration instructions on the tutorials page of Tantillus.org or if you find the extrusion is correct because the top of flat objects turns out perfectly smooth you could use the inset feature in Kisslicer to inset the outer wall by the amount they are coming out to big.
| FFF Settings Calculator | Gcode post processors | Geometric Object Deposition Tool Blog |
| Tantillus.org | Mini Printable Lathe | How NOT to install a Pololu driver |
|
Re: Cable Z axis April 10, 2013 06:35PM |
Registered: 12 years ago Posts: 26 |
|
Re: Cable Z axis April 10, 2013 07:37PM |
Registered: 13 years ago Posts: 2,947 |
What method are you using? In the start code with the G92 and G1? Using Z offset?
If you are using Z offset you will need to turn off software endstops (which I do not like).
Is it just the first layer you are having issues with?
If it is all the layers it may be a rounding error due to the Z steps per mm. At 100.66 steps per mm the best layer height is 0.139.
If you are using Z offset you will need to turn off software endstops (which I do not like).
Is it just the first layer you are having issues with?
If it is all the layers it may be a rounding error due to the Z steps per mm. At 100.66 steps per mm the best layer height is 0.139.
| FFF Settings Calculator | Gcode post processors | Geometric Object Deposition Tool Blog |
| Tantillus.org | Mini Printable Lathe | How NOT to install a Pololu driver |
|
Re: Cable Z axis April 10, 2013 08:10PM |
Registered: 12 years ago Posts: 26 |
|
Re: Cable Z axis April 10, 2013 08:28PM |
Registered: 12 years ago Posts: 26 |
|
Re: Cable Z axis April 10, 2013 08:46PM |
Registered: 13 years ago Posts: 2,947 |
Can you open the gcode file in a text editor and see if the G92 / G1 are in there the way you have them set.
Also another way is with no tape on the glass you can loosen the bed bolts and adjust the bed up until the glass just touches the hotend in each corner.
Also be sure the rod that the endstop is attached to is not moving up and down.
Edited 1 time(s). Last edit at 04/10/2013 10:33PM by Sublime.
Also another way is with no tape on the glass you can loosen the bed bolts and adjust the bed up until the glass just touches the hotend in each corner.
Also be sure the rod that the endstop is attached to is not moving up and down.
Edited 1 time(s). Last edit at 04/10/2013 10:33PM by Sublime.
| FFF Settings Calculator | Gcode post processors | Geometric Object Deposition Tool Blog |
| Tantillus.org | Mini Printable Lathe | How NOT to install a Pololu driver |
|
Re: Cable Z axis May 16, 2013 08:10PM |
Registered: 11 years ago Posts: 78 |

Sorry, only registered users may post in this forum.