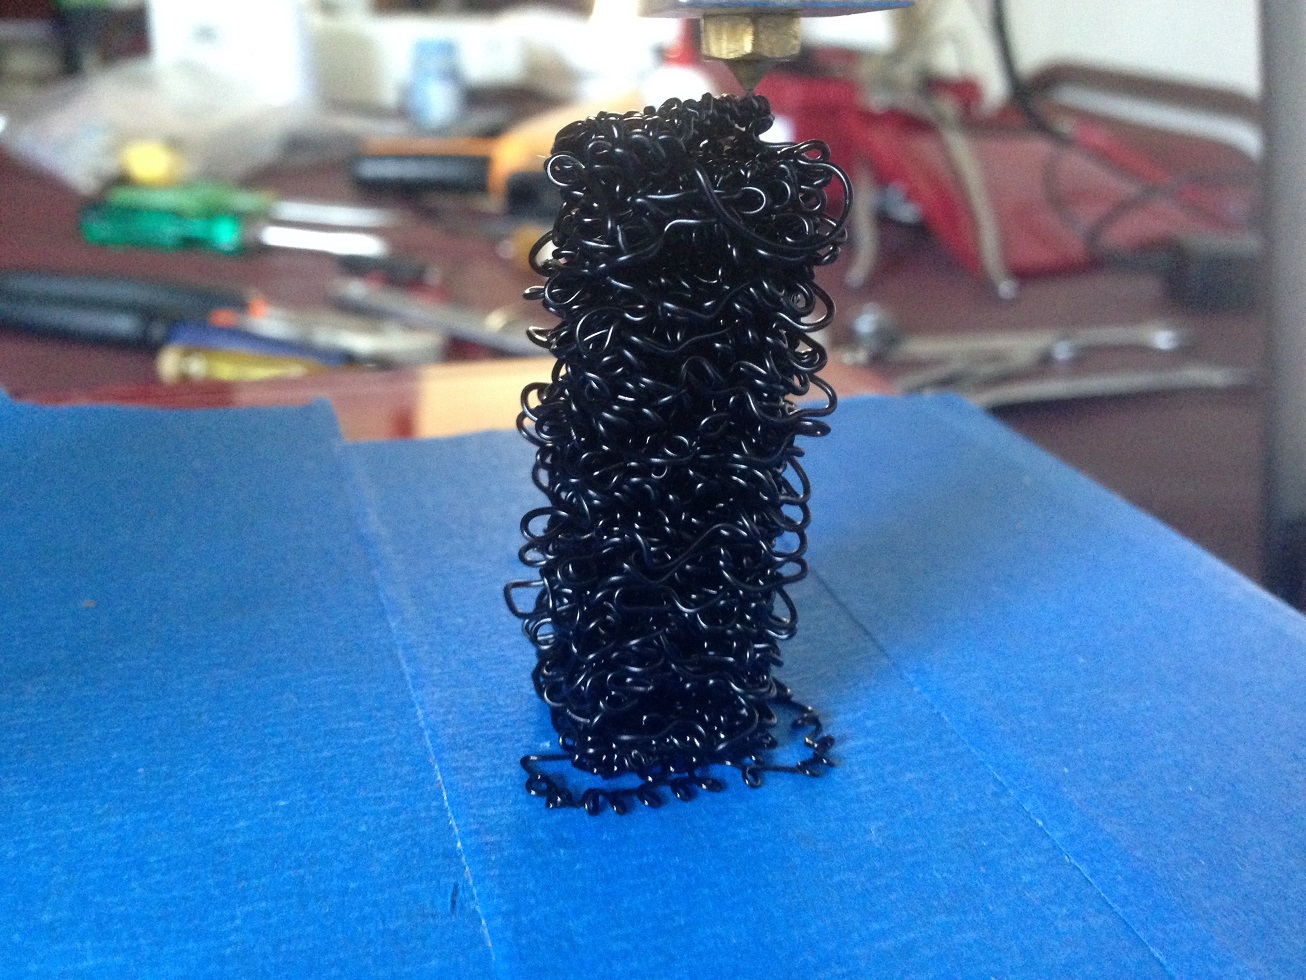
My cube test print is actually a really tall tower! 
Posted by cmzulian
|
My cube test print is actually a really tall tower! November 20, 2016 03:41PM |
Registered: 7 years ago Posts: 18 |
Hello,
I'm having more problems.
I'm trying to set my prusa I3 running, but when I print a cube to test that everything is right its end up being a super long squared based tower.
I don't know what's wrong, but something is probably wrong with the Z axis, can someone help me?
I'm printing with PLA, at 210 Celsius.
The layer height on Slic3r is 0.3mm. But obviously that's not really working. I guess it's something in the code of Marlin but I don't know what.
Do I have to change some of this?
// MOVEMENT SETTINGS
// @section motion
//
// default settings
#define DEFAULT_AXIS_STEPS_PER_UNIT {80,80,4000,500} // default steps per unit for Ultimaker
#define DEFAULT_MAX_FEEDRATE {300, 300, 5, 25} // (mm/sec)
#define DEFAULT_MAX_ACCELERATION {3000,3000,100,10000} // X, Y, Z, E maximum start speed for accelerated moves. E default values are good for Skeinforge 40+, for older versions raise them a lot.
#define DEFAULT_ACCELERATION 3000 // X, Y, Z and E acceleration in mm/s^2 for printing moves
#define DEFAULT_RETRACT_ACCELERATION 3000 // E acceleration in mm/s^2 for retracts
#define DEFAULT_TRAVEL_ACCELERATION 3000 // X, Y, Z acceleration in mm/s^2 for travel (non printing) moves
// The speed change that does not require acceleration (i.e. the software might assume it can be done instantaneously)
#define DEFAULT_XYJERK 20.0 // (mm/sec)
#define DEFAULT_ZJERK 0.4 // (mm/sec)
#define DEFAULT_EJERK 5.0 // (mm/sec)
Help please??
Edited 1 time(s). Last edit at 11/20/2016 03:59PM by cmzulian.
|
Re: My cube test print is actually a really tall tower! November 20, 2016 05:25PM |
Registered: 9 years ago Posts: 1,873 |
That may be my favorite test cube ever. I think your steps/mm for your Z axis does not match your hardware. In your config the line is
#define DEFAULT_AXIS_STEPS_PER_UNIT {80,80,4000,500} // default steps per unit for Ultimaker
You need to calculate the actual steps/mm and replace the 4000. There is a calculator that can help you here: [prusaprinters.org] See the section "Steps per millimeter - leadscrew driven systems". For example, the default in the calculator is for M8 threaded rod with 1:16 microstepping, and that comes out at 2560 steps/mm. TR8 4 start lead screws come out at 400 steps/mm with the same micro-stepping.
edit: My wife is an artist - she says you should call that piece "Entanglement of the mind" and sell it
Edited 1 time(s). Last edit at 11/20/2016 05:27PM by JamesK.
|
Re: My cube test print is actually a really tall tower! November 20, 2016 07:38PM |
Registered: 7 years ago Posts: 18 |
Thanks JamesK,
I have been trying since yesterday to solve this, I know that my screw lead is T8, but I don't know the microstepping, I tried with 400 steps/mm and 1:16 and the first few layers were good, but then the nozzle was starting to get into the previous print, so I guess that 400 steps/mm it's too low is there any way to know what my microstepping?
Tell your wife that I have a ton of those failed test if she wants them
Another question if you know:
#define DEFAULT_AXIS_STEPS_PER_UNIT {80,80,4000,500}
what's the 500 for? maybe that also has something to do?
|
Re: My cube test print is actually a really tall tower! November 20, 2016 07:54PM |
Registered: 9 years ago Posts: 1,873 |
What sort of control board are you using? For ramps, the microstepping is set by a group of three jumpers under each stepper driver, and the meaning of the jumpers depends on which sort of stepper driver is being used. For A4988 the combinations are here: [www.pololu.com] and for DRV8825 they are on here: [www.pololu.com]
You can check the Z calibration by homing the Z axis (which hopefully brings it very close to the printing surface), commanding the Z axis to move to a set height, say 10 or 20mm and then measuring how far it actually goes. If it's a micro-stepping issue then the distance will be off by some power of 2.
#define DEFAULT_AXIS_STEPS_PER_UNIT {80,80,4000,500}
The values are x,y,z and extruder. If you haven't calibrated the extruder then it's quite likely that the problem you are seeing now is over-extrusion. Have a look at this guide for general calibration and extruder calibration in particular: [reprap.org]
|
Re: My cube test print is actually a really tall tower! November 20, 2016 09:09PM |
Registered: 7 years ago Posts: 18 |
My board is the A4988.
The Z axis I have already calibrated, and the bed is leveled also. So I did what you suggested with a 400 steps/mm moved the axis 10mm and it moved 10mm, so I guess that is the extruder then...
The extruder thing, I'm trying to calibrate that, now, but, when I do the step of marking the 120 mm and then feeding 100mm, it's feeds more than the 120 mm, from what I get from the link that you sent me it should stop before the 120mm mark. What should I do then?
|
Re: My cube test print is actually a really tall tower! November 20, 2016 10:03PM |
Registered: 9 years ago Posts: 978 |
How tall should the cube be? How tall is it actually?The ratio between those will tell you the ratio between the current Z axis steps/mm and what it should be, without needing to worry about microstepping.
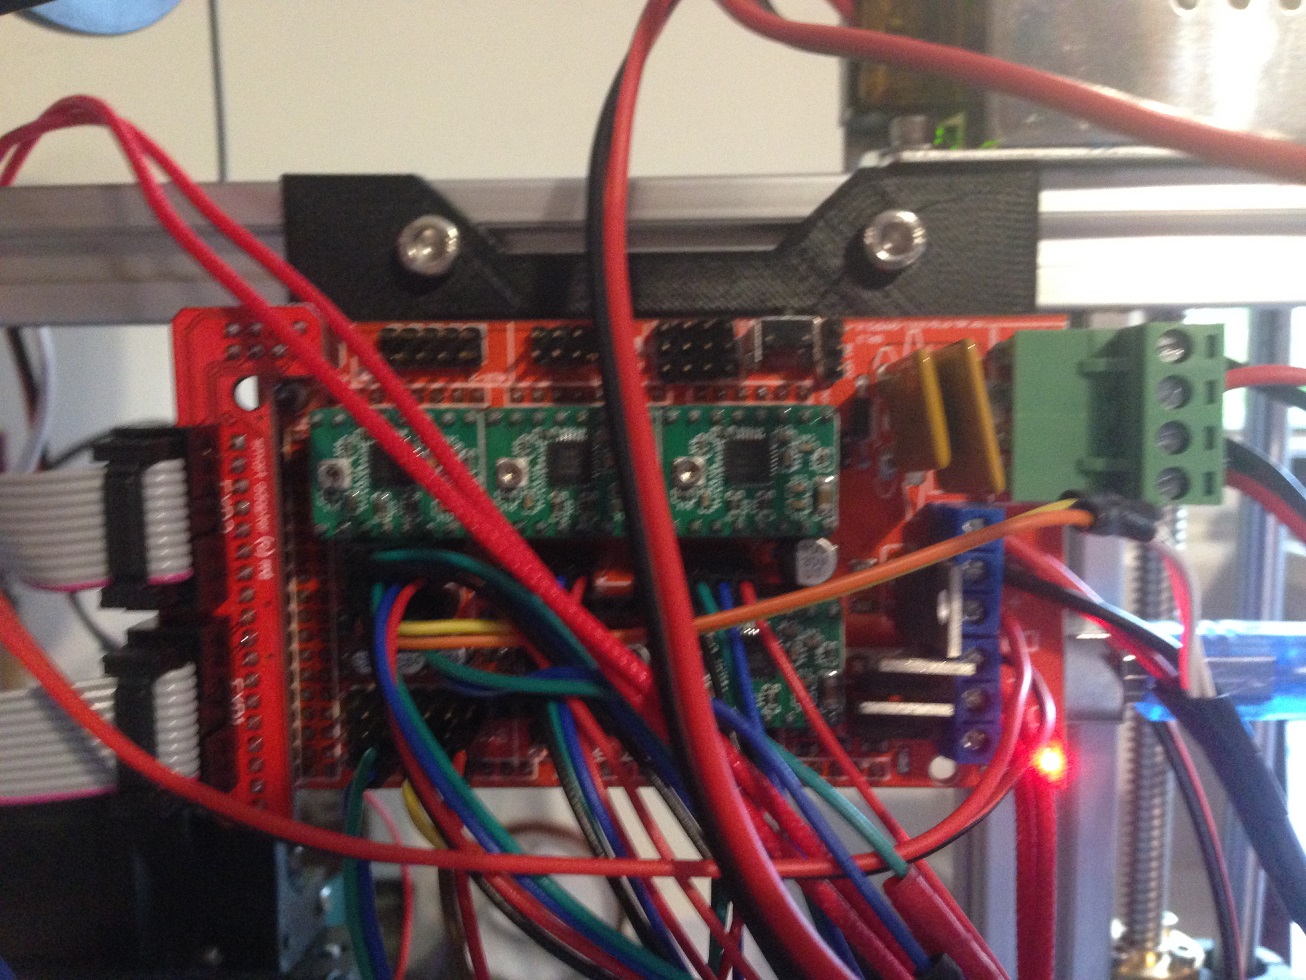
A4988 is the stepper driver... the control board will be something like a RAMPS perhaps? The thing that the stepper drivers plug into.
Very cool cube picture, BTW. I couldn't do that if I tried.

A4988 is the stepper driver... the control board will be something like a RAMPS perhaps? The thing that the stepper drivers plug into.
Very cool cube picture, BTW. I couldn't do that if I tried.
No, no... these are like screen prints and such-like... limited production runs, never to be repeated.Quote
Tell your wife that I have a ton of those failed test if she wants them grinning smiley
|
Re: My cube test print is actually a really tall tower! November 21, 2016 01:47AM |
Registered: 7 years ago Posts: 15 |
Hi.
If z settings are ok, then the culprit could be the driver or the board. This happened to me. The z steps were ok. But then sometimes the microstepping settings obviously changed. The travel of the z axis doubled or was 4 times as high as expected. Either midprint or from the start sometimes. I replaced the driver.
If z settings are ok, then the culprit could be the driver or the board. This happened to me. The z steps were ok. But then sometimes the microstepping settings obviously changed. The travel of the z axis doubled or was 4 times as high as expected. Either midprint or from the start sometimes. I replaced the driver.
|
Re: My cube test print is actually a really tall tower! November 21, 2016 11:34AM |
Registered: 7 years ago Posts: 18 |
Hi guys!
Thanks for all your answer!
I don't know the difference between a drive and a board (I'm a fashion designer student, its a miracle that I had this thing build and "somewhat' working in four days ) The board is the thing where I plugged the cables maybe? I will put a picture if its change anything.
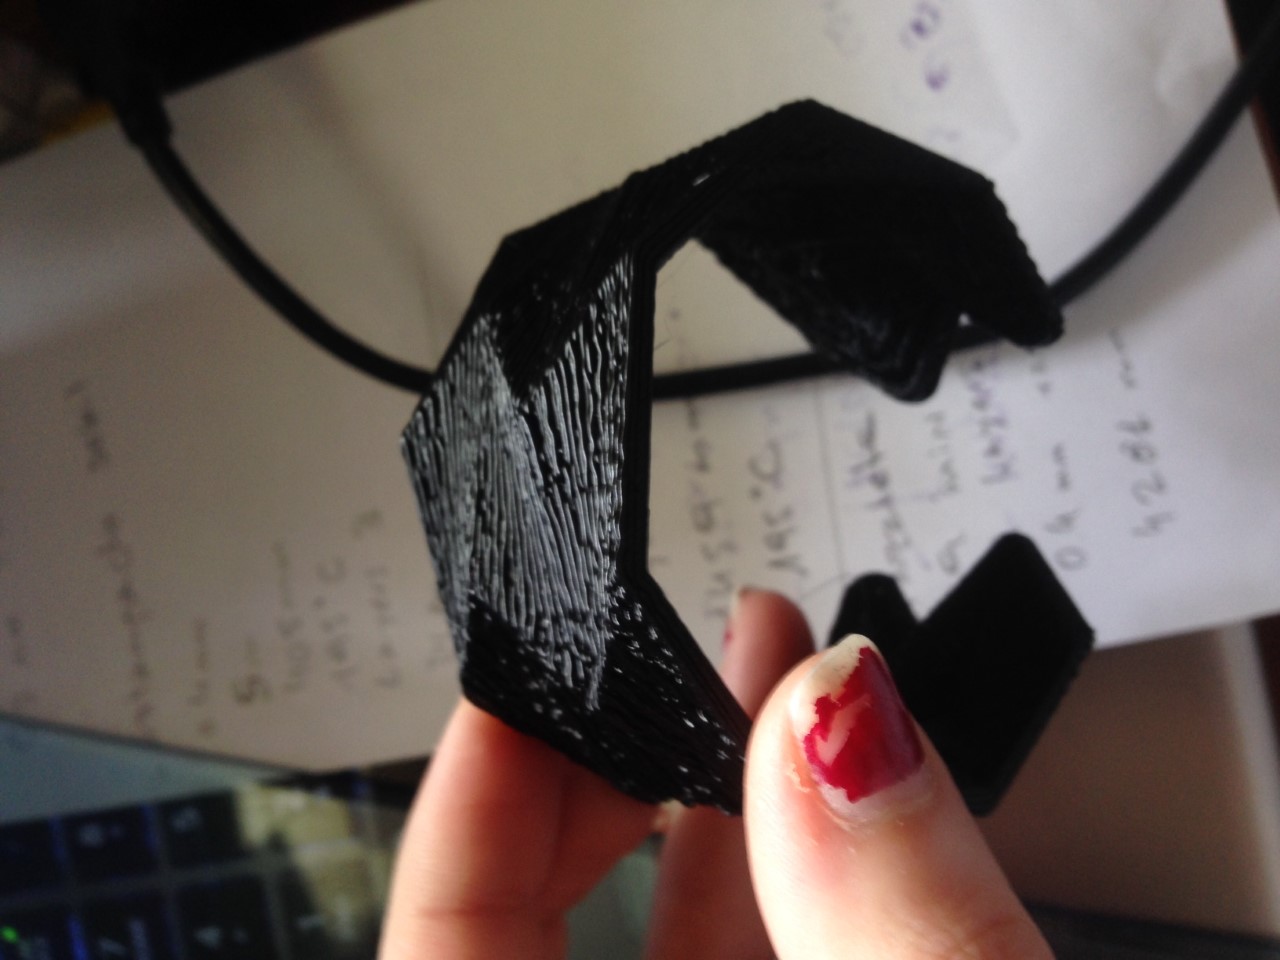
Well the matter with the cube: after I got half a cube that seemed kinda ok, I decided to stop using a cube and tried with a bracelet. And the measures printed were perfect!
The only thing that I think could be better is that on the sides the line layers are too visible (I don't know how to explain this) but maybe it could be smoother? (I will add a picture of this for reference)
is this due to the print settings?
I printed with PLA, its the roll that came with the machine, and it didn't had any labels or print directions, so I set the nozzle temperature to 195 Celsius and the layer thickness to 0.4mm. the printing speed was 40mm/s. Should I try with more temperature or/and less speed?
Besides this, I'm quite glad that the measures came right. Thanks to all your help
Thanks for all your answer!
I don't know the difference between a drive and a board (I'm a fashion designer student, its a miracle that I had this thing build and "somewhat' working in four days
) The board is the thing where I plugged the cables maybe? I will put a picture if its change anything.Well the matter with the cube: after I got half a cube that seemed kinda ok, I decided to stop using a cube and tried with a bracelet. And the measures printed were perfect!
The only thing that I think could be better is that on the sides the line layers are too visible (I don't know how to explain this) but maybe it could be smoother? (I will add a picture of this for reference)
is this due to the print settings?
I printed with PLA, its the roll that came with the machine, and it didn't had any labels or print directions, so I set the nozzle temperature to 195 Celsius and the layer thickness to 0.4mm. the printing speed was 40mm/s. Should I try with more temperature or/and less speed?
Besides this, I'm quite glad that the measures came right. Thanks to all your help
|
Re: My cube test print is actually a really tall tower! November 21, 2016 11:41AM |
Registered: 9 years ago Posts: 1,873 |
Temp and speed sound reasonable, but the layer thickness is on the high side. The thinner the layers, the smoother the sides will tend to look (but also the more critical the extruder callibration will be). 0.2mm layers is a good starting point. When you get to 0.1mm layers it tends to start looking very much smoother, but the prints take a long time.
|
Re: My cube test print is actually a really tall tower! November 21, 2016 12:47PM |
Registered: 7 years ago Posts: 18 |
|
Re: My cube test print is actually a really tall tower! November 21, 2016 01:56PM |
Registered: 9 years ago Posts: 1,873 |
Quote
cmzulian
The extruder thing, I'm trying to calibrate that, now, but, when I do the step of marking the 120 mm and then feeding 100mm, it's feeds more than the 120 mm, from what I get from the link that you sent me it should stop before the 120mm mark. What should I do then?
Did you get past this? The 120mm is just a suggestion based on the assumption that the steps/mm was already pretty close, so there's lots of ways to work around the problem, depending on how far out you think the current settings are. If it looks like it's extruding waaaaay more than 100mm then keep the mark at 120mm but instead of commanding 100mm, command only 10. Hopefully that still leaves you with the mark visible so that you can measure the amount of filament that moved and you can work out roughly how many times more filament was moved than you wanted (e.g. say it was 3 times as much). Then you'd reduce the steps/mm by that factor and you should be in the right ball-park to try again using 100mm.
If it's only extruded a little bit too much filament then you can make a second mark where the filament enters the extruder and then back out the filament so that you can see the first mark again. Now when you measure the distance between the two marks you add it to 120 to get the amount that was extruded instead of take it away like you normally do. Once you know the actual amount extruded you calculate the new steps/mm in the way that the calibration guide describes.
The final step of extrusion calibration is making sure that multiple layers of solid infill are printed without gaps but without excess building up. To my mind this is the most functionally useful definition of correct extrusion. It usually just takes a 1 or 2% adjustment of flow rate on the lcd to find the right value, assuming that you've already done the basic extrusion calibration based on filament lengths above.
Edited 2 time(s). Last edit at 11/21/2016 01:58PM by JamesK.
|
Re: My cube test print is actually a really tall tower! November 22, 2016 12:00PM |
Registered: 7 years ago Posts: 18 |
JamesK, I did do that, but I'm not exactly sure if I got it totally right. It looks better than before, the sides looks good enough, but the top looks a little messy...
I think that I need to keep working on this..
Do you think that that top layer looks too bad?
I think that I need to keep working on this..
Do you think that that top layer looks too bad?
|
Re: My cube test print is actually a really tall tower! November 22, 2016 01:04PM |
Registered: 9 years ago Posts: 1,873 |
"too bad" is entirely relative - you're getting usable prints out of your printer so it's all good. But, yes, there's room for improvement - those look quite a bit over-extruded, and getting that calibration better will avoid potential problems during a print where too much plastic builds up and then catches the nozzle on the next pass.
How are you running your prints, from an SD card or from a host PC? If you're print from an SD card then check through the LCD menus to see if there is an option for changing the flow rate (not the feed rate, that's the overall speed of the printing where as flow rate is how much plastic gets pushed out per unit length). If you're printing from the PC then the host software likely has a slider for adjusting the flow rate. Either way, if you slice a solid test cube of about 20mm each side and start it printing and then reduce the flow rate by about 5% each layer you should start to see it improve. Give it a couple of layers after each adjustment to see the change as it takes a while for the command to get through all the buffers and make a difference, and if the layer underneath is messy it may take a layer or two for things to change. If it gets too messy and you can't tell what's going on, cancel the print and start a new one, starting with the reduced value you got to on the previous run. Ignore the first two layers as they are very sensitive to the height of the first layer. Once you find a modified flow rate that looks good you can use that to calculate the new steps/mm for the extruder to put into the firmware.
How are you running your prints, from an SD card or from a host PC? If you're print from an SD card then check through the LCD menus to see if there is an option for changing the flow rate (not the feed rate, that's the overall speed of the printing where as flow rate is how much plastic gets pushed out per unit length). If you're printing from the PC then the host software likely has a slider for adjusting the flow rate. Either way, if you slice a solid test cube of about 20mm each side and start it printing and then reduce the flow rate by about 5% each layer you should start to see it improve. Give it a couple of layers after each adjustment to see the change as it takes a while for the command to get through all the buffers and make a difference, and if the layer underneath is messy it may take a layer or two for things to change. If it gets too messy and you can't tell what's going on, cancel the print and start a new one, starting with the reduced value you got to on the previous run. Ignore the first two layers as they are very sensitive to the height of the first layer. Once you find a modified flow rate that looks good you can use that to calculate the new steps/mm for the extruder to put into the firmware.
|
Re: My cube test print is actually a really tall tower! November 24, 2016 12:11PM |
Registered: 7 years ago Posts: 18 |
|
Re: My cube test print is actually a really tall tower! November 24, 2016 12:58PM |
Registered: 9 years ago Posts: 1,873 |
Sorry, only registered users may post in this forum.