Printing issues - HELP
Posted by dim131
|
Printing issues - HELP December 14, 2015 03:02PM |
Registered: 8 years ago Posts: 10 |
Hello to all,
I have a Prusa I3 3D printer and using Slic3r with the repetier host. I am having an issue of having defects in my prints at a particular layer. These defect are like as if the printer misses a perimeter or stops injecting the filament. Please note that this is only for one layer, then the prints continues flawlessly. Also, there are instances where if lets say I print the same part 3 times, I get this defect in 2 of them and then I ll get the other perfect. So that is no telling when and where this happens. All I know is that if it happens its in the same layer sad smiley.
I cannot say that I am Guru on 3D printing but neither I am a newbie. I had my printer for well over a year now and I have made alot of modifications to my printer. On the whole I get pretty much very good prints, apart from this issue that I am stating here.
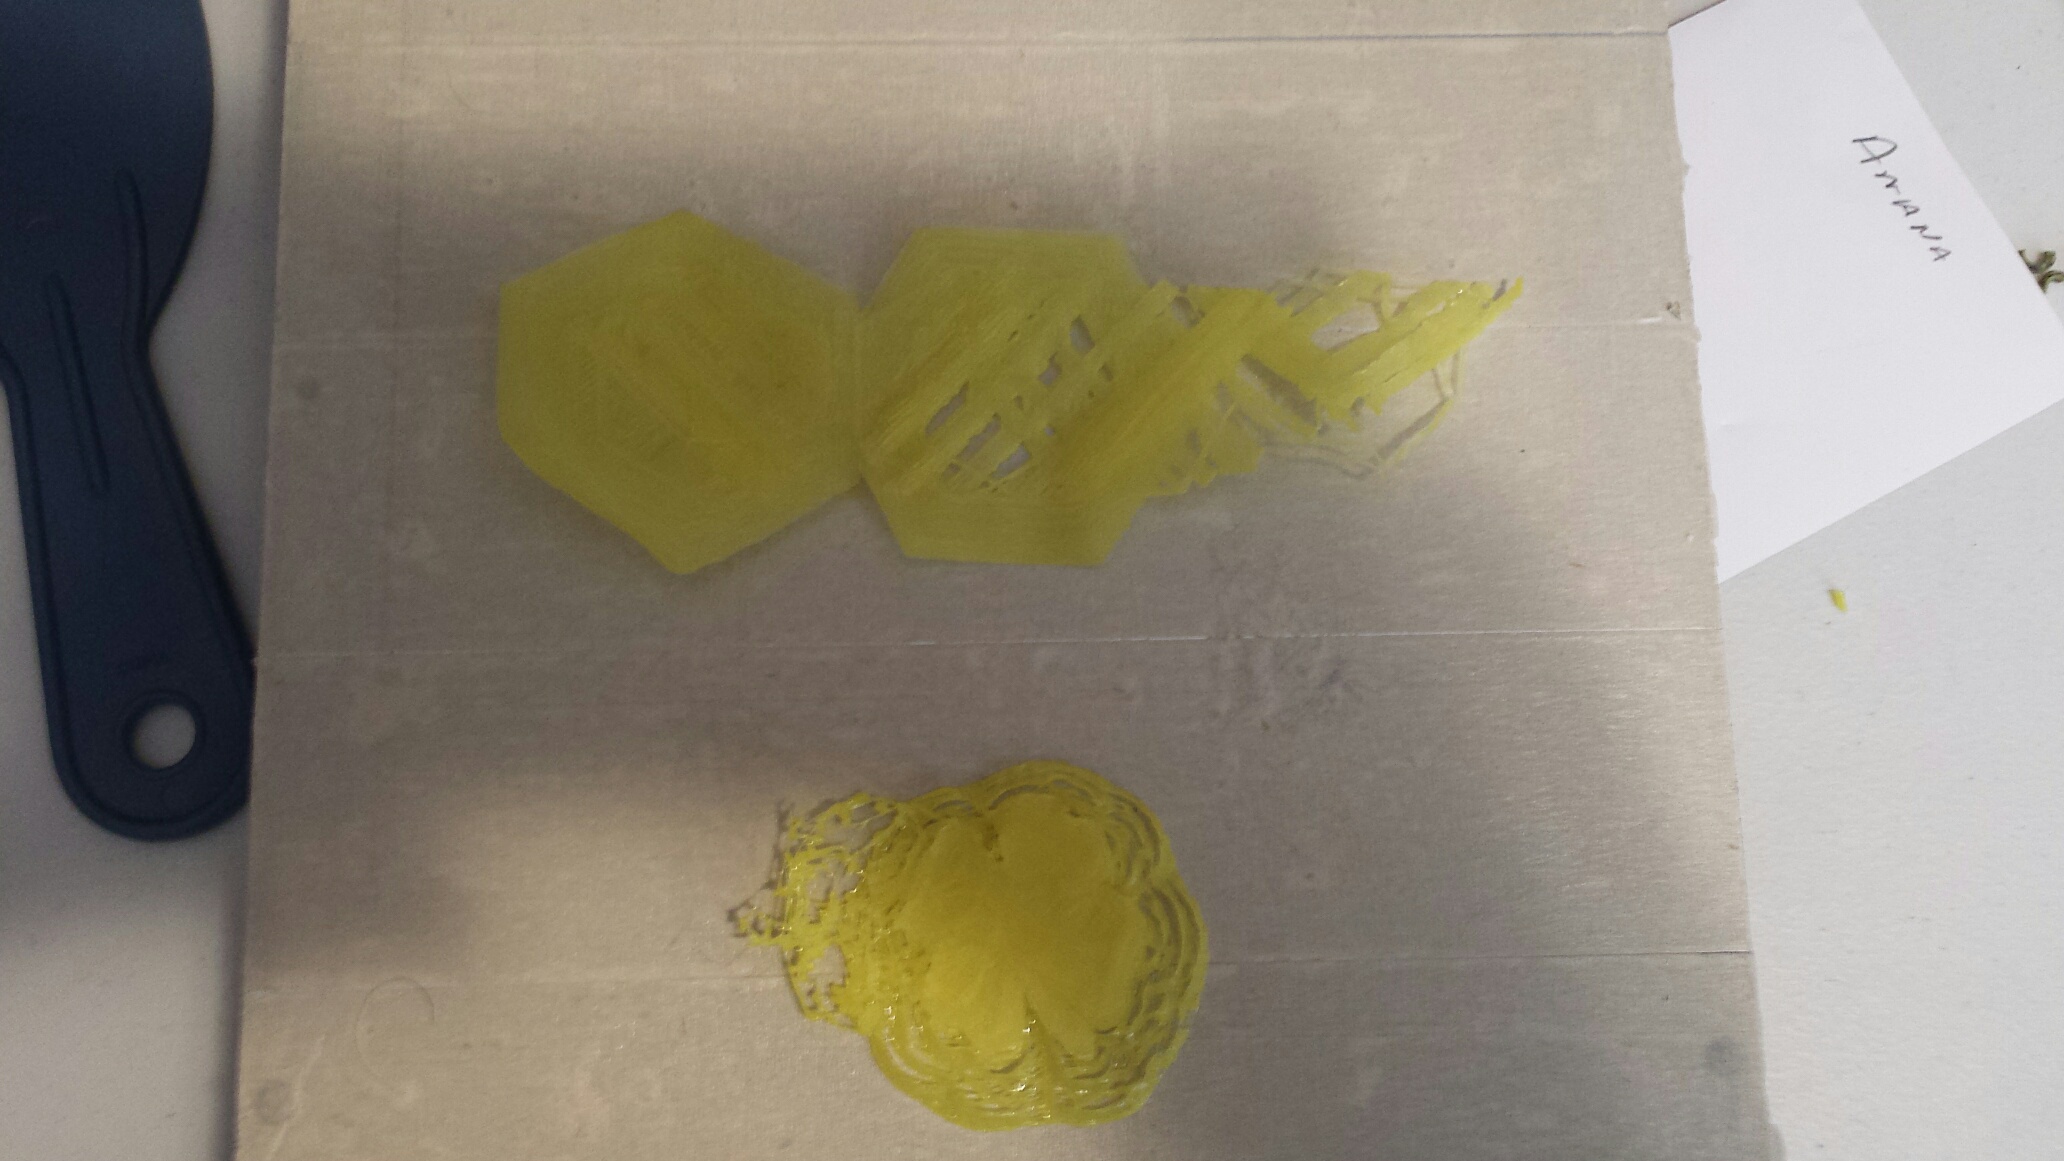
I have prepared some images to show you this defect in various 3D prints, maybe some one already had this issue and can help me out in solving it. Please let me know if you need anything else, like example what slicer settings i have or the STL file itself.
I am sorry if the photo are not that good, but I had trouble focusing :p.
P.S - at the bottom where I am holding those 2 black disc, I have printed those together. And as you can see one is bad (left) and the other is how it suppose to be (right).
Help is appreciated.
I have a Prusa I3 3D printer and using Slic3r with the repetier host. I am having an issue of having defects in my prints at a particular layer. These defect are like as if the printer misses a perimeter or stops injecting the filament. Please note that this is only for one layer, then the prints continues flawlessly. Also, there are instances where if lets say I print the same part 3 times, I get this defect in 2 of them and then I ll get the other perfect. So that is no telling when and where this happens. All I know is that if it happens its in the same layer sad smiley.
I cannot say that I am Guru on 3D printing but neither I am a newbie. I had my printer for well over a year now and I have made alot of modifications to my printer. On the whole I get pretty much very good prints, apart from this issue that I am stating here.
I have prepared some images to show you this defect in various 3D prints, maybe some one already had this issue and can help me out in solving it. Please let me know if you need anything else, like example what slicer settings i have or the STL file itself.
I am sorry if the photo are not that good, but I had trouble focusing :p.
P.S - at the bottom where I am holding those 2 black disc, I have printed those together. And as you can see one is bad (left) and the other is how it suppose to be (right).
Help is appreciated.
|
Re: Printing issues - HELP December 14, 2015 09:00PM |
Registered: 9 years ago Posts: 978 |
Hi,
I wonder if the problem is heat rather than the actual Z layer.
What can happen is that the filament in the top of the hotend gradually gets warmer until it is soft enough to expand, causing the filament to jam. So tell us about your hotend, fan(s), and printing temperatures.The same kind of thing can happen if your extruder stepper motor or driver overheats... the extruder motor will then have less power. Does your extruder motor click? Does the extruder grind away some of the filament?
Frank
|
Re: Printing issues - HELP December 15, 2015 02:42PM |
Registered: 8 years ago Posts: 10 |
Hi Frank,
Well to be honest I experimented with all the settings in the slicer, except the cooling section. I left this section as it was.
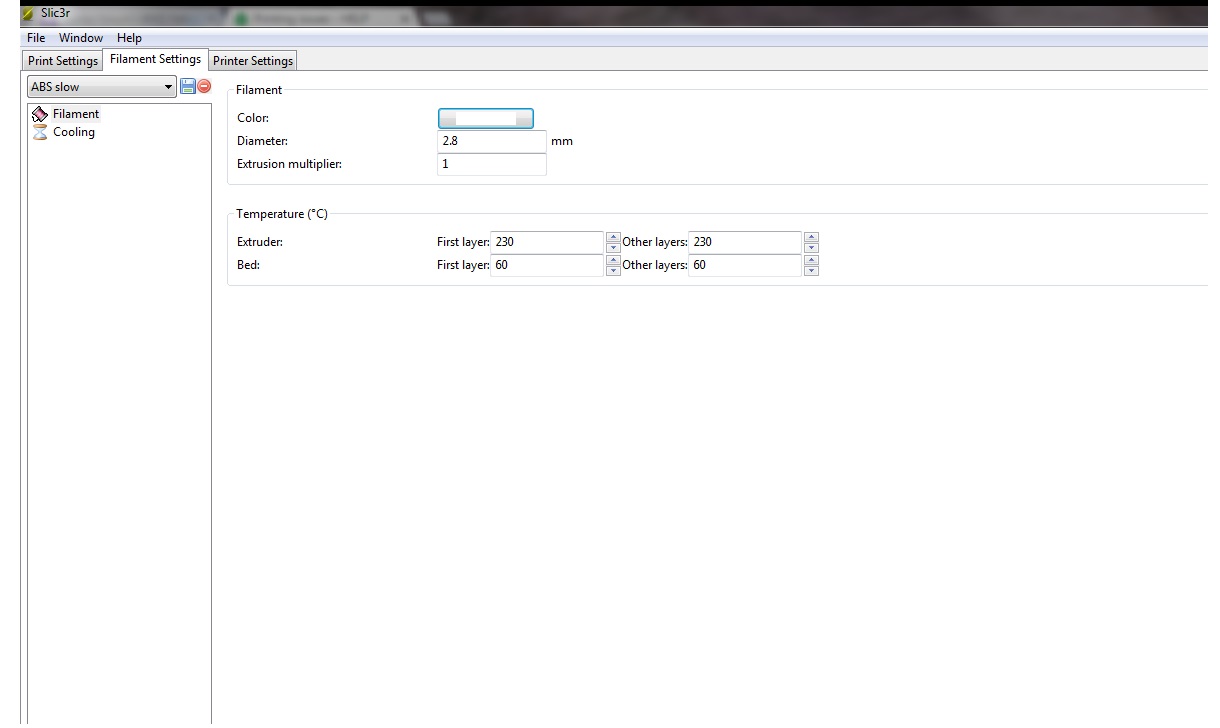
I am attaching my settings in two separate images, and a collage of another part having layers missing and a photo of my physical hot end part
To answer your questions, sometimes I do hear the motors clicking (as you mentioned), but it's difficult to see and to be sure if the clicking correspond to the defect in my prints. I mean it's difficult to be staring at the printer when the clicking sound occurs. I just know as I ll be working on my desk next to the printer and as you mentioned somethings I hear the clicking sound (the same sound as when the steppers skip steps)... So this must be the problem!! If so what is the solution for this?
Regarding the grinding, I cannot say that I don't find ground filament... but for the amount of prints that I do this is minimal... but again I am not excluding anything.
So, what is your conclusion??? What should I check or test?
P.S - When you mentioned the that driver may over heat and the motors will not have enough power to push the filament out, did you mean as in the RAMPS being hot!! because I just remembered that I never made the heat sinks on my RAMPS!
Thank you - exited for your reply
Dim
Well to be honest I experimented with all the settings in the slicer, except the cooling section. I left this section as it was.
I am attaching my settings in two separate images, and a collage of another part having layers missing and a photo of my physical hot end part
To answer your questions, sometimes I do hear the motors clicking (as you mentioned), but it's difficult to see and to be sure if the clicking correspond to the defect in my prints. I mean it's difficult to be staring at the printer when the clicking sound occurs. I just know as I ll be working on my desk next to the printer and as you mentioned somethings I hear the clicking sound (the same sound as when the steppers skip steps)... So this must be the problem!! If so what is the solution for this?
Regarding the grinding, I cannot say that I don't find ground filament... but for the amount of prints that I do this is minimal... but again I am not excluding anything
.So, what is your conclusion??? What should I check or test?
P.S - When you mentioned the that driver may over heat and the motors will not have enough power to push the filament out, did you mean as in the RAMPS being hot!! because I just remembered that I never made the heat sinks on my RAMPS!
Thank you - exited for your reply
Dim
|
Re: Printing issues - HELP December 17, 2015 12:21PM |
Registered: 8 years ago Posts: 94 |
I have an RepRap Prusa i3 Mendel 3d printer. it seams to run okay except it drifts to the right (top picture) first layer was fine then it started drifting to the right.
(bottom Picture) tried something else this time it drifed to the left. what is wrong and how do i correct it?
thank you for any help.
(bottom Picture) tried something else this time it drifed to the left. what is wrong and how do i correct it?
thank you for any help.
|
Re: Printing issues - HELP December 17, 2015 04:18PM |
Registered: 8 years ago Posts: 778 |
|
Re: Printing issues - HELP December 18, 2015 10:48AM |
Registered: 8 years ago Posts: 10 |
|
Re: Printing issues - HELP December 18, 2015 06:57PM |
Registered: 8 years ago Posts: 94 |
OKay how do you adjust the setting? someone said us Arduino I got it but nothing to tell me how to use the darn program. I'm including a picture of the control board could you tell me the type of board it is so I can find out more information about it? need to know the model of it so i can get the right information. I know it's an Mendel but that's all i know not sure if it's 1.4, 1.6 or what. Thank you for any help.
|
Re: Printing issues - HELP December 19, 2015 03:00AM |
Registered: 9 years ago Posts: 978 |
Hi dim,
Since no-one else has, I'll give it a try. But I'm close to the limit of my knowledge.
My understanding is that if too much current is fed to the motor, the driver on the RAMPS board will get hot. Possibly also/instead the motor itself will get hot (i.e. too hot to hold your finger on). When either of these things happen, the motor will begin skipping steps. The solution to either of these things is to turn down the current to the extruder. However, if the current is too low, the stepper will also skip. I don't know what the right current setting is, or how to know what the right setting is.
A workaround (and also way to confirm the overheating problem) is to pause the print when you hear it start to click. Wait 20 minutes for everything to cool down, they continue the print. If this works, slowing down your printing speed may reduce or eliminate the problem. Improving cooling of the RAMPS may help, or adding a fan to directly cool the motor itself.
However, it may not be that simple. For example, if the filament inside the hotend gets warm, it can expand, jam, and then cause the motor to start skipping. In this case, fixing the motor heating and current may not fix the real problem.And slowing down printing may make it worse. Another possible cause is over-extruding, since that can increase back-pressure in the hot end and therefore extruder motor skipping. You *could* have all 3 problems at the same time.
So I suggest trying the stop-start method and see if that helps. Also try reducing your filament extrusion multiplier (although this may cause adhesion and other issues).
|
Re: Printing issues - HELP December 23, 2015 11:58PM |
Registered: 9 years ago Posts: 705 |
A couple of thoughts, Assuming you are printing with PLA, 230 is way to hot. I run at 180c and 70c. If ABS then 230 is ok but bed is to cool to stick. Secondly, does your hotend have cooling? If not you have to add a fan where the filament leaves the hob. Heat will creep up and cause jams (clicking sound). If filament is inconsistent in diameter it will jam (clicking sound). If motors are Nema 17's than "Voltage" should be .5 to .7. At least it is on my Melzi board. I have cooling fans on all motors and my control board. 40 x 40 x 20 mm. If prints involve a lot of retract action you may see stripping of the filament. Normally if this happens it won't correct itself. The fact that it happens on the same layer is odd. You may want to try Cura slicer and see what happens.
|
Re: Printing issues - HELP December 29, 2015 05:02PM |
Registered: 8 years ago Posts: 94 |
Thank you for your help. Now to adjust the voltages you turn the "pots" right? I have them set at X=.8, Y=.8, Z=1.1 and Extruder motor at .8 does that sound right or wrong? does anyone know where to go and check on the setting?
also have picture of the last test run it's drifting to the right.
Again thank you for your help.
also have picture of the last test run it's drifting to the right.
Again thank you for your help.
|
Re: Printing issues - HELP December 29, 2015 10:40PM |
Registered: 10 years ago Posts: 580 |
Yar60, your issue may be similar to the original poster's but the cause may be different. On the Troubleshooting page in the Wiki, there is the new Shifted Layers page I compiled. There are a great many possible causes, with solutions. Make sure to check out the two Calibration Pages. Best to post this issue in it's own thread, OK?
Dim131
There's quite a bit of good things said correctly.
But in order to narrow this down I need this info.
- You've already given a photo of the parts. You have indicated that it does not always happen with the same part. So that rules out a problem with the slicer/gcode.
- In order to rule out a problem with heat creap into the cold-end, please provide a photo of your hot-end/fan setup.
- Please provide a photo of your controller/drivers so we can see how they are set up and cooled.
Please provide the relevant missing info and we will be more able to help. We don't need the G-code at this time.
My printer: Raptosaur - Large Format Delta - [www.paulwanamaker.wordpress.com]
Can you answer questions about Calibration, Printing issues, Mechanics? Write it up and improve the Wiki!
|
Re: Printing issues - HELP December 30, 2015 03:25AM |
Registered: 8 years ago Posts: 10 |
Firstly thank you again for your effort to help, I very much appreciated.
I have attached photos of my printer setup along with my slicer settings. As far as speed I think I am on the slow side, this I found to be the best for smooth results.
Other data,
I am printing with 2.8mm form futura black ABS (BTW I had the same problem with 3mm PLA).
Also to let you know, as you can see in the 'overall photo', I have two filaments (one cyan and the other black). Before I used to feed the filament from where the cyan is positioned, and I thought that the filament was being stuck (due to friction to rotate, especially when it is new, thus being heavy), so after some research I have placed the feeding filament over the extruder, thus eliminating the possibility that the filament gets stuck and pyres the hotend upwards for that little time! In other words, I tried to minimize friction... but I still had the same defect in certain prints.
Also, as far as heat in my drivers, I took note and after a 1 hr print I can assure you that these are still relatively cool.... I have never check the voltages though...
Thank you very much and I hope you have the data necessary.
Dim
Attachments:
open | download - hot end rightside.jpg (397.9 KB)
open | download - hotend left side.jpg (384.7 KB)
open | download - Mega 1.jpg (475.7 KB)
open | download - mega2.jpg (535 KB)
open | download - overall .jpg (555.1 KB)
open | download - filamnet settings.jpg (69.1 KB)
open | download - printer speeds.jpg (120.4 KB)
open | download - temp settings.jpg (104.1 KB)
|
Re: Printing issues - HELP December 30, 2015 06:10AM |
Registered: 8 years ago Posts: 778 |
|
Re: Printing issues - HELP December 30, 2015 01:58PM |
Registered: 10 years ago Posts: 580 |
Dim,
First of all, really good photos! Thank you.
I have a few thoughts:
1) Not knowing the extrusion widths or layer heights I can not calculate the mm3/second (that's what the gcode would tell us), however one thing that sticks out is the infill speed is 90 mm/second, many times higher than the other speeds. This is going to cause a huge increase in pressure in the nozzle, perhaps enough to cause it to stall. I recommend lowering your infill speed near to your other speeds as a general rule.
2) If you combine that with the fact that you are using the a printing temp that is near the low end, the added viscosity would make it harder to extrude. I recommend raising the printing temp 5 or more degrees as a test.
3) Your fan is blowing directly on your hot-end. This is not a good thing. It should be blowing only on the peek plastic heat break. That will keep the peek cool without cooling your hot-end and without cooling the ABS you are printing. Fans blowing on ABS (for a non-enclosed, heated build chamber) is not a good idea either, as it will cause it to curl and warp. The ideal thing would be to have the fan ducted, and only blowing on the heat break, and have the hot end itself insulated with some high temp fiberglass tape.
4) As for the drivers, we can just focus on the driver for the extruder. If it is relatively cool, you can turn it up a bit, say 1/16 of a turn or a bit more, clockwise, using a ceramic screw driver. There is no need to test the voltage, if the chip is not burning hot it will not do a thermal reset. It is a good idea to have a fan blowing on the drivers, that will allow more performance if you need it. If your extruder motor is also not getting hot then all is well, otherwise a fan can be used there also...
5) I'm not sure if this is mentioned: check your extruder drive gear. Is it getting clogged with ground filament? If the filament is slipping then tighten the springs.
Hope that helps.
Edited 1 time(s). Last edit at 12/30/2015 02:00PM by Paul Wanamaker.
My printer: Raptosaur - Large Format Delta - [www.paulwanamaker.wordpress.com]
Can you answer questions about Calibration, Printing issues, Mechanics? Write it up and improve the Wiki!
|
Re: Printing issues - HELP December 31, 2015 12:14AM |
Registered: 8 years ago Posts: 94 |
I would like to know where? "Best to post this issue in it's own thread," I'm new to this and I was just asking for General Help.
thank you for all your help. I'm getting closer now the only Drifting I have is on the "Y" axis now. but I'm doing a lot of reading and getting closer to the answers I need.
Thanks Ray.
thank you for all your help. I'm getting closer now the only Drifting I have is on the "Y" axis now. but I'm doing a lot of reading and getting closer to the answers I need.
Thanks Ray.
|
Re: Printing issues - HELP December 31, 2015 01:29AM |
Registered: 10 years ago Posts: 580 |
No problem Ray!
Start a thread here in General, title it "Prusa i3 - Shifted Layers".
It's just easier to tackle separate issues in their own threads, less confusing.
Thanks.
My printer: Raptosaur - Large Format Delta - [www.paulwanamaker.wordpress.com]
Can you answer questions about Calibration, Printing issues, Mechanics? Write it up and improve the Wiki!
|
Re: Printing issues - HELP December 31, 2015 05:44PM |
Registered: 8 years ago Posts: 94 |
|
Re: Printing issues - HELP January 03, 2016 03:58AM |
Registered: 8 years ago Posts: 10 |
|
Re: Printing issues - HELP January 24, 2016 11:30AM |
Registered: 8 years ago Posts: 10 |
Just to let you in on my updates.
I did all the modification that you have told.... I did see some improvements but the most effective was when I lowered the maximum feed rate from the firmware settings (currently showing 20 and it was 30).
It seems that the extruder was being pushed and retracted so fast that it would miss some turns.
I am attaching a section from my firmware settings, mainly to show the setting of the extruder...acceleration, feed rate etc..
Can someone please give me his 2 cents on these settings? Are the numbers in the attached image correct as per your experience?
Thank you .
|
Re: Printing issues - HELP February 03, 2016 04:37AM |
Registered: 10 years ago Posts: 64 |
|
Re: Printing issues - HELP February 03, 2016 09:26AM |
Registered: 8 years ago Posts: 29 |
you say its always add the same layer,
Is that also the same layer where youre cooling fan kicks in ?
It may cool youre hotend and making it harder for the extruder to push out the filament .
You could change the direction of the fan more to the part thats printed less to the hotend
Or you could try to mess with the PID settings to keep a constant temp.
|
Re: Printing issues - HELP February 03, 2016 10:48AM |
Registered: 8 years ago Posts: 778 |
|
Re: Printing issues - HELP February 03, 2016 10:57AM |
Registered: 8 years ago Posts: 10 |
Quote
dim131
Just to let you in on my updates.
I did all the modification that you have told.... I did see some improvements but the most effective was when I lowered the maximum feed rate from the firmware settings (currently showing 20 and it was 30).
It seems that the extruder was being pushed and retracted so fast that it would miss some turns.
I am attaching a section from my firmware settings, mainly to show the setting of the extruder...acceleration, feed rate etc..
Can someone please give me his 2 cents on these settings? Are the numbers in the attached image correct as per your experience?
Thank you .
Hi guys.
Can someone check this post that I have posted some time ago.
I am the creator of this tread lol...
Thank you
|
Re: Printing issues - HELP February 03, 2016 01:56PM |
Registered: 10 years ago Posts: 580 |
Dim,
I'm still under the impression that we are diagnosing an extrusion stall. The only way I know of going about this is by process of elimination.
I looked at the firmware settings. The only extruder related item that could be tweaked is the acceleration - you could try lowering that by 25% and see if that clears it up. I don't think that's it, but could be... You will have to watch it print - like a hawk to see if the filament stops feeding with the gear still turning, or if the gear stops turning or skips backwards when it is not supposed to be retracting. [edit - fixed this sentence]
A- But let's check back on what you've done first, and please provide a photo of what how it's printing now. Your photos have been excellent.
B- Please turn on Verbose gcode (Slic3r output options) and link the gcode for the same print (I'll run it through my debugger to check pressure differentials). Will also show all the other print settings we need to know.
C- Have you changed the fan angle so it isn't blowing on the metal part of your hot end, only on the plastic heat break? This is important - by not cooling the metal part - the hot end has more overhead to handle rapid extrusion rate changes. By cooling the heat break more you will have less chance of softened filament jamming there. You should then re-do the PID tuning for the extruder, and make sure the temp is not dropping during a print.
D- Do you now have a fan and heat sinks on the drivers? Did you adjust the driver current? You could also switch the extruder driver with another.
E- The hobbed bolt is not getting clogged with swarf? It's not slipping on the filament? Did you increase the spring pressure.
You can manually extrude some filament at a high rate, and then back it out and look at the gear marks - they should be even, distinct, yet the filament should not be flattened from excess pressure.
Edited 2 time(s). Last edit at 02/03/2016 01:58PM by Paul Wanamaker.
My printer: Raptosaur - Large Format Delta - [www.paulwanamaker.wordpress.com]
Can you answer questions about Calibration, Printing issues, Mechanics? Write it up and improve the Wiki!
|
Re:firmware. February 03, 2016 10:54PM |
Registered: 8 years ago Posts: 94 |
Paul do you know any thing about the : Marlin_Ramps_Epcos_i3v firmware?
I can finely get my motors to move but only in one detection, sending the config H file.
if not do you know someone who my know.
Thank You.....
************************************************************************************************************************************************************************************************
#ifndef CONFIGURATION_H
#define CONFIGURATION_H
// This configurtion file contains the basic settings.
// Advanced settings can be found in Configuration_adv.h
// BASIC SETTINGS: select your board type, temperature sensor type, axis scaling, and endstop configuration
//User specified version info of this build to display in [Pronterface, etc] terminal window during startup.
//Implementation of an idea by Prof Braino to inform user that any changes made
//to this build by the user have been successfully uploaded into firmware.
#define STRING_VERSION_CONFIG_H __DATE__ " 8-24-14 " __TIME__ // build date and time
#define STRING_CONFIG_H_AUTHOR "(Maker Farm Inc, i3v Prusa)" //Who made the changes.
// SERIAL_PORT selects which serial port should be used for communication with the host.
// This allows the connection of wireless adapters (for instance) to non-default port pins.
// Serial port 0 is still used by the Arduino bootloader regardless of this setting.
#define SERIAL_PORT 0
// This determines the communication speed of the printer
#define BAUDRATE 250000
//#define BAUDRATE 115200
//// The following define selects which electronics board you have. Please choose the one that matches your setup
// 10 = Gen7 custom (Alfons3 Version) "https://github.com/Alfons3/Generation_7_Electronics"
// 11 = Gen7 v1.1, v1.2 = 11
// 12 = Gen7 v1.3
// 13 = Gen7 v1.4
// 3 = MEGA/RAMPS up to 1.2 = 3
// 33 = RAMPS 1.3 (Power outputs: Extruder, Bed, Fan)
// 34 = RAMPS 1.3 (Power outputs: Extruder0, Extruder1, Bed)
// 4 = Duemilanove w/ ATMega328P pin assignment
// 5 = Gen6
// 51 = Gen6 deluxe
// 6 = Sanguinololu < 1.2
// 62 = Sanguinololu 1.2 and above
// 63 = Melzi
// 7 = Ultimaker
// 71 = Ultimaker (Older electronics. Pre 1.5.4. This is rare)
// 8 = Teensylu
// 81 = Printrboard (AT90USB1286)
// 82 = Brainwave (AT90USB646)
// 9 = Gen3+
// 70 = Megatronics
// 90 = Alpha OMCA board
// 91 = Final OMCA board
// 301 = Rambo
#ifndef MOTHERBOARD
#define MOTHERBOARD 33
#endif
//// The following define selects which power supply you have. Please choose the one that matches your setup
// 1 = ATX
// 2 = X-Box 360 203Watts (the blue wire connected to PS_ON and the red wire to VCC)
#define POWER_SUPPLY 1
//===========================================================================
//=============================Thermal Settings ============================
//===========================================================================
//
//--NORMAL IS 4.7kohm PULLUP!-- 1kohm pullup can be used on hotend sensor, using correct resistor and table
//
//// Temperature sensor settings:
// -2 is thermocouple with MAX6675 (only for sensor 0)
// -1 is thermocouple with AD595
// 0 is not used
// 1 is 100k thermistor - best choice for EPCOS 100k (4.7k pullup)
// 2 is 200k thermistor - ATC Semitec 204GT-2 (4.7k pullup)
// 3 is mendel-parts thermistor (4.7k pullup)
// 4 is 10k thermistor !! do not use it for a hotend. It gives bad resolution at high temp. !!
// 5 is 100K thermistor - ATC Semitec 104GT-2 (Used in ParCan) (4.7k pullup)
// 6 is 100k EPCOS - Not as accurate as table 1 (created using a fluke thermocouple) (4.7k pullup)
// 7 is 100k Honeywell thermistor 135-104LAG-J01 (4.7k pullup)
// 8 is 100k 0603 SMD Vishay NTCS0603E3104FXT (4.7k pullup)
// 9 is 100k GE Sensing AL03006-58.2K-97-G1 (4.7k pullup)
// 10 is 100k RS thermistor 198-961 (4.7k pullup)
//
// 1k ohm pullup tables - This is not normal, you would have to have changed out your 4.7k for 1k
// (but gives greater accuracy and more stable PID)
// 51 is 100k thermistor - EPCOS (1k pullup)
// 52 is 200k thermistor - ATC Semitec 204GT-2 (1k pullup)
// 55 is 100k thermistor - ATC Semitec 104GT-2 (Used in ParCan) (1k pullup)
#define TEMP_SENSOR_0 6
#define TEMP_SENSOR_1 0
#define TEMP_SENSOR_2 0
#define TEMP_SENSOR_BED 1
// Actual temperature must be close to target for this long before M109 returns success
#define TEMP_RESIDENCY_TIME 10 // (seconds)
#define TEMP_HYSTERESIS 3 // (degC) range of +/- temperatures considered "close" to the target one
#define TEMP_WINDOW 1 // (degC) Window around target to start the recidency timer x degC early.
// The minimal temperature defines the temperature below which the heater will not be enabled It is used
// to check that the wiring to the thermistor is not broken.
// Otherwise this would lead to the heater being powered on all the time.
#define HEATER_0_MINTEMP 5
#define HEATER_1_MINTEMP 5
#define HEATER_2_MINTEMP 5
#define BED_MINTEMP 5
// When temperature exceeds max temp, your heater will be switched off.
// This feature exists to protect your hotend from overheating accidentally, but *NOT* from thermistor short/failure!
// You should use MINTEMP for thermistor short/failure protection.
#define HEATER_0_MAXTEMP 250
#define HEATER_1_MAXTEMP 250
#define HEATER_2_MAXTEMP 250
#define BED_MAXTEMP 100
// If your bed has low resistance e.g. .6 ohm and throws the fuse you can duty cycle it to reduce the
// average current. The value should be an integer and the heat bed will be turned on for 1 interval of
// HEATER_BED_DUTY_CYCLE_DIVIDER intervals.
//#define HEATER_BED_DUTY_CYCLE_DIVIDER 4
// PID settings:
// Comment the following line to disable PID and enable bang-bang.
#define PIDTEMP
#define PID_MAX 256 // limits current to nozzle; 256=full current
#ifdef PIDTEMP
//#define PID_DEBUG // Sends debug data to the serial port.
//#define PID_OPENLOOP 1 // Puts PID in open loop. M104/M140 sets the output power from 0 to PID_MAX
#define PID_FUNCTIONAL_RANGE 10 // If the temperature difference between the target temperature and the actual temperature
// is more then PID_FUNCTIONAL_RANGE then the PID will be shut off and the heater will be set to min/max.
#define PID_INTEGRAL_DRIVE_MAX 255 //limit for the integral term
#define K1 0.95 //smoothing factor withing the PID
#define PID_dT ((16.0 * 8.0)/(F_CPU / 64.0 / 256.0)) //sampling period of the temperature routine
// If you are using a preconfigured hotend then you can use one of the value sets by uncommenting it
// Ultimaker
#define DEFAULT_Kp 22.2
#define DEFAULT_Ki 1.08
#define DEFAULT_Kd 114
// Makergear
// #define DEFAULT_Kp 7.0
// #define DEFAULT_Ki 0.1
// #define DEFAULT_Kd 12
// Mendel Parts V9 on 12V
// #define DEFAULT_Kp 63.0
// #define DEFAULT_Ki 2.25
// #define DEFAULT_Kd 440
#endif // PIDTEMP
// Bed Temperature Control
// Select PID or bang-bang with PIDTEMPBED. If bang-bang, BED_LIMIT_SWITCHING will enable hysteresis
//
// uncomment this to enable PID on the bed. It uses the same ferquency PWM as the extruder.
// If your PID_dT above is the default, and correct for your hardware/configuration, that means 7.689Hz,
// which is fine for driving a square wave into a resistive load and does not significantly impact you FET heating.
// This also works fine on a Fotek SSR-10DA Solid State Relay into a 250W heater.
// If your configuration is significantly different than this and you don't understand the issues involved, you proabaly
// shouldn't use bed PID until someone else verifies your hardware works.
// If this is enabled, find your own PID constants below.
//#define PIDTEMPBED
//
//#define BED_LIMIT_SWITCHING
// This sets the max power delived to the bed, and replaces the HEATER_BED_DUTY_CYCLE_DIVIDER option.
// all forms of bed control obey this (PID, bang-bang, bang-bang with hysteresis)
// setting this to anything other than 256 enables a form of PWM to the bed just like HEATER_BED_DUTY_CYCLE_DIVIDER did,
// so you shouldn't use it unless you are OK with PWM on your bed. (see the comment on enabling PIDTEMPBED)
#define MAX_BED_POWER 256 // limits duty cycle to bed; 256=full current
#ifdef PIDTEMPBED
//120v 250W silicone heater into 4mm borosilicate (MendelMax 1.5+)
//from FOPDT model - kp=.39 Tp=405 Tdead=66, Tc set to 79.2, argressive factor of .15 (vs .1, 1, 10)
#define DEFAULT_bedKp 10.00
#define DEFAULT_bedKi .023
#define DEFAULT_bedKd 305.4
//120v 250W silicone heater into 4mm borosilicate (MendelMax 1.5+)
//from pidautotune
// #define DEFAULT_bedKp 97.1
// #define DEFAULT_bedKi 1.41
// #define DEFAULT_bedKd 1675.16
// FIND YOUR OWN: "M303 E-1 C8 S90" to run autotune on the bed at 90 degreesC for 8 cycles.
#endif // PIDTEMPBED
//this prevents dangerous Extruder moves, i.e. if the temperature is under the limit
//can be software-disabled for whatever purposes by
#define PREVENT_DANGEROUS_EXTRUDE
//if PREVENT_DANGEROUS_EXTRUDE is on, you can still disable (uncomment) very long bits of extrusion separately.
#define PREVENT_LENGTHY_EXTRUDE
#define EXTRUDE_MINTEMP 170
#define EXTRUDE_MAXLENGTH (X_MAX_LENGTH+Y_MAX_LENGTH) //prevent extrusion of very large distances.
//===========================================================================
//=============================Mechanical Settings===========================
//===========================================================================
// Uncomment the following line to enable CoreXY kinematics
// #define COREXY
// corse Endstop Settings
#define ENDSTOPPULLUPS // Comment this out (using // at the start of the line) to disable the endstop pullup resistors
#ifndef ENDSTOPPULLUPS
// fine Enstop settings: Individual Pullups. will be ignord if ENDSTOPPULLUPS is defined
#define ENDSTOPPULLUP_XMAX
#define ENDSTOPPULLUP_YMAX
#define ENDSTOPPULLUP_ZMAX
#define ENDSTOPPULLUP_XMIN
#define ENDSTOPPULLUP_YMIN
//#define ENDSTOPPULLUP_ZMIN
#endif
#ifdef ENDSTOPPULLUPS
// #define ENDSTOPPULLUP_XMAX
// #define ENDSTOPPULLUP_YMAX
// #define ENDSTOPPULLUP_ZMAX
#define ENDSTOPPULLUP_XMIN
#define ENDSTOPPULLUP_YMIN
#define ENDSTOPPULLUP_ZMIN
#endif
// The pullups are needed if you directly connect a mechanical endswitch between the signal and ground pins.
const bool X_ENDSTOPS_INVERTING = true; // set to true to invert the logic of the endstops.
const bool Y_ENDSTOPS_INVERTING = true; // set to true to invert the logic of the endstops.
const bool Z_ENDSTOPS_INVERTING = true; // set to true to invert the logic of the endstops.
#define DISABLE_MAX_ENDSTOPS
// For Inverting Stepper Enable Pins (Active Low) use 0, Non Inverting (Active High) use 1
#define X_ENABLE_ON 0
#define Y_ENABLE_ON 0
#define Z_ENABLE_ON 0
#define E_ENABLE_ON 0 // For all extruders
// Disables axis when it's not being used.
#define DISABLE_X false
#define DISABLE_Y false
#define DISABLE_Z false
#define DISABLE_E false // For all extruders
#define INVERT_X_DIR true // for Mendel set to false, for Orca set to true
#define INVERT_Y_DIR false // for Mendel set to true, for Orca set to false
#define INVERT_Z_DIR true // for Mendel set to false, for Orca set to true
#define INVERT_E0_DIR true // for direct drive extruder v9 set to true, for geared extruder set to false
#define INVERT_E1_DIR false // for direct drive extruder v9 set to true, for geared extruder set to false
#define INVERT_E2_DIR false // for direct drive extruder v9 set to true, for geared extruder set to false
// ENDSTOP SETTINGS:
// Sets direction of endstops when homing; 1=MAX, -1=MIN
#define X_HOME_DIR -1
#define Y_HOME_DIR -1
#define Z_HOME_DIR -1
#define min_software_endstops false //If true, axis won't move to coordinates less than HOME_POS.
#define max_software_endstops true //If true, axis won't move to coordinates greater than the defined lengths below.
// Travel limits after homing
#define X_MAX_POS 200
#define X_MIN_POS 0
#define Y_MAX_POS 270
#define Y_MIN_POS 0
#define Z_MAX_POS 180
#define Z_MIN_POS 0
#define X_MAX_LENGTH (X_MAX_POS - X_MIN_POS)
#define Y_MAX_LENGTH (Y_MAX_POS - Y_MIN_POS)
#define Z_MAX_LENGTH (Z_MAX_POS - Z_MIN_POS)
// The position of the homing switches
//#define MANUAL_HOME_POSITIONS // If defined, MANUAL_*_HOME_POS below will be used
//#define BED_CENTER_AT_0_0 // If defined, the center of the bed is at (X=0, Y=0)
//Manual homing switch locations:
#define MANUAL_X_HOME_POS 0
#define MANUAL_Y_HOME_POS 0
#define MANUAL_Z_HOME_POS 0
//// MOVEMENT SETTINGS
#define NUM_AXIS 4 // The axis order in all axis related arrays is X, Y, Z, E
#define HOMING_FEEDRATE {50*60, 50*60, 50, 0} // set the homing speeds (mm/min)
// default settings
#define DEFAULT_AXIS_STEPS_PER_UNIT {80,80,3757.14,100.6} // default steps per unit for ultimaker {78.7402,78.7402,200*8/3,760*1.1}920
#define DEFAULT_MAX_FEEDRATE {500,500,5,25} // (mm/sec)
#define DEFAULT_MAX_ACCELERATION {9000,9000,100,10000} // X, Y, Z, E maximum start speed for accelerated moves. E default values are good for skeinforge 40+, for older versions raise them a lot.
#define DEFAULT_ACCELERATION 500 // X, Y, Z and E max acceleration in mm/s^2 for printing moves
#define DEFAULT_RETRACT_ACCELERATION 500 // X, Y, Z and E max acceleration in mm/s^2 for r retracts
// Offset of the extruders (uncomment if using more than one and relying on firmware to position when changing).
// The offset has to be X=0, Y=0 for the extruder 0 hotend (default extruder).
// For the other hotends it is their distance from the extruder 0 hotend.
// #define EXTRUDER_OFFSET_X {0.0, 20.00} // (in mm) for each extruder, offset of the hotend on the X axis
// #define EXTRUDER_OFFSET_Y {0.0, 5.00} // (in mm) for each extruder, offset of the hotend on the Y axis
// The speed change that does not require acceleration (i.e. the software might assume it can be done instanteneously)
#define DEFAULT_XYJERK 20.0 // (mm/sec)
#define DEFAULT_ZJERK 0.4 // (mm/sec)
#define DEFAULT_EJERK 5.0 // (mm/sec)
//===========================================================================
//=============================Additional Features===========================
//===========================================================================
// EEPROM
// the microcontroller can store settings in the EEPROM, e.g. max velocity...
// M500 - stores paramters in EEPROM
// M501 - reads parameters from EEPROM (if you need reset them after you changed them temporarily).
// M502 - reverts to the default "factory settings". You still need to store them in EEPROM afterwards if you want to.
//define this to enable eeprom support
#define EEPROM_SETTINGS
//to disable EEPROM Serial responses and decrease program space by ~1700 byte: comment this out:
// please keep turned on if you can.
//#define EEPROM_CHITCHAT
//LCD and SD support
//#define ULTRA_LCD //general lcd support, also 16x2
//#define SDSUPPORT // Enable SD Card Support in Hardware Console
//#define ULTIMAKERCONTROLLER //as available from the ultimaker online store.
//#define ULTIPANEL //the ultipanel as on thingiverse
// The RepRapDiscount Smart Controller (white PC
// [reprap.org]
#define REPRAP_DISCOUNT_SMART_CONTROLLER
// The GADGETS3D G3D LCD/SD Controller (blue PC
// [reprap.org]
//#define G3D_PANEL
//automatic expansion
#if defined(ULTIMAKERCONTROLLER) || defined(REPRAP_DISCOUNT_SMART_CONTROLLER) || defined(G3D_PANEL)
#define ULTIPANEL
#define NEWPANEL
#endif
// Preheat Constants
#define PLA_PREHEAT_HOTEND_TEMP 180
#define PLA_PREHEAT_HPB_TEMP 70
#define PLA_PREHEAT_FAN_SPEED 255 // Insert Value between 0 and 255
#define ABS_PREHEAT_HOTEND_TEMP 225
#define ABS_PREHEAT_HPB_TEMP 100
#define ABS_PREHEAT_FAN_SPEED 255 // Insert Value between 0 and 255
#ifdef ULTIPANEL
// #define NEWPANEL //enable this if you have a click-encoder panel
#define SDSUPPORT
#define ULTRA_LCD
#define LCD_WIDTH 20
#define LCD_HEIGHT 4
#else //no panel but just lcd
#ifdef ULTRA_LCD
#define LCD_WIDTH 16
#define LCD_HEIGHT 2
#endif
#endif
// Increase the FAN pwm frequency. Removes the PWM noise but increases heating in the FET/Arduino
//#define FAST_PWM_FAN
// M240 Triggers a camera by emulating a Canon RC-1 Remote
// Data from: [www.doc-diy.net]
// #define PHOTOGRAPH_PIN 23
// SF send wrong arc g-codes when using Arc Point as fillet procedure
//#define SF_ARC_FIX
#include "Configuration_adv.h"
#include "thermistortables.h"
#endif //__CONFIGURATION_H
|
Re: Printing issues - HELP February 04, 2016 12:00AM |
Registered: 10 years ago Posts: 580 |
Yar: it could be your endstop settings. See this thread
|
Re: Printing issues - HELP February 04, 2016 12:39PM |
Registered: 8 years ago Posts: 10 |
Hi Paul.
Again thank you for all your help. I think I have solved this print issue, I lowered the feed rate from the firmware, as I have noticed that if I had to quickly turn the extruder wheel nothing comes out. It's not an issue of power I think. I will lower the acceleration as you have advised and let you know if happened.
Again thank you for all your help. I think I have solved this print issue, I lowered the feed rate from the firmware, as I have noticed that if I had to quickly turn the extruder wheel nothing comes out. It's not an issue of power I think. I will lower the acceleration as you have advised and let you know if happened.
|
Re: Printing issues - HELP February 04, 2016 12:45PM |
Registered: 8 years ago Posts: 94 |
|
Re: Printing issues - HELP February 04, 2016 01:21PM |
Registered: 8 years ago Posts: 94 |
|
Re:firmware. February 05, 2016 12:46PM |
Registered: 8 years ago Posts: 94 |
Paul, Read the information you sent and my setting where already set for "True" change them to False all that did was really lock them up, I have X, and Y working but Z is still jerking as it turns, cant figure any other setting to change? I checked the setting yesterday for the trim pots got them set X= .85, Y= .84 and Z= 1.60, I haven't found anything about the setting of the trim pots anywhere yet to read, so is there a rule of thumb to follow.

Sorry, only registered users may post in this forum.