Bad prints, square and circles not right
Posted by Colin08
|
Bad prints, square and circles not right June 24, 2015 12:37PM |
Registered: 8 years ago Posts: 5 |
Hi,
I've been searching high and low for answers and just can't seem to nail it.
I've got an Ordbot, from Robotronics. Now that I have said that you die hards I take my hat off to you, I've had enough getting this running, let alone building from the ground up for a reprap. It has one mod, and that is the extruder, as the Robotronics supplied one in the kit was much to be desired. It has one from a k8200.eu kit that my brother had spare which works real well. But that is not my problem.....
I am running a Ramps 1.4 board, programmed with Marlin firmware, talked to via Repetier and Sli3er 1.1.7. I've spent considerable time in the config.h file, set up the feed rates as per;
// default settings
#define DEFAULT_AXIS_STEPS_PER_UNIT {80,80,2560,850} // default steps per unit for Ultimaker
#define DEFAULT_MAX_FEEDRATE {1000, 1000, 50, 50} // (mm/sec)
#define DEFAULT_MAX_ACCELERATION {500,500,50,30} // X, Y, Z, E maximum start speed for accelerated moves. E default values are good for Skeinforge 40+, for older versions raise them a lot.
I slowed the accel rates, due to my main problem, and that is circles are not round. Neither are squares square. If I print a square with 100mm internal, and 110mm external (so 5mm wall thickness), the internal measure 99x100, the external 109x110. I'm loosing around 1mm. If I print a 30mm internal, and 40mm internal I have the same 1mm discrepency. So I am loosing 1mm on my Y axis.
If I print a 20mm x 20mm solind square it measures 19mm x20mm. This translates to all shapes.
I have leveled my bed so much I am wearing out my pliers, and for the most part I think my bottom layer is OK, well good enough for now. Image 3811 shows the bottom with 2 arrows. The arrows actually mark where the wall has been cut short, meaning that is not just a bottom defect, it goes right through the whole depth. If I hold the part up to light, I can see through that crack, at both arrows.
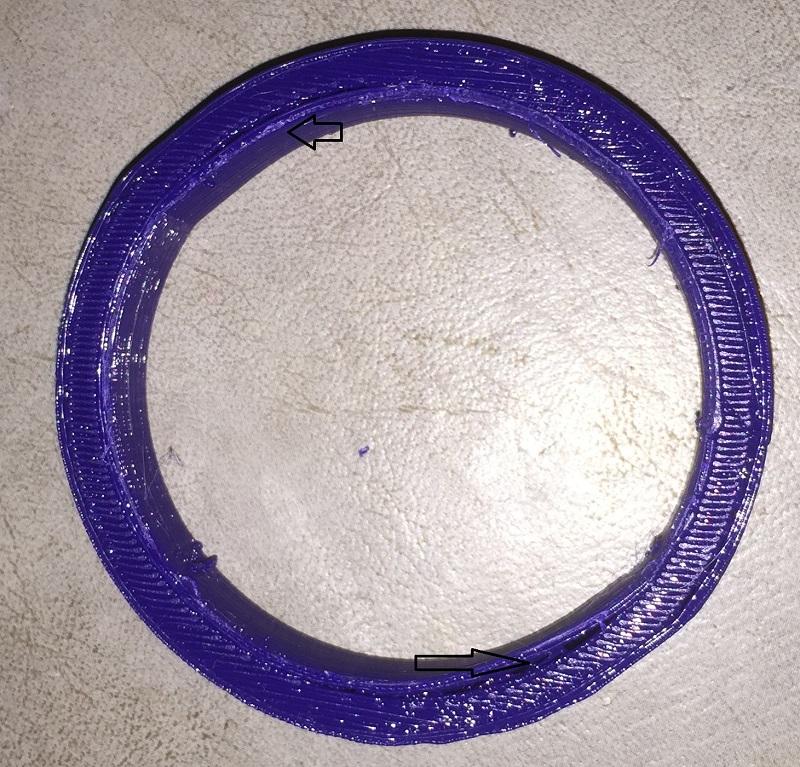
Looking at Image 3810, you can see 2 arrows, the inside arrow points to the gap that starts at the bottom shown on Image 3811 (at least its consistent!!!). The outside arrow is pointing to a flat section. Yes its flat, why on earth is that flat???, and through the whole 10mm of depth?????? Again at least its consistent.
Its taken a huge amount of prints to get this far, so what am I missing to get this sorted out? I know the Steps/unit is OK as they are exactly the same hardware on both axis, but I cannot find anywhere why its doing as it is.
I must say this would be addictive, if not so hard to set up.
Edited 1 time(s). Last edit at 06/24/2015 12:41PM by Colin08.
I've been searching high and low for answers and just can't seem to nail it.
I've got an Ordbot, from Robotronics. Now that I have said that you die hards I take my hat off to you, I've had enough getting this running, let alone building from the ground up for a reprap. It has one mod, and that is the extruder, as the Robotronics supplied one in the kit was much to be desired. It has one from a k8200.eu kit that my brother had spare which works real well. But that is not my problem.....
I am running a Ramps 1.4 board, programmed with Marlin firmware, talked to via Repetier and Sli3er 1.1.7. I've spent considerable time in the config.h file, set up the feed rates as per;
// default settings
#define DEFAULT_AXIS_STEPS_PER_UNIT {80,80,2560,850} // default steps per unit for Ultimaker
#define DEFAULT_MAX_FEEDRATE {1000, 1000, 50, 50} // (mm/sec)
#define DEFAULT_MAX_ACCELERATION {500,500,50,30} // X, Y, Z, E maximum start speed for accelerated moves. E default values are good for Skeinforge 40+, for older versions raise them a lot.
I slowed the accel rates, due to my main problem, and that is circles are not round. Neither are squares square. If I print a square with 100mm internal, and 110mm external (so 5mm wall thickness), the internal measure 99x100, the external 109x110. I'm loosing around 1mm. If I print a 30mm internal, and 40mm internal I have the same 1mm discrepency. So I am loosing 1mm on my Y axis.
If I print a 20mm x 20mm solind square it measures 19mm x20mm. This translates to all shapes.
I have leveled my bed so much I am wearing out my pliers, and for the most part I think my bottom layer is OK, well good enough for now. Image 3811 shows the bottom with 2 arrows. The arrows actually mark where the wall has been cut short, meaning that is not just a bottom defect, it goes right through the whole depth. If I hold the part up to light, I can see through that crack, at both arrows.
Looking at Image 3810, you can see 2 arrows, the inside arrow points to the gap that starts at the bottom shown on Image 3811 (at least its consistent!!!). The outside arrow is pointing to a flat section. Yes its flat, why on earth is that flat???, and through the whole 10mm of depth?????? Again at least its consistent.
Its taken a huge amount of prints to get this far, so what am I missing to get this sorted out? I know the Steps/unit is OK as they are exactly the same hardware on both axis, but I cannot find anywhere why its doing as it is.
I must say this would be addictive, if not so hard to set up.
Edited 1 time(s). Last edit at 06/24/2015 12:41PM by Colin08.
|
Re: Bad prints, square and circles not right June 25, 2015 08:45AM |
Registered: 9 years ago Posts: 124 |
Quote
Colin08
I know the Steps/unit is OK as they are exactly the same hardware on both axis,
Just because it's the same hardware on both axis', you must calculate the proper steps for each axis. This guide here is recommended:
[reprap.org]
|
Re: Bad prints, square and circles not right June 25, 2015 09:33AM |
Registered: 8 years ago Posts: 5 |
|
Re: Bad prints, square and circles not right June 25, 2015 10:04AM |
Registered: 9 years ago Posts: 124 |
I just read this thread as well:
[forums.reprap.org]
May be the answer to the flat spot you're asking about. Good luck working it out.
[forums.reprap.org]
May be the answer to the flat spot you're asking about. Good luck working it out.
|
Re: Bad prints, square and circles not right June 27, 2015 10:48PM |
Registered: 8 years ago Posts: 5 |
Hey that sounds like its probably it. I had the Y axis apart to fit the new extruder, and it was after that it went stupid. I searched so many times on circles not round in google and this forum and didn't come up with anything. Much appreciated passing this on. Time to pull the machine apart again...carefully this time. I'm actually over the belt driven axis, and I'm going to fit ball screws to it, and do away with the micro stepping to get the torque values back up.
|
Re: Bad prints, square and circles not right July 02, 2015 10:48AM |
Registered: 8 years ago Posts: 5 |
Just finalize on it, much appreciated on that post. Pulled my Y axis apart, and found that a couple of the bearings have a dirty spot. The carriage did not move smoothly and had a couple of tight spots over the 200mm of travel. Pulling the axis apart I found that a couple of the bearings were just stuffed. I sprayed them with WD40, and ran them up and down a piece of wood and they came reasonably good, but you can still feel a lump in them. Assembled the carriage and you could still feel the rough spot, but it was not nearly as bad. Did a test print of the circles again, and they turn out a heap better, but they do have 2 little kinks noticable on them 180 degrees apart, so they are still upsetting things slightly. So it seems to be on its way to being usable again. More test parts tonight, and they are getting better with each print.
Sorry, only registered users may post in this forum.