CoreXZ
Posted by nicholas.seward
|
Re: CoreXZ March 12, 2015 01:27PM |
Registered: 10 years ago Posts: 515 |
|
Re: CoreXZ March 12, 2015 04:13PM |
Registered: 10 years ago Posts: 979 |
There is a verified version that is almost exactly like my next version here. (I made small changes so that I could make it completely parametric. Give me the rod lengths and I should be able to output the design.)
ConceptFORGE
Wally, GUS Simpson, LISA Simpson, THOR Simpson, Sextupteron, CoreXZ

ConceptFORGE
Wally, GUS Simpson, LISA Simpson, THOR Simpson, Sextupteron, CoreXZ
|
Re: CoreXZ March 26, 2015 08:08AM |
Registered: 11 years ago Posts: 8 |
|
Re: CoreXZ June 02, 2015 06:47PM |
Registered: 9 years ago Posts: 18 |
|
Re: CoreXZ June 02, 2015 11:19PM |
Registered: 10 years ago Posts: 979 |
No endstops. Everything can be driven by hand so it takes no time to manually home the machine. My theory is it is something else to adjust and something else that can fail. However, it would be easy to add stops.
ConceptFORGE
Wally, GUS Simpson, LISA Simpson, THOR Simpson, Sextupteron, CoreXZ
ConceptFORGE
Wally, GUS Simpson, LISA Simpson, THOR Simpson, Sextupteron, CoreXZ
It strikes me that by building a longer bed, it would be entirely possible to print complete Frame Sides, Frame Bottom, and Frame Top. Not just as flat panels, but with included ribs that would enhance stiffness. Yielding a large-volume printer with a high proportion of printed parts. (Seemingly a sought-after goal within the RepRap paradigm, right?
Front and back might need to be done in sections. Hmm...
Edited 1 time(s). Last edit at 06/03/2015 10:12AM by MacMarty.
Front and back might need to be done in sections. Hmm...
Edited 1 time(s). Last edit at 06/03/2015 10:12AM by MacMarty.
|
Re: CoreXZ June 24, 2015 03:51PM |
Registered: 8 years ago Posts: 17 |
Hi Nicholas - I love this design! However, I want to modify it a little bit to match the parts I have on hand. Please forgive my ignorance of physics, but when you say you have 3X resolution in Z movement, is that determined by the number of direction changes of the string (number of pulleys), or do I need to worry about ratio of string length? Thanks! - Scotty
|
Re: CoreXZ June 24, 2015 08:55PM |
Registered: 10 years ago Posts: 979 |
You can just ask how many strings leave the gantry in the y direction (12) and how many strings leave the effector in the x direction (4). That gives you a 12/4 or a 3:1 ratio.
Edited 1 time(s). Last edit at 06/24/2015 09:39PM by nicholas.seward.
ConceptFORGE
Wally, GUS Simpson, LISA Simpson, THOR Simpson, Sextupteron, CoreXZ
Edited 1 time(s). Last edit at 06/24/2015 09:39PM by nicholas.seward.
ConceptFORGE
Wally, GUS Simpson, LISA Simpson, THOR Simpson, Sextupteron, CoreXZ
|
Re: CoreXZ June 28, 2015 08:51PM |
Registered: 8 years ago Posts: 17 |
Here's what I have so far on my modifications. The XZ stages are pretty much figured out. With the Extruder assembly I will use, the current design will have about 156mm print width (X), 194 print height (Z). I can make Y as deep as I want, but I'll probably fix it at 200mm because that's the size heater I have. I will also probably use a longer horizontal rail to get a full 200mm in the X direction (easy to fix in my drawing). Right now the back plate is 404X400. If I make it wider, it will probably go to 450X400 for a 200X200X195 print volume.
The bearings mounted to the back plate are double stacked 608zz's and 6000Z's (to form a groove where they join - like Nicholas' original design). The pulleys on the gantry are v625zz v-groove pulleys. They are mounted on the same bolt, but turn independently. The front ones ride on OpenRail, the back ones are to carry string.
Edited 1 time(s). Last edit at 06/28/2015 09:20PM by scottyo.
The bearings mounted to the back plate are double stacked 608zz's and 6000Z's (to form a groove where they join - like Nicholas' original design). The pulleys on the gantry are v625zz v-groove pulleys. They are mounted on the same bolt, but turn independently. The front ones ride on OpenRail, the back ones are to carry string.


Edited 1 time(s). Last edit at 06/28/2015 09:20PM by scottyo.
|
Re: CoreXZ July 09, 2015 03:32PM |
Registered: 8 years ago Posts: 17 |
I've made more progress on my adaptation of the CoreXZ. I put a rendering on Thingiverse so you could get a 3D view (not all parts of the scad file rendered - not sure why). [www.thingiverse.com]
Here are a few more screen shots. I will share the OpenSCAD files when I am a little bit farther along.
Additional notes:
The print area of the current design will be 200 X by 200 Z by 190 to 196 Y (depending on bearings used). [The cabinet is 446x360x406 (xyz).] One reason for the constraints is I'm trying to use easily obtainable parts for the build. Y is limited because I chose to use ready-made parts for the bed (OpenBuilds and EBay). I could design custom plates, but that would require a custom heater, etc. So far I have 4 unique custom aluminum plates (2 each for 3 of them), and 4 unique custom structural MDF parts (2 each for 2 of them - if you don't count holes to be drilled). I will have a small number of 3D printed parts (hot end carrier, extruder driver, and a couple of spacers). I have a feeling the biggest expense for the structure (less electronics) will be the laser cutting I need to have done.
Here's a little animated gif to show the range of motion:
Edited 4 time(s). Last edit at 07/11/2015 06:57AM by scottyo.
Here are a few more screen shots. I will share the OpenSCAD files when I am a little bit farther along.


Additional notes:
The print area of the current design will be 200 X by 200 Z by 190 to 196 Y (depending on bearings used). [The cabinet is 446x360x406 (xyz).] One reason for the constraints is I'm trying to use easily obtainable parts for the build. Y is limited because I chose to use ready-made parts for the bed (OpenBuilds and EBay). I could design custom plates, but that would require a custom heater, etc. So far I have 4 unique custom aluminum plates (2 each for 3 of them), and 4 unique custom structural MDF parts (2 each for 2 of them - if you don't count holes to be drilled). I will have a small number of 3D printed parts (hot end carrier, extruder driver, and a couple of spacers). I have a feeling the biggest expense for the structure (less electronics) will be the laser cutting I need to have done.
Here's a little animated gif to show the range of motion:
Edited 4 time(s). Last edit at 07/11/2015 06:57AM by scottyo.
|
About that String.... July 14, 2015 08:55PM |
Registered: 9 years ago Posts: 18 |
Today I'm tied up in a knot. Can someone point me in the right direction? [And tell me how to insert photos inline, while they're at it?? Click on "Open Image URL" in the error boxes to see my photos until then. *sigh*]
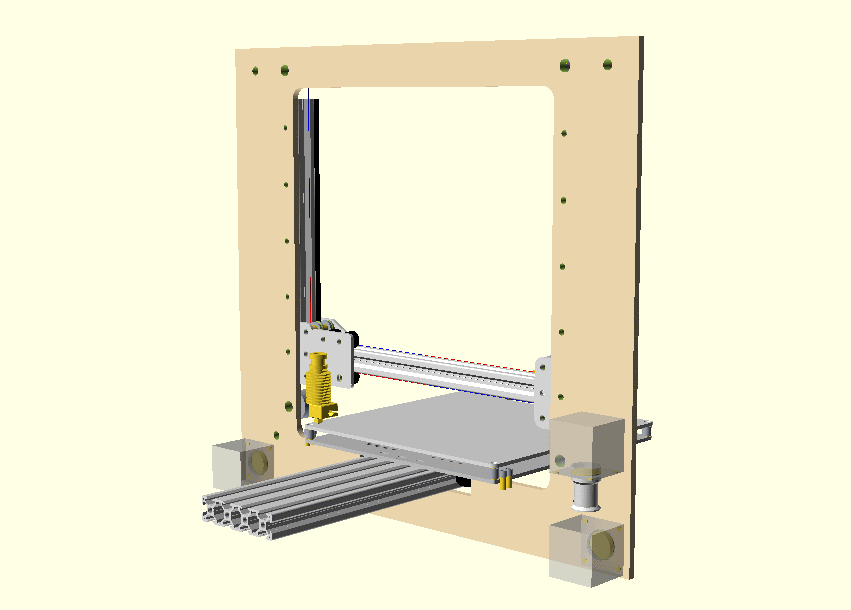
I'm partway through my CoreXZ build, using the design files that @Nicholas.Seward published in Feb 2015. Frame construction is from 1/4" plywood. I had to do a little fiddling with the front and rear panels to make them fit in the local Trotec laser - I divided them in half vertically, and nested the halves together. I thought I was going to need some mechanical reinforcement behind that seam, but everything seems stable even without that.
I bought a spool of multicolor Spectra line, and I'm putting a different color on each axis, to help people understand what's going on inside. The right-side tuner controls tension of BOTH strings. The left-side tuner is the Leveler. That much I understand. Sliding the Effector back and forth throws things out of level. I can see that things would be better if the strings stayed horizontal, instead of coming to a point on the tuner peg. The Inventor model, a thing of wonder, is mute on the subject. Actually, the strings seem to go right THROUGH the extruder motor. I haven't been able to source that special kind of motor. The "CoreXZ Walkaround" on YouTube teases us, since the Effector is printed in black plastic, so the anchoring points are cast in shadow.
Can someone please disclose the Secret Anchoring Methodology? I can think of several ways to attempt it, but I would hate to invent a square wheel when a perfectly round one already exists.
Edited 4 time(s). Last edit at 07/14/2015 09:26PM by MacMarty.
I'm partway through my CoreXZ build, using the design files that @Nicholas.Seward published in Feb 2015. Frame construction is from 1/4" plywood. I had to do a little fiddling with the front and rear panels to make them fit in the local Trotec laser - I divided them in half vertically, and nested the halves together. I thought I was going to need some mechanical reinforcement behind that seam, but everything seems stable even without that.
I bought a spool of multicolor Spectra line, and I'm putting a different color on each axis, to help people understand what's going on inside. The right-side tuner controls tension of BOTH strings. The left-side tuner is the Leveler. That much I understand. Sliding the Effector back and forth throws things out of level. I can see that things would be better if the strings stayed horizontal, instead of coming to a point on the tuner peg. The Inventor model, a thing of wonder, is mute on the subject. Actually, the strings seem to go right THROUGH the extruder motor. I haven't been able to source that special kind of motor.
The "CoreXZ Walkaround" on YouTube teases us, since the Effector is printed in black plastic, so the anchoring points are cast in shadow.Can someone please disclose the Secret Anchoring Methodology? I can think of several ways to attempt it, but I would hate to invent a square wheel when a perfectly round one already exists.
Edited 4 time(s). Last edit at 07/14/2015 09:26PM by MacMarty.
|
Re: About that String.... July 14, 2015 10:41PM |
Registered: 10 years ago Posts: 979 |
I printed a square ring that slipped over the stepper. It ha 4 holes on two opposite sides. Two holes have string going to pulleys and two go to the tuner.
I wish I had a picture or a model right now but I am out of pocket. In two days I can give you a model.
However, I don't like this method and have gone another direction on my new ones. I will take a few pictures in a couple of days and give you lots of options.
ConceptFORGE
Wally, GUS Simpson, LISA Simpson, THOR Simpson, Sextupteron, CoreXZ
|
Re: About that String.... July 15, 2015 09:38AM |
Registered: 9 years ago Posts: 18 |
|
Re: CoreXZ July 15, 2015 09:58AM |
Registered: 10 years ago Posts: 14,672 |
In case it's of interest, my fork of RepRapFirmware for 32-bit Duet electronics includes CoreXZ support as standard, although it's not been tested yet. I implemented it several months ago at the same time as CoreXY. I will be happy to support anyone who wants to try it out.
Large delta printer [miscsolutions.wordpress.com], E3D tool changer, Robotdigg SCARA printer, Crane Quad and Ormerod
Disclosure: I design Duet electronics and work on RepRapFirmware, [duet3d.com].
Large delta printer [miscsolutions.wordpress.com], E3D tool changer, Robotdigg SCARA printer, Crane Quad and Ormerod
Disclosure: I design Duet electronics and work on RepRapFirmware, [duet3d.com].
|
Re: CoreXZ July 15, 2015 10:10AM |
Registered: 10 years ago Posts: 979 |
Dc42: Is the x to z drive ratio 3:1 or is it adjustable?
ConceptFORGE
Wally, GUS Simpson, LISA Simpson, THOR Simpson, Sextupteron, CoreXZ
ConceptFORGE
Wally, GUS Simpson, LISA Simpson, THOR Simpson, Sextupteron, CoreXZ
|
Re: CoreXZ July 15, 2015 10:34AM |
Registered: 10 years ago Posts: 14,672 |
Quote
nicholas.seward
Dc42: Is the x to z drive ratio 3:1 or is it adjustable?
Currently it's fixed at 1:1 as for CoreXY, however I can easily add another parameter to the M667 command (see [reprap.org]) to make it adjustable.
Large delta printer [miscsolutions.wordpress.com], E3D tool changer, Robotdigg SCARA printer, Crane Quad and Ormerod
Disclosure: I design Duet electronics and work on RepRapFirmware, [duet3d.com].
|
Re: CoreXZ July 16, 2015 02:21AM |
Registered: 8 years ago Posts: 6 |
Hi all,
I'm planning to start a CoreXZ build in the near-ish future. The laser cutter I have access to can only do up to 5mm flatstock. Will that be sufficient? Would I be better off doubling up 3mm?
Or, I think I recall you (Nicholas) mentioning on Google+ that you can output files for different thicknesses? I don't suppose you have a 5mm version kicking around?
Thank you for your work on this and your other printers!
Jeremy
|
Re: CoreXZ July 16, 2015 09:49AM |
Registered: 9 years ago Posts: 18 |
Hi, Jeremy -
I can't presume to speak for Nicholas's broader vision and plans, but I can tell you about my own experience to date.
The newest version of CoreXZ files (downloadable zip here) does appear to be set up for 5mm sheet stock. I've been successful in building a frame from these files, using some nominal 1/4" plywood that actually measures 5.4 mm, and everything fits together just fine.
The front and back panels measure 480 mm by 512 mm, which was too big for the laser cutter I have access to. (Trotec Sppedy 300, with a working area of only 726 mm bu 432 mm.) I modified the front-panel and back-panel files by splitting each part vertically, and nested the two halves together so that they fit onto split the front and back panel files in half vertically, so that they fit onto 600 mm by 310mm panels.
|
Re: CoreXZ July 18, 2015 12:06AM |
Registered: 8 years ago Posts: 6 |
|
Re: CoreXZ July 19, 2015 08:35AM |
Registered: 8 years ago Posts: 6 |

|
Re: CoreXZ July 19, 2015 11:13AM |
Registered: 9 years ago Posts: 18 |
Hi, @jnj. I have STLs for the effector and the bed tensioner mount, I'll send them offline. Keep in mind that @nicholas.seward has indicated that there may be other approaches forthcoming for the effector. [hint, hint, please, please  ]
]
Edited 1 time(s). Last edit at 07/19/2015 11:14AM by MacMarty.
]Edited 1 time(s). Last edit at 07/19/2015 11:14AM by MacMarty.
|
Re: CoreXZ July 22, 2015 01:13PM |
Registered: 10 years ago Posts: 979 |
Here are pictures for 3 approaches to the effector.
I attached the string redirect for the black version.
ConceptFORGE
Wally, GUS Simpson, LISA Simpson, THOR Simpson, Sextupteron, CoreXZ
I attached the string redirect for the black version.
ConceptFORGE
Wally, GUS Simpson, LISA Simpson, THOR Simpson, Sextupteron, CoreXZ
|
Re: CoreXZ July 27, 2015 09:37AM |
Registered: 8 years ago Posts: 6 |
|
CoreXZ - SO CLOSE TO WORKING!!! August 13, 2015 08:56PM |
Registered: 9 years ago Posts: 18 |
SO CLOSE, but yet so far....
Everything is built, and powered up, and working (yay!) -except- for the Y axis, which is not even powering up. When I connect to Repeater-host, I can drive the Z axis up and down, and X back and forth, which (I believe) means that I have the right set of code from Github, and that software is mixing the X and Z axis commands properly. But the Y axis - nothing. The stepper motor is not being energized at all - I can turn the motor with my fingers.
If I re-flash a copy of standard RAMPS code into the Arduino Mega, all three stepper motors work as expected. (Which causes my printer to make interesting grunting noises as the steppers fight each other.)
I MUST mention that Nicholas' [Configuration.h] is set up for Motherboard = 65, ATzeeg X1
I changed that one line, specifying Motherboard=33 instead. (Ramps 1.4 with Power outputs: Extruder, Fan, Bed)
What am I missing?
I have a Smoothieboard on the shelf, and I'd jump to that in a heartbeat if it had CoreXZ support. :/
Edited 3 time(s). Last edit at 08/13/2015 09:59PM by MacMarty.
|
Re: CoreXZ - SO CLOSE TO WORKING!!! August 15, 2015 10:00AM |
Registered: 10 years ago Posts: 979 |
Before I read the third paragraph, I would say it was a wiring issue or a bad driver. However, you say they make interesting grunting noises. With standard firmware the steppers should move smoothly. Y should work as it should and X and Z will cause weird diagonal motions. Is that what is happening? If not, it probably isn't a firmware issue and is probably a electronics issue.
ConceptFORGE
Wally, GUS Simpson, LISA Simpson, THOR Simpson, Sextupteron, CoreXZ
ConceptFORGE
Wally, GUS Simpson, LISA Simpson, THOR Simpson, Sextupteron, CoreXZ
|
New CoreXZ firmware in town! Meet MarlinKimbra August 15, 2015 06:02PM |
Registered: 9 years ago Posts: 18 |
Hi, Kids!
While groping around the web trying to sort out my Y-axis issues, I discovered that there is a new Marlin branch that specifically claims to support CoreXY -and- CoreXZ!
[github.com]
At this instant I'm trying to sort it all out so as to work with my machine. (Can't figure out how it knows CoreXY from CoreXZ, and need to set endstops to N.O., but that's all part of the learning process.) I thought you'd all like to know that MarlinKimbra exists. Onward to world domination!
|
Re: New CoreXZ firmware in town! Meet MarlinKimbra August 15, 2015 11:38PM |
Registered: 10 years ago Posts: 979 |
Keep in mind that they probably mean a 1:1 CoreXZ and not a 3:1 one. I really threw a wrench in the mix by not making it 1:1.
ConceptFORGE
Wally, GUS Simpson, LISA Simpson, THOR Simpson, Sextupteron, CoreXZ
ConceptFORGE
Wally, GUS Simpson, LISA Simpson, THOR Simpson, Sextupteron, CoreXZ
|
Re: New CoreXZ firmware in town! Meet MarlinKimbra August 16, 2015 01:18PM |
Registered: 9 years ago Posts: 18 |
Quote
nicholas.seward
Keep in mind that they probably mean a 1:1 CoreXZ and not a 3:1 one. I really threw a wrench in the mix by not making it 1:1.
I think a lot of us appreciate the way you actively push the envelope. No worries.
SO! The news for today is that with a bit of fiddling, I've gotten MarlinKimbra to move all three axes, and heat the nozzle, and extrude some filament. (Yay!) I'm going to have a go at porting your 3:1 mixing code, and then I'll be able to start the calibration process. I am a happy boy - it's nice to stop banging one's head against the wall.
|
Re: New CoreXZ firmware in town! Meet MarlinKimbra September 02, 2015 07:04AM |
Registered: 8 years ago Posts: 17 |
Quote
MacMarty
SO! The news for today is that with a bit of fiddling, I've gotten MarlinKimbra to move all three axes, and heat the nozzle, and extrude some filament. (Yay!) I'm going to have a go at porting your 3:1 mixing code, and then I'll be able to start the calibration process. I am a happy boy - it's nice to stop banging one's head against the wall.
Any more progress with your printer?
|
Re: New CoreXZ firmware in town! Meet MarlinKimbra September 03, 2015 01:09PM |
Registered: 9 years ago Posts: 18 |


Sorry, only registered users may post in this forum.