Need formatting tips, Any and all help welcomed
Posted by Zulance
|
Need formatting tips, Any and all help welcomed February 21, 2017 10:07PM |
Registered: 8 years ago Posts: 46 |
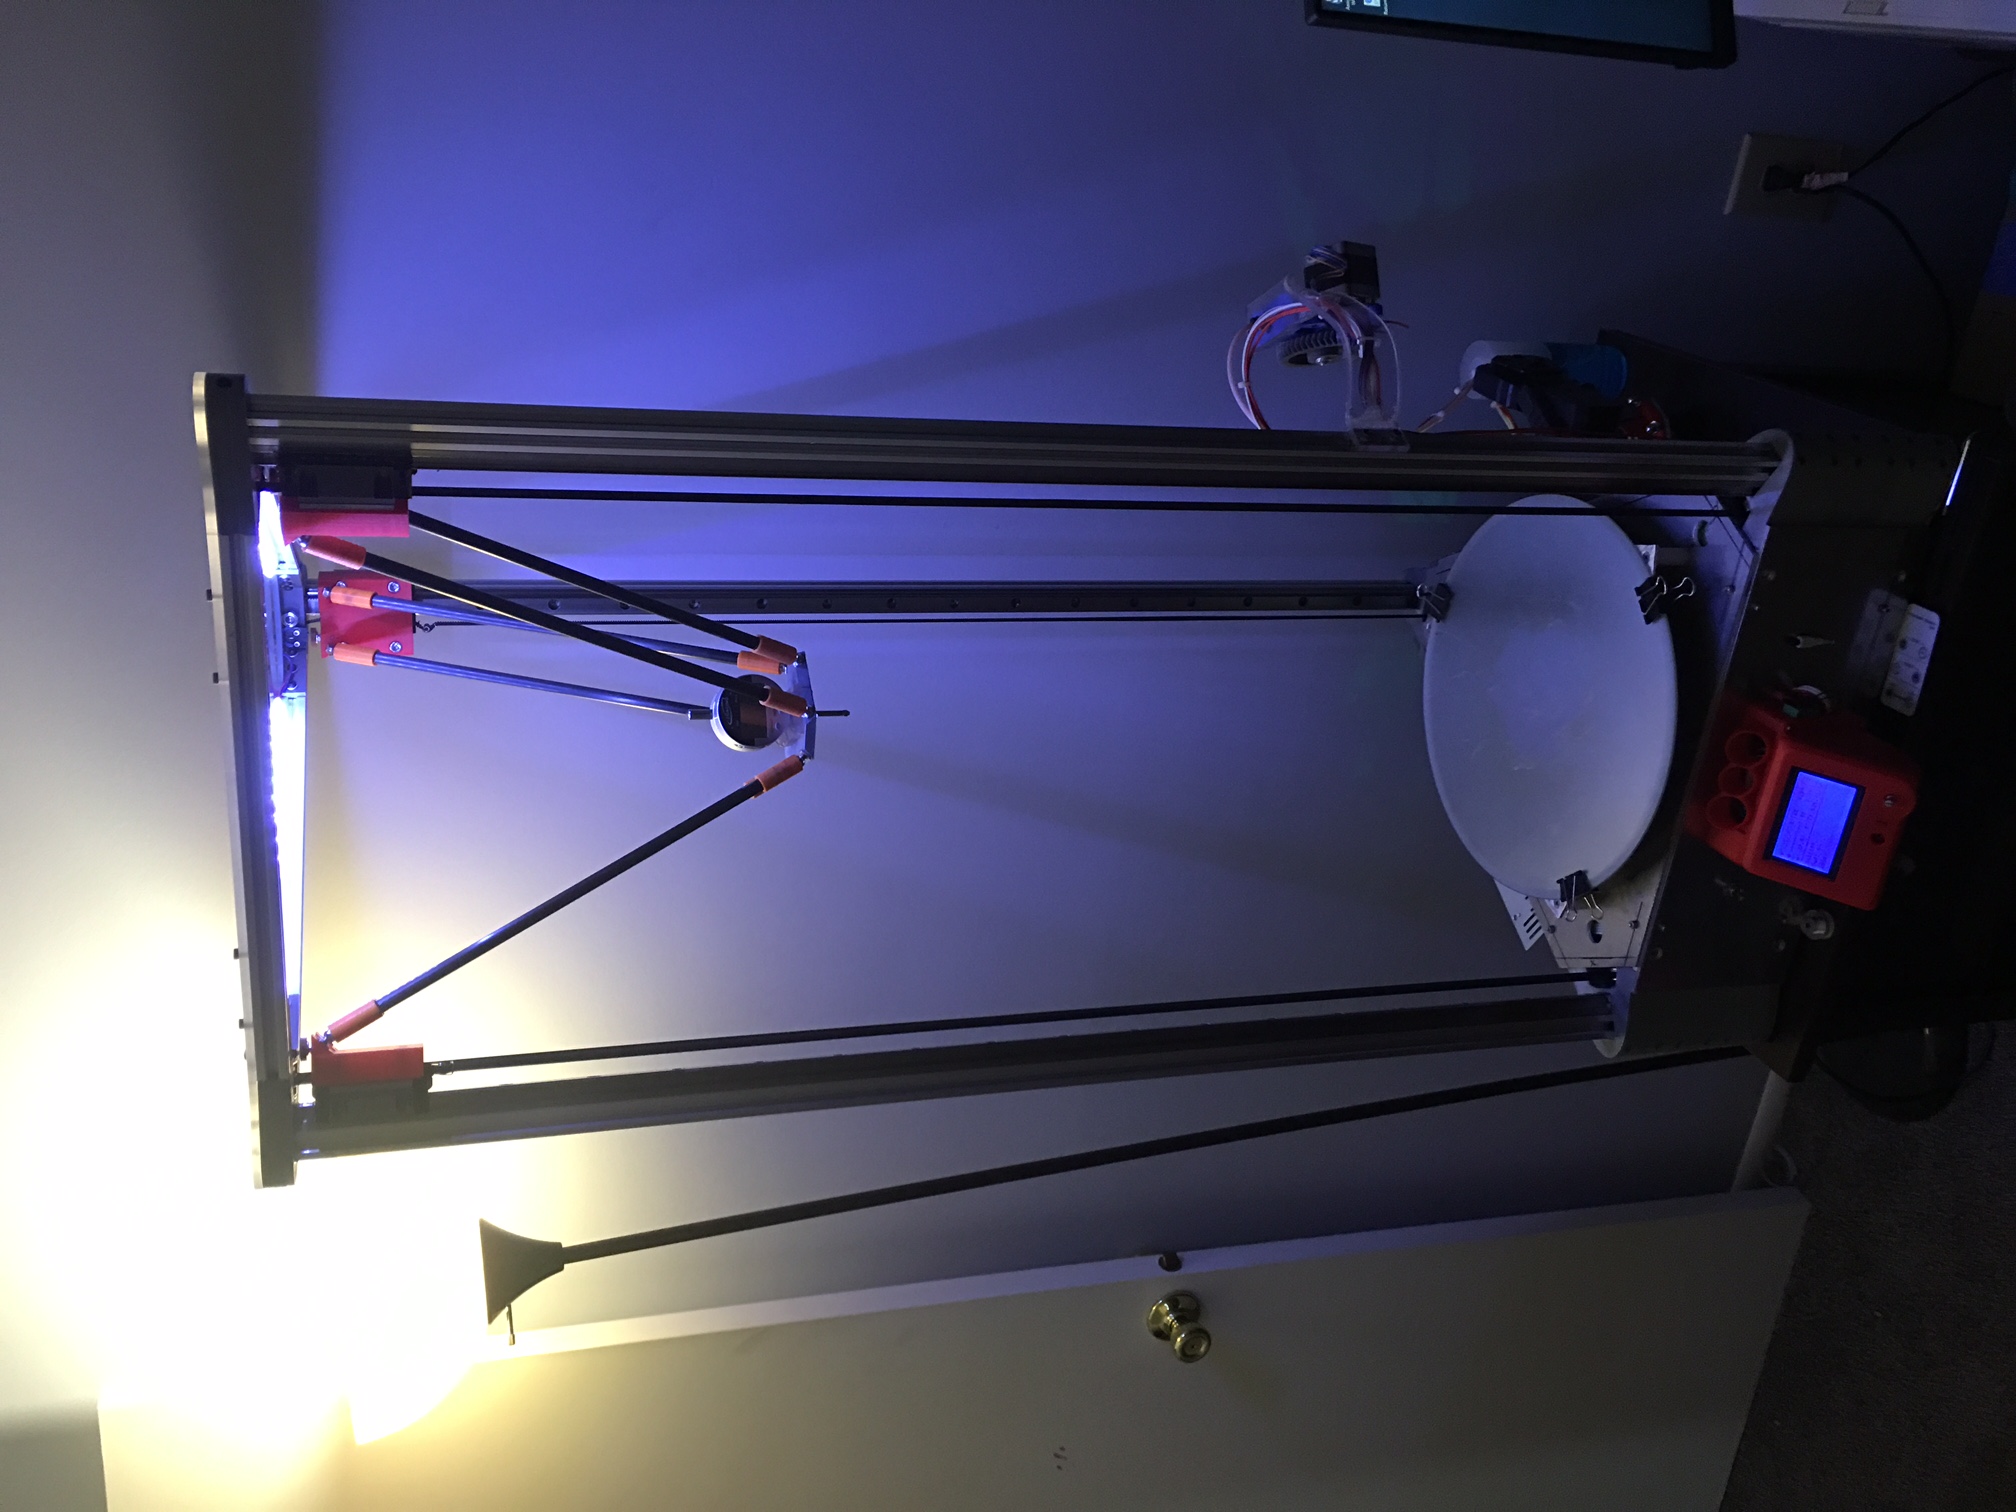
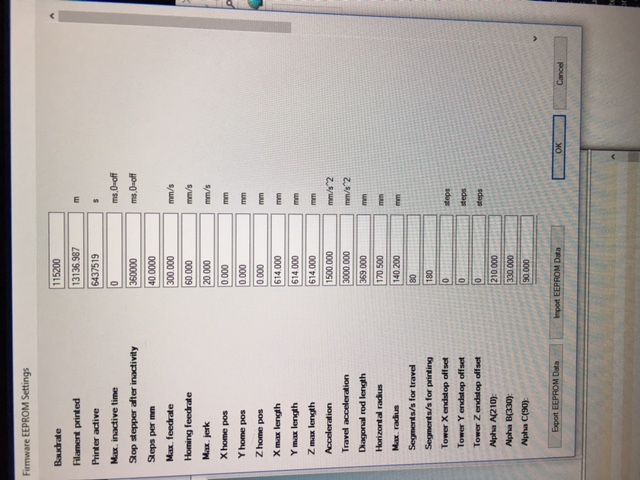
Hey guys/gals. I have been building 3d printers for a few years, and this most recent one is kicking my butt. I normally build printers with linear bearings. I recently built a printer with linear rails to completely eliminate any play in the rails. In doing so I also went from a 36 tooth pulley to 40 tooth pulleys to create zero error. I used to use 44.4444 steps per mm for the 36 tooth, but since I am using a 40 tooth i am using 40 steps per mm. I am attaching my EEPROM settings to see if anyone can point out what my problem is. Here is what I am having problems with. When it came to formatting my other printers I was always able to make perfect circles and squares. They may have been off .1 or .2mm, but the objects were square and round. I am able to make a square, but my round objects are not turning out so well. I went into the firmware and updated everything that I felt I needed to for the new gear to include the new tooth settings.
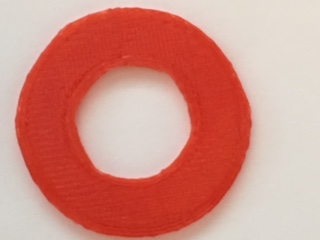
My circles are printing in more of a hexagon shape. The circle i uploaded is a 40mm outside diameter by 20mm inside diameter. The outside circle fluctuates from a 39.94mm down to a 38.73mm. Not worried about the inside diameter right now because I know something is off with my settings, or maybe my 40 tooth pulley is to much for these machines. IDK.
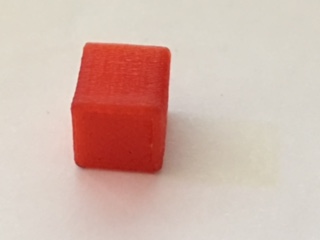
My square is suppose to be a 10mm x 10mm all around. The measurements for that came in at 9.77mm x 9.72mm on the outside walls with a height of 10.12mm.
I appreciate any, and all help that anyone can give me.
My circles are printing in more of a hexagon shape. The circle i uploaded is a 40mm outside diameter by 20mm inside diameter. The outside circle fluctuates from a 39.94mm down to a 38.73mm. Not worried about the inside diameter right now because I know something is off with my settings, or maybe my 40 tooth pulley is to much for these machines. IDK.
My square is suppose to be a 10mm x 10mm all around. The measurements for that came in at 9.77mm x 9.72mm on the outside walls with a height of 10.12mm.
I appreciate any, and all help that anyone can give me.
|
Re: Need formatting tips, Any and all help welcomed February 21, 2017 11:59PM |
Registered: 8 years ago Posts: 916 |
|
Re: Need formatting tips, Any and all help welcomed February 22, 2017 06:17AM |
Registered: 8 years ago Posts: 46 |
|
Re: Need formatting tips, Any and all help welcomed February 22, 2017 09:49PM |
Registered: 8 years ago Posts: 916 |
Are the belts nice and tight?
Also, 40 steps/mm seems awfully low, you'll get visible artefacts in your prints from such a low ratio. I assume you're using 1.8 degree steppers? 0.9 degree steppers might be more appropriate.
Are you getting any binding? How much stiction is in those magnetic ball ends? Have you greased them with a light grease such as lithium grease?
I'd guess that the issue is a combination of stiction in the ball ends, low steps/mm, possibly low belt tension, and 1/16 or higher microstepping.
To sort it out, I'd firstly check the stiction of the bearings, and tighten the belts, followed by lowering the size of the pulley, and using 0.9 degree steppers.
|
Re: Need formatting tips, Any and all help welcomed February 22, 2017 10:25PM |
Registered: 8 years ago Posts: 46 |
I have checked the tightness of everything before posting. Bearings and magnetic ball ends are all very tight and well lubricated with white lithium grease. I had not issues using with my 36 tooth pulleys so I thought I would give 40s a try. I am still playing around with the pulley sizes. I am using nema 17 stepper motors. I went with the bigger pulleys because of the large prints, the less motion of the motor the less heat they generate. If I have to go to a lower pulley size that is the cheapest route. I had run out of thoughts so I came to here to make sure I did not miss something in my settings. I will order a set of 20 tooth pulleys and try those out. Thanks again
Edited 1 time(s). Last edit at 02/22/2017 10:50PM by Zulance.
Edited 1 time(s). Last edit at 02/22/2017 10:50PM by Zulance.
|
Re: Need formatting tips, Any and all help welcomed February 22, 2017 10:59PM |
Registered: 8 years ago Posts: 916 |
Good luck with the tuning. 20 tooth pulleys will double the torque available to your carriages, which should help.
0.9 degree motors aren't all that expensive: [www.robotdigg.com]
Also, with such long belts you might be running into issues with belt stretch. Perhaps try some steel cored belts? They have issues with smaller diameter pulleys (the steel core breaks), but the stretch should reduced a lot.
0.9 degree motors aren't all that expensive: [www.robotdigg.com]
Also, with such long belts you might be running into issues with belt stretch. Perhaps try some steel cored belts? They have issues with smaller diameter pulleys (the steel core breaks), but the stretch should reduced a lot.
|
Re: Need formatting tips, Any and all help welcomed February 23, 2017 03:54PM |
Registered: 8 years ago Posts: 46 |
I am using belt springs that help reduce belt stretching. When the spring starts to extend to its max I tighten the belt up. This method has been working for me for years. I just hope by swapping to a smaller pulley will fix my issues. They should be in tomorrow and I will update you on how things go. I never had any issues with a 36 tooth pulley and jumping 4 teeth I would not have guessed to have these kind of issues. This machine is only a half a foot bigger than my last machine so we will see what happens. Even though I have been building machines for 3 years I am still learning a lot and these pulleys are a great example. If you have any tips or links to help me with z-probing that would be awesome as well. I have always done calibrations manually, but recently installed a z-probe. I have not been able to get it to work properly and am still researching on how to format that as well. Thanks
|
Re: Need formatting tips, Any and all help welcomed February 23, 2017 08:25PM |
Registered: 8 years ago Posts: 916 |
Which firmware are you running? If using RepRapFirmware then ignore the rest of this post, as it's for the great unwashed (like me) who are still using 8 bit hardware. Reprapfirmware has this calibration built in.
If not using RepRapFirmware, then:
Firstly, go here:
[escher3d.com]
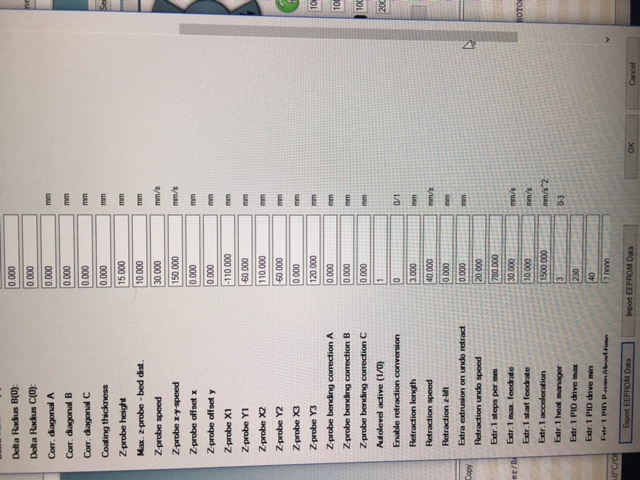
Input all the numbers from your firmware, choose 6 factor calibration, 10 points, and suggest probe points.
Then move your effector around and do a probe at each point. eg:
Then press "Calculate". The page will spit out some new numbers. Put those new numbers into your firmware, and also press "Copy to initial parameters".
Then repeat.
You want to get a deviation of less than 0.05. Looking at your beautiful Delta, with its lovely metal corners, I'd expect that you'll get 0.03 or lower.
Once this is done, it's a good idea to set up some form of probing before the print. How you do this depends on your firmware.
If not using RepRapFirmware, then:
Firstly, go here:
[escher3d.com]
Input all the numbers from your firmware, choose 6 factor calibration, 10 points, and suggest probe points.
Then move your effector around and do a probe at each point. eg:
G1 F6000 Z20 X0 Y90
M340 P0 S700; // Deploy probe
G30; // Measure height using Z probe
Then press "Calculate". The page will spit out some new numbers. Put those new numbers into your firmware, and also press "Copy to initial parameters".
Then repeat.
You want to get a deviation of less than 0.05. Looking at your beautiful Delta, with its lovely metal corners, I'd expect that you'll get 0.03 or lower.
Once this is done, it's a good idea to set up some form of probing before the print. How you do this depends on your firmware.
|
Re: Need formatting tips, Any and all help welcomed February 23, 2017 08:27PM |
Registered: 8 years ago Posts: 916 |
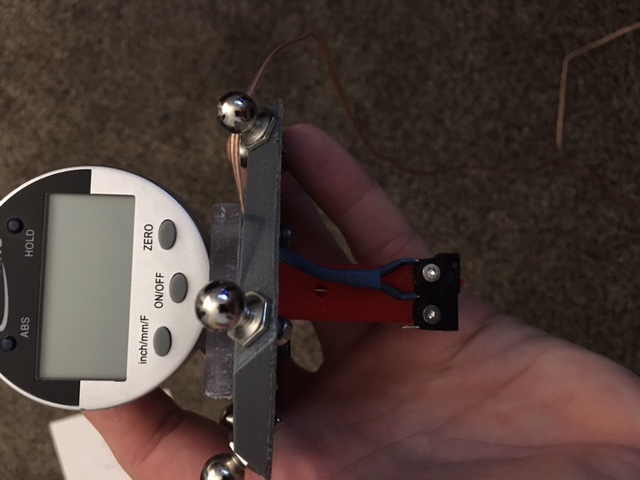
I can see from your picture that you have a dial indicator on the effector. This will work fine for the calculator. Do you have a picture of your effector with the probe mounted?
Here's how I did it: [www.thingiverse.com]
Here's how I did it: [www.thingiverse.com]
|
Re: Need formatting tips, Any and all help welcomed February 23, 2017 08:45PM |
Registered: 8 years ago Posts: 46 |
I actually have a setup for the probe to use with the dial caliper. I have it set at a 15mm offset from where the nozzle would be. I am just trying to understand how to get my z-probe to work before creating something a bit more permanent. The problem I am having is when I run Bed Height Map on Repetier Host it homes itself and moves around up top beating up my end stops. Seems like it is working in reverse. I attached a picture of my probe setup so you can see what I am talking about. Again this is just temp so I can understand how to use it. I just started playing with z-probing a few days ago. I have always manually calibrated my machines.
I think I may have found one of my problems. I am using 0.91 and all of the videos I am watching are 0.92x on up. When trying to use a new type of firmware I am getting this error
/Repetier.h:265:2: error: #error You need to define Z_PROBE_PIN to use z probe!
I was using the default that the program came with of -1, and not really sure what to change this to. I have it attached to my other Z switch like I have seen on a lot of diagrams.
Edited 1 time(s). Last edit at 02/23/2017 09:11PM by Zulance.
|
Re: Need formatting tips, Any and all help welcomed February 23, 2017 09:14PM |
Registered: 8 years ago Posts: 916 |
Here's my setup using the latest Repetier (0.92.9)
Maybe it will help. I've got the z probe pins plugged into the Z Min endstop pins. Ignore the Start and Finished scripts, these are for servo deployment of the probe.
Edit: you'll need to set your pullup on, if using a normally open switch (I use an optical endstop, so don't need the pullup)
Edited 2 time(s). Last edit at 02/23/2017 09:17PM by nebbian.
Maybe it will help. I've got the z probe pins plugged into the Z Min endstop pins. Ignore the Start and Finished scripts, these are for servo deployment of the probe.
Edit: you'll need to set your pullup on, if using a normally open switch (I use an optical endstop, so don't need the pullup)
// #################### Z-Probing #####################

#define Z_PROBE_Z_OFFSET 0
#define Z_PROBE_Z_OFFSET_MODE 0
#define UI_BED_COATING 1
#define FEATURE_Z_PROBE 1
#define Z_PROBE_BED_DISTANCE 10
#define Z_PROBE_PIN ORIG_Z_MIN_PIN
#define Z_PROBE_PULLUP 0
#define Z_PROBE_ON_HIGH 1
#define Z_PROBE_X_OFFSET 0
#define Z_PROBE_Y_OFFSET 0
#define Z_PROBE_WAIT_BEFORE_TEST 0
#define Z_PROBE_SPEED 2
#define Z_PROBE_XY_SPEED 150
#define Z_PROBE_SWITCHING_DISTANCE 1
#define Z_PROBE_REPETITIONS 1
#define Z_PROBE_HEIGHT 9.65
#define Z_PROBE_START_SCRIPT "M340 P0 S700"
#define Z_PROBE_FINISHED_SCRIPT "M340 P0 S1800"
#define Z_PROBE_REQUIRES_HEATING 0
#define Z_PROBE_MIN_TEMPERATURE 150
#define FEATURE_AUTOLEVEL 1
#define Z_PROBE_X1 -69
#define Z_PROBE_Y1 -40
#define Z_PROBE_X2 69
#define Z_PROBE_Y2 -40
#define Z_PROBE_X3 0
#define Z_PROBE_Y3 80
#define BED_LEVELING_METHOD 0
#define BED_CORRECTION_METHOD 0
#define BED_LEVELING_GRID_SIZE 5
#define BED_LEVELING_REPETITIONS 5
#define BED_MOTOR_1_X 0
#define BED_MOTOR_1_Y 0
#define BED_MOTOR_2_X 200
#define BED_MOTOR_2_Y 0
#define BED_MOTOR_3_X 100
#define BED_MOTOR_3_Y 200
#define BENDING_CORRECTION_A 0
#define BENDING_CORRECTION_B 0
#define BENDING_CORRECTION_C 0
#define FEATURE_AXISCOMP 0
#define AXISCOMP_TANXY 0
#define AXISCOMP_TANYZ 0
#define AXISCOMP_TANXZ 0
Edited 2 time(s). Last edit at 02/23/2017 09:17PM by nebbian.
|
Re: Need formatting tips, Any and all help welcomed February 23, 2017 09:52PM |
Registered: 8 years ago Posts: 46 |
That helped. I am able to upload the firmware. (#define Z_PROBE_PIN) was reading (#define Z_PROBE_PIN -1) I changed it to (#define Z_PROBE_PIN 63) and I was able to upload the firmware to get started, but not quite sure that is even the correct settings. I am also having problems with my endstops. I got so comfortable with 0.91 firmware and this 0.92.9 does not seem to like the settings I used to use from that firmware. Curious to see what your endstop settings are set to. I am using mechanical stops that are always open and the machine closes them.
Thought I had it, but machine is acting weird. Would like to see what settings anyone else is using for mechanical stops. I can get it to home once and then I get this.
22:16:42.804 : Info:Autoleveling disabled
22:16:42.955 : RequestPause:Homing failed!
22:16:42.955 : SelectExtruder:0
22:16:42.959 : X:0.00 Y:0.00 Z:614.000 E:0.0000
22:16:42.963 : Info:Autoleveling enabled
Thanks again for all the help!
Edited 3 time(s). Last edit at 02/23/2017 10:27PM by Zulance.
|
Re: Need formatting tips, Any and all help welcomed February 24, 2017 01:13AM |
Registered: 8 years ago Posts: 916 |
|
Re: Need formatting tips, Any and all help welcomed February 24, 2017 08:40PM |
Registered: 8 years ago Posts: 46 |
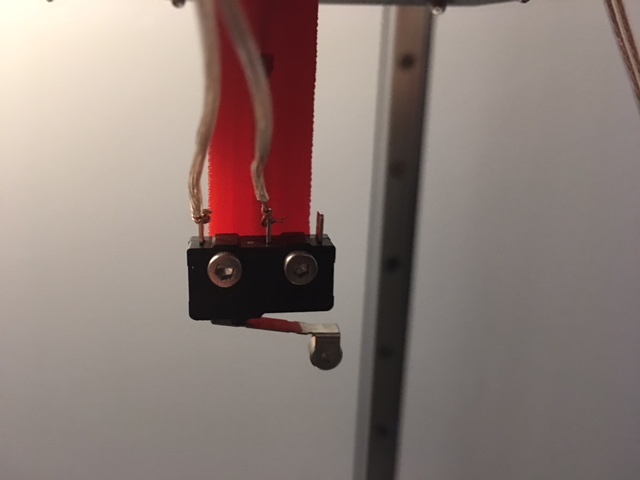
Thanks a lot nebbian, you have been a huge help. Hopefully you can help me over the last hump and I can start to enjoy the benefits of auto leveling. I have my machine homing and working amazing, the problem I am having currently is it is not recognizing my z-probe. When I run my auto leveling it goes through the motions, but continues as though the probe is not there and continues to crash into the plate. I attached a picture of my test probe so you can see the wiring. I have the other end plugged into the other z port on my printer.
|
Re: Need formatting tips, Any and all help welcomed February 24, 2017 11:23PM |
Registered: 8 years ago Posts: 916 |
|
Re: Need formatting tips, Any and all help welcomed February 25, 2017 05:49PM |
Registered: 8 years ago Posts: 46 |
|
Re: Need formatting tips, Any and all help welcomed February 25, 2017 07:04PM |
Registered: 8 years ago Posts: 916 |
|
Re: Need formatting tips, Any and all help welcomed February 25, 2017 07:22PM |
Registered: 8 years ago Posts: 46 |
19:18:00.032 : endstops hit: x_max:L y_max:L z_max:L Z-probe state:L
19:18:14.938 : endstops hit: x_max:L y_max:L z_max:L Z-probe state:L
I enabled (#define MIN_HARDWARE_ENDSTOP_Z true) as well and my switch seems to be recognized. The issue with enabling this is it pauses my printer ever command
Edited 1 time(s). Last edit at 02/25/2017 07:43PM by Zulance.
19:18:14.938 : endstops hit: x_max:L y_max:L z_max:L Z-probe state:L
I enabled (#define MIN_HARDWARE_ENDSTOP_Z true) as well and my switch seems to be recognized. The issue with enabling this is it pauses my printer ever command
Edited 1 time(s). Last edit at 02/25/2017 07:43PM by Zulance.
|
Re: Need formatting tips, Any and all help welcomed February 25, 2017 07:46PM |
Registered: 8 years ago Posts: 46 |

|
Re: Need formatting tips, Any and all help welcomed February 25, 2017 09:09PM |
Registered: 8 years ago Posts: 46 |
|
Re: Need formatting tips, Any and all help welcomed February 25, 2017 09:09PM |
Registered: 8 years ago Posts: 46 |
|
Re: Need formatting tips, Any and all help welcomed February 25, 2017 10:24PM |
Registered: 8 years ago Posts: 916 |
|
Re: Need formatting tips, Any and all help welcomed February 28, 2017 07:08PM |
Registered: 8 years ago Posts: 46 |
|
Re: Need formatting tips, Any and all help welcomed February 28, 2017 09:56PM |
Registered: 8 years ago Posts: 916 |
|
Re: Need formatting tips, Any and all help welcomed March 01, 2017 06:04PM |
Registered: 8 years ago Posts: 46 |
I have a file with a bunch of circles, but I am unable to crop it down to a size lower than 610kb. My belts are tight, but not overly tight. I use belt springs so that all of the belts have the same tension on them, as the belt stretches the spring compensates for the stretch. I made sure everything was tight, no gear slippage etc. the only thing I can think of is a formatting error of some sorts. The closer to the center, smaller I got the more you could see the octagon shape. The bigger the circles got the cleaner around they became. Not sure what would cause this.
|
Re: Need formatting tips, Any and all help welcomed March 02, 2017 11:18AM |
Registered: 8 years ago Posts: 30 |
Zulance,
Based upon your "The bigger the circles got the cleaner around they became" observation, I think that the magnetic joints around the effector may be binding up. The photo attached to your first post ( when zoomed in) seems to show the magnetic rod ends on the effector completely covering over the joint balls instead of only cupping the top half of the ball like the connections on the carriage magnetic joints appear. Is the effector using a different size ball than the carriage?
Based upon your "The bigger the circles got the cleaner around they became" observation, I think that the magnetic joints around the effector may be binding up. The photo attached to your first post ( when zoomed in) seems to show the magnetic rod ends on the effector completely covering over the joint balls instead of only cupping the top half of the ball like the connections on the carriage magnetic joints appear. Is the effector using a different size ball than the carriage?
|
Re: Need formatting tips, Any and all help welcomed March 02, 2017 06:54PM |
Registered: 8 years ago Posts: 46 |
I have ran the test multiple times. There is no slippage, binding, or skipping. I have been using these same rods for about a year now, just swapped them over to this new machine. Just weird what it is doing. I will try and print a few off center to see how my results are.
Edited 1 time(s). Last edit at 03/02/2017 06:56PM by Zulance.
Edited 1 time(s). Last edit at 03/02/2017 06:56PM by Zulance.
|
Re: Need formatting tips, Any and all help welcomed March 02, 2017 07:55PM |
Registered: 8 years ago Posts: 916 |
Quote
Zulance
I have a file with a bunch of circles, but I am unable to crop it down to a size lower than 610kb. My belts are tight, but not overly tight. I use belt springs so that all of the belts have the same tension on them, as the belt stretches the spring compensates for the stretch. I made sure everything was tight, no gear slippage etc. the only thing I can think of is a formatting error of some sorts. The closer to the center, smaller I got the more you could see the octagon shape. The bigger the circles got the cleaner around they became. Not sure what would cause this.
You can save at a lower resolution in your image editing program, to get it below the 610kb limit.
|
Re: Need formatting tips, Any and all help welcomed March 02, 2017 08:03PM |
Registered: 8 years ago Posts: 916 |
Quote
ayudtee
Zulance,
Based upon your "The bigger the circles got the cleaner around they became" observation, I think that the magnetic joints around the effector may be binding up. The photo attached to your first post ( when zoomed in) seems to show the magnetic rod ends on the effector completely covering over the joint balls instead of only cupping the top half of the ball like the connections on the carriage magnetic joints appear. Is the effector using a different size ball than the carriage?
Wow you've got sharp eyes. I can see that now. I agree, all the observations point to stiction, that combined with a springy belt spring might result in what is being seen.
If it were me I'd remove the belt springs, you want that belt to be as rigid as possible (high spring constant) so that any small displacement results in a large change in force. The belt springs will work against you here.
|
Re: Need formatting tips, Any and all help welcomed March 02, 2017 08:06PM |
Registered: 8 years ago Posts: 916 |
Holy... I just saw this.
Is the belt between the carriage and the top pulley not parallel? It looks like you might be using really large idlers, with the belt attachment on the carriage a different width to the diameter of the idler. No wonder you need spring tensioners.
As the carriage moves down, you'll lose belt tension, meaning that it's harder to overcome stiction.

Sorry, only registered users may post in this forum.