Automatic bed levelling and effector tilt
Posted by nebbian
|
Automatic bed levelling and effector tilt April 18, 2016 02:55AM |
Registered: 8 years ago Posts: 916 |
I've been working towards getting a bed levelling system operational, and am running into effector tilt issues.
Basically I'm seeing an effector tilt change of around 1 degree, which over 22mm (the distance from my nozzle to the sensor) works out to be 0.4mm.
0.4mm is huge. It's way more variation than I can use. I need less than 0.1mm, ideally less than 0.05mm.
I can print perfectly without the Z sensor, but I can see the difference when I start a print in the morning, vs in the afternoon when the printer has warmed up a bit. I need to adjust the Z height by up to 0.1mm, depending on how hot or cold the printer is. I was hoping that a Z sensor would solve this issue, but I'm stuck on effector tilt issues.
I'm using a self-designed sensor based around an optical endstop, and a wire rod. I'm getting repeatability of 0.01mm. The sensor itself is working really well.
However, after I've done the paper test and calibrated all 4 points so that they are touching the paper at 0 Z height, when I probe those points there is up to a 0.4mm variation. This is despite being able to print perfectly over the whole surface of the bed. This has to be effector tilt at play.
So how the frig is everyone doing it? Surely everyone else has effector tilt of some amount. You'd have to be a pretty good machinist to get rid of it altogether surely?
Does the DC42 RepRapFirmware handle effector tilt properly?
|
Re: Automatic bed levelling and effector tilt April 18, 2016 04:04AM |
Registered: 10 years ago Posts: 14,672 |
A few points:
1. You can use a Z probe to set the Z=0 height without doing auto calibration. With RepRapFirnware, just move the head to a few mm above the centre of the bed, and execute G30.
2. If you are getting that much effector tilt, that is likely to affect your dimensional accuracy and the straightness of straight lines. So you really ought to reduce it.
3. In RepRapFirmware you have the option of specifying a Z probe trigger height correction at each probe point. This can be used to correct for any residual effector tilt. To use this, you need to measure the probe trigger height at each probe point.
4. Try to get the Z probe closer to the tip of the nozzle, to reduce the effect of effector tilt on trigger height. I designed my mini IR sensor to fit under the heatsink of an E3D hot end so that it can be closer than most other types of Z probe. On my delta, it's 13mm between the two.
Large delta printer [miscsolutions.wordpress.com], E3D tool changer, Robotdigg SCARA printer, Crane Quad and Ormerod
Disclosure: I design Duet electronics and work on RepRapFirmware, [duet3d.com].
|
Re: Automatic bed levelling and effector tilt April 18, 2016 04:15AM |
Registered: 8 years ago Posts: 916 |
Thanks DC.
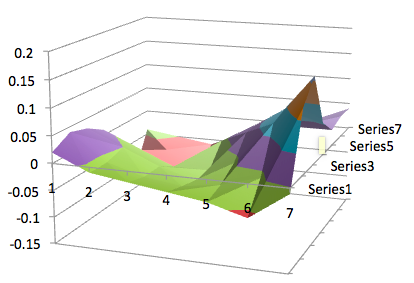
I've certainly been trying to reduce it, I think that the RobotDigg carriages that go onto the linear guides aren't set up as well as they should be. They have 3mm threaded holes for the diagonal rods, and I'm convinced that those 3mm holes are not at exactly the same height from the bed. This was a problem on my other printer as well. I've been doing a mesh grid probe on the bed, and graphing the result in excel to see graphically what's going on. This has helped, but isn't the end of the story by a long shot.
Good stuff. How do you do this? Is this done using G codes? If so, what are the G codes for:
a) Specifying the positions of each probe point, and
b) Specifying the Z offset of the probe at each point.
Thanks in advance.
I've certainly been trying to reduce it, I think that the RobotDigg carriages that go onto the linear guides aren't set up as well as they should be. They have 3mm threaded holes for the diagonal rods, and I'm convinced that those 3mm holes are not at exactly the same height from the bed. This was a problem on my other printer as well. I've been doing a mesh grid probe on the bed, and graphing the result in excel to see graphically what's going on. This has helped, but isn't the end of the story by a long shot.
Quote
dc42
3. In RepRapFirmware you have the option of specifying a Z probe trigger height correction at each probe point. This can be used to correct for any residual effector tilt. To use this, you need to measure the probe trigger height at each probe point.
Good stuff. How do you do this? Is this done using G codes? If so, what are the G codes for:
a) Specifying the positions of each probe point, and
b) Specifying the Z offset of the probe at each point.
Thanks in advance.
|
Re: Automatic bed levelling and effector tilt April 18, 2016 10:10AM |
Registered: 10 years ago Posts: 14,672 |
It doesn't matter if there is a slight static tilt of the effector due to the screw holes in the carriages being slightly out. Here are some cause of varying tilt:
- Diagonal rods in a pair not quite the same length between bearing centres
- Bearing spacing at top of a pair of rods not quite the same as at the bottom
- Lines between pairs of bearings on the carriages not quite parallel with the lines between pairs of bearings on the effector in the XY plane, e.g. due to warped printed carriages
- Play in the joints. The sideways force exterted by the Bowden tube may reverse direction depending on XY position, taking up the play in opposite directions.
For the bed.g file, see [reprap.org]. You can use my bed file wizard at escher3d.com to generate it The H parameter on the G30 commands is used to adjust the trigger height at each probe point.
Large delta printer [miscsolutions.wordpress.com], E3D tool changer, Robotdigg SCARA printer, Crane Quad and Ormerod
Disclosure: I design Duet electronics and work on RepRapFirmware, [duet3d.com].
|
Re: Automatic bed levelling and effector tilt April 18, 2016 01:01PM |
Registered: 8 years ago Posts: 356 |
Maybe you should do some new arm, magnetic or hi end bushing ( igus I think people recommend) or try a different effector design that allow some adjustment to remove that tilt or reduce it a least.
You probably have a mechanical problem somewhere like DC said, trying to fix it with with software is probably not the good way to go.
Im glad I did not ran into that tilt problem, look complicate to solve.
I hope you can solve it without too much rebuilding.
You probably have a mechanical problem somewhere like DC said, trying to fix it with with software is probably not the good way to go.
Im glad I did not ran into that tilt problem, look complicate to solve.
I hope you can solve it without too much rebuilding.
|
Re: Automatic bed levelling and effector tilt April 18, 2016 10:23PM |
Registered: 8 years ago Posts: 916 |
Thanks for the advice.
The screw holes being at slightly different heights absolutely does make a difference to dynamic tilt. I've verified this many times. Think about it, as the effector moves closer to the carriage, the differing heights of the holes will have more and more of an effect. Conversely, as the effector moves away, the diagonal rods become more and more horizontal, which means that the differing heights has less and less of an effect.
This was obvious from the grid surface measurements I was taking. Loosening the carriage screws, and rotating the carriage slightly made a big difference to the print surface as measured by the (offset) probe.
Visualising the surface using the chart feature in Excel really helps to figure out what's going on. It also really shows if your delta radius is slightly off, as you can visually see a slight dip in the surface.
Before I did these measurements I had no idea that I had so much effector tilt (well, if you call 1 degree a lot of tilt). I find it difficult to measure with normal instruments. I think the only way to measure effector tilt is similar to how I'm doing it -- if you haven't made strong efforts to measure your effector tilt you'll be blissfully unaware of how much is present in your machine, and will only see the effects when you try dual extruders.
|
Re: Automatic bed levelling and effector tilt April 19, 2016 10:26AM |
Registered: 8 years ago Posts: 916 |
With a whole lot of experimentation, and just by changing the carriage angle (both by rotating it slightly and shimming one side), I've gone from this:
to this:
and now I'm here:
This is difficult to get to. Very slight changes in carriage angle have a large effect.
I think the only way to get delta bed levelling working properly is to have a sensor that is extremely close to the nozzle. I just can't see most people being able to get the required accuracy you need to stop effector tilt altogether.
Edited 1 time(s). Last edit at 04/19/2016 10:27AM by nebbian.

to this:

and now I'm here:

This is difficult to get to. Very slight changes in carriage angle have a large effect.
I think the only way to get delta bed levelling working properly is to have a sensor that is extremely close to the nozzle. I just can't see most people being able to get the required accuracy you need to stop effector tilt altogether.
Edited 1 time(s). Last edit at 04/19/2016 10:27AM by nebbian.
|
Re: Automatic bed levelling and effector tilt April 19, 2016 10:52AM |
Registered: 9 years ago Posts: 83 |
I wanted to Chime in here mainly because i am having the very same problems still...
While i can stick prints most of the time now my bed is still not level. I have tried measuring Z-Heights at each probe point and adjusting for effector tilt using DC's differential IR probe. However I usually make the problem worse and not better... I believe it is something mechanical because i am having the same problems in the same areas. I am VERY close to level bed but when i print larger objects my printer struggles to lay down and squish the first layer infill (which pulls away from the bed and leaves plastic bubbled up which then leads to the nozzle dragging through the print... I recently have re-calibrated my extruder feed which was off by a bit...
After the adjustments i still cannot get a flat print...I am almost certain it is due to effector tilt which as you mentioned is a difficult problem to tackle... i have been considering rebuilding the delta for a different style printer to achieve better prints but I am not sure if i am ready to give up on the delta yet...
|
Re: Automatic bed levelling and effector tilt April 19, 2016 05:39PM |
Registered: 10 years ago Posts: 14,672 |
Quote
nebbian
The screw holes being at slightly different heights absolutely does make a difference to dynamic tilt. I've verified this many times. Think about it, as the effector moves closer to the carriage, the differing heights of the holes will have more and more of an effect. Conversely, as the effector moves away, the diagonal rods become more and more horizontal, which means that the differing heights has less and less of an effect.
I'll give this some more thought, and maybe make a mathematical model. I can already see that one of the assumptions I was making is incorrect.
If you can get the variation in trigger height across the bed down to +/-0.1mm or better, then IMO that is small enough that you can use the H parameter on the G30 commands in bed.g to correct for those changes in trigger height. But having the sensor very close to the nozzle - or using the nozzle itself as the probe - is definitely a good thing, to reduce the effect of effector tilt on trigger height.
Large delta printer [miscsolutions.wordpress.com], E3D tool changer, Robotdigg SCARA printer, Crane Quad and Ormerod
Disclosure: I design Duet electronics and work on RepRapFirmware, [duet3d.com].
|
Re: Automatic bed levelling and effector tilt April 19, 2016 08:38PM |
Registered: 8 years ago Posts: 443 |
On my HE3D delta I observed that it was very clear to see that as the machine moved from Z0 to Z600 you could see the nozzle snaking side to side, this wobble was traced to the rollers not tracking correctly, which caused the carriages to wobble, which in turn induced the wobble into the effector..... I fixed this by replacing the rollers with linear rails.
If your delta is using rollers its probably worthwhile checking how well the rollers track
In an ideally parallelogram, any constant deviation in the carriage mounts should result in a constant deviation at the effector, regardless of your position and angle, however, what I suspect is happening is this deviation is twisting the other parallelogram pairs, each effector mounts will be subject to a dominant tilt from its tower and a recessive twist from the other two towers, and as the effector gets closer to a particular tower then the dominant tilt induced by that tower will increase and the recessive twisting from the other two towers will reduce
RepRapPro Mendel 3 Tricolour
RepRapPro Fisher
-Carbon Arms
-Easy adjust Carriage+effector
-axis stiffness mods
HE3D -600 delta
-Duet 0.8.5
-PanelDue
-DC42 Height probe
-RobotDigg metal components
Simplyfy3D
RS Design Spark CAD
|
Re: Automatic bed levelling and effector tilt April 19, 2016 11:16PM |
Registered: 8 years ago Posts: 916 |
Just on the carriage rotation thing, here are two measurements taken just minutes apart.
The first one is with the Y carriage rotated fully clockwise on its linear bearing mount (something like a 1 degree rotation off what you would consider vertical).
The second one is with the Y carriage rotated fully anticlockwise on its mount (probably something like 2 degrees anticlockwise compared to the previous set of measurements)
I had to do this with all 3 carriages, as well as shimming each side, to see what effect the various offsets would have on my effector tilt error. It's tedious. However seeing the results graphically like this, makes it a lot easier to figure out what to do to the carriages to get less effector tilt.
Edited 2 time(s). Last edit at 04/19/2016 11:17PM by nebbian.
The first one is with the Y carriage rotated fully clockwise on its linear bearing mount (something like a 1 degree rotation off what you would consider vertical).

The second one is with the Y carriage rotated fully anticlockwise on its mount (probably something like 2 degrees anticlockwise compared to the previous set of measurements)

I had to do this with all 3 carriages, as well as shimming each side, to see what effect the various offsets would have on my effector tilt error. It's tedious. However seeing the results graphically like this, makes it a lot easier to figure out what to do to the carriages to get less effector tilt.
Edited 2 time(s). Last edit at 04/19/2016 11:17PM by nebbian.
|
Re: Automatic bed levelling and effector tilt July 26, 2016 09:17PM |
Registered: 7 years ago Posts: 5 |
|
Re: Automatic bed levelling and effector tilt July 30, 2016 05:04PM |
Registered: 9 years ago Posts: 83 |
Hi,
I am still working on this issue currently. I have adjusted everything i can mechanically however after i measure all my individual probe point trigger heights and adjust the H parameter in the .bed file i still cant even stick a print.
My plans are to very slightly adjust the H parameters further at each probe point until i can get the majority of them to snag the paper test at z-height =0 after an auto calibration...
I am unsure what else i can adjust or upgrade to solve this problem. I am very happy with my build and all of the hardware but lately i have been having trouble even sticking a print which can be discouraging. This is because even when i can stick prints the bed is not level enough to stick larger prints onto the bed...I have been considering a second build (with an old Mega + RAMPs)...or cannibalizing the kossels hardware for a new build. But this will be my last resort, I would really like to get the kossel working...Are magnetic rods worth it? Has anyone else got ideas on how to correct this I have checked and corrected the majority of DC's suggestions such as carriage and effector rod spacing.
Mini Kossel(15x15) T3DP3D Duet8.5 + Panel Due Heated bed covered with PLA(painted black) is my setup
|
Re: Automatic bed levelling and effector tilt January 21, 2017 03:21AM |
Registered: 8 years ago Posts: 117 |
I also have a question about the effector tilt, I hope it is Ok to ask it here.
It looks like I have a slight effector tilt as-well. Who doesn't ?
?
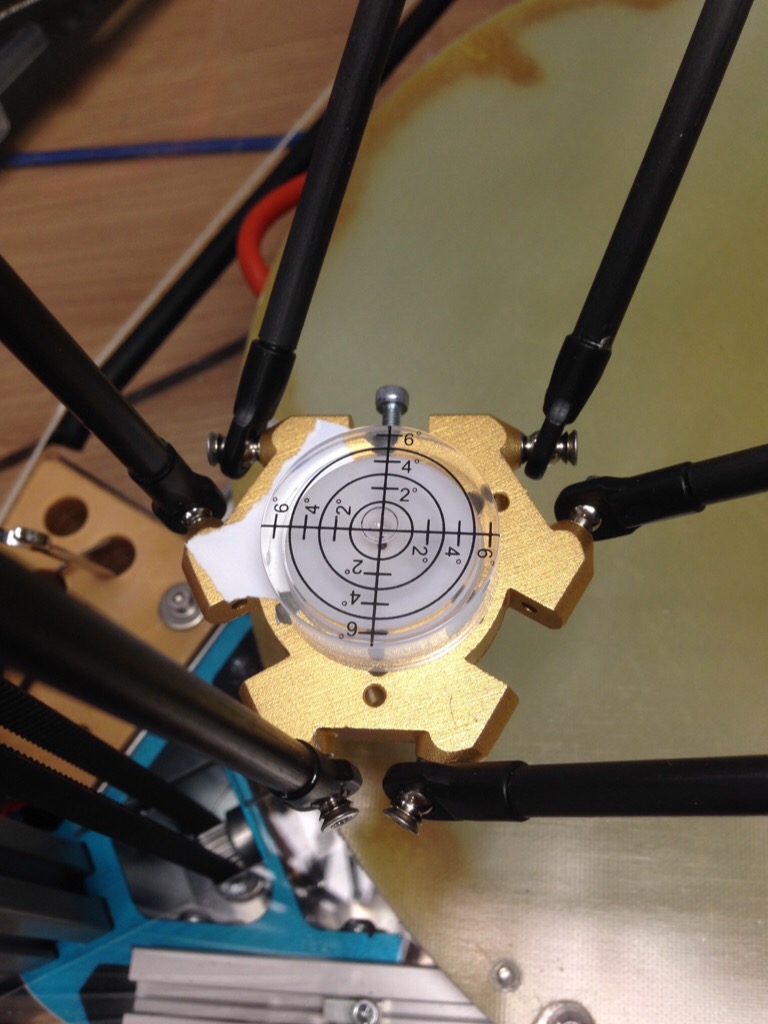
Using a cheap bubble level it looks like I have roughly +/-0.5 deg of tilt. I have no idea if it is a lot...
Here comes the question: It looks like the effector is tilting roughly symmetrical, and kind of at a spherical pattern, with the center and the top of the sphere sitting in the middle of the bed. Have a look at the pictures, these are X,Y,Z towers, and bed center.
I have not much knowledge about the geometry of a delta, perhaps this is always so, but I wanted to ask which screws I need to tune to get rid od this. The mechanics (rods, bearing distances, etc) are well within 0.1mm from each other.
I hope someone with a bit more experience can leave a comment on this...
It looks like I have a slight effector tilt as-well. Who doesn't
?Using a cheap bubble level it looks like I have roughly +/-0.5 deg of tilt. I have no idea if it is a lot...
Here comes the question: It looks like the effector is tilting roughly symmetrical, and kind of at a spherical pattern, with the center and the top of the sphere sitting in the middle of the bed. Have a look at the pictures, these are X,Y,Z towers, and bed center.
I have not much knowledge about the geometry of a delta, perhaps this is always so, but I wanted to ask which screws I need to tune to get rid od this. The mechanics (rods, bearing distances, etc) are well within 0.1mm from each other.
I hope someone with a bit more experience can leave a comment on this...
|
Re: Automatic bed levelling and effector tilt January 21, 2017 07:51AM |
Registered: 10 years ago Posts: 14,672 |
The classic cause of that symmetrical pattern is bearing spacings not quite the same at the top and bottom of the rods. But if you are sure that they match accurately, then I guess there must be other causes as well.
Large delta printer [miscsolutions.wordpress.com], E3D tool changer, Robotdigg SCARA printer, Crane Quad and Ormerod
Disclosure: I design Duet electronics and work on RepRapFirmware, [duet3d.com].
Large delta printer [miscsolutions.wordpress.com], E3D tool changer, Robotdigg SCARA printer, Crane Quad and Ormerod
Disclosure: I design Duet electronics and work on RepRapFirmware, [duet3d.com].
|
Re: Automatic bed levelling and effector tilt January 22, 2017 08:55AM |
Registered: 8 years ago Posts: 117 |
Thanks David,
It is rather hard to measure precisely, but it looks like the distances are within 0.1mm or better (pair wise). Is it to bad? What would you call a reasonably good tolerance?
And what about the effector tilt? How much is OK for a good system? I am getting a +/-0.5 deg currently.
I have noticed today, that if I perform G30 S-1 at the bed center, I get let's say a 1.85mm reading. The Y and Z towers are within 0.05mm from that (both report a trigger a bit higher).
However, the X tower is way of, at about 2.00mm trigger heigh.
This test is done directly after the Duet restart and homing (and heating up to the temp). If I try to move the nozzle on the X axis, I can clearly see, that the standoff is increasing towards -X and decreasing towards a +X direction. The Y axis is pretty constant.
It looks like the virtual working plane is tilted around the Y axis (Cartesian)
What can be the cause of that from your experience? How to deal with it?
I have noticed, that there are several options for the G30 command, I usually use G30 S6 calibration. I have tried to use a S7, but the delta diagonals length was tending to decrease with every iteration. What is the best practice here? My diagonals should be 350mm long, but if I try to measure them, I get something more like 349.5mm...
If you like, I would open a separate thread on that, so people can find the information more easily...
|
Re: Automatic bed levelling and effector tilt January 22, 2017 10:19AM |
Registered: 8 years ago Posts: 916 |
Teilchen,
I've recently upgraded my machine and in the process, eliminated effector tilt. I got my ball spacing to within about 0.03mm, which is the limit of accuracy of my calipers.
Measuring this is tricky. The only way I've found that works, is to put washers just inside the joints, and measure the distance between the washers. You can then shim the inside end of the washer to get the required spacing (hint, an aluminium drink can is about 0.05mm wide, and you can make washers with a 3mm drill and a hole punch).
I'm now getting parts that are within 0.2% tolerance everywhere on the bed. This requires a lot of physical tweaking, and calibration, and tweaking, and calibration, etc, to get to this point. Note that GT2 belts aren't always 2mm between teeth. Also note that changing the tension on a belt also changes the steps per mm for it.
Good luck with your printer.
Sorry, only registered users may post in this forum.