FLSUN I3 kit review
Posted by R.G.
|
Re: FLSUN I3 kit review April 02, 2017 06:40PM |
Registered: 7 years ago Posts: 1 |
Hi,
I've got my FLSUN i3 working pretty well but I've added a 3d touch auto-leveler and I can't get it configured. I've scoured the web looking for help. If you've gotten the 3dtouch to work on your Flsun i3, would you be willing to share the configuration.h file with me? Thanks
Edited 1 time(s). Last edit at 04/04/2017 05:46PM by evansr.
|
Re: FLSUN I3 kit review April 14, 2017 08:43PM |
Registered: 7 years ago Posts: 4 |
Good Day Everyone
I just wanted to post that I have picked up this kit and so far in the build it is ok except I had to add
another set screw for the X axis, one on each side now and she is pretty solid.
I just wanted to add that this forum has been a wealth of knowledge as I am a total greenhorn to 3D printing.
Take Care
|
Re: FLSUN I3 kit review April 23, 2017 01:53PM |
Registered: 7 years ago Posts: 38 |
Hey everyone!
I just wanted to leave a note here in hopes it might be of use to someone else.
From the beginning my printer has been pretty noisy, the vibration from the 40mm fan was pretty brutal on the ears. It didn't help when I forgot to shut it off while leveling the X axis and sheared off two fan blades with my calipers...
I purchased a standard replacement fan...at 30mm, so it's sitting in a box somewhere. I tried adding some foam padding between the fan and the mount, no luck.
More recently I was at the computer shop picking up stuff for work and decided, what the heck, the fans for computers can get pretty fancy for noise reduction. I picked up a 40mm fan for about $20 that promised it could do what I wanted. I just installed it today and oh. wow. No vibration. No noise. I have it sitting beside me and I don't have to turn up my music to drown it out anymore, haha. I haven't run it while printing yet as the printer has sat idle for a month and needs a check over.
The fan:
[tinypic.com]
You can see the brown pads on the corners, they're silicone to reduce vibrations and I didn't tighten the fan bolts to the point of the lighter brown making contact with the blue mount. It also came with silicone mounting pegs but I didn't end up needing them.
The specific model I purchased was [www.memoryexpress.com]
A higher price to pay for a fan, a small price for the sanity of you and anyone you live with
Until next time!
|
Re: FLSUN I3 kit review April 26, 2017 04:53PM |
Registered: 7 years ago Posts: 4 |
Good Day
Well after looking at all the brackets to hold the lead screws more secure, I noticed that the top brackets that come with the Flsun I3 to support the two Z axis stainless rods also have a 8mm counter sunk hole opposite each other that would support the lead screws if they were longer, so I bought two 8mm lead by 2mm pitch (same as factory) lead screws 400mm long and cut them to 368mm and voila they fit in the existing supports perpendicular to the stainless rods, complete X carriage is much more stable.
I have not checked yet but I should gain quite a bit of printing height as well, we will see how it go's.
Take Care
|
Re: FLSUN I3 kit review April 26, 2017 04:57PM |
Registered: 7 years ago Posts: 38 |
Quote
Tatsudoshi
Good Day
Well after looking at all the brackets to hold the lead screws more secure, I noticed that the top brackets that come with the Flsun I3 to support the two Z axis stainless rods also have a 8mm counter sunk hole opposite each other that would support the lead screws if they were longer, so I bought two 8mm lead by 2mm pitch (same as factory) lead screws 400mm long and cut them to 368mm and voila they fit in the existing supports perpendicular to the stainless rods, complete X carriage is much more stable.
I have not checked yet but I should gain quite a bit of printing height as well, we will see how it go's.
Take Care
I noticed that as well and was curious how well they would work. Please let us know if you find it works for you and if you're able to get the extra height working, I would definitely be interested in getting longer lead screws in that case!
|
Re: FLSUN I3 kit review April 30, 2017 11:13AM |
Registered: 7 years ago Posts: 4 |
Good Day
Well I have the Flsun I3 working pretty well now, the longer lead screws work fantastic, nice and solid and I was able to get about 250mm height for print area.
This is a great kit that is easy to upgrade, and I am a total newbie to the whole 3d printing thing, much more learning to do.
Take Care
Well I have the Flsun I3 working pretty well now, the longer lead screws work fantastic, nice and solid and I was able to get about 250mm height for print area.
This is a great kit that is easy to upgrade, and I am a total newbie to the whole 3d printing thing, much more learning to do.
Take Care
|
Re: FLSUN I3 kit review May 10, 2017 06:44AM |
Registered: 8 years ago Posts: 776 |
this is the same printer that's available on taobao: [world.taobao.com]
and its "bigger brother" is this one: [world.taobao.com]
both are... questionable quality: i bought one, and my friend bought the other. i'm presently in the process of redesigning the parts so that there's something that will actually work. i'm currently in taiwan and yes the kit arrived in a box that had no significant internal protection from stuff smashing around.
the print-head arrangement is f*****g shit: the vertical arragement plus the quality of the parts means it bounces around by about 3-4 mm (!!). the 3D printed parts: some are badly designed, whilst others were printed without a brim and began unsticking from the bed. the z-axis lead screws are joined with flexible couplers, meaning that the entire X-assembly can bounce around! (i'll be replacing those with mendel90 z-screw couplers). the plate under the hotplate was 1.5mm aluminium and flexes like mad. it also came with a MK2 printbed which i'll have to replace (i much prefer the MK3 with printbite).
of the frame: the more expensive version uses L-brackets which go into the frame: these are so weak as to be almost useless, whilst on the cheaper variant the lack of a box-frame (only one upright) again results in the whole thing wobbling about.
again, just like you: when contacting the seller they completely failed to respond. they're in china, they've got the money, why the f*** should they care.
the printer's only saving grace is the printhead and hotend arrangement, which look reasonably good.
in order to rescue the kit i am presently redesigning the entire thing to a horizontal x-axis arrangement, based on this: [www.thingiverse.com]
it's a hell of a lot of work just to recover $200 worth of parts. i *was* going to get 10 of these because i need to set up an assembly line... but i won't be doing that now.
what i am thinking of doing instead, now that i am here in taiwan, is to design a 3D printer, test it *properly* and then sell it. i particularly want to add an option for the flex3drive "direct drive" adapter [flex3drive.com] which will be a drop-in upgrade option. flex3drives are fricking awesome, combining the best of both bowden and direct-drive *and then going one better* by providing a 40:1 gear ratio in an amazingly compact space.
Edited 1 time(s). Last edit at 05/10/2017 06:47AM by lkcl.
|
Re: FLSUN I3 kit review May 10, 2017 06:57AM |
Registered: 8 years ago Posts: 776 |
Quote
Tatsudoshi
Good Day
Well I have the Flsun I3 working pretty well now, the longer lead screws work fantastic, nice and solid and I was able to get about 250mm height for print area.
This is a great kit that is easy to upgrade, and I am a total newbie to the whole 3d printing thing, much more learning to do.
Take Care
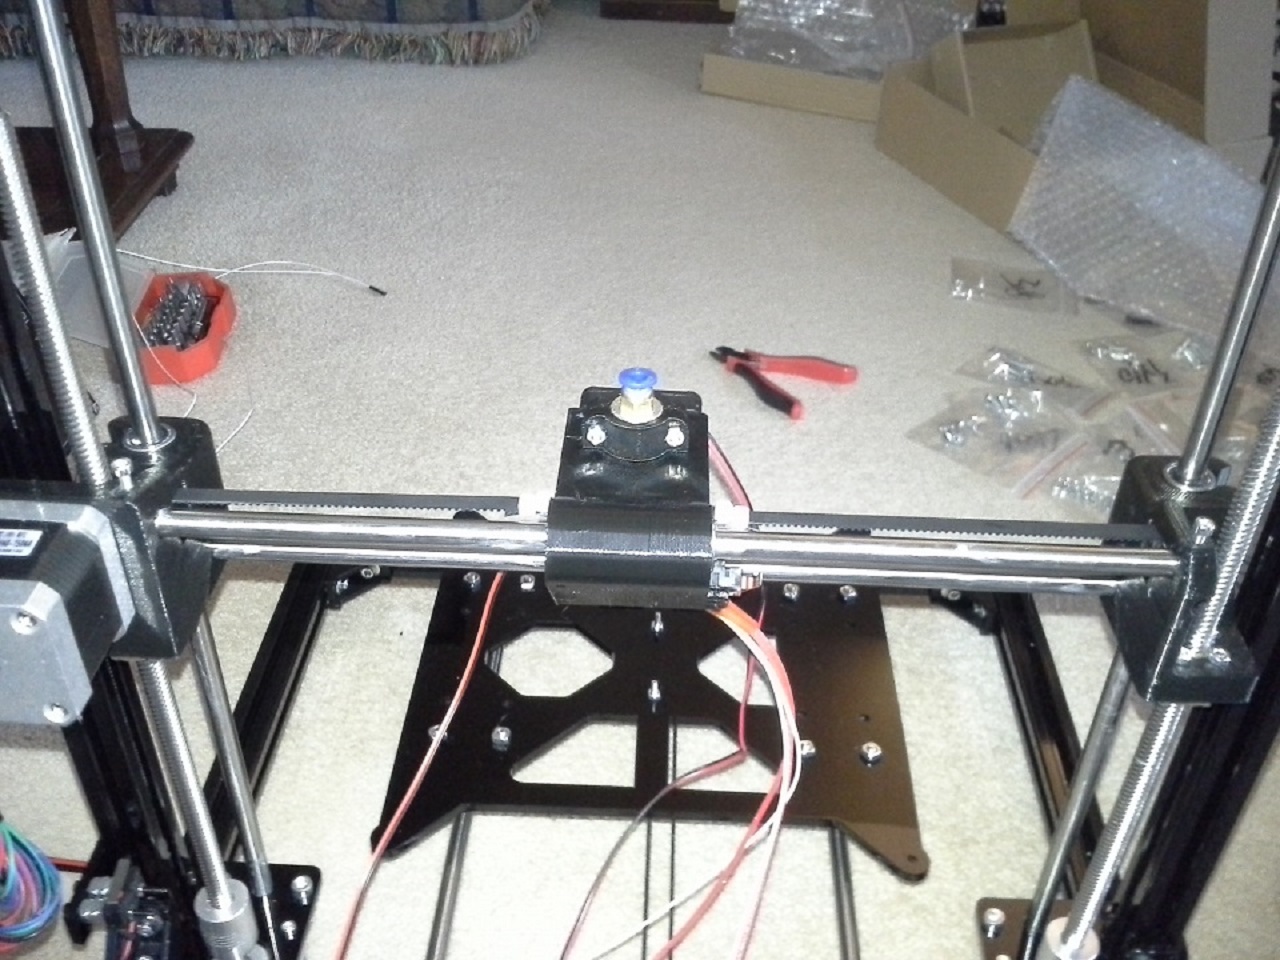
tatsudoshi: one very important thing you will need to do: the belts absolutely absolutely must be dead level. what i'd like you do do is: move the print-head as far to the left (relative to the photo you posted) and then look at the belt that goes from the print-head to the bearing on the left. see how it's not level? that means that the belt is stretching. if it were the right-hand side you'd be in trouble, because the length of travel would NOT be related to the number of steps, it would be modiied by 1/(1-sin(angle))!
much more importantly on this horribly-designed printer is the y-axis (print bed). what you should check is that underneath you have used longer screws so that the belt-holder is DEAD level with the top of the belt as it comes off the Y-motor GT2-16 gear. what you can do is put the longer bolt in, then lock it down to the metal plate with a nut. tighten all four really well. then put ANOTHER nut onto each bolt, THEN put the belt-holder on, THEN put ANOTHER nut onto each. adjust the nuts so that the belt is dead-level.
the other thing is: you should replace the Y-axis idler holder with a proper GT2 idler. don't use the single bearing: it's too narrow and it will wreck the belt. but to do that, you'll need to redesign the actual holder because it's too narrow. also, it's printed with such poor quality PLA that it'll likely snap at some point due to the tension of the belt. then, take that second (spare) bearing and put it into the x-axis idler hole. two bearings fit nicely into there.
|
Re: FLSUN I3 kit review May 10, 2017 05:18PM |
Registered: 7 years ago Posts: 20 |
I disagree. The flsun3d i3 is not the same as the two printers you have provided links to. Some similarities in that they all use 2020 extruded aluminium but the similarities seem to end there. The shortcomings you mention are not present in my flsun3d i3 and my relationship with the seller was brilliant. I think you owe flsun3d an apology!
|
Re: FLSUN I3 kit review May 10, 2017 06:35PM |
Registered: 8 years ago Posts: 776 |
Quote
wunderkind
I disagree. The flsun3d i3 is not the same as the two printers you have provided links to.
true: i spotted that after posting, and so took a closer look, so thank you for prompting me to investigate. the design is actually *worse* than both those printers.
Quote
Some similarities in that they all use 2020 extruded aluminium but the similarities seem to end there.
they're definitely derivatives. i've seen variants on taobao which also use rails and belts.
Quote
The shortcomings you mention are not present in my flsun3d i3 and my relationship with the seller was brilliant. I think you owe flsun3d an apology!
Quote
R.G.
After that automated reply, I got ...nothing at all.
so no... i do not.
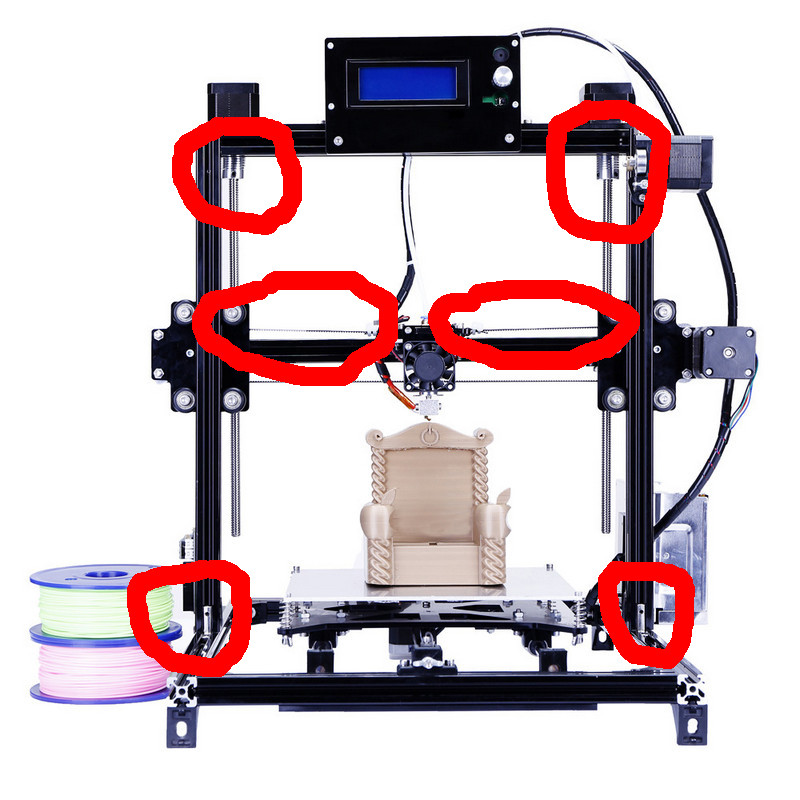
take a look at the image that is attached: it's directly from their website. start at the top: the first two ringed (red) highlighted areas: these are flexible couplings. that means that the z-screws are going to bounce around by a good millimetre or so. as the *entire x-assembly*'s position is critically dependent on those, you can test this very easily by simply moving the x assembly up and down *at each end*. as the motors are upside-down you don't even get assistance from gravity, here.
what will happen if you do larger, complex prints is that you may end up with uneven accumulation of filament in some areas, at different heights. the flexible couplings will allow the hotend to RIDE OVER these uneven bumps in SOME cases.... and in others there will be such an accumulated height difference that the nozzle could SMASH into the object, ripping it off the printbed and potentially damaging the printer in the process.
solution: replace the flexible couplings with e.g. (fixed) mendel90 couplings.
middle of the image: i've ringed the x-axis belt. it's CLEARLY not level, and i can tell that from a small not-very-detailed image. that means, pure and simple, that as the head moves further left (or further right), the closer it gets to the edges the faster the hotend will move.. in a NON-LINEAR fashion. you can test this really easily by printing a long thin rectangle 275mm long, 2mm wide and 1mm high along the diagonal of the printbed. then WITHOUT removing the object get yourself a decent ruler and put it alongside what you've printed. you'll find that the print - which should be absolutely dead straight - is in fact CURVED note that this assumes that the Y-axis belt does not have the exact same flaw: i can't tell from the photos. it should be obvious that if the same flaw is present with the exact same amount of bowing in BOTH BELTS then printing across the diagonal will NOT show up this design flaw.
solution: difficult to do on an all-aluminium design: normally i'd say "alter the design and re-print it". instead you'll need to experiment, find different sized idlers and different sized GT2-NN drive pulleys for the X-motor to make the belt level.
bottom of the image: i've ringed the join between the uprights (which are a single upright!) and the base. these joins are 5mm cast L-shapes! they're total shit for structural strength! you can't *possibly* expect them to hold those uprights steady! you can check it by just pushing the uprights at the top: the entire thing will wobble back-and-forth... and that's going to happen *during printing*, even at low speeds.
this flaw can be corrected by replacing those 5mm L-brackets with 20x20x20mm triangles just like the ones that can be seen as "feet" (or better get 40x40x20 triangles instead). in fact you could probably print up some squares for feet then use the ones at the front and back and put them to better use stabilising the frame.
no my friend, far from apologising i thank *you* for bringing my mistake to my attention, causing me to investigate more in-depth so as to be able to warn people of the design flaws in this printer. we're here not to serve corporations: we're here to learn from each other so as to improve 3D printing for ourselves and for others. if a corporation does a shit job it's our *responsibility* to bring it to everyone's attention. they can then decide, "hmm i'll avoid that thank you" or "hmm it's so cheap i think i'll get it and then just replace the crap bits and still save myself some wonga".
|
Re: FLSUN I3 kit review May 10, 2017 06:52PM |
Registered: 7 years ago Posts: 20 |
The image you have posted is radically different from my flsun3d i3. I don't think you are comparing apples with apples. My 2020 frame is incredibly rigid and displays no tendency to wobble. Are we talking about the same supplier? Mine came from flsun3d Printer Store, whom I found to be communicative and proactively helpful even though I did not have any issues with the product. Are you determined to besmirch a product which many here are finding reliable and very good value?
|
Re: FLSUN I3 kit review May 10, 2017 07:04PM |
Registered: 7 years ago Posts: 38 |
Quote
wunderkind
The image you have posted is radically different from my flsun3d i3. I don't think you are comparing apples with apples. My 2020 frame is incredibly rigid and displays no tendency to wobble. Are we talking about the same supplier? Mine came from flsun3d Printer Store, whom I found to be communicative and proactively helpful even though I did not have any issues with the product. Are you determined to besmirch a product which many here are finding reliable and very good value?
I second Wunderkind on that your printer has quite a few differences from mine. While mine has some acrylic braces that I plan to replace it's been pretty solid and has been running really well for me. In the last 3 days I ran two 13 hour prints in a row, I need to tune some dimension settings a very small amount (my X and Y are a little off), but everything else has worked great.
I took a look at the website I originally bought mine from and it has been replaced with Ikcl's model, so it looks like there may have been a rebuild recently.
My FLSUN Printer. The main photos are the same as Ikcl's, but if you scroll down to the description you can see the model I have (smaller photo beside the header).
If FLSUN has replaced their model with this new one, and it's much lower quality, that's really unfortunate...I hope they will change it back if that's the case.
|
Re: FLSUN I3 kit review May 10, 2017 07:14PM |
Registered: 7 years ago Posts: 20 |
Yes, looking at the website it looks as though our reliable printer has been replaced by a new design. I have qualms about the top heavy nature of the tower with the Z motors on top. So I will agree that there is room for constructive criticism and maybe we will see an unemotive review posted here. In the meantime, LKCL, perhaps we can agree that not all flsun3d i3 printers have been created equal and care is needed in specifying models when making comparisons.
Edited 2 time(s). Last edit at 05/11/2017 06:00PM by wunderkind.
Edited 2 time(s). Last edit at 05/11/2017 06:00PM by wunderkind.
|
Re: FLSUN I3 kit review May 10, 2017 07:27PM |
Registered: 8 years ago Posts: 776 |
[www.flsun3dprinter.com] - it's from here, which is from the top hit on a google search "FLSUN3D". 7am and i haven't slept yet: more tomorrow.
Edited 2 time(s). Last edit at 05/10/2017 07:29PM by lkcl.
Edited 2 time(s). Last edit at 05/10/2017 07:29PM by lkcl.
|
Re: FLSUN I3 kit review May 11, 2017 09:32AM |
Registered: 8 years ago Posts: 776 |
Quote
wunderkind
Yes, looking at the website it looks as though our reliable printer has been replaced by a new design. I have qualms about the top heavy nature of the tower with the Z motors on top. So I will agree that there is room for constructive criticism and maybe we will see an unemotional review posted here. In the meantime, LKCL, perhaps we can agree that not all flsun3d i3 printers have been created equal and care is needed in specifying models when making comparisons.
it is a constant common occurrence in china to change the product without changing the name, *including* without informing the customer... which is deception pure and simple. i've heard dozens of horror stories of variants from outright deception (smaller capacitors inside capacitor cases or 2.5in HDDs inside 3.5in HDD cases) to "oops we forgot to tell you we can't get the parts any more so we just... replaced them with a totally new design whoopsie".
it's *also* a common theme for chinese citizens to "copy" an existing design - usually verbatim - and to sell it under phonetically similar names. one hilarious one is a 2-cylinder 500cc diesel motor which goes by the name "Yangma", "Yanma", "Yongma", "Yenma"... any variant that sounds the same, they want to gain market share.
unfortunately as a non-national of the PRC you have absolutely no legal rights whatsoever to recover any funds that you give such companies.
this is basically why i'm now in taiwan and will be sourcing the components directly myself then building my own reliable 3d printer. i'm using chinese nationals (citizens) to do the ordering so that the sellers know that they cannot rip me off. once it's ready yes i will make kits available and no, the name will *not* change, so that you know exactly what you're getting, and i will train someone to make sure that the kit's properly packed.
|
Re: FLSUN I3 kit review May 11, 2017 01:10PM |
Registered: 8 years ago Posts: 776 |
oh: about the "new" design, i notice from the photo that the Y stepper is vertical not horizontal, so the belt is also upright instead of flat. the problem with that is that aligning the motor and idler holders in the correct place is now quite tricky. normally a flat belt, if it is not aligned properly, it iwll very quickly try to work its way off the idler or the GT2 gear as you move the printbed back and forth, particularly at the maximum travel limits.
in the case of a vertical Y stepper the belt will be out of alignment (and will stretch considerably) but there would be no obvious consequences (such as trying to ride off the idler or GT2 gear).
but just as with the x-axis it is *really* important to have the belt absolutely dead-level, the top of the belt as it comes off the GT2, through the line of its mounting points on the bed, all the way to where it goes back onto the idler, that line MUST be absolutely dead-straight.
bit of a pain but it's something that everyone who has this new design will need to double-check during assembly if you don't you'll get non-linear printing if you ever try to do large prints or print something in the corners / edges of the printbed.
|
Re: FLSUN I3 kit review May 21, 2017 08:31PM |
Registered: 7 years ago Posts: 4 |
Good Day
I can see that it looks like the manufacturer has changed the design of the printer and that is to bad as the design I purchased
has been working very well, I knew going in that I would have to mod a few things to make it better but for me that is the fun part,
I might have been lucky but mine has been great.
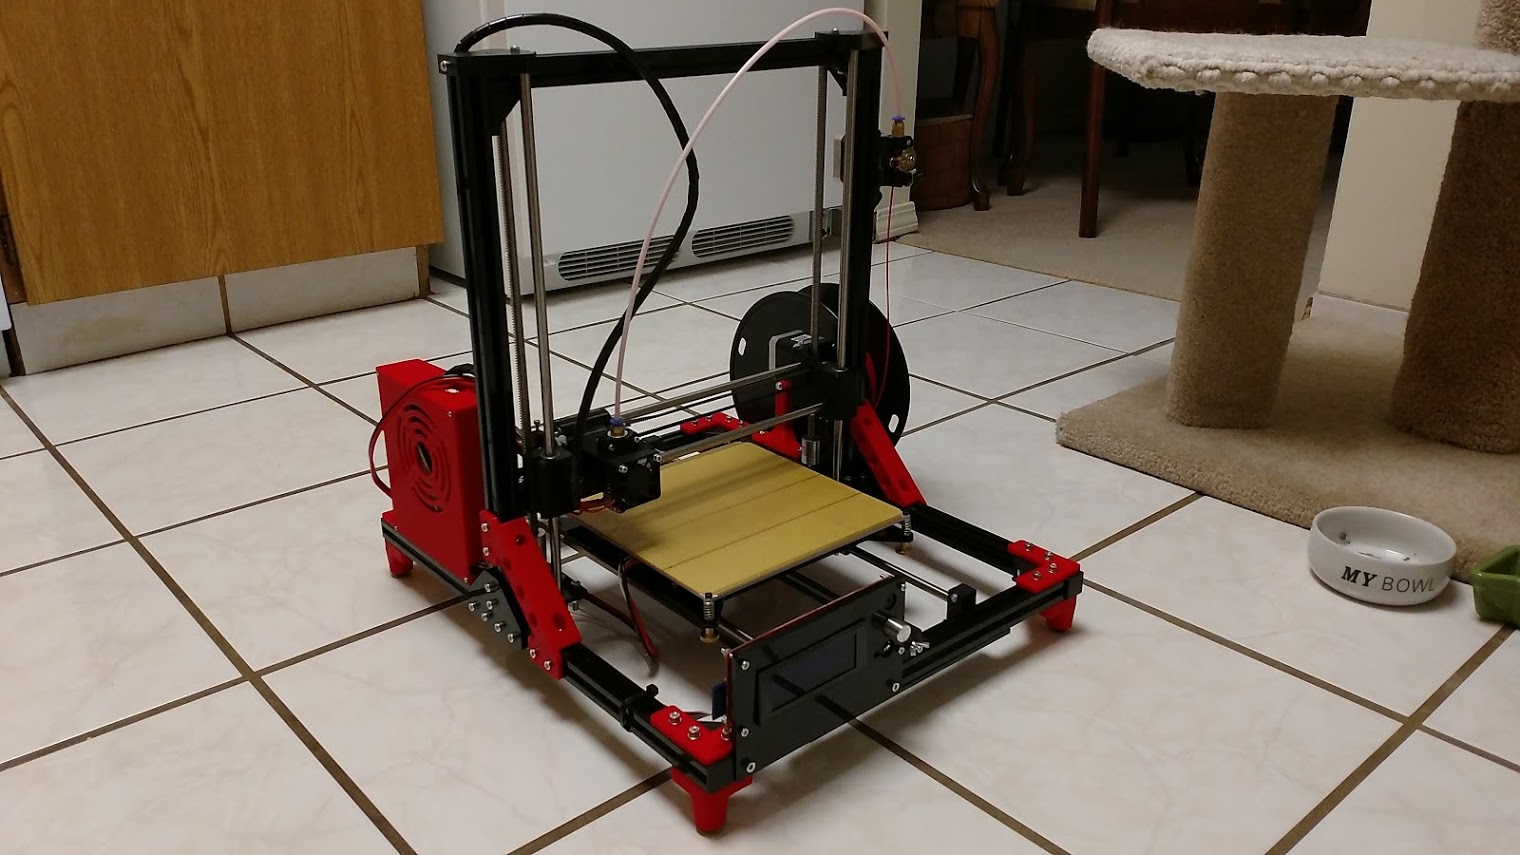
Here is a picture in its current config. thanks to the crew over at Thingiverse for all the files for the mods in Red, I added the longer lead screws which helped stabilize things greatly.
Take Care
Edited 1 time(s). Last edit at 05/21/2017 08:33PM by Tatsudoshi.
I can see that it looks like the manufacturer has changed the design of the printer and that is to bad as the design I purchased
has been working very well, I knew going in that I would have to mod a few things to make it better but for me that is the fun part,
I might have been lucky but mine has been great.
Here is a picture in its current config. thanks to the crew over at Thingiverse for all the files for the mods in Red, I added the longer lead screws which helped stabilize things greatly.
Take Care
Edited 1 time(s). Last edit at 05/21/2017 08:33PM by Tatsudoshi.
|
Re: FLSUN I3 kit review May 22, 2017 04:33AM |
Registered: 7 years ago Posts: 20 |
Yes, I think it is a pity they have altered a design which is working for us. Mine is the same model as yours and I have been very pleased with output. Now, two months down the track and having processed several kgs of filament I am wondering if it is time to tighten up the mechanism to see if even better results may be possible. I've been printing quite a bit of low-res stuff lately because surface finish has not been a prime consideration - mostly bits and pieces for my garden and toys for young grandchildren but I today ran off some Benchys to check against prints I made when the machine was first built. Just a hint of 'drift' using Slic3r, but much more like the originals when using Cura. I need to get to know Cura better. I have printed all the parts for the X and Z carriages and mounts and the leadscrew brackets and I'm just waiting for the last stragglers of new hardware parts to come to hand. I also have a v6 extruder and I may use it as well when I do my mods. Not sure yet if I will convert the Y belt to horizontal orientation and have still to print the parts for that. This sure is a fun machine to tinker with!
|
Re: FLSUN I3 kit review May 22, 2017 06:45AM |
Registered: 8 years ago Posts: 776 |
Quote
wunderkind
Yes, I think it is a pity they have altered a design which is working for us.
well... you could always have a word with them, and reference this conversation, and simply say to them "hey guys we've been recommending you online, now you've changed the design *and not changed the name* please can you put it back"
Quote
Just a hint of 'drift' using Slic3r, but much more like the originals when using Cura. I need to get to know Cura better.
yeah if you're not totally familiar with 3d print slicing, slic3r is literally the worst possible choice of program to use that you could possibly make. slic3r is written in a programming language called perl, and it tries to be "very very clever". the problem is that its cleverness doesn't result in actually being clever, it results in total shit for output. i can point you at some parts to try out if you like: don't actually print them, just bring them up in pronterface, cura or other "viewer" and switch it to "layer" mode. you'll see that the layers often "jump height" and it basically makes a total mess. the resultant output... well... to say that slic3r's "cleverness" adversely affects the print quality would be a massive understatement of the first order.
yes cura is pretty good. the "stock" version which is reliable and works well with other printers is cura 15.04. cura 2 (latest version) really doesn't play nice with other printers. but because it's software libre, lulzbot have been working on the older (reliable) version, and they're up to version 21.04 so far.
i've been using cura 15.04 for about a year and its simplicity makes *far* better prints. i just installed 21.04 from lulzbot a couple of days ago and the GUI is a great improvement: management of the printer (manual x-step, y-step, etc. just like in Pronterface) is possible.
Quote
I have printed all the parts for the X and Z carriages and mounts and the leadscrew brackets and I'm just waiting for the last stragglers of new hardware parts to come to hand. I also have a v6 extruder and I may use it as well when I do my mods. Not sure yet if I will convert the Y belt to horizontal orientation and have still to print the parts for that. This sure is a fun machine to tinker with!
if you are considering prioritisation of what kinds of improvements to make that would result in higher-quality prints, horizontal x-axis would be much better: changing the y-belt to horizontal will have no appreciable change in the quality. i started from this one [www.thingiverse.com] and can make the current work available online if you like.
|
Re: FLSUN I3 kit review May 22, 2017 06:03PM |
Registered: 7 years ago Posts: 20 |
Thanks for your comments lkcl. I'm quite well down the track using the mods to stabilise the leadscrews and put the X carriage rods in the same plane to avoid any ramping. The same mods are in progress by another local printer so we can 'swap notes'. This has arisen out of considerable discussion on the flsun users facebook page. A helpful bunch of guys. Cheers.
Edited 1 time(s). Last edit at 05/22/2017 06:04PM by wunderkind.
Edited 1 time(s). Last edit at 05/22/2017 06:04PM by wunderkind.
|
Re: FLSUN I3 kit review May 22, 2017 06:25PM |
Registered: 8 years ago Posts: 776 |
no problem wunderkind, do consider reviewing this (and potentially helping edit it with your experiences, particularly adding examples). that's fantastic to hear that people are getting together in other places as well to learn about 3d printing. best of luck. [reprap.org]
Edited 1 time(s). Last edit at 05/22/2017 06:26PM by lkcl.
Edited 1 time(s). Last edit at 05/22/2017 06:26PM by lkcl.
|
Re: FLSUN I3 kit review July 29, 2017 07:49AM |
Registered: 6 years ago Posts: 19 |
I bought the Flsun i3 printer kit from 3DPrinterCreator via Amazon. The kit arrived within a week, which was amazing all the way from Hong Kong. The packaging was as described by R.G. above, except that the PSU was packed in a different location in the main box, but it was also damaged in transit - a corner of the box had been stove in by some rough handling. In my case the supplier was very responsive and sent me a replacement within a few days. Assembly was pretty straight forward as described by RG, and once I got the new PSA it all worked as advertised. I don't think this is the same kit as referred to by markshur above and subsequent posts as his description of the hardware problems doesn't jive with the construction of my kit. There are no x-axis rods on mine and the x-axis belt is mounted on a rigid cross-beam and has no influence on the angle of the z-axis acme rods.
I spent many frustrated days after assembling the printer trying to get it to print a simple PLA model without the model coming loose during printing. I tried all the recommended print surface preparations: blue tape (the suppliers recommended solution), glass, glue-stick, etc. and nothing seemed to work. I then discovered BuildTak, but even that didn't work at first. I then tried the BuildTak with a heated bed (60C), and bingo! I got a complete model to print successfully, and that combination has been working well for PLA ever since. I initially didn't use the heated bed as most posts I read regarding PLA said it wasn't necessary, including the supplier's brief user guide.
That solved the PLA printing problem, but I am now running into an issue trying to print in ABS. My printer seems incapable of heating the print bed to the desired temperature (110-120C). It gets up to about 93C, very, very slowly for the last few degrees, but won't go any higher. The heat is dissipating from the bed quicker than the heater can supply it. I tried putting a towel or a piece of Styrofoam on top of the bed and that allows the bed to heat to the desired temperature (very, very slowly), but as soon as I remove it when the printing starts the bed temperature starts to drop and the model comes loose before the first layer is finished. Does anyone have any suggestions for solving this problem? Do I need a better heated bed, or will a more powerful PSU help (e.g. 350W instead of the 240W?)
|
Re: FLSUN I3 kit review July 29, 2017 08:24AM |
Registered: 8 years ago Posts: 776 |
hiya cheddy, i remember that nophead recommended the trick of putting several layers of cardboard (cutting up the box his kit arrived in..  ) in between the metal plate and the printbed. that stops airflow getting in underneath, and also acts as a heat-trap.
the only thing you really want to watch out for is that if you have any PLA-printed parts on your printer that are near the printbed they might get sufficiently close to the 60C glass point of PLA as to start warping, particularly if they're under any kind of load.
basically these chinese cheap-and-cheerful printers are in absolutely no way designed for high-temperature materials, you probably have a PTFE tube down the middle of the heat break. this was a bad design decision somewhere in the west that was "copy-copy-copy-copy-we-have-no-idea-why-we're-copying-it-but-who-cares-as-long-as-foreigners-continue-to-give-us-money" copied and propagated without any kind of thought as to why it was done...
... and it means that if you try to go over about 250C (even accidentally, which can happen if your PID settings are out of whack and you get enough overshoot on first heating up the hotend) you *will* start to destroy things. starting with the heatbreak. then you will get blockages and the extruder won't stop so the filament will jam. which in turn will damage the extruder....
.... so... be careful ok!
) in between the metal plate and the printbed. that stops airflow getting in underneath, and also acts as a heat-trap.the only thing you really want to watch out for is that if you have any PLA-printed parts on your printer that are near the printbed they might get sufficiently close to the 60C glass point of PLA as to start warping, particularly if they're under any kind of load.
basically these chinese cheap-and-cheerful printers are in absolutely no way designed for high-temperature materials, you probably have a PTFE tube down the middle of the heat break. this was a bad design decision somewhere in the west that was "copy-copy-copy-copy-we-have-no-idea-why-we're-copying-it-but-who-cares-as-long-as-foreigners-continue-to-give-us-money" copied and propagated without any kind of thought as to why it was done...
... and it means that if you try to go over about 250C (even accidentally, which can happen if your PID settings are out of whack and you get enough overshoot on first heating up the hotend) you *will* start to destroy things. starting with the heatbreak. then you will get blockages and the extruder won't stop so the filament will jam. which in turn will damage the extruder....
.... so... be careful ok!
|
Re: FLSUN I3 kit review July 29, 2017 10:21AM |
Registered: 6 years ago Posts: 19 |
Quote
lkcl
hiya cheddy, i remember that nophead recommended the trick of putting several layers of cardboard (cutting up the box his kit arrived in..
Hi Ikcl, thanks for your quick response. I don't think the print bed on my printer has two layers, just a single aluminum plate with wires attached underneath for the heater. It seems pretty rudimentary to me, with the heat being supplied by resistance in the wires and I'm wondering if I need to get a better heated bed. Or do you mean putting the padding between the plate and the BuildTak print surface?
|
Re: FLSUN I3 kit review July 29, 2017 11:22AM |
Registered: 7 years ago Posts: 38 |
Quote
cheddy
Quote
lkcl
hiya cheddy, i remember that nophead recommended the trick of putting several layers of cardboard (cutting up the box his kit arrived in..
Hi Ikcl, thanks for your quick response. I don't think the print bed on my printer has two layers, just a single aluminum plate with wires attached underneath for the heater. It seems pretty rudimentary to me, with the heat being supplied by resistance in the wires and I'm wondering if I need to get a better heated bed. Or do you mean putting the padding between the plate and the BuildTak print surface?
Hey cheddy ,
Ikcl probably meant between the sled and the heat bed. It keeps the heat from escaping from the bottom. And the wired method is standard with the beds so I don't think you'll find a different design, just better quality. From my understanding upgrading to a 24v psu from the 12v would help with heating both the bed and the extruder, but I could be wrong. I haven't done a lot of research on that part yet.
I picked up a 12x12in sheet of cork from Staples, trimmed it down, and taped it to the underneath of my bed, it's helped a fair bit, but I only need to get to 75 for printing PETG, I haven't tried ABS. My bed did give me trouble when I tried to get to 80.
If you still have trouble with getting things to stick after getting up to temp I've been using a sheet of PEI on top of my bed and it's been amazing, I haven't had any issues with my prints not sticking since adding that.
Best of luck! I'm rooting for you, I upgraded to an E3Dv6 a few months ago and have been unable to print since. Yesterday I finally came close so I'm hoping today is the day.
|
Re: FLSUN I3 kit review July 29, 2017 12:03PM |
Registered: 8 years ago Posts: 776 |
hi folks, yes the sled, it's about 1in below the heated bed, on 4(?) spring-loaded screws for adjustment, that's the standard mendel layout at least. one layer of cork's not enough, you want enough (cardboard) underneath the cork to make sure that the cork is fully in contact with the printbed. cool-down time will be longer but you can do what nophead did with the mendel90 and add a side directed cooling fan (120mm). see mendel90 firmware for details if you want to set that up under control of gcode.
don't for god's sake just try blithely switching to 24v, you have to have either a printbed that can cope (re-soldering if it's a MK2 or MK3) or you need a minimum of a 500W PSU if you want to leave the printbed configured as-is. now you also need to make sure that the electronics (the crappy RAMPS-style stuff is unlikely to cope) is able to handle the current...
... but more than that you now need to change the heater cartridge to 24V (otherwise it will blow up - double the wattage will be supplied to it otherwise, that's now 50W to a heater cartridge: guaranteed burn-out and/or equipment fires), and replace all the fans with 24V ones, and.. and... and.. and...
overall cheddy i'd say try the cardboard, and if that doesn't work just don't bother, do what Ynotha did instead: get PETG and use that in place of ABS. i really like PETG, you can get it in translucent colours, it has a much higher glass point than PLA, has better structural rigidity than ABS, isn't as toxic (you will still need to vent the room), and doesn't need such ridiculously high printbed temperatures. there's nothing particularly fancy (that i know of) about it - nothing as bad as nylon (which needs to be placed in an oven @ some mad temperature for 6-8 hours because it absorbs like.... 15% of its volume in water or something mad, so when you heat it you get boiling water pockets in the heat chamber (!) and your print if you don't dry it out!)
anyway, lots of good reasons to try PETG over ABS.
|
Re: FLSUN I3 kit review July 29, 2017 12:17PM |
Registered: 7 years ago Posts: 38 |
Quote
lkcl
hi folks, yes the sled, it's about 1in below the heated bed, on 4(?) spring-loaded screws for adjustment, that's the standard mendel layout at least. one layer of cork's not enough, you want enough (cardboard) underneath the cork to make sure that the cork is fully in contact with the printbed. cool-down time will be longer but you can do what nophead did with the mendel90 and add a side directed cooling fan (120mm). see mendel90 firmware for details if you want to set that up under control of gcode.
don't for god's sake just try blithely switching to 24v, you have to have either a printbed that can cope (re-soldering if it's a MK2 or MK3) or you need a minimum of a 500W PSU if you want to leave the printbed configured as-is. now you also need to make sure that the electronics (the crappy RAMPS-style stuff is unlikely to cope) is able to handle the current...
... but more than that you now need to change the heater cartridge to 24V (otherwise it will blow up - double the wattage will be supplied to it otherwise, that's now 50W to a heater cartridge: guaranteed burn-out and/or equipment fires), and replace all the fans with 24V ones, and.. and... and.. and...
overall cheddy i'd say try the cardboard, and if that doesn't work just don't bother, do what Ynotha did instead: get PETG and use that in place of ABS. i really like PETG, you can get it in translucent colours, it has a much higher glass point than PLA, has better structural rigidity than ABS, isn't as toxic (you will still need to vent the room), and doesn't need such ridiculously high printbed temperatures. there's nothing particularly fancy (that i know of) about it - nothing as bad as nylon (which needs to be placed in an oven @ some mad temperature for 6-8 hours because it absorbs like.... 15% of its volume in water or something mad, so when you heat it you get boiling water pockets in the heat chamber (!) and your print if you don't dry it out!)
anyway, lots of good reasons to try PETG over ABS.
Thank you for clearing up the power supply details! Now that you mention all of that I do remember it's a much bigger undertaking.
I do highly recommend the PETG, I'm loving it so far (when my printer behaves). I will also be adding more insulation to my bed like suggested, I've been doing a bunch of modifications and haven't finished that portion yet.
|
Re: FLSUN I3 kit review July 29, 2017 05:36PM |
Registered: 6 years ago Posts: 19 |
Right! Of course! Put the insulation under the bed. What was I thinking? That would make a difference. I will give that a try. How do you fix the padding to the bottom of the bed? Do you use longer corner screws and put the leveling springs under the padding, with a rigid under-plate?
Got a spool of PETG filament on order. I'm keen to see how it works after all the recommendations.
Thanks for all the advice.
Got a spool of PETG filament on order. I'm keen to see how it works after all the recommendations.
Thanks for all the advice.
|
Re: FLSUN I3 kit review July 29, 2017 07:36PM |
Registered: 8 years ago Posts: 776 |
Quote
cheddy
Right! Of course! Put the insulation under the bed. What was I thinking? That would make a difference. I will give that a try.
Quote
How do you fix the padding to the bottom of the bed?
keep adding more cardboard until it don't move no more
ya ain't gonna be running this printer fast enough for it to fall out.Quote
Do you use longer corner screws and put the leveling springs under the padding, with a rigid under-plate?
naah, nothing remotely that sophisticated or complicated. as in: don't alter the setup in *any* way. just... literally keep stuffing in 8x8in squares of heavy-duty corrugated cardboard (the stuff your printer arrived in) until y'all can't fit no more. simple as that.
Quote
Got a spool of PETG filament on order. I'm keen to see how it works after all the recommendations.
Thanks for all the advice.
*thumbs-up*
|
Re: FLSUN I3 kit review August 03, 2017 06:28AM |
Registered: 6 years ago Posts: 9 |
How did I get here?
I started with a lot online window shopping and warnings of 'you get what you pay for' etc, but decided that I would do my research properly.
Even began a Comparative spreadsheet and quickly realised that there was not much separating the budget units.
Decided to then just look at Sellers with the most orders and plenty of feedback.
It then appeared to me that Flsun were eager to improve. All Specs were clearly stated. What stood out was the Metal Frame, Auto levelling Dual Extruders and 2 Z-Axis motors.
A 20% off deal ending in 2 days sealed it. Could not resist, and I ordered the i3!
While waiting for delivery have been getting familiar with the Assembly process. Luckily, I found instructions uploaded on Thingiverse. I expect the unit I receive will be a bit different but the basics would not change. I even wrote my own instructions to clarify some stages of assembly.
However, the steps after everything is assembled are not very clear.
How to set the limit switch positions.
How to confirm motors are spinning the right way and avoid crashes.
What software to upload first etc.
Any advice much appreciated.


Sorry, only registered users may post in this forum.