FLSUN I3 kit review
Posted by R.G.
|
Re: FLSUN I3 kit review February 14, 2017 07:41AM |
Registered: 7 years ago Posts: 14 |
Quote
MIKEYMCC
Just ordered and received the FLSUN 3D I3 kit, bit gutted as straight away I am missing the motors and the glass panel. Thats without going through with a fine tooth comb and counting each nut and bolt. Quick glance though it seems I have everything else.
Can anyone remember what box the motors were in? OR rather what other parts they were inside with?
Thanks for any help in advance.
They don't ship the glass panel anymore, since the new kits comes with an aluminum heated bed which you can print on directly with results much better than the old headbed and glass panel
|
Re: FLSUN I3 kit review February 14, 2017 08:20AM |
Registered: 7 years ago Posts: 5 |
|
Re: FLSUN I3 kit review February 14, 2017 03:03PM |
Registered: 7 years ago Posts: 16 |
Don't assume the print bed is level. Quite a few of us have had to get and use glass because there was a depression around the middle of the plate. I went through trphyids (sic?) calibration and could not get mine to print or stick. Then I measured the plate with a straight edge ruler and found a kidney shaped depression about palm size and 30 thou or so deep. Just enough to screw everything up. Grabbed a cheap piece of glass to test short term and still using it a few months later, needless to say it cured the problems lol.
Am surprised they screwed up with the boxing/shipping. When they get everything sorted out it isn't a bad kit/printer. It is easy to upgrade to take it to the next level ie stiffening and getting rid of the "all metal" plastic. Mine was advertised as all metal so wasn't expecting to see plastic and acrylic parts. About $30 of bearings and alum and that's fixed too.
Am surprised they screwed up with the boxing/shipping. When they get everything sorted out it isn't a bad kit/printer. It is easy to upgrade to take it to the next level ie stiffening and getting rid of the "all metal" plastic. Mine was advertised as all metal so wasn't expecting to see plastic and acrylic parts. About $30 of bearings and alum and that's fixed too.
|
Re: FLSUN I3 kit review February 27, 2017 03:39PM |
Registered: 7 years ago Posts: 38 |
I'm getting pretty happy with the quality of my prints, it's been getting much better. I want to upgrade my nozzle next to get some finer detail on my smaller prints.
How do I know which nozzle to get? I want to go with Micro Swiss because I want to print with coarser filaments (like glow in the dark, carbon fibre, etc).
The shop I'm buying from is:
[spool3d.ca]
But I can order something online instead if their selection isn't what I'm looking for.
Any suggestions would be a huge help, I've already accidentally bought a couple wrong parts and want to avoid doing that again, haha.
Thanks!
|
Re: FLSUN I3 kit review March 06, 2017 11:26PM |
Registered: 7 years ago Posts: 20 |
|
Re: FLSUN I3 kit review March 06, 2017 11:29PM |
Registered: 7 years ago Posts: 38 |
Quote
wunderkind
That's most unfortunate to hear, Mikey. My kit is still winging its way to me. Is there a packing list in the box (or on the SD card) so we can check off kit contents before starting the build?
Nelson Kennedy
Rolleston, NZ
That's exciting! Hopefully it all goes together for you smoothly. This is the packing list mine came with, it was on the SD Card with all the other files they provided. Not very detailed, but it helped out when I had to check back on several things.
|
Re: FLSUN I3 kit review March 07, 2017 12:40AM |
Registered: 7 years ago Posts: 20 |
|
Re: FLSUN I3 kit review March 07, 2017 03:02AM |
Registered: 7 years ago Posts: 20 |
Whilst I'm waiting for my kit to arrive I've been looking at some prints I will want to build. Let me display my abject newbie-ness by asking a question. The blurb on the AliExpress listing says that .STL, .GCODE and .OBJ formats are supported. Does that mean that an .STL file can be sent directly to the printer? I would have expected to have had to slice it first and send it as a GCODE file.
Nelson Kennedy
Rolleston, NZ
Nelson Kennedy
Rolleston, NZ
|
Re: FLSUN I3 kit review March 07, 2017 03:09AM |
Registered: 7 years ago Posts: 38 |
Quote
wunderkind
Whilst I'm waiting for my kit to arrive I've been looking at some prints I will want to build. Let me display my abject newbie-ness by asking a question. The blurb on the AliExpress listing says that .STL, .GCODE and .OBJ formats are supported. Does that mean that an .STL file can be sent directly to the printer? I would have expected to have had to slice it first and send it as a GCODE file.
I had to go through all the learning too very recently, haha.
You can import an STL or OBJ into the slicer but you'll need to output GCode for the printer to actually know what it's doing. Some programs will work as both a slicer and host software for the printer (repetier is a common one). I personally have setup Octoprint on a Raspberry Pi, then use Slic3r on my laptop to send it the GCode for my prints. I used repetier for testing purposes while I was still tweaking the firmware settings as well (rather than moving the USB connection back and forth between laptop and Rasp Pi)
|
Re: FLSUN I3 kit review March 07, 2017 03:20AM |
Registered: 7 years ago Posts: 20 |
Thanks again, Ynothyna. You are proving to be very helpful. Good to know I was originally on the right track. I have been slicing with Slic3r and saving as Gcode but a friend of mine who uses an aging Makerbot said he just fires his STL files off to the printer. Your comments clarify why that could be. Seeing the 'supported formats' comments in the listing made me wonder if the firmware in the Flsun was just as clever.
Nelson Kennedy
Rolleston, NZ
Nelson Kennedy
Rolleston, NZ
|
Re: FLSUN I3 kit review March 07, 2017 10:29AM |
Registered: 7 years ago Posts: 38 |
Quote
wunderkind
Thanks again, Ynothyna. You are proving to be very helpful. Good to know I was originally on the right track. I have been slicing with Slic3r and saving as Gcode but a friend of mine who uses an aging Makerbot said he just fires his STL files off to the printer. Your comments clarify why that could be. Seeing the 'supported formats' comments in the listing made me wonder if the firmware in the Flsun was just as clever.
Glad I can help!
There's a good chance of that. When mine arrived the recommended software was repetier, their guide used it, etc.
Octoprint also does have a slicer built in using Cura profiles so you could just sent it a model and it would convert it, but the lack of fine control over the settings makes me unsure how well it works. I didn't have great luck with regular Cura, so I'm sticking to slicing it myself.
One thing I've found, I haven't really been keeping a collection of GCode, at least not yet, because your settings will change depending on the filament you're using, you may need to adjust extruder offset, extrusion percentage, supports and brims, etc. At least during the tweaking stages you'll be changing settings a lot. I just keep a collection of the STL files at the moment, once I'm comfortable with my printer configuration I'll probably starting keeping the GCode. I'm not sure what everyone else does, I just haven't used the same code twice yet.
|
Re: FLSUN I3 kit review March 08, 2017 04:02PM |
Registered: 7 years ago Posts: 20 |
Looks as though my unboxing time is imminent. I ordered from flsun3d printer Store in Zhengzhou last Sunday night and they processed the order promptly on Monday morning. Just three days later the TNT tracking shows it has arrived in Auckland and is awaiting Customs clearance. It should be routine as the value is well within our free entry limits. Hoping I will have it for the weekend. I have been very impressed with TNT as a logistics company at a very reasonable shipping cost of only about US$10.
Nelson Kennedy
Rolleston, NZ
Nelson Kennedy
Rolleston, NZ
|
Re: FLSUN I3 kit review March 08, 2017 04:04PM |
Registered: 7 years ago Posts: 38 |
|
Re: FLSUN I3 kit review March 09, 2017 10:55PM |
Registered: 7 years ago Posts: 20 |
Well, so far, so good. About 2.30 this afternoon the courier knocked on my front door and handed me my box of kit. Top marks to flsun3d Printer Store for actioning my order so promptly when they opened up on Monday morning and to TNT for a brilliant international courier service. I checked out the contents against the packing list that Ynothna uploaded and all seems to be present. One issue was the power supply. No evidence of crushing of the white box it was in but the PSU itself must have been dropped before being boxed, I think, and the protective casing crushed in to touch the coil of the large choke and a bit of peripheral damage around the edges. I judged that removing it and doing a quick panel beating job would fix it and it has. Perhaps more significantly I found the screw connector strip for mains input and secondary output was wobbly enough to make a jelly proud. A quick inspection showed failed solder connections. A quick touch with the soldering iron on all the connectors has produced a firm terminal strip.
So, now to start on the build. Probably not for a day or two. Visitors for dinner this evening and tomorrow is preparation for church on Sunday as I am presiding then taking my wife to a birthday dinner. Maybe Monday?
Nelson Kennedy
Rolleston, NZ
So, now to start on the build. Probably not for a day or two. Visitors for dinner this evening and tomorrow is preparation for church on Sunday as I am presiding then taking my wife to a birthday dinner. Maybe Monday?
Nelson Kennedy
Rolleston, NZ
|
Re: FLSUN I3 kit review March 10, 2017 11:02AM |
Registered: 7 years ago Posts: 38 |
Quote
wunderkind
Well, so far, so good. About 2.30 this afternoon the courier knocked on my front door and handed me my box of kit. Top marks to flsun3d Printer Store for actioning my order so promptly when they opened up on Monday morning and to TNT for a brilliant international courier service. I checked out the contents against the packing list that Ynothna uploaded and all seems to be present. One issue was the power supply. No evidence of crushing of the white box it was in but the PSU itself must have been dropped before being boxed, I think, and the protective casing crushed in to touch the coil of the large choke and a bit of peripheral damage around the edges. I judged that removing it and doing a quick panel beating job would fix it and it has. Perhaps more significantly I found the screw connector strip for mains input and secondary output was wobbly enough to make a jelly proud. A quick inspection showed failed solder connections. A quick touch with the soldering iron on all the connectors has produced a firm terminal strip.
So, now to start on the build. Probably not for a day or two. Visitors for dinner this evening and tomorrow is preparation for church on Sunday as I am presiding then taking my wife to a birthday dinner. Maybe Monday?
Good to hear everything arrived mostly intact! I was definitely concerned when mine arrived after seeing how many people were having trouble with missing parts. I did have to make a splitter cable while they shipped me the proper one but otherwise it was all good.
Good on you for being able to hold off until after the weekend...I was definitely not that strong, haha. I didn't sleep for a weekend building mine and had to be dragged away to go spend time with my girlfriend's family for a week (awesome people, but I was in the zone!) Things have slowed down now as work has bogged me down, soon I will have time to play with it more. I have a problem with the z axis, I can only print a few inches high before it doesn't raise properly.
|
Re: FLSUN I3 kit review March 11, 2017 04:12AM |
Registered: 7 years ago Posts: 20 |
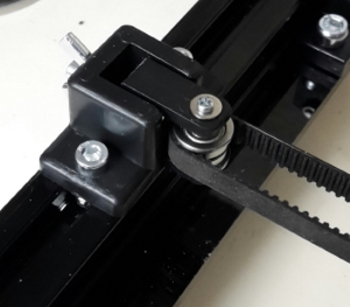
Well, it rained here today so some of the chores I had intended to take care of had to be left. I naturally put the time to good use in the workshop and started my build. I have got as far as completing the installation of the Y axis including the belt drive. I'm not sure about my belt tension - it might be a bit tight. The tension adjuster should take care of it OK though. One of my sons has a Reprap style printer and I will be at his place tomorrow so I'll compare with his belt tension. One little oddity. The M2.5 x16 screw that retains the pair of bearings on the belt adjuster is not long enough to go right through the housing. The instructions do not show a nut to be fitted. Once the belt is installed and tensioned it is probably not an issue but in the process of fitting the belt I turned the frame assembly upside down with the inevitable consequences. Do you have any idea how far those small ball races can roll on a workshop floor?! I'll have a scrounge around for a longer M2.5 screw and a nut just as insurance against a future mishap. Pleased with progress so far and the good fit of parts. Ynothna, what is the splitter cable you mentioned? I don't think I have seen one.
Nelson Kennedy
Rolleston, NZ
Nelson Kennedy
Rolleston, NZ
|
Re: FLSUN I3 kit review March 11, 2017 12:15PM |
Registered: 7 years ago Posts: 38 |
That's great, I mean, horrible, that the chores got delayed 
I struggled a bit with the Y axis tension as well, I had it far too loose to begin with but later got the tensioner working right. The mount I have didn't attach properly with the length of screw they suggested (didn't make it all the way to the nut) so it popped out when I tightened it. After putting in a longer one I was able to get it where I wanted it. The downside is that it was a fair bit longer, so now I have a screw sticking out the front of the printer farther than I would like, I'll find a replacement eventually.
As far as I know I'm the only person here who's had to use this splitter cable, haha. The Ramps 1.4 Plus board I have only has 1 connector for the Z axis motors so it uses a splitter cable to allow me to plug both in at the same time (I could use the secondary extruder connector if I had another driver but the one I bought doesn't work). So if you have more than one Z axis connector, or can use the EXT1 connector, then you don't need a splitter cable.
|
Re: FLSUN I3 kit review March 13, 2017 02:28AM |
Registered: 7 years ago Posts: 20 |
The loose screw on the belt tensioner is the vertical one which, in the attached photo, I have replaced with a longer 2mm screw in a 3mm piece of tube the same length as the thickness of the bracket (about 18 mm) so that I have been able to tighten a nut without risk of crimping theplastic bracket on to the bearings. I have concluded that the bracket was originally a printed one (mine is injection moulded) and that the original screw was intended to self tap into it whereas on the injection moulded version there is a 3 mm clearance hole. A bit further on I have come to realise that some screws are intended to self tap into printed parts. What brought that home were the blind holes for mounting the fan to the extruder. I was having trouble getting the screws to start in these holes so tapped them M3 for trouble free fitting of the screws. Had I realised that sooner I would have tapped two blind screws in the X axis end fitting that has the motor attached. The screws concerned were two of the four that retain the brass lead screw fitting. I knew that I had to provide firm attachment all around to ensure flat fitting of the lead screw so I milled away a small pocket on the end of the two blind holes to locate nuts there. Would have been a lot easier to simply tap M3 if I had been wide awake!
Ynothna, did you fit four screws to that lead screw fitting? If you fitted only two it could have given rise to an alignment issue maybe affecting the winding up of your lead screws? Just a thought.
Working on the Z axis now and this beast is starting to look as though it means business!
Nelson Kennedy
Rolleston, NZ
|
Re: FLSUN I3 kit review March 13, 2017 11:18AM |
Registered: 7 years ago Posts: 38 |
I'll have to double check my lead screw fitting, I can't remember off the top of my head. Thanks for the suggestion! I did have some braces for the lead screws but I must have got them a bit off, they were causing some waves in the Y axis of the print. Removing them didn't totally solve the problem, but it's far less noticeable. I'll have to try a different brace design.
The self tap screw locations are the ones I've been having the most trouble with, mainly on the carriage like you mentioned. I printed out a new fan attachment to improve cooling and give a nicer mount for the 40mm fan. The larger cooling fan on the back of the carriage never mounted properly (got horrible vibrations because the holes weren't deep enough and a touch too wide so everything was loose). I finally ended up zip tying it to the carriage when the fan fell off mid print, haha.
The fan mount/cooler I ended up going with was [www.thingiverse.com] but I had to trim a bit off the bottom of the shroud, the clips I have holding down my PEI plate kept clipping it (there is a model for a much shorter shroud, I would have reprinted for that one but it was a shame to waste the filament). I also tried [www.thingiverse.com] and designed some custom adapters to make everything fit the way I wanted (added a mount for the 40mm fan so that I wasn't using the self tap holes and some spacers to make up for the distance the adapter added from the extruder tip) but I found the first one gave me better quality prints so I switched back.
|
Re: FLSUN I3 kit review March 14, 2017 04:03AM |
Registered: 7 years ago Posts: 20 |
Spent a few hours at the bench today and basic build is complete except for wiring which looks like tomorrow's pastime if the rain hasn't cleared enough to allow me outside. Our farmers and gardeners need the rain - let their needs be filled!!
The power supply is a 20A one which is physically bigger than the 16A one shown in online photos and it will not fit on the right hand rail aft of the 'tower'. It will fit on the left hand rail in front of the tower but looks rather unsightly there. I'll look around in my scraps for some sturdy metal to make brackets to enable it to sit a little above the back rail where it will be out of the way but having easy access to the RAMPS board. The bracket for the Y axis motor prevents it sitting on the top of the back rail. Hang on, turning up some stand offs would raise it enough to clear that bracket and not require any other hardware. Sometimes it pays to think out loud - thanks for listening!
I was puzzled when I came to mount the heated bed plate. Which is the top surface? The surface printed with heat warnings, etc looks as though it ought to be the top but that is also the surface that the wires are soldered to and all photos I have seen show the wiring going to the underside. At the moment I have it mounted with the plain aluminium side to the top but I wonder if that is correct. Any thoughts?
Thanks, guys.
Nelson Kennedy
Rolleston, NZ
|
Re: FLSUN I3 kit review March 14, 2017 04:20AM |
Registered: 7 years ago Posts: 16 |
Warning side down. Makes a lot of sense doesn't it? Lol. I did wonder if it would work better with a glass plate warning side up. Some older kits came with glass but the newer ones claim not to need it. That is until you run a square edge over the alum plate and find it either warped or with a depression in the middle. That's after pulling your hair out trying to figure out why nothing sticks. Something else to check.
|
Re: FLSUN I3 kit review March 14, 2017 04:21AM |
Registered: 7 years ago Posts: 16 |
Warning side down. Not being able to see the warning makes a lot of sense doesn't it? Lol.
I did wonder if it would work better with a glass plate warning side up. FYI Some older kits came with glass but the newer ones claim not to need it. That is until you run a square edge over the alum plate and find it either warped or with a depression in the middle. That's after pulling your hair out trying to figure out why nothing sticks. Something else to check.
I did wonder if it would work better with a glass plate warning side up. FYI Some older kits came with glass but the newer ones claim not to need it. That is until you run a square edge over the alum plate and find it either warped or with a depression in the middle. That's after pulling your hair out trying to figure out why nothing sticks. Something else to check.
|
Re: FLSUN I3 kit review March 14, 2017 05:28AM |
Registered: 7 years ago Posts: 20 |
Thanks for your quick response. Yes, there is a tiny concave effect on my build plate. If I fit a glass sheet over it should I still use masking tape over the surface? Reason I ask is that I have seen some prints with a mirror like finish on the bottom which seems to indicate they have come straight off glass rather than a taped surface. Cheers.
Nelson Kennedy
Rolleston, NZ
Nelson Kennedy
Rolleston, NZ
|
Re: FLSUN I3 kit review March 16, 2017 02:30AM |
Registered: 7 years ago Posts: 20 |
Well, I'm delighted to have a recognisable object off my first attempt to print. It has problems, but I'm sure they are just part of my learning process. Photo attached of a calibration cube.
Printed in PLA in .1 mm layers. The file I used defaulted to 55 deg heated bed and I'm wondering if that may be the reason for the bottom corners having lifted and deformed. Dimensionally it is very good at 20 x 20 x 20 with the X axis measured at the mid point avoiding the turned up corners. Of particular note to me is the incredibly smooth faces that were affected by the fan draught which does not have any means of directing the draught specifically at the extruder point area. So I quickly ran off a fan vent designed for this printer.
That file defaulted to unheated bed and there has been no hint of the corners turning up. However, as the print progressed at about one third height it started rocking as the pressure of the tip 'hinged' the part backwards with the 'toes' of the feet coming off the bed. A quick jab of the 'pause print' saw me taping down the feet of the print and proceeding. A little later the tape needed pressing down again - pause and resume again. Then after about the half way point the print started getting pushed out of the way of the extruder. This time I gave up on the tape and used a length of brass strip about 15mm x 2 mm across the whole width of the bed and clamped each end with spring clips.
It didn't shift after that, but a bit of a step is evident in the print at that point - it will clean off for cosmetic purposes but I was watching the print at the time and the hollow channel inside does not appear to be affected.
I have found a thread elsewhere on this forum, dealing with heat or no heat for PLA and it seems there is no clear preference. It also deals with hairspray on glass and glue stick on glass which I may explore.
Edited 1 time(s). Last edit at 03/16/2017 03:22AM by wunderkind.
Nelson Kennedy
Rolleston, NZ
|
Re: FLSUN I3 kit review March 16, 2017 07:44PM |
Registered: 7 years ago Posts: 38 |
Looking good for the first prints!
The curling is usually caused by the print not sticking, overheating will tend to cause elephant foot (the bottom layer melts more and spreads out a bit, creating a bit of a lip on the bottom). I found that adding a PEI plate on top of my heat bed did wonders for my prints sticking, I don't have to use tape anymore.
Also, with that fan cooler model you should be able to rotate it so that it sits flat, the two feet it is on at that angle don't create a lot of surface area to keep it held to the plate, especially when you get higher up. I printed mine sitting down and it worked pretty well. The other option would be adding a decent brim that would create a larger footprint and can be shaved off afterwards. I've lost quite a few taller prints because they didn't stick when it got too high.
Upping the heat might help keep your prints staying on the plate, or using purple glue stick on the tape, but if you can get your hands on some PEI I would recommend that for sure. I think mine cost me $20-$30 and my friend has been using his for over a year and hasn't had to replace it yet.
PLA claims it shouldn't need a heated bed, but I've found keeping mine around 40 degrees has worked really well and doesn't give it an elephant foot. But each company's filament will be a bit different, the ambient temp will have an effect, etc, so it will take some testing.
|
Re: FLSUN I3 kit review March 17, 2017 06:15AM |
Registered: 7 years ago Posts: 20 |
Thanks for the tip on flipping the cooler print on to its back. Couldn't see how to do it in Repetier but MS 3D Print came to the rescue and saving the result as an .OBJ file allowed it to be imported to Repetier. I got into some strife with my original print when I came to open up the two slots of the vent. I bodgied it up to last long enough for me to print the version on its back and that one is performing well. Need to put some test prints under the magnifier but at normal viewing distance they are looking very smooth. PEI is incredibly expensive here at first glance. I will do some asking around specialist plastics suppliers. In the meantime, using tape wiped with IPA just before heating up is giving me excellent adhesion - so much so that the tape has to come away from the bed to lift the printed model.
My beast is quite musical. Is yours? When doing repetitive motions like building up the feet on the cooler it emits a pitch for each pair of movements and then increases the pitch by about a semitone for maybe half a dozen times when it then drops down about half an octave and starts the cycle again. I can't decide if it is coming from the extruder head or the movement of the Y axis, or even the X axis but the sound appears to becoming from the centre of the machine rather than the X motor at the side. Not a problem at all - just fascinating. Nearly as fascinating as my disbelief that I have got this machine printing reliably without any drama! I did take my time over the build spread over about four days and I think that care may have paid me some dividends.
I'm really enjoying this new experience. A 3D scanner is on my want list and this printer is going to help me build one.
Nelson Kennedy
Rolleston, NZ
|
Re: FLSUN I3 kit review March 17, 2017 02:25PM |
Registered: 7 years ago Posts: 38 |
I know repetier does have the ability to rotate, but I can't remember off the top of my head how, I used it only for a short time. Usually there are options to rotate around an axis. Glad you got it figured out!
That's unfortunate that PEI is so expensive out there. When I saw your signature for some reason I thought you were in the USA, not NZ. I spent a month in NZ a few years ago, I love it out there and can't wait to visit again!
Mine is quite noisy too, but partly because I accidentally sheared off two fan blades when I was using my calipers to check if my X axis rods were level and forgot to turn off the fan...then I bought a replacement that was too small. I also think that one of my X rods might be slightly bent, around 1/3rd of the way along it gets extra noisy but clears up around halfway across. I have to dismantle it and check the rod. Making some anti-vibration feet are supposed to help, I still need to make some. For mine pretty much all of the noise is made by the 40mm fan vibrating the assembly, if I unplug that fan it's really nice and quite. So I'm trying to come up with ways to limit that, next I will probably look at a thin padding to put between my fan and it's mount.
I was also surprised at how well mine did after the initial build. The first major tweak I had to do was check my extrusion rate, mine was only extruding about 75% of what it was supposed to so my lines were coming out fairly thin. After fixing that things went much smoother and then it was mostly tweaking retraction speeds.
I've been swamped with work and haven't had a chance to touch my printer for a couple weeks...I'm really looking forward at trying out some PETG filament next and making something a little more flexible. I also need to get a nozzle upgrade so I can print with coarser material without wearing out the nozzle.
|
Re: FLSUN I3 kit review March 21, 2017 02:55AM |
Registered: 7 years ago Posts: 20 |
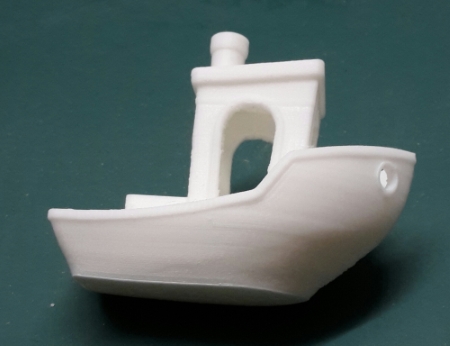
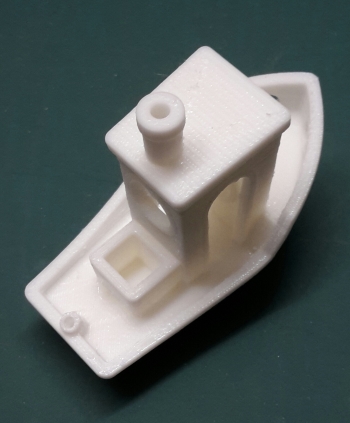
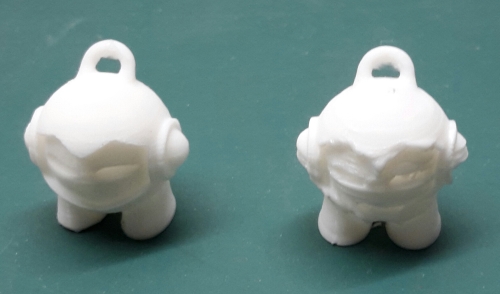
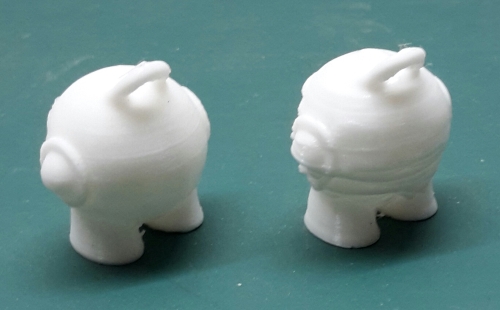
I've been putting a bit of time into trying to optimise my prints. I think I have got the cooling fan set up right now. I've settled on the same one as Ynothna (see his post a few earlier on this page). It has a high air flow and is working a lot better than the other version I first tried. I have used the obligatory Marvin and Blechly prints to judge my progress. Attached photos show My Blechly - the only one I have printed, and a pair of Marvins. The one with ridging on the back and malformations on the face was printed with my earlier low air flow fan adaptor. The one with little blemish is from the higher air flow set up I fitted today. I'm generally happy with these renditions apart from flat top surfaces.
Part of my journey has been seeking as smooth a top surface as possible. I'm not there yet, but these two examples are better than I have achieved before. These were sliced using Cura and have 100% infill. Cura has less of a definite pattern on the top surface compared with Slic3r where the user chooses the pattern and, regrettably, there is not an option for 'none'! If any of you have cracked the nut of achieving a smooth or near smooth top surface I'd appreciate your sharing your advice.
Nelson Kennedy
Rolleston, NZ
|
Re: FLSUN I3 kit review March 21, 2017 11:51PM |
Registered: 7 years ago Posts: 38 |
That is some pretty awesome progress! I'm glad to see they're coming out fairly well 
I find for my top surfaces my printer almost seems to be under extruding, it fills in the gaps pretty decently throughout the print, but when creating the top layers the lines are thinner and create openings. I need to play around with some settings and see what I can find, I haven't had much time lately. Today I'm finally printing for the first time in a couple weeks! I personally found Cura missing a few too many options I wanted that I found in Slic3r, the main one being the extruder offset, I almost always need to adjust it a little bit to get my prints sitting just right. Cura definitely has some attractive features though, if they add extruder offset I may have to give them another try.
I'm trying a custom design for my a tool my dad wants while making his fly fishing lures. My mom has requested a custom bobbin design that can go between the loom and spinning wheel without having to rewind the fiber onto another spool. I'll be trying to visit her this week to take a look at what she has and come up with some ideas.
I did try putting some padding between my 40mm fan and the mount location...not sure if it made a difference or if it made it worse. As I'm writing this my print just finished and in resting mode it's giving off a horrible buzz...will have to try something else, haha.


Sorry, only registered users may post in this forum.