My first steps in printable robotics - servo question
Posted by nb99
|
My first steps in printable robotics - servo question May 28, 2012 01:10AM |
Registered: 12 years ago Posts: 120 |
A prime reason for my starting my Prusa build several months ago was the potential ease of prototyping robot bits.
Having got the Prusa fairly reliable I've now made some initial progress on my Grand Design.
(love the process - a thought, some sketching, followed by an hour in OpenSCAD, 50 cents of plastic and 30-60 minutes later you have the part in your hand
First object is an experimental gripper. Simple goal, lift a coke can : 0.33 Kg.
It is not a compact or efficient design, more shaped for convenience of manual testing. More versions will come.
Having printed & assembled it over the weekend, I'm close to powering up the grip servo, but have a question or two.
It takes 1 kilo of manually applied force to hold a coke can without it slipping from the gripper. That was the main info this version was aimed at gleaning.
( there are rubber bands wrapped round the "palm/fingers" area of the gripper for - well - grip. )
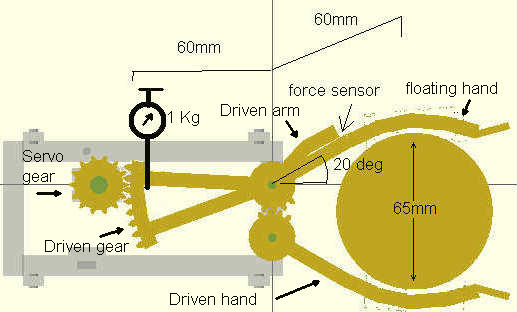
I applied that force with a spring scale, from the point indicated in the diagram below. (w/o the servo in place)
That's torque of 6 Kg * cm to hold the can reliably. (this is a top-down view)
For ease of experimentation, the driven gear radius is the same as the average load radius at 60mm.
With a servo gear of 12mm radius, that gives a torque muliplication of 5.
( the servo will turn 180 deg, I only need 20 deg for open-to-close of the gripper, so can gear it down)
So **theoretically** the servo stall/holding torque needs to meet 6 /5 = 1.2 Kg * cm.
Now a Sparkfun 'small' servo (from Mindkits in NZ) is rated at 1.6 Kg * cm @ 6v,
lovely light little thing at 4 gm - and weight is important out at the far end of an arm.
Finally - close to THE QUESTION:
My design has a force-sensistive-resistor as a pressure sensor between the driven arm and the top floating arm.
I'll be using an Arduino to drive the servo and monitor the FSR.
How do you hold a (close to) constant *pressure* using a servo ?
So I drive the servo to open the gripper, then close it until it reaches the required pressure on the arm,
then is it sufficient to just hold the pulse ratio at that point, or will things get hot ?,
Is there anything I need to be careful of to avoid burning something out in the servo, or stripping gears?
Are servos happy to be held at a constant torque approaching their spec limit?
Interested in any thoughts...
Edited 1 time(s). Last edit at 05/28/2012 02:31AM by nb99.
Having got the Prusa fairly reliable I've now made some initial progress on my Grand Design.
(love the process - a thought, some sketching, followed by an hour in OpenSCAD, 50 cents of plastic and 30-60 minutes later you have the part in your hand
First object is an experimental gripper. Simple goal, lift a coke can : 0.33 Kg.


It is not a compact or efficient design, more shaped for convenience of manual testing. More versions will come.
Having printed & assembled it over the weekend, I'm close to powering up the grip servo, but have a question or two.

It takes 1 kilo of manually applied force to hold a coke can without it slipping from the gripper. That was the main info this version was aimed at gleaning.
( there are rubber bands wrapped round the "palm/fingers" area of the gripper for - well - grip. )
I applied that force with a spring scale, from the point indicated in the diagram below. (w/o the servo in place)
That's torque of 6 Kg * cm to hold the can reliably. (this is a top-down view)


For ease of experimentation, the driven gear radius is the same as the average load radius at 60mm.
With a servo gear of 12mm radius, that gives a torque muliplication of 5.
( the servo will turn 180 deg, I only need 20 deg for open-to-close of the gripper, so can gear it down)
So **theoretically** the servo stall/holding torque needs to meet 6 /5 = 1.2 Kg * cm.
Now a Sparkfun 'small' servo (from Mindkits in NZ) is rated at 1.6 Kg * cm @ 6v,
lovely light little thing at 4 gm - and weight is important out at the far end of an arm.
Finally - close to THE QUESTION:
My design has a force-sensistive-resistor as a pressure sensor between the driven arm and the top floating arm.
I'll be using an Arduino to drive the servo and monitor the FSR.
How do you hold a (close to) constant *pressure* using a servo ?
So I drive the servo to open the gripper, then close it until it reaches the required pressure on the arm,
then is it sufficient to just hold the pulse ratio at that point, or will things get hot ?,
Is there anything I need to be careful of to avoid burning something out in the servo, or stripping gears?
Are servos happy to be held at a constant torque approaching their spec limit?
Interested in any thoughts...
Edited 1 time(s). Last edit at 05/28/2012 02:31AM by nb99.
|
Re: My first steps in printable robotics - servo question May 28, 2012 02:28AM |
Registered: 11 years ago Posts: 59 |
Nice design, and a noble goal.
I'm also excited about the extremely short prototyping cycle from idea to first part in a few hours or less. It's going to completely revolutionize design.
As far as servos are concerned, it depends on the type of servo you select. The small, cheap (a relative term), hobby servos usually have nylon/plastic gears that will strip out easily. They really aren't designed for the gripper type application where force has to be applied for protracted periods of time. They might work OK for a short time, but will heat up or strip out if you keep them constantly stressed. Basically, to apply the necessary force you're asking them to move to a position they can't attain, so they keep struggling.
A more robust, though more costly, approach would be to use a more advanced servo (Robotis, Kondo, Futaba) that includes features like compliance and feedback that can be processed by the controller including temperature and current draw. Monitoring the current draw, which should have a close correlation to the applied force, might allow you to eliminate the need for the force sensor.
Another challenge is that the gripper effectivity depends to a large extent on the friction between the gripper fingers and the object. The friction from can to can will vary, especially when the can is cold and covered with condensation. That can be improved by adding things like soft rubber pads.
One 'trick' that I've seen work well in the past is to include a small floor/shelf on the base of each gripper finger that slides under the can. Since the gripper floor supports the weight of the can the gripper force doesn't have to be as strong.
----------------
Lem Fugitt
3D Printing Dreams
Robots Dreams
"The map is not the territory."
|
Re: My first steps in printable robotics - servo question May 28, 2012 06:13AM |
Registered: 12 years ago Posts: 120 |
Monitoring the current is a good idea, and if it gives a repeatable result then as well as being significantly cheaper than force sensors, it will double as protection.
(5c current sense resistor instead of a several dollar FSR - using the same atmega A2D input )
In the spirit of low(ish) costs made more possible with the reprap, I'd like to be able to come up with a system that manages to keep the magic blue smoke inside the simpler servos.
But it's a case of 'the journey *is* the destination', so I see some months of fun evenings trying things out.
May just have to set myself a limit on the number of sacrifices...
I also had the thought about the 'floor/shelves' to provide support - sprung loaded so they move out of the way if closing on an object without the gap at the bottom. On the 'to be designed' list.
I'm on the lookout for more 'grippy' rubber - the rubber bands (visible in the photo above) certainly improved things.
|
Re: My first steps in printable robotics - servo question May 28, 2012 07:19PM |
Registered: 15 years ago Posts: 332 |
What about changing the axes of the arm hinges, so that as the grippers close, they sink very slightly? This way, the weight of the can will increase the gripping power, because it'll try and pull the grippers down, which will close them tighter. Using a worm gear would also sort out all the issues of wasting power to hold things, because you can just use a small motor to turn the driving gear until the right torque is set, then the motor doesn't need to be powered.
|
Re: My first steps in printable robotics - servo question May 28, 2012 09:04PM |
Registered: 12 years ago Posts: 120 |
Interesting... I shall try some modelling...Quote
(splay) axes of the arm hinges .. close .. sink
Now - yes, the self-holding aspect of a worm drive has great merit - as well as providing the torque increase in a shorter space than my long driven gear arm.
I see a number of printable worms on thingiverse, but I have a concern about the smoothness of thread achievable,
so I guess the obvious compromise would be a long metal screw + captive nut - with a scissor action mechanism to open and close the gripper fingers.
It does lose the simple positioning control of the servo...
But I've been looking at using small pots to provide positional feedback on those parts where I won't be using a servo - e.g. I'm looking at using an "elevating elbow joint" approach instead of a tilting Upper Arm - so need an alternate vertical position indicator for that. Pots have about a 300 deg span, but simple spur gearing to fit them to the range required (like 70 cm linear travel) is readily printable.
                                                                 _
                    ___       _______                           | |            _
                  /     \ ___/                                #==O=======o|><|<_
 _____       o====|  o  |/                                      | |
|     |       \   \ ___ /                                       | |
|motor #======##    ___                                         | |
|_____|       /   /     \                                       | |
             o====|  o  |\___                                   | |
                  \ ___ /    \_______                           | |
                                                             o========o
Sorry, only registered users may post in this forum.