First unbox and Build - Prusa I3X DIY Tech Shop
Posted by n9jcv
|
Re: First unbox and Build - Prusa I3X DIY Tech Shop February 20, 2014 10:13PM |
Registered: 10 years ago Posts: 211 |
I dont know exactly how you are testing the E stepper. But to extrude without melting, you can remove the hotend and then comment out this line;
#define PREVENT_DANGEROUS_EXTRUDE
doing this, you could test extruding without the hot end to test the motor
MAKE SURE to put this BACK Before you actually print something.
I wonder if you extruder motor is bad?
Another option is to go to the RepRap IRC, lots of good guys there helped me with questions I had.
english and spanish are available
[reprap.org]
Good luck
|
Re: First unbox and Build - Prusa I3X DIY Tech Shop February 21, 2014 02:41AM |
Registered: 10 years ago Posts: 55 |
Testing the E stepper was easy since the heater in the hotend is working, to comment out the #define PREVENT_DANGEROUS_EXTRUDE was not neccesssary. And I did the procedure described in the forum with exchanging x motor with extruder motor, exchanging the stepper motor driver and so on... It took my an hour to find out that the stepper motor on the extruder was bad, because it was not even working on my cnc milling machine.
The new stepper motor - yes, I have such things on stock :-) - don´t work either with the E0 connection on RAMPS but everywhere else. That tells me, that someting with the RAMPS board or the arduino must be wrong. I´ve already tried an alternative wiring, so I know that the wiring is not faulty.
In an other forum I´ve read something about shortend pins on the board due to poor quality at production and I think this could be the key.
|
Re: First unbox and Build - Prusa I3X DIY Tech Shop February 21, 2014 04:28PM |
Registered: 10 years ago Posts: 211 |
I designed a holder for my 60mm LED ring;
This is the LED ring I used
[www.amazon.com]
At first I was going to use 2 rings, but I found that 1 ring is more than adequate to hold the ring.
Pic of LED ring mounted
the ring has a hole for the wires and the LED ring snaps in place. I also used a small zip tie just in case.
This is the LED ring I used
[www.amazon.com]
At first I was going to use 2 rings, but I found that 1 ring is more than adequate to hold the ring.
Pic of LED ring mounted

the ring has a hole for the wires and the LED ring snaps in place. I also used a small zip tie just in case.
|
Re: First unbox and Build - Prusa I3X DIY Tech Shop February 22, 2014 12:33AM |
Registered: 10 years ago Posts: 211 |
Hey all I3X/I3XL owners, if you have the LCD panel, this thing may interest you, a set of mounts to put the LCD on top of your frame.
Thing is at [www.thingiverse.com]

Thing is at [www.thingiverse.com]
|
Re: First unbox and Build - Prusa I3X DIY Tech Shop February 22, 2014 09:42AM |
Registered: 10 years ago Posts: 47 |
|
Re: First unbox and Build - Prusa I3X DIY Tech Shop February 22, 2014 09:35PM |
Registered: 10 years ago Posts: 211 |
|
Re: First unbox and Build - Prusa I3X DIY Tech Shop February 24, 2014 04:13AM |
Registered: 10 years ago Posts: 1 |
Quote
ciutateivissa
Did several checks with exchanging different steppers and stepper driver boards this evening, here are the results:
Stepper driver boards --> all OK
Stepper motor x,y,z --> OK
Stepper motor extruder --> didn´t move regardless where I connect this stepper. Had a spare part here and replaced it. New stepper motor works on all axis, but NOT on the extruder
Change of firmware didn´t change anything, this was expected
It seems that there is no signal for the extruder, could be Arduino or RAMPS1.4... No chance to replace these parts within a few days since DIY shop does not react on emails, is there anything else I could try?
My extruder wasn't running properly at first either I also had problems on the Z-axis. Have you measured the Voltage on the stepper drivers? The ones that came with this kit don't have end stops and if you turn them up too much it appears they go to full power and then back to minimum. Without a multi-meter it is hard to prove that they were actually turned up and not back down by going too far.
The next issue I saw was the min temp error you are getting, I fixed that through a number of things. First was to use the new Marlin firmware and not the one from DIY techshop, looks like your New_Configuration.h is from the new version so that should be ok. I also had one of the temp sensor plugged in wrong on the ramps board, not sure where it was but it was basically triggering Marlin to warn on a Min temp from the config. Once I fixed those problems it reads temps great and allows heating up.
If you have the Min Temp warning I believe that it won't allow heated of either the bed or hot end. And looking at the firmware you have posted above both have prevent dangerous extrude turned on which will prevent the extruder from running unless you have it heated up.
#define PREVENT_DANGEROUS_EXTRUDE
Hope that helps
|
Re: First unbox and Build - Prusa I3X DIY Tech Shop February 24, 2014 04:24AM |
Registered: 10 years ago Posts: 55 |
Hi speedyhawk,
thanks for your support, last night I finally managed to get my extruder up and running.
The main issue was a bad stepper motor which I could replace with one of my spare parts. On top of that something with flashing the firmware went wrong, but I can´t figure out was it was. I just flashed the firmware with exactly the same settings in the config file 3 or 4 times and a certain point everything was working. Perhaps my baudrate is still to high (115.200) or maybe my USB cable to long... Whatever it was, it is working now.
I would be happy to share pictures of my first print here but unfortunately the printer bed was not well calibrated, so I´m currently working on that.issue. After everything is fine, I will post some modification as well, please be patient ;-)
|
Re: First unbox and Build - Prusa I3X DIY Tech Shop February 25, 2014 12:52PM |
Registered: 10 years ago Posts: 6 |
Hey n9jcv, or anybody else in this thread that's working with a DIYTechShop build...
Did you have to clean your linear bearings at all? I'm building an i3xl and it seems like they should slide easier. Mine move easily enough when I push them, but if I hold one of my threaded rods vertically with a bearing on it, it doesn't fall. Does that sound normal?
Did you have to clean your linear bearings at all? I'm building an i3xl and it seems like they should slide easier. Mine move easily enough when I push them, but if I hold one of my threaded rods vertically with a bearing on it, it doesn't fall. Does that sound normal?
|
Re: First unbox and Build - Prusa I3X DIY Tech Shop February 25, 2014 01:10PM |
Registered: 10 years ago Posts: 55 |
|
Re: First unbox and Build - Prusa I3X DIY Tech Shop February 25, 2014 02:08PM |
Registered: 10 years ago Posts: 6 |
|
Re: First unbox and Build - Prusa I3X DIY Tech Shop February 26, 2014 01:26PM |
Registered: 10 years ago Posts: 211 |
Hello everyone,
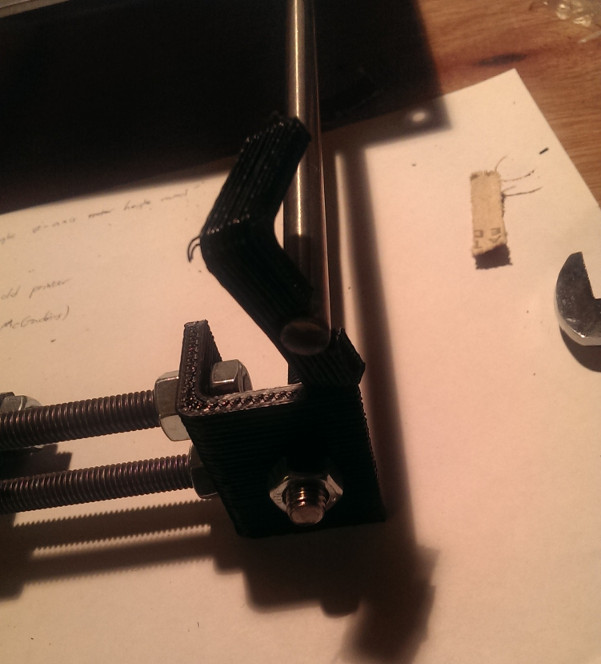
I just developed a Custom Adjustable Z Endstop for the DIY Tech Shop I3X - I3XL
enjoy
Custom Adjustable Z Endstop on Thingiverse
I just developed a Custom Adjustable Z Endstop for the DIY Tech Shop I3X - I3XL
enjoy
Custom Adjustable Z Endstop on Thingiverse
|
Re: First unbox and Build - Prusa I3X DIY Tech Shop March 01, 2014 02:23AM |
Registered: 10 years ago Posts: 4 |
I'm Robert a mechanical engineering student in Milwaukee, WI. I ordered this on January 14th and got the last parts on February 20th.
I got all the axis to move with pronterface today. I had been trying to get something working on my Ubuntu box for the last week and finally gave up for now. I flashed marlin onto the mega on ubuntu and now I can't get it to compile in windows with the diy or the n9jcv version. I was wondering if the n9jcv marlin wouldn't work because I don't have the lcd before I realized that the oem marlin wouldn't compile either. I definately want to get this thing working on ubuntu even though solidworks is only on my pc. I reverted back to ubuntu 12.04lts thinking that things would be better, but now I'm back to 13.04 and lost everything I had done.
I was using these instructions. [mendelcraft.com] I flipped my motor plugs around on the ramps board so now I wonder if it will try to home in the wrong direction away from the endstops. Do I need to change them back and reverse them in the firmware?
The bed and extruder heaters and thermistors seam to be working without changing anything. I'm using a ps3 psu that outputs 23.5A at 12V.
In order to get things moving in Pronterface I changed the max speeds to XY:100, Z:10, and extruder to 1mm@10mm/min otherwise it just squeeled and went nowhere. When I click any of the home buttons it just squeels. I'm wondering if that speed can only be changed in the firmware.
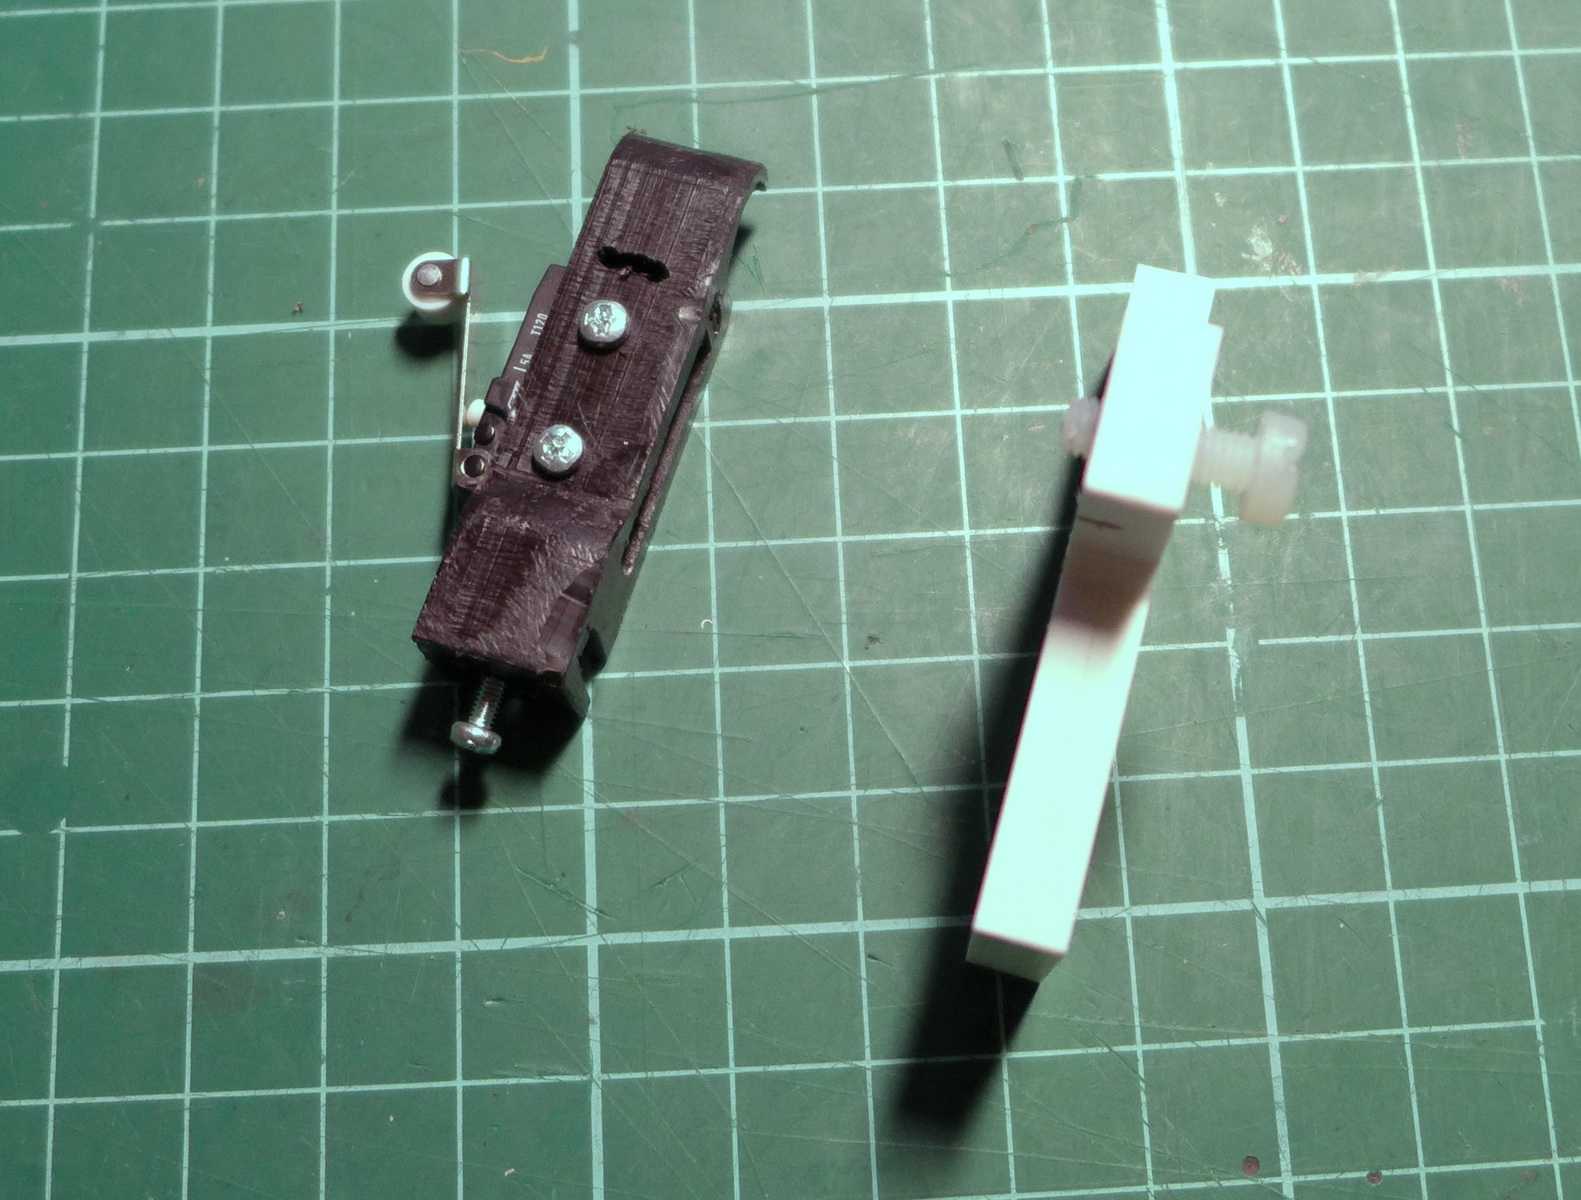
When exactly should the z endstop close? Exactly when the hotend would contact the bed or does the z home itself with the bed out of the way? It seams like it would be impossible to setup the microswitch acurately enough to rely on it to prevent a crash. This kit should have come with mounts for the microswitches and microswitches that are better suited for the job. I think they would be better off without the metal arms but thought I might break them if I tried to remove them.
The short white plastic tube goes where? Does it go into the top of the clamp on the extruder? I haven't tried running any filament yet.
I got all the axis to move with pronterface today. I had been trying to get something working on my Ubuntu box for the last week and finally gave up for now. I flashed marlin onto the mega on ubuntu and now I can't get it to compile in windows with the diy or the n9jcv version. I was wondering if the n9jcv marlin wouldn't work because I don't have the lcd before I realized that the oem marlin wouldn't compile either. I definately want to get this thing working on ubuntu even though solidworks is only on my pc. I reverted back to ubuntu 12.04lts thinking that things would be better, but now I'm back to 13.04 and lost everything I had done.
I was using these instructions. [mendelcraft.com] I flipped my motor plugs around on the ramps board so now I wonder if it will try to home in the wrong direction away from the endstops. Do I need to change them back and reverse them in the firmware?
The bed and extruder heaters and thermistors seam to be working without changing anything. I'm using a ps3 psu that outputs 23.5A at 12V.
In order to get things moving in Pronterface I changed the max speeds to XY:100, Z:10, and extruder to 1mm@10mm/min otherwise it just squeeled and went nowhere. When I click any of the home buttons it just squeels. I'm wondering if that speed can only be changed in the firmware.
When exactly should the z endstop close? Exactly when the hotend would contact the bed or does the z home itself with the bed out of the way? It seams like it would be impossible to setup the microswitch acurately enough to rely on it to prevent a crash. This kit should have come with mounts for the microswitches and microswitches that are better suited for the job. I think they would be better off without the metal arms but thought I might break them if I tried to remove them.
The short white plastic tube goes where? Does it go into the top of the clamp on the extruder? I haven't tried running any filament yet.
|
Re: First unbox and Build - Prusa I3X DIY Tech Shop March 02, 2014 12:21AM |
Registered: 10 years ago Posts: 4 |
I got n9jcv's marlin loaded and I adjusted the voltages today. Everything is going in the right direction now and stops at the endstops. I figured out that that the endstops are need to be wired in normally closed mode which is the oposite of what I assumed.
When I try to home anything in pronterface it still just squeels even if it's already in the home position. I'm not sure if I just need to turn the speeds way down in the firmware or if there is something else wrong.
When I try to home anything in pronterface it still just squeels even if it's already in the home position. I'm not sure if I just need to turn the speeds way down in the firmware or if there is something else wrong.
|
Re: First unbox and Build - Prusa I3X DIY Tech Shop March 02, 2014 05:53PM |
Registered: 10 years ago Posts: 55 |
Quote
n9jcv
Hello everyone,
I just developed a Custom Adjustable Z Endstop for the DIY Tech Shop I3X - I3XL
]
Hi,
the Z endstop was a bigger issue for me as well. In the meantime I developed my own an produced it on my CNC milling machine.
I can`t upload it to thingiverse at the moment because it was considered for milling, not for printing.
|
Re: First unbox and Build - Prusa I3X DIY Tech Shop March 02, 2014 06:06PM |
Registered: 10 years ago Posts: 55 |
The endstop was the last mechanical issue - as far as I can see today.
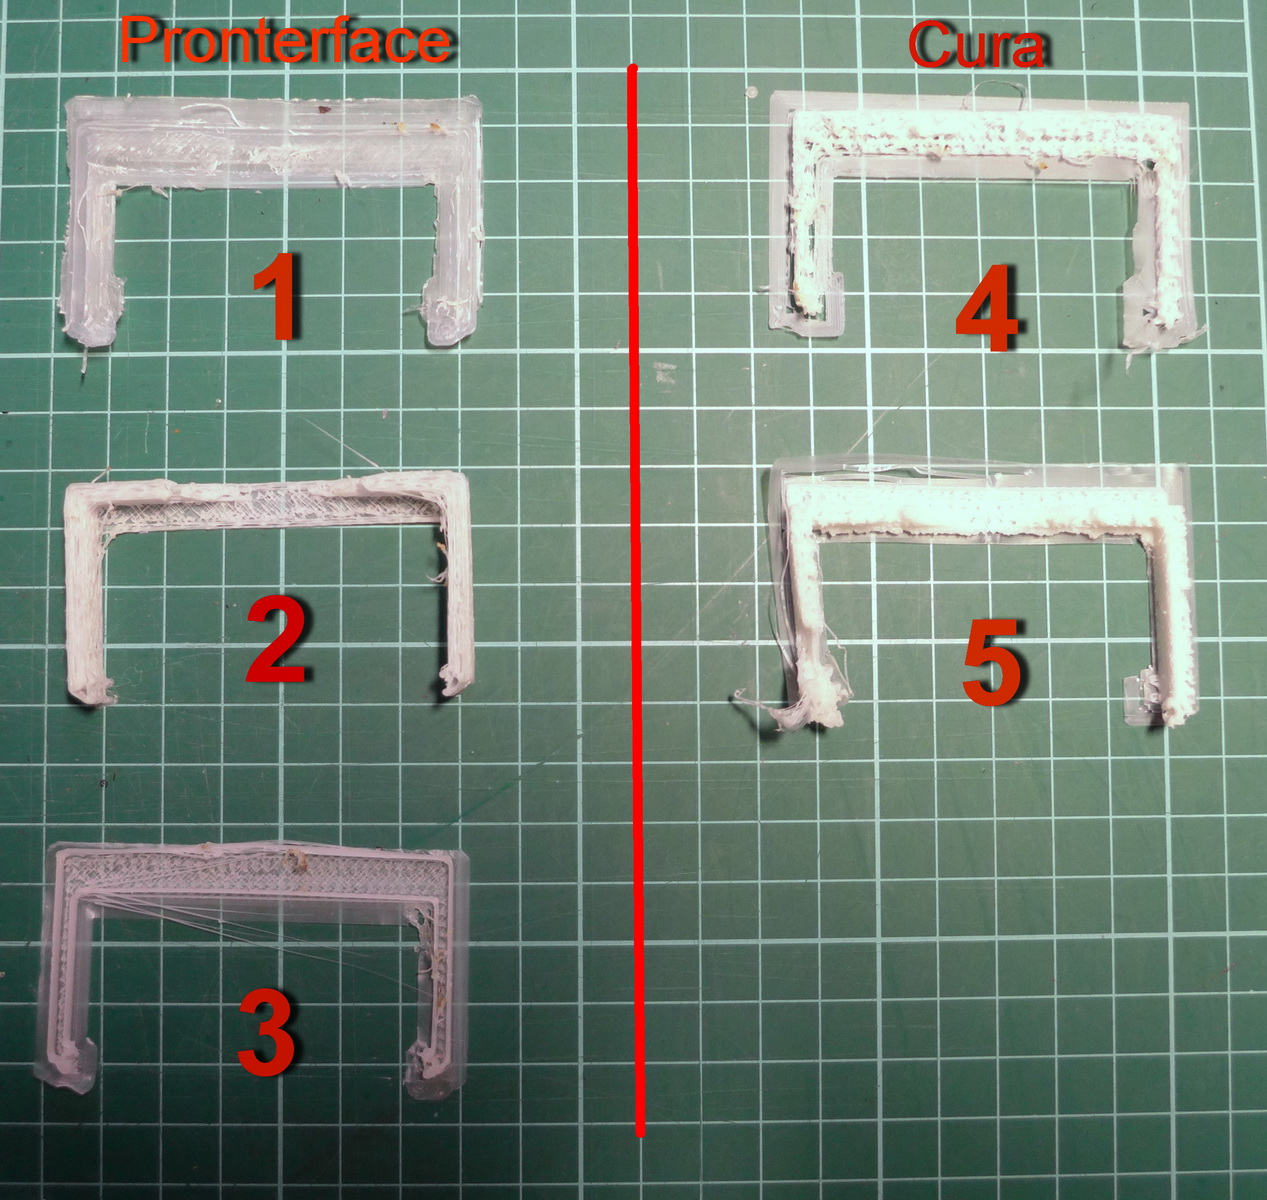
I´ve started printing yesterday and had there some issues as well. It took me ages to get the "Little Brass hotend" running and I´m still not sure if it is now as it should be... I´ve tried to print with Pronterface (and Slic3r) and with Cura and get different results, but none of these prints were of good quality...
Filament was 3mm "Smart ABS" -- nozzle diameter is 0.4mm -- temperature was from 210 - 230 degree C. -- bed temperature from 90 - 110 degree C.
I think i get to less filament out of the nozzle but I´m quite sure that this is not the only issue. All prints are thin and brittle, impossible to use. I´ve attached a photo with different attempts of printing, maybe you´ve had a similar problem and can give me some advise.
|
Re: First unbox and Build - Prusa I3X DIY Tech Shop March 02, 2014 07:09PM |
Registered: 10 years ago Posts: 211 |
ciutateivissa ,
I have never done abs, I do pla, but here are some thoughts
i have used both pronterface/slic3r and cura and both work fairly well
I generally print at about 50mm speed try to slow it down a bit
One thing you need to do is calibrate your extruder, this is a really good guide for how to do it
[richrap.blogspot.com]
I did it before first print and have had pretty good results
try layer height .2,
I hope this helps
|
Re: First unbox and Build - Prusa I3X DIY Tech Shop March 02, 2014 09:28PM |
Registered: 10 years ago Posts: 211 |


|
Re: First unbox and Build - Prusa I3X DIY Tech Shop March 02, 2014 09:30PM |
Registered: 10 years ago Posts: 29 |
 Glad you like it bud.
|
Re: First unbox and Build - Prusa I3X DIY Tech Shop March 05, 2014 05:26PM |
Registered: 10 years ago Posts: 99 |
|
Re: First unbox and Build - Prusa I3X DIY Tech Shop March 05, 2014 10:02PM |
Registered: 10 years ago Posts: 211 |
cfy7, that is just the way the config file came initially. All values should be calculated to your setup. If you are using 16x stepping and 5mm z threaded rod, the 4000 is good, but you need to calculate x and y(both will be close to 80) and calibrate your extruder to get E(generally 600-700 or so).
Other news,
I now have parametric Herringbone gears on the extruder, here is a pic
Other news,
I now have parametric Herringbone gears on the extruder, here is a pic

|
Re: First unbox and Build - Prusa I3X DIY Tech Shop March 05, 2014 10:17PM |
Registered: 10 years ago Posts: 99 |
I came up with:
#define DEFAULT_AXIS_STEPS_PER_UNIT {80,80,4000,630}
for mine using Prusa's calculator and calibrating the extruder.
The y and x axis both use the same type of gears and belt on mine, so I would assume they should be the same. Maybe whoever made your file found through experience that 78.80 works better.
Since I have to make a new extruder, maybe I'll make a personalized gear as well. Yours looks awesome!
|
Re: First unbox and Build - Prusa I3X DIY Tech Shop March 11, 2014 02:55AM |
Registered: 10 years ago Posts: 32 |
At long last, I finally got my package from DIY Tech Shop! So far I've assembled the frame, belts and motors. However, they sure missed a lot of parts. No hobbed bolt, no hot end (!), no wingnuts or imperial flatheads for the hot bed. I sent them an email earlier today; hopefully I can get some response soon. It's not really a big deal since I plan to cannibalize the miserable Techzone Huxley's parts, including a far more reliable J-Head.
The kit differs from what I expected in a number of ways. The extruder carriage has the J-Head mount built-in. The Y-axis corners are now L-shaped structures (not as strong and they are awkward to deal with when putting the threaded rods and nuts together). The support parts are totally different, and take advantage of the holes on the upper part of the backsplash.
I'll be sure to post again once I make some more progress.

The kit differs from what I expected in a number of ways. The extruder carriage has the J-Head mount built-in. The Y-axis corners are now L-shaped structures (not as strong and they are awkward to deal with when putting the threaded rods and nuts together). The support parts are totally different, and take advantage of the holes on the upper part of the backsplash.

I'll be sure to post again once I make some more progress.
|
Re: First unbox and Build - Prusa I3X DIY Tech Shop March 11, 2014 10:55PM |
Registered: 10 years ago Posts: 211 |

|
Re: First unbox and Build - Prusa I3X DIY Tech Shop March 11, 2014 11:21PM |
Registered: 10 years ago Posts: 4 |
|
Re: First unbox and Build - Prusa I3X DIY Tech Shop March 12, 2014 08:39AM |
Registered: 10 years ago Posts: 211 |
I created an adjustable z endstop specifically for the DIY Techshop i3x/i3xl
Here is the thread for it;
[forums.reprap.org]
It works GREAT, I highly suggest it
see the thread and thingiverse
[www.thingiverse.com]
[www.thingiverse.com]
good luck
Here is the thread for it;
[forums.reprap.org]
It works GREAT, I highly suggest it
see the thread and thingiverse
[www.thingiverse.com]
[www.thingiverse.com]
good luck
|
Re: First unbox and Build - Prusa I3X DIY Tech Shop March 12, 2014 09:08AM |
Registered: 10 years ago Posts: 4 |
|
Re: First unbox and Build - Prusa I3X DIY Tech Shop March 12, 2014 04:59PM |
Registered: 10 years ago Posts: 99 |
Veryprint,
Glad to see you got your machine. The plastic pieces that go to your backstop are backwards in your one picture. Not sure if you figured that out yet.
Let them know you're missing stuff! I'm sure they'll get it sent out to you. They've been pretty good with fixing issues in my kit.
They sent me both those L brackets, and the old style. I sure liked the old style better.
Make sure your extruder body is shaped right and accepts a jhead. Mine had issues and they had to send another.
For the most part though, I really like the black plastics they sent.
Did they put tape on the corners of your heatsinks?
Good luck!
|
Re: First unbox and Build - Prusa I3X DIY Tech Shop March 12, 2014 11:43PM |
Registered: 10 years ago Posts: 4 |
|
Re: First unbox and Build - Prusa I3X DIY Tech Shop March 13, 2014 11:17PM |
Registered: 10 years ago Posts: 18 |
My i3x didnt contain many of the right nessesary parts, for example, the support for the print bed came with holes that were not in the correct spot as the instructions/parts would allow. And many nuts and bolt were missing. Oh and a question... Did your kit come with a heat bed? Because mine did not contain one
Edited 1 time(s). Last edit at 03/13/2014 11:18PM by ben.meyer.
Edited 1 time(s). Last edit at 03/13/2014 11:18PM by ben.meyer.


Sorry, only registered users may post in this forum.