Using RepRap for copper engraving
Posted by papergeek
|
Using RepRap for copper engraving August 22, 2013 06:32PM |
Registered: 10 years ago Posts: 134 |
I'm curious to hear from anyone who's done this before...
It's quite easy to remove the hot end and extruder from my Prusa and I can put something like a Dremel rotary tool or engraver in place with vertical gravity feed (with a little effort). I'm assuming that most of the people who do this are more interested in CNC in wood and other materials whereas engraving copper (and other flat metals) is mostly 2D.
The things I'm interested in are what type of tools have you used (to keep the cost down but get good clean lines)? Some engravers meant for hand-held use produce a lot of vibration which needs to be either dampened or might make it unusable.
I don't need to control tool speed etc. for now, just want to affix an engraver to the X carriage in place of the extruder / hot end assembly and turn the tool on and off manually, then run G code.
|
Re: Using RepRap for copper engraving August 23, 2013 02:35AM |
Admin Registered: 16 years ago Posts: 13,886 |
... instead of milling the contours I'm spraying the copper with black paint, burning the paint away with an IR-diodelaser and etching the copper: [forums.reprap.org]
It's precise enough for SMT and even finepitch with a 0.05mm-spot, what's not possible with a dremel.
Yesterday I've tested a new (for me) PCB-material, composed of an Aliminium base, coated with an isolating sheet of 0.1mm thick ceramic and the copper ontop. With the Aluminium inside it's tricky to make vias, but absolute perfect for single-sided PCB's with high-power components, cooled through the PCB itself, that is glued or fixed to a cooler ...
This was made with a laser-spot of 0.15mm size and maybe 3 Watts of power (but possible with 1 Watt IR or 445nm too):
Edited 1 time(s). Last edit at 08/23/2013 02:37AM by VDX.
Viktor
--------
Aufruf zum Projekt "Müll-freie Meere" - [reprap.org] -- Deutsche Facebook-Gruppe - [www.facebook.com]
Call for the project "garbage-free seas" - [reprap.org]
It's precise enough for SMT and even finepitch with a 0.05mm-spot, what's not possible with a dremel.
Yesterday I've tested a new (for me) PCB-material, composed of an Aliminium base, coated with an isolating sheet of 0.1mm thick ceramic and the copper ontop. With the Aluminium inside it's tricky to make vias, but absolute perfect for single-sided PCB's with high-power components, cooled through the PCB itself, that is glued or fixed to a cooler ...
This was made with a laser-spot of 0.15mm size and maybe 3 Watts of power (but possible with 1 Watt IR or 445nm too):

Edited 1 time(s). Last edit at 08/23/2013 02:37AM by VDX.
Viktor
--------
Aufruf zum Projekt "Müll-freie Meere" - [reprap.org] -- Deutsche Facebook-Gruppe - [www.facebook.com]
Call for the project "garbage-free seas" - [reprap.org]
|
Re: Using RepRap for copper engraving August 23, 2013 06:50AM |
Registered: 13 years ago Posts: 7,616 |
Quote
The things I'm interested in are what type of tools have you used (to keep the cost down but get good clean lines)?
I use a Micromot 50 with some enhancements: [reprap.org] Small diameter tools are good, because the smaller the diameter, the lower the forces due to vibrations.
Other than that, simply give it a try. And don't give up if it doesn't work immediately, the process needs some experience.
PCB layout packages like gEDA/pcb, Eagle with a plugin or Visolate produce G-code which is pretty much ready to use. Just header and footer need tweaking, as RepRap firmwares usually don't understand the S keyword.
| Generation 7 Electronics | Teacup Firmware | RepRap DIY |
|
Re: Using RepRap for copper engraving August 23, 2013 12:43PM |
Registered: 10 years ago Posts: 134 |
Thanks for the replies - all fascinating. There are so many possibilities.
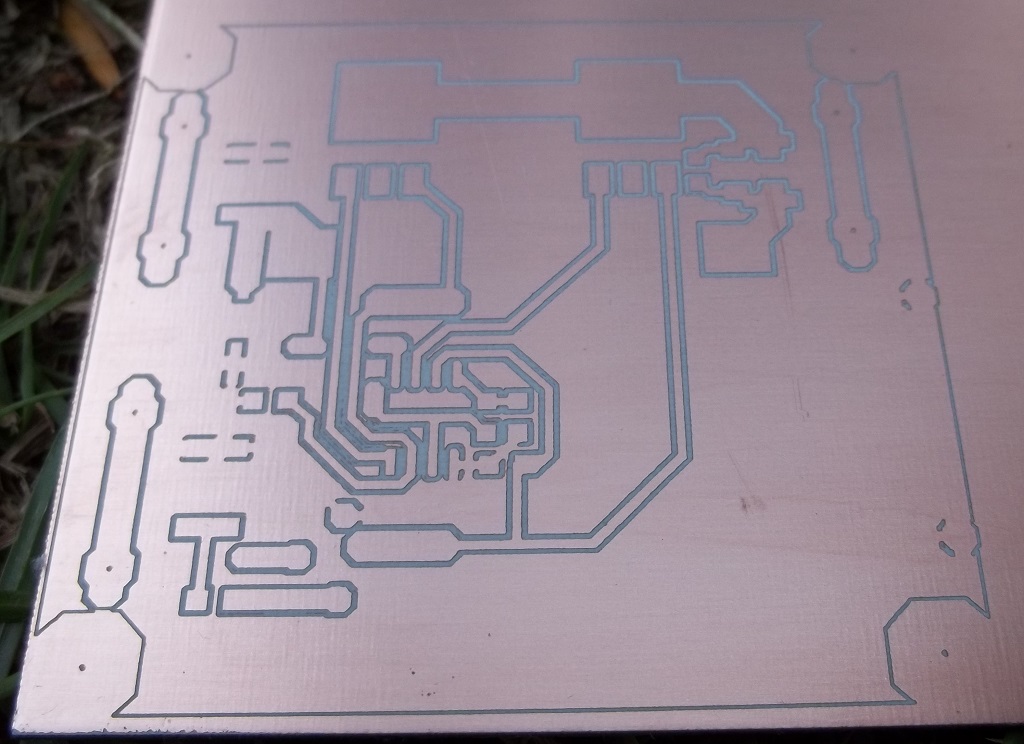
I've been looking at all the techniques for resist etching including scribing a wax coating. At some point I'll probably want to try etching PCBs but for now I'm focused mainly on engraving smooth plate (copper, brass or glass) for art.
I got the dremel engraver [www.homedepot.com] since it was cheap (USD $20) and tried it out. As I suspected it vibrates quite a bit but it's actually rather gentle and lightweight (around 100gm). It does a good job engraving aluminum and (surprisingly) glass but I need to do something with the dust, especially for glass; regardless of what it does to the moving parts I don't want to be inhaling any finely powdered glass. I was thinking about hooking up some flexible hose like one of those computer-vacuuming attachments for a regular vacuum cleaner.
I'm in the process of putting together a mounting bracket using wood and large hose clamps. We'll see how it performs. For starters I should be able to get a layer of G-code from Inkscape with the plugin and tweak it a bit.
I like the Micromot disassembly, looks like a much better integration for doing actual small scale milling and works with PWM control. I will try that later, should also work with hardwoods.
|
Re: Using RepRap for copper engraving August 24, 2013 08:08AM |
Registered: 13 years ago Posts: 7,616 |
For less tool wear and zero dust I run my PCB milling unter water: [vimeo.com] The video is a bit dated, everything is about double as fast today.
| Generation 7 Electronics | Teacup Firmware | RepRap DIY |
|
Re: Using RepRap for copper engraving September 01, 2013 08:54AM |
Registered: 10 years ago Posts: 134 |
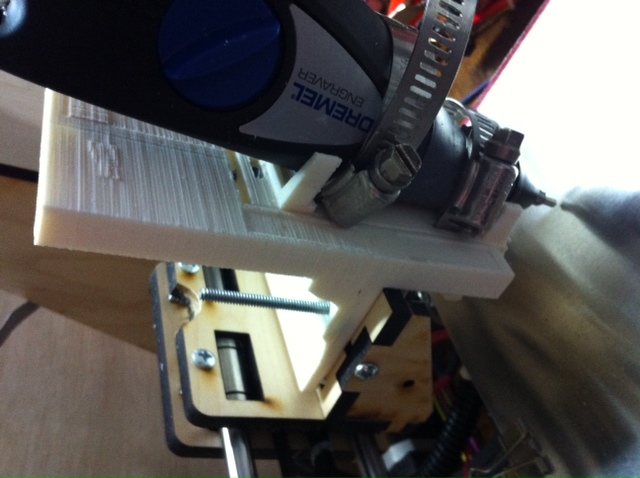
I've gotten this to engrave straight lines on aluminum using manually entered G code. I tried the maximum setting (which generates the maximum vibration) and didn't have any problem with wavering.
I chose to print a two-part structure with the inner tab able to slide out for height adjustment. Screw pockets and nut traps are designed to work with M4 or #6. The tool is held in place against the vee structures using standard hose clamps (19/44mm and 46/70mm), The larger vee was meant to handle the width of the tool but I think it works better with the tool inserted diagonally. The main adjustments I need to make in my Freecad design are to raise the tool up so the Z home endstop can be used (currently I am 21.4mm from the Z endstop). The 0.5mm I allowed between the two parts ended up not being enough and I had to do quite a bit of filing to get them to move stiffly - the goal was to allow the tool to move up vertically and either put a compression spring on the long center bolt or thread an additional nut if vertical rigidity is desired. It could also work with gravity since these engraving tools don't need much pressure.
I tried using gcodetools to generate the G code I wanted from Inkscape but it doesn't look like the code it generates will work with Marlin. I'm working on learning Skeinforge - the end tool milling profile should be adaptable to the 2D engraving I want and it works with svg input.
Edited 1 time(s). Last edit at 09/01/2013 08:57AM by papergeek.
I chose to print a two-part structure with the inner tab able to slide out for height adjustment. Screw pockets and nut traps are designed to work with M4 or #6. The tool is held in place against the vee structures using standard hose clamps (19/44mm and 46/70mm), The larger vee was meant to handle the width of the tool but I think it works better with the tool inserted diagonally. The main adjustments I need to make in my Freecad design are to raise the tool up so the Z home endstop can be used (currently I am 21.4mm from the Z endstop). The 0.5mm I allowed between the two parts ended up not being enough and I had to do quite a bit of filing to get them to move stiffly - the goal was to allow the tool to move up vertically and either put a compression spring on the long center bolt or thread an additional nut if vertical rigidity is desired. It could also work with gravity since these engraving tools don't need much pressure.
I tried using gcodetools to generate the G code I wanted from Inkscape but it doesn't look like the code it generates will work with Marlin. I'm working on learning Skeinforge - the end tool milling profile should be adaptable to the 2D engraving I want and it works with svg input.

Edited 1 time(s). Last edit at 09/01/2013 08:57AM by papergeek.
|
Re: Using RepRap for copper engraving September 15, 2013 11:55AM |
Registered: 10 years ago Posts: 134 |
Improved version posted on Thingiverse finally.
Spring-loaded toolhead
Edited 1 time(s). Last edit at 09/15/2013 11:56AM by papergeek.
Spring-loaded toolhead
Edited 1 time(s). Last edit at 09/15/2013 11:56AM by papergeek.
Sorry, only registered users may post in this forum.