Hangprinter version 2
Posted by tobben
|
Re: Hangprinter version 2 April 03, 2017 10:02AM |
Registered: 10 years ago Posts: 401 |
Hi keplingate. This forum is for collaboration, so please go ahead =)
What are your ideas? Do you have sketches?
torbjornludvigsen.com
What are your ideas? Do you have sketches?
torbjornludvigsen.com
|
Re: Hangprinter version 2 April 03, 2017 10:14AM |
Admin Registered: 16 years ago Posts: 13,884 |
.. "no limits of dimensions" means, you can build complete houses with a big enough setup and a concrete dispenser as tool -- maybe he's on this way 
Viktor
--------
Aufruf zum Projekt "Müll-freie Meere" - [reprap.org] -- Deutsche Facebook-Gruppe - [www.facebook.com]
Call for the project "garbage-free seas" - [reprap.org]
Viktor
--------
Aufruf zum Projekt "Müll-freie Meere" - [reprap.org] -- Deutsche Facebook-Gruppe - [www.facebook.com]
Call for the project "garbage-free seas" - [reprap.org]
|
Re: Hangprinter version 2 April 03, 2017 10:24AM |
Registered: 10 years ago Posts: 401 |
@NOVAprint: how did the push fit spools come out? Did they work? Du you have pictures?
torbjornludvigsen.com
torbjornludvigsen.com
|
Re: Hangprinter version 2 April 04, 2017 12:22PM |
Registered: 10 years ago Posts: 26 |
|
Re: Hangprinter version 2 April 06, 2017 01:13AM |
Registered: 7 years ago Posts: 15 |
Please put a pointer to this forum on the wiki or hangprinter.org
I looked around and found an old thread, but not this one (I fond this one by reading the closed github issues)
I have a few questions about the design of this.
1. why are you using doubled line instead of single line? do you need it for accuracy or to let the small steppers have enough power? or is there some other reason.
2. did you consider using just a single vertical line and account for the sled tilt due to the tension in the side lines in the math? (the maslow does this, it's a CNC that hangs the router between two chains in what is essentially a 2D version of the hangprinter)
3. every example of this that I've seen has the lines stretched ~6' to the edges of the room, and in your interview with Tom at the 3d meetup you indicated that the printable area was not much larger than the board you were using (which looked like 1-2' per side), what happens to the printable area if you don't have the lines out as far? If you were to only go out 3' in each direction, how large an area could be used? how can I calculate this limit?
4. what are the limits to accuracy. You mention aiming for 1-2mm accuracy and are justifying it by the percentage of a 10' span, but is that a matter of the accuracy of the line winding onto the spools? of the math limits of the 8-bit processor? the stretch of the fishing line? the buildup of the line on the reels? something else?
I see that you are thinking in terms of servos or bruchless motors instead of the steppers, I think that would be a good advance, as you would decouple the positioning from the drive motor accuracy. You could put an encoder of some sort on the lines (something like the sensors used on old non-optical mice wind the line with one loop around the shaft and use the encoder to read hoe much it moves, that's good for a few hundred dpi)
In line with your thoughts about having a hopper of pellets and extruding from those, consider making the axle shaft that the reels spin on _much_ wider (say a couple inches in diameter) so that you can have the extruder mechanism extend up into that area. Beside the idea of using pellets, this would also let you do things like a frosting dispenser and other food trickery.
I'm ordering parts and waiting for a friend to get time to print me the parts, then I'll be tinkering with such questions on the first one I build (and looking to improve things for the second one)
|
Re: Hangprinter version 2 April 06, 2017 01:14AM |
Registered: 7 years ago Posts: 15 |
|
Re: Hangprinter version 2 April 06, 2017 10:09AM |
Registered: 10 years ago Posts: 401 |
@dlang There was already a link to this thread at [hangprinter.org] I included the old thread as well just now. Where did you want to find the link? I'd say that finding it in a closed Github issue is fine.
1. I used double lines before I added the line buildup compensation to avoid missing steps due to line buildup and resulting over-tightening.
2. No, I never thought about this. Hangprinter currently doesn't measure tension. It measures nothing other than hot end temp. Looking forward to see a lot of sensor experimentation!
3. The calculation is complicated and depends very much on random calibration errors. As a rule of thumb you can travel 1/3 of the distance from origo to anchor point along all three directions (when printing the first layer).
4. Buildup of line on the spools, and calibration errors are the biggest ones I think. To get much better you also need to automate the manual homing process.
You're idea for line position sensing is a really good one I think. How would you keep friction between line and shaft when line gets slack? Would pinching with a rubber wheel work?
Spool and gear diameter is hard to max out further without splitting bottom_plate into two prints or moving the stack of spool+gear sandwiches to a stationary unit in the ceiling. We (me and friends in Gothenburg and Oslo) will try the second approach first. We'll test it with steppers and filament before going BLDC and pellets. We have too little time to test all three this spring, but oDrive alpha v3.2 goes into production on April 17, so there's plenty of opportunity to contribute on the BLDC side right now =)
@dlang Yes, you measure and feed the numbers into Configuration.h. See [hangprinter.org]
Edited 1 time(s). Last edit at 04/06/2017 10:14AM by tobben.
torbjornludvigsen.com
|
Re: Hangprinter version 2 April 08, 2017 12:13AM |
Registered: 7 years ago Posts: 15 |
Quote
tobben
@dlang There was already a link to this thread at [hangprinter.org] I included the old thread as well just now. Where did you want to find the link?
I'd love to see it in the github readme.md file
I'd also like to see the link to the reprap forum at the bottom of this page ( [vitana.se] ) be changed to point at the current topic rather than an old one.
having it somewhere on this page ( [salt.bountysource.com] ) would be nice as well
I missed it on the about page
so do you think it would be possible to go to single-lines instead of doubled ones?Quote
tobben
1. I used double lines before I added the line buildup compensation to avoid missing steps due to line buildup and resulting over-tightening.
moving from steppers to regular motors/servos would make this easy, with them you don't have to actually measure the tension, you measure the amount of power you have to exert (how much power are you feeding the motors or the offset you feed to the servos) and assume that the tension has a pretty linear relation to the power being applied (assuming you aren't moving, and allowing for gravity when you are offcenter)Quote
tobben
2. No, I never thought about this. Hangprinter currently doesn't measure tension. It measures nothing other than hot end temp. Looking forward to see a lot of sensor experimentation!
Thanks, that gives me a reasonable idea. I'm thinking in terms of building one of these as my first 3d printer and then using it to build a replacement to tinker with design ideas on.Quote
tobben
3. The calculation is complicated and depends very much on random calibration errors. As a rule of thumb you can travel 1/3 of the distance from origo to anchor point along all three directions (when printing the first layer).
if the homing process is off, you should still be able to start a new print without loss of accuracy, you just run into problems being repeatable from print to print, right? Or am I misunderstanding the problem?Quote
tobben
4. Buildup of line on the spools, and calibration errors are the biggest ones I think. To get much better you also need to automate the manual homing process.
my thinking was that in operation, the lines are not allowed to become slack enough to matter. If they do become slack, then pinching the line between rubber wheels and having the rubber wheel rotate the sensor. This picture of a disassembled mouse shows the sensor wheels off to the right ( [cdn.instructables.com] ) the center of the shaft rubs against the mouse ball and there are optical sensors that detect the rotation of the 'jagged whell' end of the shaft.Quote
tobben
You're idea for line position sensing is a really good one I think. How would you keep friction between line and shaft when line gets slack? Would pinching with a rubber wheel work?
I was not suggesting changing the spool or gear diameter (although going to a smaller spool with the same gear diameter would provide more accurate positioning, if you take into account line buildup)Quote
tobben
Spool and gear diameter is hard to max out further without splitting bottom_plate into two prints or moving the stack of spool+gear sandwiches to a stationary unit in the ceiling.
I was suggesting keeping the spool diameter the same, but making the hub diameter much larger. Right now there is a lot of space between the hub and the surface of the spool that the line winds on. If you keep the spool diameter the same, but make the hub diameter much larger (a large hollow cylinder instead of a small one), you could then move the extruder/hotend/pellet hopper/etc up into that space.
I looked at the oDrive, nice idea but it's build to such levels that it's expensive :-) $60/motor is quite a bit,and given the limits of extruder speed, it's speed you won't be able to use. but the idea of being able to drive h-bridges for speed/direction and then have a line position sensor would up the accuracy quite a bit (line buildup wouldn't matter, you would measure hor far it moves and not care how much it's built-up. I may still order an oDrive, it looks like a really neat tool to have.Quote
tobben
We (me and friends in Gothenburg and Oslo) will try the second approach first. We'll test it with steppers and filament before going BLDC and pellets. We have too little time to test all three this spring, but oDrive alpha v3.2 goes into production on April 17, so there's plenty of opportunity to contribute on the BLDC side right now =)
|
Re: Hangprinter version 2 April 08, 2017 03:59AM |
Registered: 10 years ago Posts: 401 |
Ok, added links on all those sites.
Yes, after adding line buildup compensation, I've only used single-line.
It's also possible to drive steppers in constant force mode =) See the Mechaduino Project and some ongoing discussion about that here: [www.facebook.com]
I don't recommend the Hangprinter as a first printer unless you're very confident with building open source hardware from before. The project is young and there's still only one functioning prototype in existence.
The printer has hard-coded into it the line lengths at origo. If you don't find the exact origo manually, it will start off that print with false assumptions about its current line lenghts. The consequences of this is not noticeable now on my current printer, since every other error drowns in the errors of the hard-coded values themselves. The worst thing about manual homing, I find, is getting consistent first layers.
So the mouse uses an optical encoder. That could be a good option. I know cheap commercial 2d printers also use optical. The Mechaduino uses a rotating magnet glued to the motor shaft.
Oh, I'm sorry. Of course you can increase the inner diameter of the spool without altering the outer diameter. If you try that out, I suggest a Nylon+PTFE based bearing (maybe just rest the gear+spool ring on a circular bowden tube?) to keep weight and price low.
A single-unit Hangprinter with light and strong BLDC motor is a goal for the future, but the high price of oDrive that you mention has convinced me to keep the steppers for my next prototype.
The line position sensor idea is being discussed in the facebook group linked above. I'll try to find the time to summarize all sensing ideas I've heard in a blog post soon.
torbjornludvigsen.com
|
Re: Hangprinter version 2 April 08, 2017 05:00AM |
Registered: 7 years ago Posts: 15 |
thanksQuote
tobben
Ok, added links on all those sites.
I hadn't heard of that, I'll dig into itQuote
tobben
It's also possible to drive steppers in constant force mode =) See the Mechaduino Project and some ongoing discussion about that here: [www.facebook.com]
I've built three CNC machines (one kit, one from plans, one to my own plans), so I'm confident (or foolish) enough to tackle it :-)Quote
tobben
I don't recommend the Hangprinter as a first printer unless you're very confident with building open source hardware from before. The project is young and there's still only one functioning prototype in existence.
is that just due to 3d printers being sensitive to sub mm differences in height for the first layer?Quote
tobben
The printer has hard-coded into it the line lengths at origo. If you don't find the exact origo manually, it will start off that print with false assumptions about its current line lenghts. The consequences of this is not noticeable now on my current printer, since every other error drowns in the errors of the hard-coded values themselves. The worst thing about manual homing, I find, is getting consistent first layers.
Yes, an optical encoder combined with a very small diameter shaft so that the encoder wheel spins many times per inch. do the lines get slack enough to be slipping during normal operation? I refuse to sign up for facebook, so feel free to pass along any of my comments/ideas wherever they will helpQuote
tobben
So the mouse uses an optical encoder. That could be a good option. I know cheap commercial 2d printers also use optical. The Mechaduino uses a rotating magnet glued to the motor shaft.
do you have any idea how much force or how fast you need the motors to run? from what I've seen, it seems like even micro servos would probably provide enough force and speed for the horizontal lines (and with the worm gear, possibly even for the vertical lines, but there a simple open-loop stepper may be the easiest answer)Quote
tobben
A single-unit Hangprinter with light and strong BLDC motor is a goal for the future, but the high price of oDrive that you mention has convinced me to keep the steppers for my next prototype.
But I need to build one at least roughly following your plans before I start doing much modification :-) I'm waiting for a friend to get back from a business trip and have time to print the parts for me.
David Lang
|
Re: Hangprinter version 2 April 10, 2017 09:57AM |
Registered: 10 years ago Posts: 401 |
Three CNC machines should make one confident 
Yes, it is indeed due to 3d printers being sensitive to sub mm differences in height for the first layer.
Lines will not get slack during normal operation, but they definitely will during setup and calibration.
I sympathize with your facebook refusal. My account is Hangprinter only, no friends... Are you able to see the facebook comments without logging in?
Ca 20 N of force for ABC should be fine. The worm needs even less force. Very small servos could be strong enough, I think.
I'm looking forward to your build. Will you post pics and other progress here or somewhere else?
torbjornludvigsen.com
|
Re: Hangprinter version 2 April 13, 2017 06:42AM |
Registered: 7 years ago Posts: 21 |
|
Re: Hangprinter version 2 April 13, 2017 06:48AM |
Registered: 7 years ago Posts: 15 |
|
Re: Hangprinter version 2 April 13, 2017 06:51AM |
Registered: 7 years ago Posts: 21 |
|
Re: Hangprinter version 2 April 13, 2017 06:56AM |
Registered: 10 years ago Posts: 401 |
Hi Seneko!
Any pair of hobbed bolts should work. 1 hobbed bolt pressing agains 1 623 bearing should also work.
I use two of these: [e3d-online.com]
Best regards
torbjornludvigsen.com
Any pair of hobbed bolts should work. 1 hobbed bolt pressing agains 1 623 bearing should also work.
I use two of these: [e3d-online.com]
Best regards
torbjornludvigsen.com
|
Re: Hangprinter version 2 April 13, 2017 07:36AM |
Registered: 7 years ago Posts: 21 |
Hi T and Dlang,
Thanks. Ok , understand now, will buy a pair of hobbed bolts.
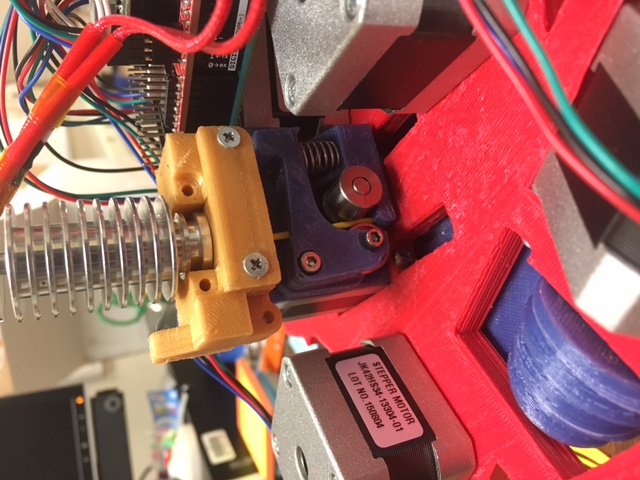
One hobbed gear/pulley goes to stepper, the other goes where? I didn`t see the other ax. Do you use a screw in lever on the sstruder2 plate with washer?
Could any of you send a picture of extruder assembly if you have time?
Manuel Bradovent
Thanks. Ok , understand now, will buy a pair of hobbed bolts.
One hobbed gear/pulley goes to stepper, the other goes where? I didn`t see the other ax. Do you use a screw in lever on the sstruder2 plate with washer?
Could any of you send a picture of extruder assembly if you have time?
Manuel Bradovent
|
Re: Hangprinter version 2 April 13, 2017 11:25AM |
Registered: 10 years ago Posts: 401 |
|
Re: Hangprinter version 2 April 20, 2017 10:53AM |
Registered: 6 years ago Posts: 6 |
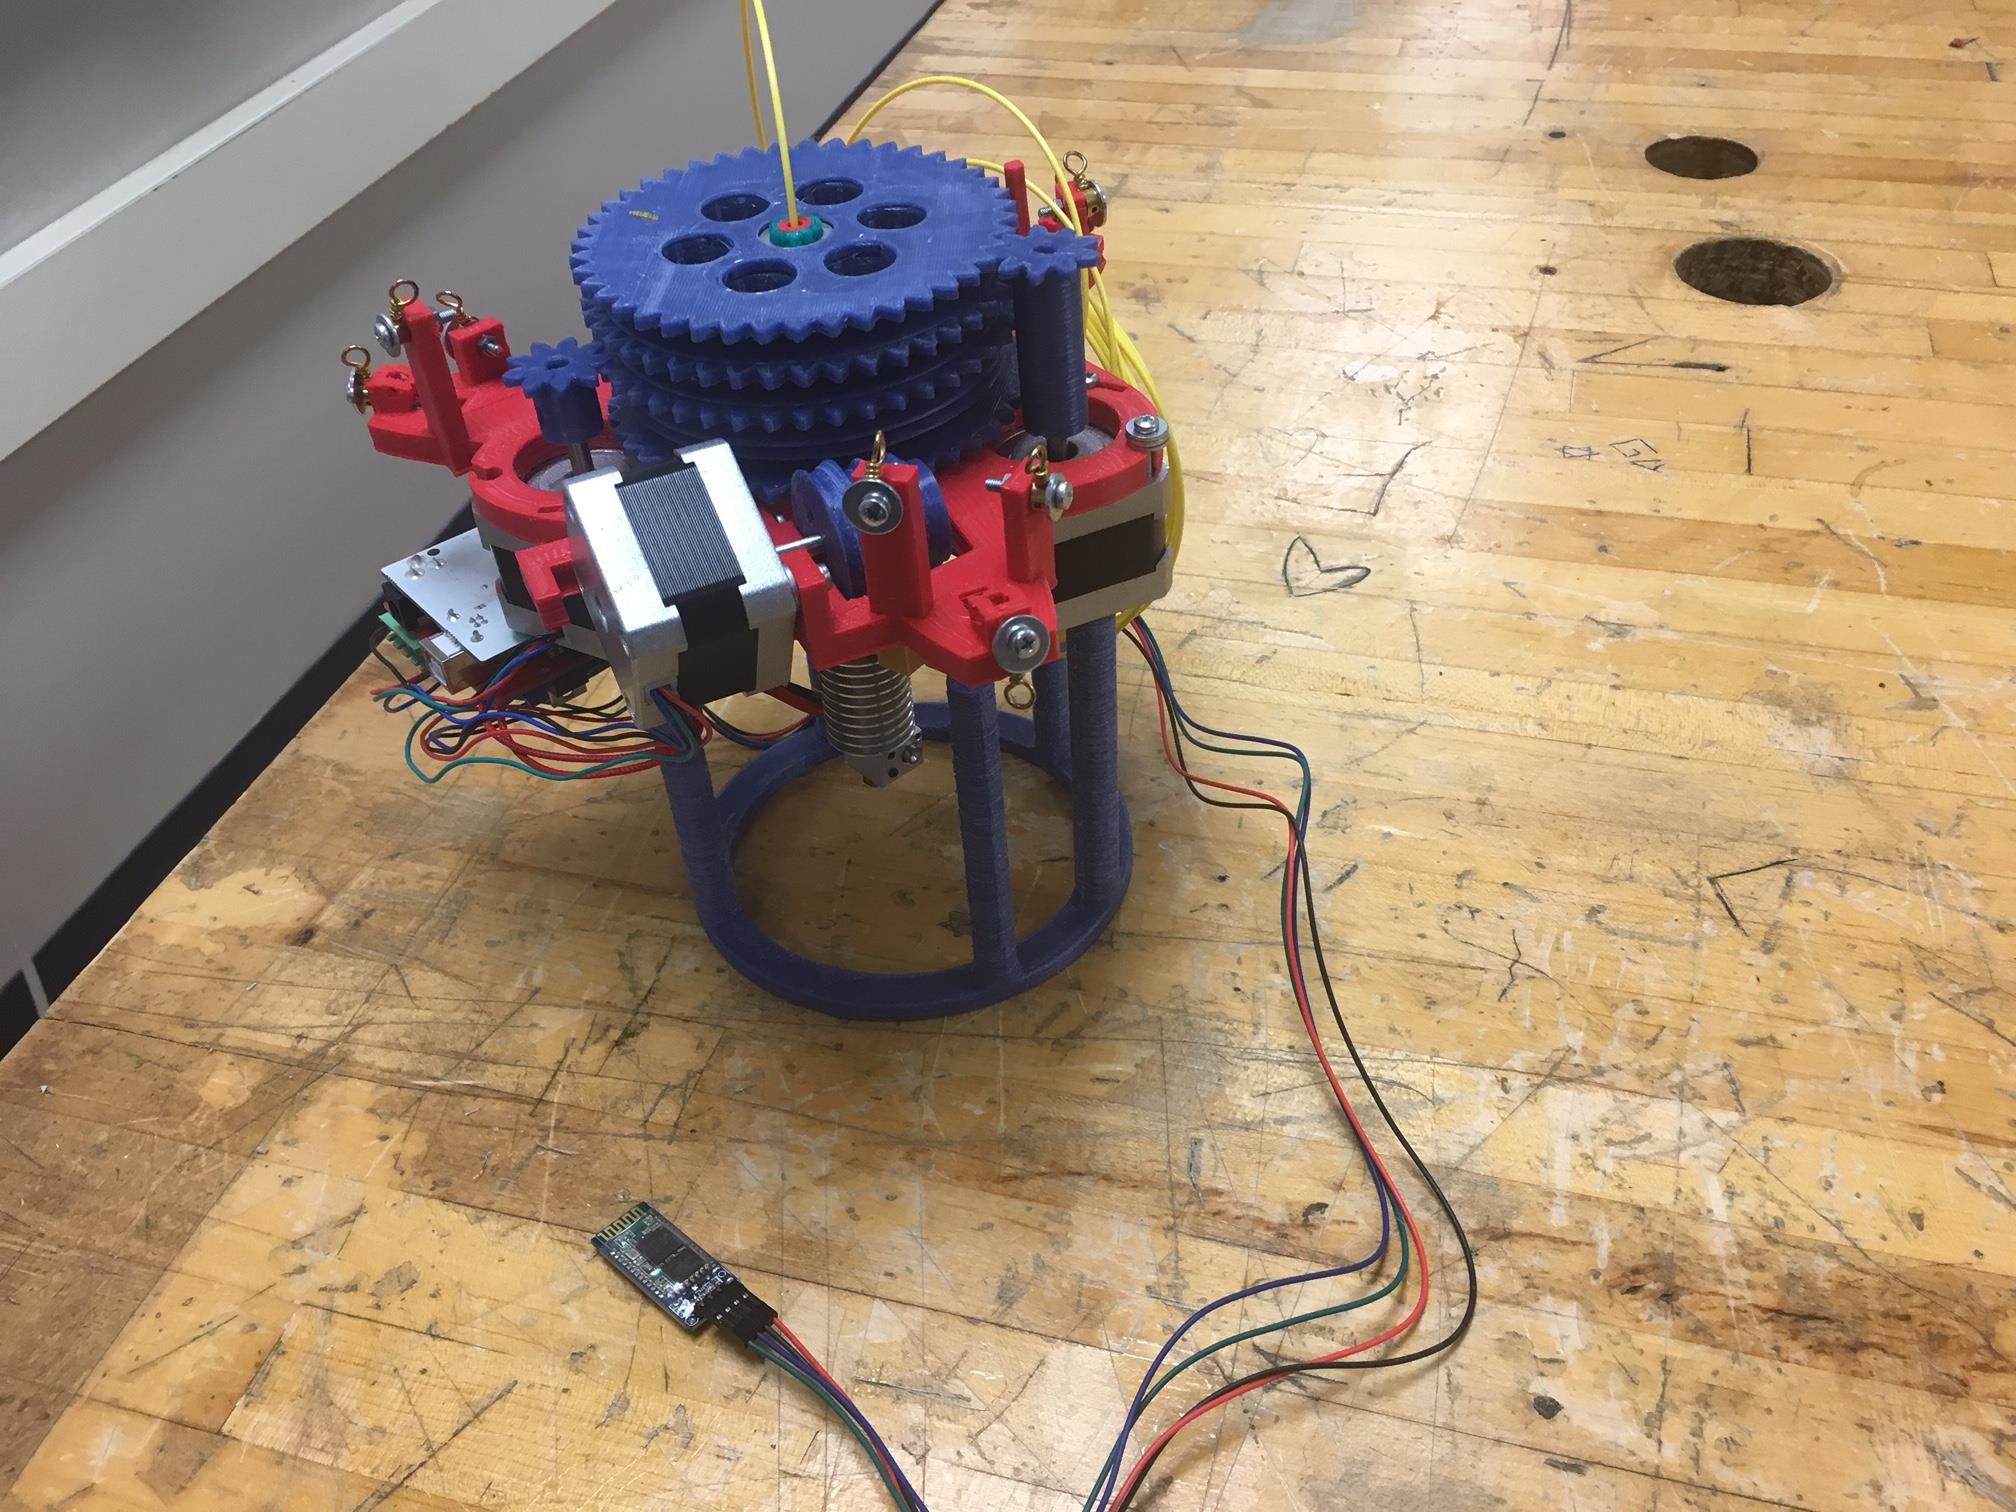
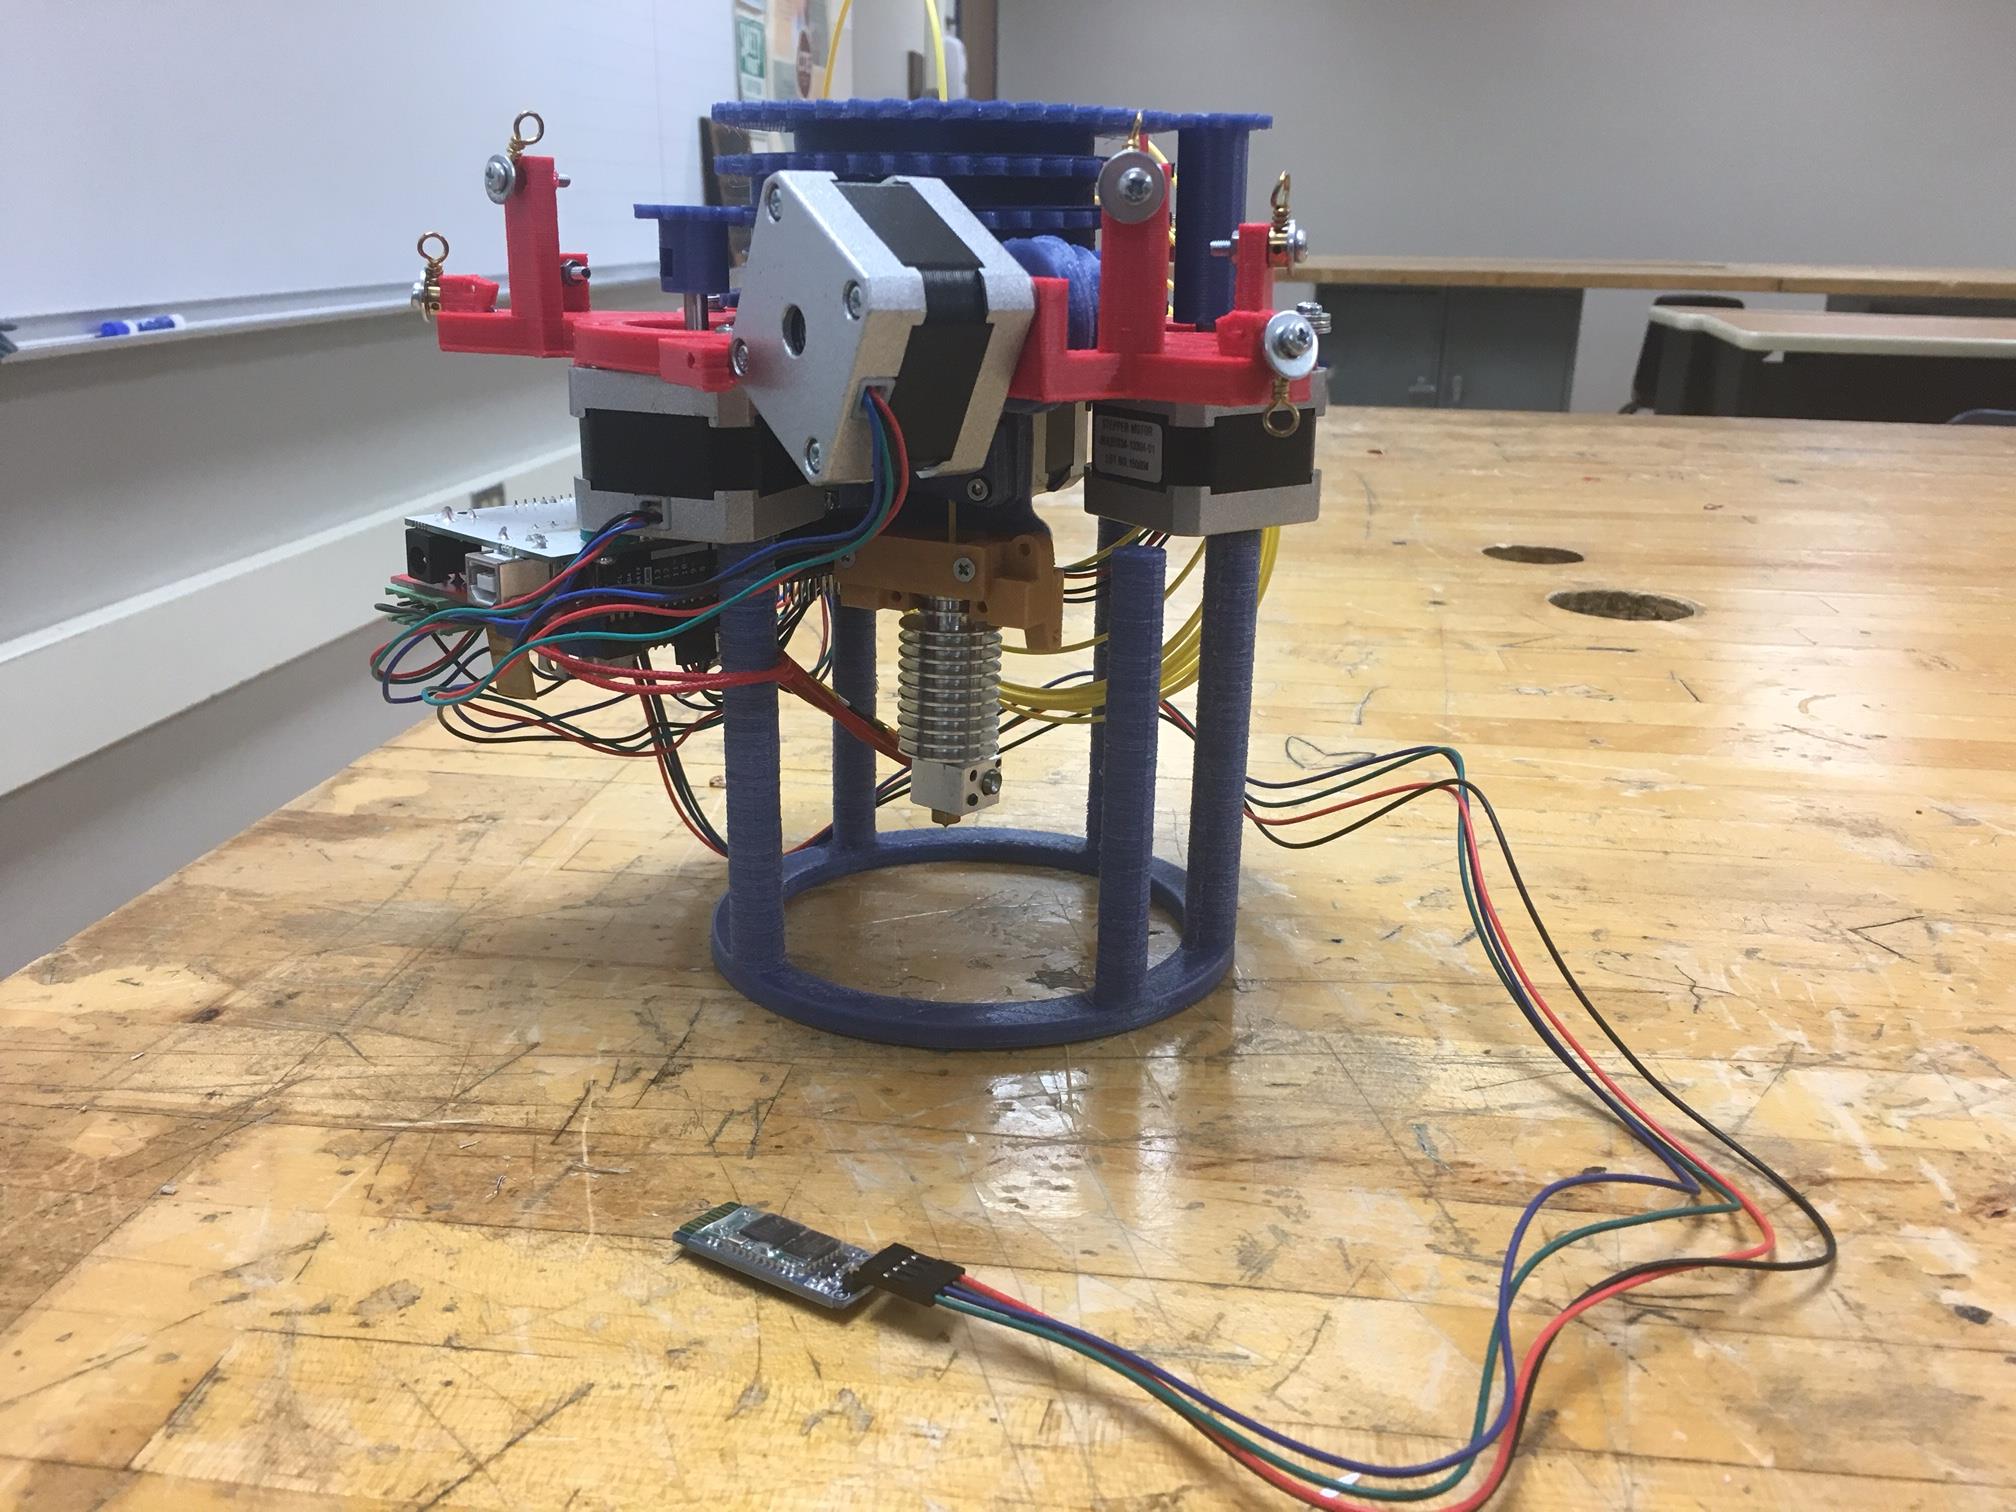
hello i have just finished building the hangprinter and am now in the long process of getting it to work.
i need help with linking bluetooth to repetier host or pronterface.
i have adjusted the baud rate to 115200 with AT codes in the arduino software.
i have uncommitted the code in marlin.
it is paired with the computer.
i get an serial error: could not open port com14: [Error 1168] element not found.
also i need help finding the fishing rod guide rings. i believe that that style of guide ring is being phased out.
Thank you
|
Re: Hangprinter version 2 April 20, 2017 03:19PM |
Registered: 7 years ago Posts: 21 |
Hi rclemence,
You can find fishing rings here : [www.ebay.com]
I am still waiting them more than 1 month.... as I wait also for fishing line will not make different fishing rings. Some people made it with teflon.
I guess, using a teflon pipe with 3 to 5mm, cutting it into rings and inserting in the printed shell could do the trick.
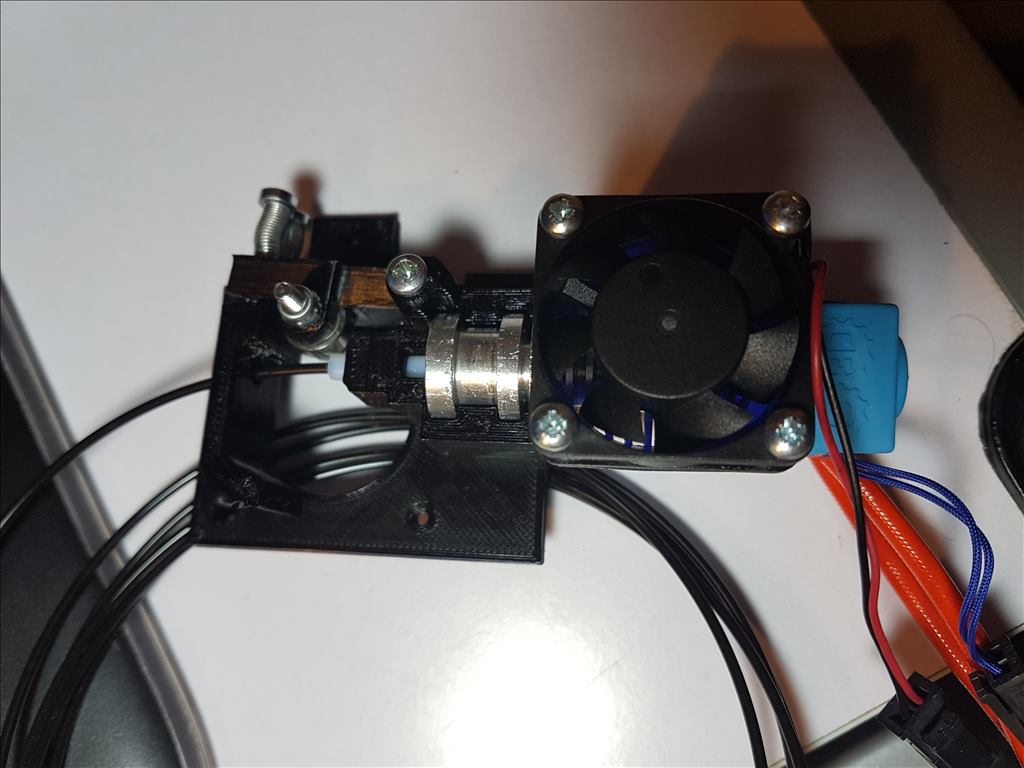
I changed a bit the design for SStruder/extruder in order to use e3d V6 and designed side plate for 623 bearing with spring tensioner screws....still have to to redesign few small points but will be ok...attached.
Related to communication with hangprinter - would you have raspberry? I think octoprint over wifi is much better.
Manuel
You can find fishing rings here : [www.ebay.com]
I am still waiting them more than 1 month.... as I wait also for fishing line will not make different fishing rings. Some people made it with teflon.
I guess, using a teflon pipe with 3 to 5mm, cutting it into rings and inserting in the printed shell could do the trick.
I changed a bit the design for SStruder/extruder in order to use e3d V6 and designed side plate for 623 bearing with spring tensioner screws....still have to to redesign few small points but will be ok...attached.
Related to communication with hangprinter - would you have raspberry? I think octoprint over wifi is much better.
Manuel
|
Re: Hangprinter version 2 April 21, 2017 10:32AM |
Registered: 6 years ago Posts: 6 |
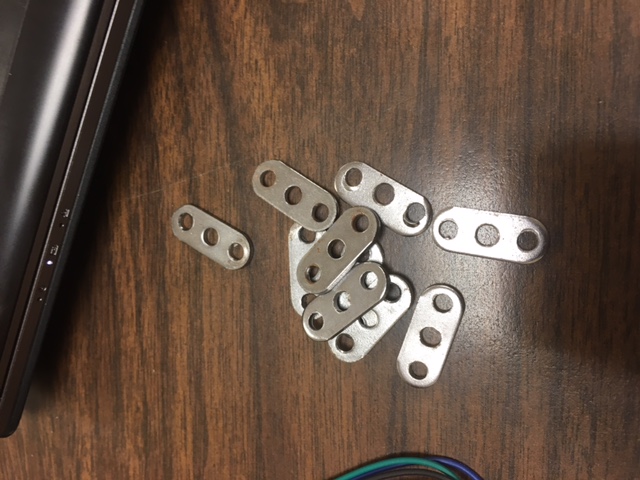
Thank you for the reply. I ordered the rings but they are about a month from delivery. I am going to try some parts I pulled from a soldering jig holder, the kind with the alligator clips. Just to keep moving forward with the project.
I had a hard time trying to figure out the extruder design, so I made my own with a design I'm familiar with. I created a bracket and attached a e3d v5 mount and a mk8 spring arm attachment to it. I'm happy with the result. I did have to mount the spring arm upside down and may have to run a teflon tube through the open air gap.
I'll have to look in to the octoprint. I have a Pi, but I do not have permissions on the wifi at the school that I teach at. Which is where I would mostly use the hangingprinter. If I can find a work around for the wifi I would use it, just would need to find a place to mount it to the printer.
Thank you
|
Re: Hangprinter version 2 April 21, 2017 11:08AM |
Registered: 7 years ago Posts: 15 |
|
Re: Hangprinter version 2 April 24, 2017 05:52AM |
Registered: 7 years ago Posts: 21 |
|
Re: Hangprinter version 2 April 25, 2017 03:59PM |
Registered: 10 years ago Posts: 401 |
Hi guys, nice pics!
@rclemence Nice Hangprinter stand! Do you mind if I re-post a pic along with your nick on the dev blog?
Regarding the bluetooth connectivity, what operating system are you using?
In most GNU/Linuxes I expect it to show up as rfcomm0 or something similar. Other than that it should behave just like if you plugged in a USB from the RAMPS. A bluetooth module and a USB cable at the same time won't work though.
I like your extruder mods and the metal substitute for the fish rod rings
torbjornludvigsen.com
|
Re: Hangprinter version 2 April 25, 2017 07:46PM |
Registered: 6 years ago Posts: 6 |
Sure use the pics, I'll post the stand soon on Thingiverse and post the link in the blog.
The Bluetooth is really kicking my b--. At first I think I got the wrong type of Bluetooth (hc 04). I then got an hc 05. Both can be paired and both connect to the computer but the software repetier and ponterface do not recognize it. The com port shows up but they will not communicate with the printer. I've changed the baud rate in the Bluetooth board, device manage, software and firmware. I'm using windows ten. I really want the Bluetooth to work I won't give up, still trying, I'll try octoprint as a last resort, don't really want to add another board to the printer.
Thank you all for replys
|
Re: Hangprinter version 2 April 26, 2017 11:59AM |
Registered: 10 years ago Posts: 401 |
I would ask my local GNU/Linux guru to try to connect.
It could be a driver problem. Device manager should show something "serial rfcomm something bluetooth", not only "com something bluetooth". If there's no "serial rfcomm something bluetooth" in device manager, then I would web search "Windows 10 serial bluetooth" and feel kind of lost.
It could also be that you're connecting on the wrong pins since the picture on the wiki is so confusing. Here's my modified version:
A third option is that you could have connected the wire backwards. It's very easy, once you've soldered the 680 and 1k resistances on the picture, to accidentally connect the JY-MCU to the RAMPS end of the resulting cable.
If it's none of those, I would continue with calibration, throw away the JY-MCU and just use a USB cable until I found a real GNU/Linux guru to help me in person.
torbjornludvigsen.com
It could be a driver problem. Device manager should show something "serial rfcomm something bluetooth", not only "com something bluetooth". If there's no "serial rfcomm something bluetooth" in device manager, then I would web search "Windows 10 serial bluetooth" and feel kind of lost.
It could also be that you're connecting on the wrong pins since the picture on the wiki is so confusing. Here's my modified version:

A third option is that you could have connected the wire backwards. It's very easy, once you've soldered the 680 and 1k resistances on the picture, to accidentally connect the JY-MCU to the RAMPS end of the resulting cable.
If it's none of those, I would continue with calibration, throw away the JY-MCU and just use a USB cable until I found a real GNU/Linux guru to help me in person.
torbjornludvigsen.com
|
Re: Hangprinter version 2 April 26, 2017 03:21PM |
Registered: 6 years ago Posts: 6 |
Here is the link to the stand [www.thingiverse.com]
I did not use the bridge for the JY-MCU, i believed that i ordered Bluetooth boards that did not have to be bridged. i have bridged my JY-MCU HC-05 today and am getting the same error codes. The error code is "No start signal detected - forcing start" from repetier and the error code for pronterface is "Could not connect to COM13 at 115200 baudrate 115200;Serial error; could not open port COM13; [ERROR 1168] Element not found.
I have a JY-MCU HC-04 that i will try tomorrow.
I have also found that pi zero can run octoprint and the new version of the board has built in wifi and bluetooth, i will be looking in to that.
|
Re: Hangprinter version 2 April 27, 2017 04:09AM |
Registered: 10 years ago Posts: 401 |
|
Re: Hangprinter version 2 April 27, 2017 05:19PM |
Registered: 8 years ago Posts: 1,671 |
|
Re: Hangprinter version 2 April 28, 2017 05:46AM |
Registered: 10 years ago Posts: 401 |
|
Re: Hangprinter version 2 April 28, 2017 05:55AM |
Registered: 8 years ago Posts: 1,671 |


Sorry, only registered users may post in this forum.