Hangprinter version 2
Posted by tobben
|
Re: Hangprinter version 2 March 14, 2017 03:11AM |
Registered: 10 years ago Posts: 401 |
I can't find a nice pic of my wiring right now, so linking to the wiki instead.
See connection diagram at [reprap.org].
5 A input is the only connected power input on Hangprinter. More details on connecting power here: [reprap.org]
torbjornludvigsen.com
See connection diagram at [reprap.org].
5 A input is the only connected power input on Hangprinter. More details on connecting power here: [reprap.org]
torbjornludvigsen.com
|
Re: Hangprinter version 2 March 14, 2017 12:36PM |
Registered: 10 years ago Posts: 26 |
|
Re: Hangprinter version 2 March 14, 2017 01:08PM |
Registered: 10 years ago Posts: 26 |
|
Re: Hangprinter version 2 March 14, 2017 01:22PM |
Registered: 10 years ago Posts: 401 |
Oh, the Configuration.h file in the master branch happened to be configured for 1/8 stepping.
I guess 1/16 stepping is a more sane default, so I updated that now.
The (now updated) line in Configuration.h is here:
[github.com]
Assuming you will use the experimental line buildup compensation feature (it's the default right now), your extruder's stepping rate will need to be configured on line 477:
[github.com]
I'm excited that you're already configuring firmware. Would you mind posting a picture?
torbjornludvigsen.com
|
Re: Hangprinter version 2 March 15, 2017 10:06AM |
Registered: 10 years ago Posts: 26 |
Tobben,
I will post a picture for sure., a few note for constructing in the future:
1. ABC conforms to XYZ, I think that A used to be the short one and C the tall one, but I cannot be for sure (I thought I checked the letters on each, but I cannot be sure). I know that I arranged the A and C opposite of each other. Also the D coordinates to E1 E0 is the extruder, I take it. I was trying for a few moments to figure out why I was getting no movement from E0 and now I know. Also in the testing phase a person does not always need all the connectors, a hot end a fan etc. I was more or less just trying to make sure that the hangprinter was not a series of camera tricks (it's not of course), but I neglected to install a hot end thermister and a hot end for that mater, this prevented the unit from moving at all, a good safety measure. So when putting this together be sure to have at least four motors and a thermistor in the hot end spot. Oh one other thing, in your BOM, if you have not already you have to specify the height of the nema 17 motors, I have taller ones and the hangprinter is speced for a shorter, higher torque units. I will post pictures I promise. Give me 24 hours and they will be up.
|
Re: Hangprinter version 2 March 15, 2017 05:47PM |
Registered: 10 years ago Posts: 401 |
Hi, nice to hear you have progress!
If you want to specify a motor height and generate new stl files, start here:
[github.com]
I'm don't think all parts will conform perfectly to the new value of Nema17_cube_height, so do visual inspections in OpenSCAD before printing. I'll update the BOM.
EDIT: the BOM already included a warning and very precise information, so not updating. See [www.appropedia.org] EDIT END
More info on the stepper I've used in my first prototypes is here:
[github.com]
Edited 1 time(s). Last edit at 03/15/2017 05:49PM by tobben.
torbjornludvigsen.com
|
Re: Hangprinter version 2 March 15, 2017 11:28PM |
Registered: 10 years ago Posts: 26 |
|
Re: Hangprinter version 2 March 16, 2017 10:44AM |
Registered: 10 years ago Posts: 26 |
Tobben,
I do not know how to implant a picture in this blog I am learning that process, I have attached my setup. I have elected to have a reasonably stationary installation first, there are a few things I want to print with the unit right off. So I plan to use it like a standard delta if you will. I have setup an old glass table top and secured it with a few screws on three sides. I am waiting on the eyelets so I cannot run the unit currently so no video or pix of that for a few days. I also am going to change the STL file for the ramps holder. I have terrible luck with the screws on the bottom of the NEMA motors, they are soft and I do not know what length to replace them with practically so I am going to see if I can create a holder that can attache with the help of zip ties. Where are the instructions on routing of the filament? For each axis? I can use that information and what is a good average length for the filament to start with? 10 meters 5 meters,considering the routing I would suspect that I would cut a piece of line too short because I have not accounted for the back and forth through the pulleys. Looking forward to hearing from you.
I do not know how to implant a picture in this blog I am learning that process, I have attached my setup. I have elected to have a reasonably stationary installation first, there are a few things I want to print with the unit right off. So I plan to use it like a standard delta if you will. I have setup an old glass table top and secured it with a few screws on three sides. I am waiting on the eyelets so I cannot run the unit currently so no video or pix of that for a few days. I also am going to change the STL file for the ramps holder. I have terrible luck with the screws on the bottom of the NEMA motors, they are soft and I do not know what length to replace them with practically so I am going to see if I can create a holder that can attache with the help of zip ties. Where are the instructions on routing of the filament? For each axis? I can use that information and what is a good average length for the filament to start with? 10 meters 5 meters,considering the routing I would suspect that I would cut a piece of line too short because I have not accounted for the back and forth through the pulleys. Looking forward to hearing from you.
|
Re: Hangprinter version 2 March 16, 2017 05:56PM |
Registered: 10 years ago Posts: 401 |
Hi, thanks for the pics!
Press the questionmark in the upper right corner of the textbox to get help on BBcode (how to include images and such).
In the first version I used a top frame and v-bearings for the D-lines. In the second version I use three lamp hooks instead:
Lamp hooks are easier to mount than a printed top frame part. It's also easier to unhook your Hangprinter from lamp hooks than from v-bearings. You will probably need to improvise when fastening the D-anchor points because every ceiling is different.
The filament is routed through the center cylinder. The lines for each axis are wound clockwise around each spool. The line-paths from the spools to the eyelets are horizontal (highest spool goes to highest eyelets etc). See this stl for reference:
[github.com]
Or this pic:
Note that both the stl and the above image shows doubled lines along all axes (for mechanical advantage). I don't double the A, B and C lines (that is, no back and forth through pulleys) on my prototype anymore. If you want double mechanical advantage along A, B and C, you must specify that in Configuration.h:
[github.com]
I use two 4-5 m long fishing lines on each of A, B and C spools. Once threaded, I tie the two A ends together so I get a continous A-loop of fishing line that is 8-10 m long. Ditto for B and C lines. For D-lines I usually use three 10 m long lines.
All the best
Edited 2 time(s). Last edit at 03/16/2017 06:01PM by tobben.
torbjornludvigsen.com
Press the questionmark in the upper right corner of the textbox to get help on BBcode (how to include images and such).
In the first version I used a top frame and v-bearings for the D-lines. In the second version I use three lamp hooks instead:

Lamp hooks are easier to mount than a printed top frame part. It's also easier to unhook your Hangprinter from lamp hooks than from v-bearings. You will probably need to improvise when fastening the D-anchor points because every ceiling is different.
The filament is routed through the center cylinder. The lines for each axis are wound clockwise around each spool. The line-paths from the spools to the eyelets are horizontal (highest spool goes to highest eyelets etc). See this stl for reference:
[github.com]
Or this pic:

Note that both the stl and the above image shows doubled lines along all axes (for mechanical advantage). I don't double the A, B and C lines (that is, no back and forth through pulleys) on my prototype anymore. If you want double mechanical advantage along A, B and C, you must specify that in Configuration.h:
[github.com]
I use two 4-5 m long fishing lines on each of A, B and C spools. Once threaded, I tie the two A ends together so I get a continous A-loop of fishing line that is 8-10 m long. Ditto for B and C lines. For D-lines I usually use three 10 m long lines.
All the best
Edited 2 time(s). Last edit at 03/16/2017 06:01PM by tobben.
torbjornludvigsen.com
|
Re: Hangprinter version 2 March 17, 2017 09:24AM |
Registered: 10 years ago Posts: 26 |
Tobben,
Actually I will likely be amending the file for the Hang printer because the concept of a hole that has PTFE running through it is much faster for me to execute because the fishing rod accessories are still a full week to fifteen days away. I drilled holes in all of the connection points in the frame. I re-printed the worm drive gear (Turns out the Petg that I used was too flexible). I may reprint all the gears in a stiffer PLA. I may not get it moving this weekend I have some house guests, but I am using the ceiling mount, the measurements are already there, I have drilled the holes and lined them with PTFE, I am not tracking as to why I would need a grooved bearing, but I know I will find out.
Actually I will likely be amending the file for the Hang printer because the concept of a hole that has PTFE running through it is much faster for me to execute because the fishing rod accessories are still a full week to fifteen days away. I drilled holes in all of the connection points in the frame. I re-printed the worm drive gear (Turns out the Petg that I used was too flexible). I may reprint all the gears in a stiffer PLA. I may not get it moving this weekend I have some house guests, but I am using the ceiling mount, the measurements are already there, I have drilled the holes and lined them with PTFE, I am not tracking as to why I would need a grooved bearing, but I know I will find out.
|
Re: Hangprinter version 2 March 17, 2017 12:50PM |
Registered: 10 years ago Posts: 401 |
Nice, making line guides of PTFE is a good idea. LoboCNC had a good experience with such a solution on his rail-less design (see [forums.reprap.org]).
I even think it's a good idea to guide the lines all the way from the action point to the spool through PTFE tubes, in order to minimize risk of line being caught by gear teeth.
Interesting that you tried Petg. I have no experience with that material. I used Nylon.
There's no need for grooved bearings if you drill lamp hooks right into the ceiling mount =)
torbjornludvigsen.com
|
Re: Hangprinter version 2 March 22, 2017 05:08PM |
Registered: 7 years ago Posts: 21 |
Hi,
I am new to the blog and to 3D printing but what is the difference in MiniRambo and Ramps1.4 ? MniRambo 1.3 has most of the below solved out :
- Pellet extrusion, since filament is expensive (Pellet extrusion - you mean to make your own filament? It exists to buy and is around 10000€ and could be made DIY)
- Cheaper, faster and stronger motors. The oDrive project is moving forwards: [hackaday.io] I'm hoping to be among the beta testers to get BLDC motors on the Hangprinter ASAP
- Electronics with an SD card reader and maybe Wifi would be nice Minirambo 1.3 with correct firmwhare has SD card reader, automated procedures, pause, change filament and calibration with induction probe.
- Automated procedures for pausing over night and changing filament spool
- Sensors that allow an automatic calibration and/or homing procedure. Many sensor setups could achieve this:
Metal tubes on each line that can close a circuit
Accelerometer+gyro (IMU) units
Sound sensing (maybe 1 mic + 5 speakers)
Draw-wire displacement sensors in each direction
Optical sensing from salvaged computer mice
Small touchpad area on the build plate. For example calibrating and homing with a tablet or smart phone below print head.
Actually both are based on Atmega 2560 thus the solution to above could be seen in firmware used on Minirambo (Prusa 3D 3_0_10) and part of codes could be applied to hangprinter for pause, change filament, calibration XYZ,..etc
Edited 1 time(s). Last edit at 03/23/2017 03:44AM by Seneko.
|
Re: Hangprinter version 2 March 22, 2017 05:12PM |
Registered: 7 years ago Posts: 21 |
|
Re: Hangprinter version 2 March 22, 2017 05:56PM |
Registered: 10 years ago Posts: 401 |
Hi Seneko!
Mini Rambo is a fine electronics design but it has only 4 stepper drivers (RepRap Wiki). You need 5 to drive a Hangprinter.
Ca 30% for rigidness is a good idea. Throw in ca 4 top- and bottom layers or more as well. I used ca 20% and it was too little. Lack of rigidity in the bottom plate is a small but noticable problem on my prototype.
Edited 1 time(s). Last edit at 03/22/2017 05:56PM by tobben.
torbjornludvigsen.com
|
Re: Hangprinter version 2 March 23, 2017 03:49AM |
Registered: 7 years ago Posts: 21 |
Thank you Tobben,
Noted for prints. Will soon start building one hangprinter. Still need to source some material.
After will check how to use parts of code from other firmware which has pause and many functions and apply to hangprinter. Than use wi-fi to send data from display,SD card to the board. ...
all the best,
Noted for prints. Will soon start building one hangprinter. Still need to source some material.
After will check how to use parts of code from other firmware which has pause and many functions and apply to hangprinter. Than use wi-fi to send data from display,SD card to the board. ...
all the best,
|
Re: Hangprinter version 2 March 23, 2017 03:23PM |
Registered: 7 years ago Posts: 4 |
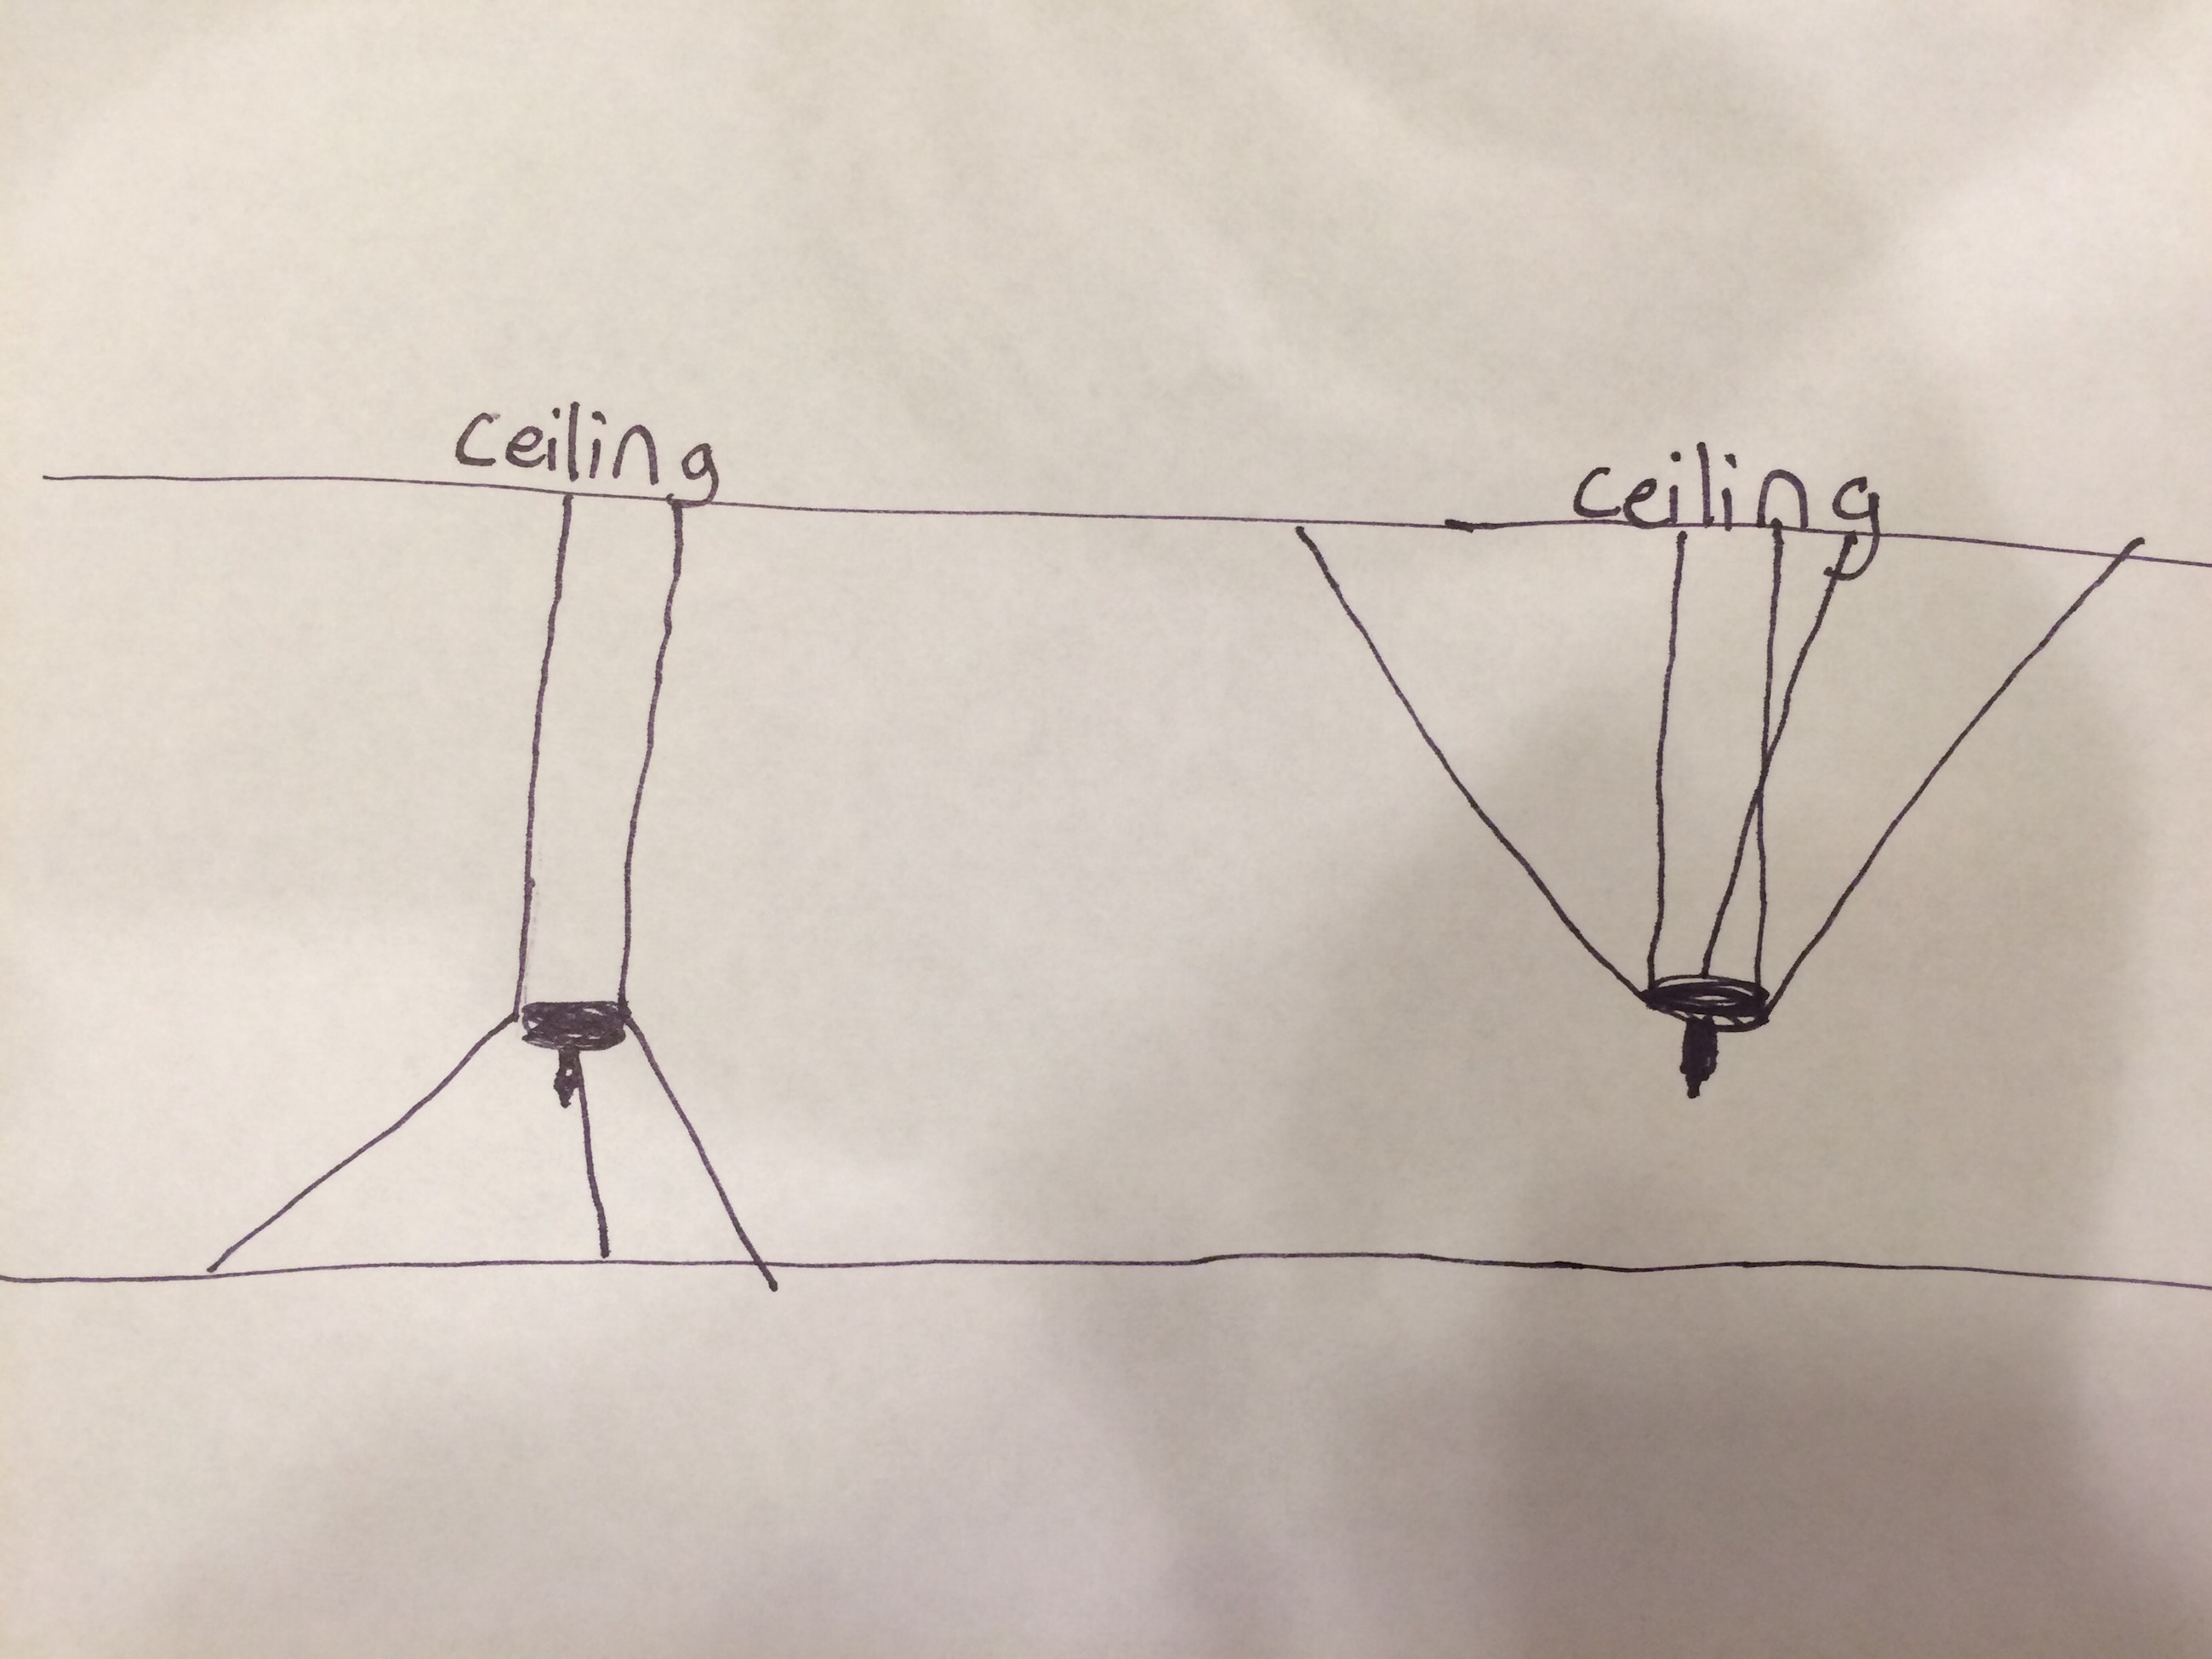
I'm very interested in this design! I was thinking when looking at the babel print, why not put the anchor points on the ceiling as well? Think of a delta printer with the rods being the string mounted to the ceiling. This would give room for larger and taller prints if someone doesn't have the height needed. Yes it would be more of a permanent fixture.
I think it would be a good addition or iteration if it is possible to do.
I think it would be a good addition or iteration if it is possible to do.
|
Re: Hangprinter version 2 March 23, 2017 04:17PM |
Registered: 7 years ago Posts: 4 |
This next Idea would make the build more expensive, but I think a more accurate printer. Add a frame from the center going out to the anchor points to keep the fishing line all the same length. think of an X or a Y frame. I am thinking of this being more of a whole room fixed printer if people want that.
Again what I am referring to is having the anchors on the ceiling not floor or walls.
Again what I am referring to is having the anchors on the ceiling not floor or walls.
|
Re: Hangprinter version 2 March 23, 2017 05:09PM |
Registered: 10 years ago Posts: 401 |
Hello L0G4N, thanks for taking up the discussion here. Reposting your image:
The setup to the right would work well, especially when lines are at a ca 45 degree angle. My main reasons for not choosing it for Hangprinter was
Sorry, I don't think I understand the suggestion in your second post.
torbjornludvigsen.com

The setup to the right would work well, especially when lines are at a ca 45 degree angle. My main reasons for not choosing it for Hangprinter was
- Accelerations are limited by gravity. Maximum acceleration is equal to that of a pendulum.
- Slightly trickier to park in the ceiling when not in use.
Sorry, I don't think I understand the suggestion in your second post.
torbjornludvigsen.com
|
Re: Hangprinter version 2 March 23, 2017 05:57PM |
Registered: 7 years ago Posts: 4 |
Quote
tobben
Hello L0G4N, thanks for taking up the discussion here. Reposting your image:
The setup to the right would work well, especially when lines are at a ca 45 degree angle. My main reasons for not choosing it for Hangprinter was
- Accelerations are limited by gravity. Maximum acceleration is equal to that of a pendulum.
- Slightly trickier to park in the ceiling when not in use.
Sorry, I don't think I understand the suggestion in your second post.
Make a mount that people can size for their room so the lines can me equal every print vs. eyeballing the lines when setting up.
|
Re: Hangprinter version 2 March 23, 2017 06:17PM |
Registered: 10 years ago Posts: 401 |
Ok now I get it.
Wouldn't you need to do measurments when building the frame, just like you must when mounting anchor points already?
torbjornludvigsen.com
Wouldn't you need to do measurments when building the frame, just like you must when mounting anchor points already?
torbjornludvigsen.com
|
Re: Hangprinter version 2 March 23, 2017 06:38PM |
Registered: 14 years ago Posts: 351 |
|
Re: Hangprinter version 2 March 23, 2017 08:44PM |
Registered: 7 years ago Posts: 4 |
|
Re: Hangprinter version 2 March 24, 2017 03:52AM |
Registered: 10 years ago Posts: 401 |
@arthurwolf (and anyone interested in programming Hangprinter firmware): The extra mathematics is captured in
Gcode lines are split into segments just like in most other Delta printer firmwares (see the prepare_move function: [github.com])
Go for it!
Edited 1 time(s). Last edit at 03/24/2017 03:52AM by tobben.
torbjornludvigsen.com
- the function calculate_delta (see [github.com])
- the array target in the function plan_buffer_line (see [github.com])
Gcode lines are split into segments just like in most other Delta printer firmwares (see the prepare_move function: [github.com])
Go for it!
Edited 1 time(s). Last edit at 03/24/2017 03:52AM by tobben.
torbjornludvigsen.com
|
Re: Hangprinter version 2 March 26, 2017 10:54PM |
Registered: 10 years ago Posts: 26 |
|
Re: Hangprinter version 2 March 26, 2017 11:35PM |
Registered: 10 years ago Posts: 26 |
I dont think that the fream radiating out of a center point to three points would not be an improvement for stability, I think of forces as forces and monofilament line is STRONG. Furthermore the stiffness of a singular metal hook might rival that of a joined together triangular frame. If you placed he motors on the frame that would give you a lighter carriage with potentially faster kinematic speeds.
|
Re: Hangprinter version 2 March 26, 2017 11:50PM |
Registered: 10 years ago Posts: 26 |
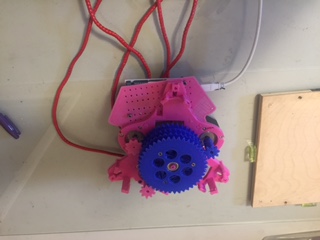
I will use PTFE on teh Z axis, to avoid teeth interference. I used Made Solid Pet Plus and it was too soft. The gears bend and there are gaps between the snell and the gears such that my filament would creep inside of the body of the gear. So I am reprinting in PLA from Orb Polymer and it is a pretty durable material. Also I will need to reprint my base as well, I made it in PLA with four layers on top and bottom but the base flexes in my hands when I am moving the unit around. No big deal though. Also i am thinking that there needs to be a hole in the base of the unit versus a printed line guide, the tower without a hole in it. I will make the change on my end and repost to github. The github z axis mounts depend quite heavily on the eyelets, and I really think that PTFE is a good thing to try right now, it cuts cost!
|
Re: Hangprinter version 2 March 27, 2017 04:02AM |
Registered: 14 years ago Posts: 351 |
Quote
NOVAprint
Tobben,
I qwould like to move the kinemaics to Smoothieware. What is the next step. I just wound my spools tonight I ma going to hang the unit this week I hope.
Email me at wolf.arthur@gmail.com
|
Re: Hangprinter version 2 March 27, 2017 04:42PM |
Registered: 10 years ago Posts: 401 |
Thanks for the input NOVAprint. I made a suggestion to solve the problem with the gap between gear and snelle. See blog post: [vitana.se]
torbjornludvigsen.com
torbjornludvigsen.com
|
Re: Hangprinter version 2 March 27, 2017 09:56PM |
Registered: 10 years ago Posts: 26 |
I love collaboration, thanks for the upgrade. I will print those too. While you are at it, why not place the holes at the angles that relate to xy and z? The holes are right next to each other now, but if they were 30 degrees separated, ti would make the first few turns of the winding easier.
|
Re: Hangprinter version 2 April 02, 2017 04:25PM |
Registered: 7 years ago Posts: 1 |


Sorry, only registered users may post in this forum.