VIDEO POSTED! Details about the BerryBot3D
Posted by BerryBot3D
|
Re: VIDEO POSTED! Details about the BerryBot3D May 01, 2013 08:18PM |
Registered: 11 years ago Posts: 83 |
rsilvers- Sorry there is no link for the girl figure, the file is huge.
rsilvers- Sure a infrared lamp could keep things hot but I am already warmer than I want to be.
I may end up building another BerryBot3D just for ABS that is totally enclosed.
Here is a great idea for applying ABS Glass Juice!! Quick and easy to clean up.
"NEW VIDEO" : [youtu.be]
Happy Printing!
Werner
|
Re: VIDEO POSTED! Details about the BerryBot3D May 01, 2013 08:46PM |
Registered: 11 years ago Posts: 186 |
I know a lot of people asked for the file. You could put it on GoogleDrive and it can generate a link for people to download it. I want to see how much faster, if any, a QU-BD RPM can print it at the same apparent quality.
[support.google.com]
[www.matter-replicator.com]
[support.google.com]
[www.matter-replicator.com]
|
Re: VIDEO POSTED! Details about the BerryBot3D May 01, 2013 09:03PM |
Registered: 13 years ago Posts: 2,947 |
It happens to be my file and it is made up of two different files with conflicting licenses so it can not be posted on the web.
| FFF Settings Calculator | Gcode post processors | Geometric Object Deposition Tool Blog |
| Tantillus.org | Mini Printable Lathe | How NOT to install a Pololu driver |
|
Re: VIDEO POSTED! Details about the BerryBot3D May 02, 2013 01:04PM |
Admin Registered: 17 years ago Posts: 7,879 |
Hi Werner,
I use much lower concentrations of ABS juice and much thinner layer. I just smear it on with a lint free cloth once or twice. After that I just wipe it down with pure acetone as the grip gets better and better. That way it doesn't leave an residue of the part. The part just sticks to the glass when hot and releases when cold.
Not sure what happens at the molecular level. It seems as if the glass surface absorbs some of the ABS and it gets baked in. I haven't found a quick way of getting it to work. I have to build small objects until the glass gets conditioned then it works perfectly.
The thickness you use it is almost like having a raft layer. It might be needed for objects with very thin bases but most people print a brim for those nowadays.
[www.hydraraptor.blogspot.com]
|
Re: VIDEO POSTED! Details about the BerryBot3D May 04, 2013 04:29PM |
Registered: 11 years ago Posts: 83 |
Hi Nophead, Thanks for that I will give it a try! You are right the way I have been doing the glass juice is thick but leaves a really cool totally smooth like a mirror finish on the printed part that is very nice looking. It does stick great but like yours as soon as it cools it just falls off. I just about have the video done on the new end effector design using dimples for those of you who are looking for more info on it!
Happy printing!
Werner
Happy printing!
Werner
|
Re: VIDEO POSTED! Details about the BerryBot3D May 04, 2013 09:00PM |
Registered: 11 years ago Posts: 28 |
|
Re: VIDEO POSTED! Details about the BerryBot3D May 04, 2013 11:21PM |
Registered: 13 years ago Posts: 2,947 |
Why not go with hemispherical magnets like these. [www.leevalley.com] Then you wont need to make the dimple or cups to hold them, just glue them to your angled effector bracket.
| FFF Settings Calculator | Gcode post processors | Geometric Object Deposition Tool Blog |
| Tantillus.org | Mini Printable Lathe | How NOT to install a Pololu driver |
|
Re: VIDEO POSTED! Details about the BerryBot3D May 06, 2013 12:59PM |
Registered: 11 years ago Posts: 83 |
Hi Sublime, I didn’t even know that hemispherical mags existed! Good find! The hemispherical mag could restrict the range of motion depending on the cup design, but the biggest disadvantage for me would be the loss of precise location. Using the dimple and a spherical mag and location is extremely precise with no effort. One other benefit is that the dimple method gives a built-in lock/key to aid in preventing the ball from breaking loose (see pic). I will order some of the hemispherical mag and do some tests with them for strength. They may work well for someone that wants to print their end effector and JB Weld the cylindrical part of the mag into small sockets? A small 3/16” through hole could be designed into the print or just drilled after the fact and then countersunk from the bottom side to provide the same lock/key? I think we will see some of these examples in short order as I know there are a lot of Guys working on mods like this for their Rostock’s.
|
Re: VIDEO POSTED! Details about the BerryBot3D May 06, 2013 01:07PM |
Registered: 13 years ago Posts: 2,947 |
I do think the way you are doing it is great (maybe even ideal for the use) but as you have stated earlier you have the equipment to make it that way and most of us do not. But even with your CNC'd bracket if you made the radius of the bracket the same as the magnet then positioning it would not be too hard as the edges would line up and all you have to do is worry about it moving while the glue hardens.
As for limiting the movement I am not sure it would limit it if the angle of the bracket was just right. The reason I say this is because the arms go from vertical to something like 80 degrees which means they should never exceed about 80 degrees of movement and the balls should allow a full 90 before the cup bottoms out on the not spherical part (But I could easily be wrong).
As for limiting the movement I am not sure it would limit it if the angle of the bracket was just right. The reason I say this is because the arms go from vertical to something like 80 degrees which means they should never exceed about 80 degrees of movement and the balls should allow a full 90 before the cup bottoms out on the not spherical part (But I could easily be wrong).
| FFF Settings Calculator | Gcode post processors | Geometric Object Deposition Tool Blog |
| Tantillus.org | Mini Printable Lathe | How NOT to install a Pololu driver |
|
Re: VIDEO POSTED! Details about the BerryBot3D May 06, 2013 06:01PM |
Registered: 11 years ago Posts: 28 |
|
Re: VIDEO POSTED! Details about the BerryBot3D May 07, 2013 07:33PM |
Registered: 11 years ago Posts: 83 |
Hi Sublime, I think you are correct! You could always just have rods long enough that it would never need to go past the 80 degree point. I should get the hemispherical mags in a few days. I will post my strength test results for anyone that is thinking this may be a good option.
Hi Frank, I listed were I got the with a link in the very first post: [forums.reprap.org]
Sorry it was very long winded! You will find them to be unbelievably strong.
Happy printing!
Werner
Hi Frank, I listed were I got the with a link in the very first post: [forums.reprap.org]
Sorry it was very long winded! You will find them to be unbelievably strong.
Happy printing!
Werner
|
Re: VIDEO POSTED! Details about the BerryBot3D May 07, 2013 07:40PM |
Registered: 11 years ago Posts: 28 |
Ho yeah right, I double check on all your video on youtube to find the link I tought i saw it there I didnt back up ... sorry about that and thank's!!
Cant wait to Print !
Did you use 3/8'' od carbon fiber?
Here the supplyer of magnet but they sell higher for the same magnet, but there a lot of information about Magnet!
Edited 2 time(s). Last edit at 05/08/2013 07:15AM by Frank_The_Rock.
Cant wait to Print !
Did you use 3/8'' od carbon fiber?
Here the supplyer of magnet but they sell higher for the same magnet, but there a lot of information about Magnet!
Edited 2 time(s). Last edit at 05/08/2013 07:15AM by Frank_The_Rock.
|
Re: VIDEO POSTED! Details about the BerryBot3D May 09, 2013 11:35AM |
Registered: 11 years ago Posts: 82 |

|
Re: VIDEO POSTED! Details about the BerryBot3D May 09, 2013 04:23PM |
Registered: 11 years ago Posts: 142 |
Hey Berry,
Love the design! I am particularly taken with the magnets (like everyone else), and I was trying to come up with a hacky way for poor grad students without access to mills to imitate them. Do you see any immediate issue with buying a 1/2" ball-end mill bit, throwing it on my hand drill, and making cups into the hex cap screws by hand? If I go slow and steady, I'd think the hex in the cap would act sort of like a pilot hole and center the bit, and then I could attach the newly cupped screws to wherever I need the joint.
Thanks, and (again) great work!
Chris
PS. Are the teflon pads glued in place or does it just stay in the cup on its own accord?
|
Re: VIDEO POSTED! Details about the BerryBot3D May 10, 2013 02:08AM |
Registered: 11 years ago Posts: 83 |
Hi Sublime, Sorry for the late reply! I think you are right in that rods of the correct length (a little longer) could limit the max angle to 80 degrees and still allow all the platen to be used. I think it should work fine especially if the shoulder socket head screws are used as they have a small footprint on the mag. My original rod end ball cups had a much bigger footprint on the mag. My original thinking was that it would create a stronger pull. After extensive testing I concluded that it really was not needed and there was no doubt that the shoulder screws would be easy to make. Sublime I have discovered, reading hundreds of your posts that you are not often wrong! BTW I just started printing with PLA and I can see why you like it so much. I can’t believe the prints coming out of my machine!!
Happy printing
Werner
Happy printing
Werner
|
Re: VIDEO POSTED! Details about the BerryBot3D May 10, 2013 02:25AM |
Registered: 13 years ago Posts: 2,947 |
Thanks. Yeah I was thinking the cup side covered about 90degrees of the ball judging from your pictures and with the movement being 80 that meant you needed 170degrees of round showing. Those hemispherical magnets should have a full 180 degrees available so you are left with a 10degree margin to play with. That's why I mentioned the angle of the end effector needing to be just right for them to work. The price drop on them was nice too. I am not sure how they compare with the ones you used as far as price is concerned but if it was anything like the ones I linked to it is a significant savings over an entire machine.
The prints are looking good.
The prints are looking good.
| FFF Settings Calculator | Gcode post processors | Geometric Object Deposition Tool Blog |
| Tantillus.org | Mini Printable Lathe | How NOT to install a Pololu driver |
|
Re: VIDEO POSTED! Details about the BerryBot3D May 11, 2013 01:39AM |
Registered: 11 years ago Posts: 83 |
Thanks Thanh and Chris,
Chris, The mags are working awesome! I think you could do a good job of machining the shoulder screws with and hand drill, like you said the hex will help you along. I think I would go for a four flute ball end. Of course a drill press would be a great option. The Teflon pad is a tape type with adhesive on one side. The adhesive on the Teflon is all that is need to keep it in place. You could get some ½” hardened steel balls [www.mcmaster.com] and lapping compound to make them very close to perfect. Use some sort of small container filled with compound than hold the steel ball with pliers buried in the compound. Chuck the rod end in a drill motor and with light pressure lap against the steel ball. I would frequently rotate the steel ball in the pliers to help prevent wear.
Happy Building!
Werner
|
Re: VIDEO POSTED! Details about the BerryBot3D May 12, 2013 11:27AM |
Registered: 11 years ago Posts: 83 |
NEW VIDEO
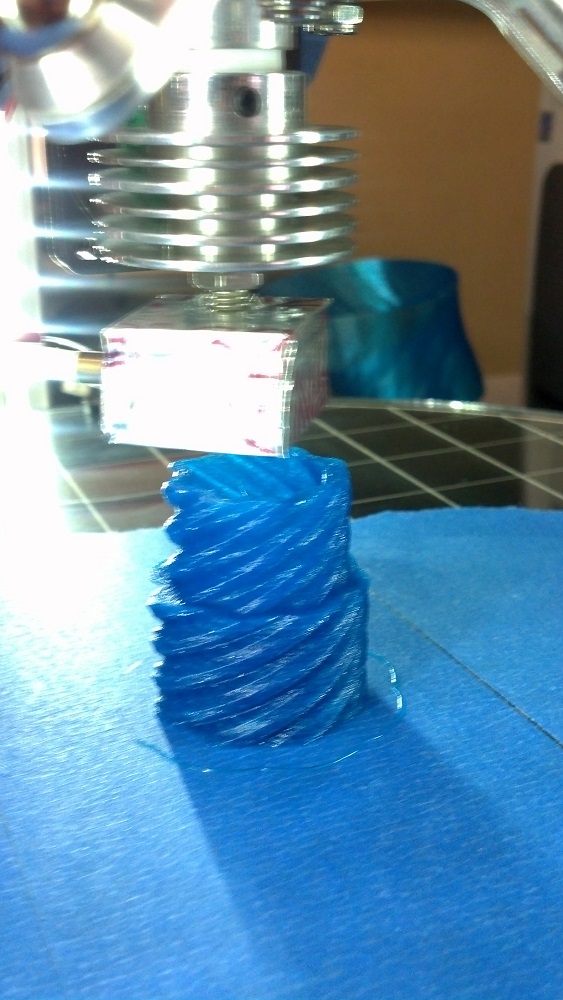
Hi Guys, This video is a look at the new way I am making the BerryBot3D end effectors using a dimple set. It is working awesome. The method is very accurate and repeatable. Also a few pics of the Tiki Guy I found in my printer this morning. The model I started last night that you will see in the video completed this morning at 5:45am.
Happy printing!
Werner
|
Re: VIDEO POSTED! Details about the BerryBot3D May 12, 2013 04:17PM |
Registered: 11 years ago Posts: 28 |
Ho yeah great work! I never seen those Pneumatic Vise ? So its a 1/4'' sise ?
Those dimple die can be use for sure whit some other tool. Keep up the good work and video !
I post on youtube, but just remember you said its better in the forum.
Is it 3/8 shoulder whit 1/2'' od Carbon fiber you used?
 Hope I can pay you a beer one day!
Edited 1 time(s). Last edit at 05/12/2013 04:33PM by Frank_The_Rock.
Those dimple die can be use for sure whit some other tool. Keep up the good work and video !
I post on youtube, but just remember you said its better in the forum.
Is it 3/8 shoulder whit 1/2'' od Carbon fiber you used?
Hope I can pay you a beer one day!Edited 1 time(s). Last edit at 05/12/2013 04:33PM by Frank_The_Rock.
|
Re: VIDEO POSTED! Details about the BerryBot3D May 12, 2013 04:47PM |
Registered: 11 years ago Posts: 1,171 |
|
Re: VIDEO POSTED! Details about the BerryBot3D May 12, 2013 08:14PM |
Registered: 11 years ago Posts: 28 |
Thank's tmorris9, whit your help and what Werner, said on his video I have found these Dimple SET I will order a pair and maker a holder for a vise or manual press.
Thanks'
Thanks'
|
Re: VIDEO POSTED! Details about the BerryBot3D May 13, 2013 01:51AM |
Registered: 11 years ago Posts: 83 |
Hi Frank,
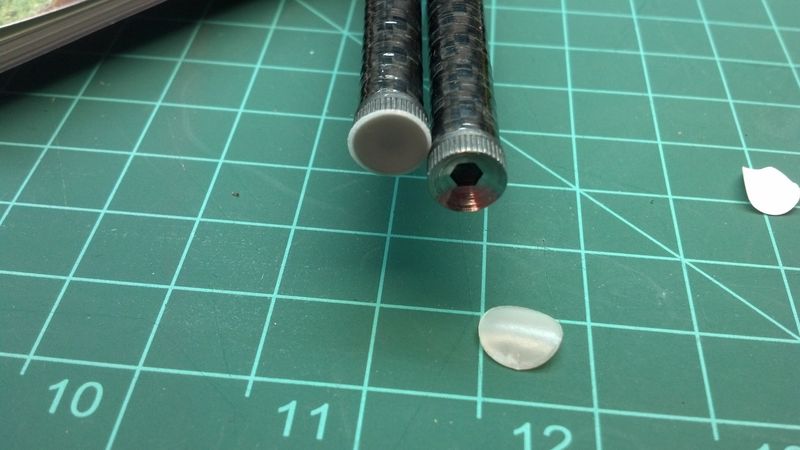
My carbon rods are 3/8" OD 1/4" ID something like: [www.graphitestore.com] . I would pay close attention to the handle clock position of your vise. So that you can make a repeatable dimple formation for all of them. One other important tip is to drill a very small hole in the center of your tubes so that air can escape and equalize as you JB weld your screws in the ends. Also the shoulder screws I used had a head that is about 3/8” but the shaft size is a precision ¼”. [www.mcmaster.com]
My carbon rods are 3/8" OD 1/4" ID something like: [www.graphitestore.com] . I would pay close attention to the handle clock position of your vise. So that you can make a repeatable dimple formation for all of them. One other important tip is to drill a very small hole in the center of your tubes so that air can escape and equalize as you JB weld your screws in the ends. Also the shoulder screws I used had a head that is about 3/8” but the shaft size is a precision ¼”. [www.mcmaster.com]
Attachments:
open | download - 5MHYlyFoIa9bXMk_xyOtTlmUQICf7n1vDQH36yOSqIM.jpg (47.3 KB)
open | download - -8nqsZjNC6gnpAtodW3G9C6eeXU4kTvBl2MlWLEZqYc.jpg (53.4 KB)
open | download - soeI1pgWty-sUOo9am0T3Wr_uULni3VImcQCbq6Xjv8.jpg (44.6 KB)
open | download - tG-uEJuInaMykhaLg5Nx0q-6-BD0NKHpQVCsBpEUXi0.jpg (47.8 KB)
|
Re: VIDEO POSTED! Details about the BerryBot3D May 13, 2013 09:27PM |
Registered: 11 years ago Posts: 28 |
Thank's Berry,
By clock position you mean to keep the clamping tool always in the same orientation i guess? I might do it on a hydraulic press at work i will just make some kind of holder.
For the Small hole I didn't think about that thanks! I might have figure it out during dry assembly ;o)
Have you experience with the length of the screw 1,5 inch seems long a bit ? I was thinking something like ,75'' It should be plenty of Steel to do the trick but maybe I am wrong?
Thanks' for the carbon fiber site I had hard time to find carbon fiber tube that are not extrude... How well can it be drill and cut those tube?
also did you sand them or made some paralleled groove for the JB weld?
I have already receive my magnet I will experience with them. Do you found a trick to oriented them correctly, an by the way what is correct lol
Thanks' in advance
Frank
p.s. great Photos!
|
Re: VIDEO POSTED! Details about the BerryBot3D May 14, 2013 10:03PM |
Registered: 11 years ago Posts: 83 |
Hi Frank, Yeah I was talking about the handle on the vise. Clocking meaning that you would bring the handle to the same exact position each time to keep things consistent. This was assuming that you would use a vise. I would go with 1.5” on the shoulder screw, it will give extremely good performance should you ever need to print at 1000mm haha. Drilling the small hole is not a problem just use high speed and a very small drill like 1/32”. I have a mini abrasive miter saw that I use for cutting the carbon tubes. However it can be hacked with a pneumatic dye grinder and abrasive cutoff wheel and than finished to square and size with a belt or disk sander and fine grit 220 very easily.
Happy building Buddy!
Werner
Happy building Buddy!
Werner
|
Re: VIDEO POSTED! Details about the BerryBot3D May 16, 2013 06:02PM |
Registered: 11 years ago Posts: 83 |
Update for the hemispherical magnets!
After careful testing and examination I concluded that the hemispherical magnets that Sublime suggested as an option would not work as well as the type used on the BerryBot3D. The magnetic pull of the hemispherical magnet is near the same as the ones I used however the shape is not perfectly hemispherical but a little cone shaped. One other thing is that the surface finish/plating is not nearly as good as the ones used on BerryBot3D. I would stick with the [www.fridgedoor.com] at $3 dollars a pc.
Happy building!
Werner
|
Re: VIDEO POSTED! Details about the BerryBot3D May 16, 2013 07:33PM |
Registered: 11 years ago Posts: 28 |
Thanks' for your comments Werner Its really helpful! I decided to stuck to your design for the 1,5'' shoulder I just got 25 of them and I have found a place that have carbon tube stock in stock in a local shop. I will go visit tomorrow to see what they got... This way I can print at 1000mm ;oP
The fridgedoor are freaking quick to ship to it took 3 open days and i am in Canada!... There pakaging is great to
Is the yellow device for measuring magnet force?
CIao
Frank
The fridgedoor are freaking quick to ship to it took 3 open days and i am in Canada!... There pakaging is great to
Is the yellow device for measuring magnet force?
CIao
Frank
|
Re: VIDEO POSTED! Details about the BerryBot3D May 19, 2013 09:35AM |
Registered: 11 years ago Posts: 28 |
I have found a carbon/fiber glass tube that suppose to be as stiff as carbon but is really cheeper I might try this.
What you guys think ?
of this
Using a composite hybrid of carbon & S-2 glass fiber in both axial and circumferential orientation, the CP-16-309 Prospar Comp tube is close to the same size but dramatically stiffer than either the E-40 fiberglass or the PS-16-306 carbon/fiberglass tubes. CP-16-309 Prospar Comp Tubes are similar to modern wrapped carbon tubes in stiffness, yet they weighs .5 gram less than the E-40 & 1 gram less than the PS-16-306.
The PS-19-352 Prospar Comp tube is the same size as a K-75 fiberglass tube but weighs about a gram less and is 40% stiffer.
|
Re: VIDEO POSTED! Details about the BerryBot3D May 19, 2013 12:43PM |
Registered: 11 years ago Posts: 186 |
Does anyone use arrow shafts? I actually have an arrow shaft cutting machine.
[www.matter-replicator.com]
[www.matter-replicator.com]
|
Re: VIDEO POSTED! Details about the BerryBot3D May 19, 2013 12:49PM |
Registered: 11 years ago Posts: 28 |
|
A new world record! Largest print ever! May 19, 2013 07:21PM |
Registered: 11 years ago Posts: 83 |
NEW VIDEO!!
A NEW WORLD RECORD!!
Largest print ever! Also a cool tip on cleaning up your models!
[youtu.be]
Happy Printing!
Edited 1 time(s). Last edit at 05/19/2013 07:21PM by BerryBot3D.
Now get off the computer and go build something!
Have a great day!
Werner Berry
BerryBot3D
[www.youtube.com]
A NEW WORLD RECORD!!
Largest print ever! Also a cool tip on cleaning up your models!
[youtu.be]
Happy Printing!
Edited 1 time(s). Last edit at 05/19/2013 07:21PM by BerryBot3D.
Now get off the computer and go build something!
Have a great day!
Werner Berry
BerryBot3D
[www.youtube.com]


Sorry, only registered users may post in this forum.